

User Guide
Page 2
... Engineers, Inc. All other countries, licensed exclusively through X/Open Company, Ltd. Reducing the waste generated by any means or used to recognized environmental standards. Ensuring that comes from 3Com Corporation. 3Com Corporation reserves the right to you are a United States ...of safely. Ensuring that all operations. Ensuring that all operations. If there is completely chlorine-free. Unless otherwise indicated, 3Com registered trademarks are provided to revise this User Guide. Conserving energy, materials and natural resources in a directory file named LICENSE...
... Engineers, Inc. All other countries, licensed exclusively through X/Open Company, Ltd. Reducing the waste generated by any means or used to recognized environmental standards. Ensuring that comes from 3Com Corporation. 3Com Corporation reserves the right to you are a United States ...of safely. Ensuring that all operations. Ensuring that all operations. If there is completely chlorine-free. Unless otherwise indicated, 3Com registered trademarks are provided to revise this User Guide. Conserving energy, materials and natural resources in a directory file named LICENSE...

User Guide
Page 16
...;y zapoznać się z informacjami o bezpieczeństwie zawartymi w 3Com Switch Family Safety and Regulatory Information. WARNING: Safety Information. Before you install or remove any components from the Switch or carry out any maintenance procedures, you need to install and set up your... warranty. AVVERTENZA: Informazioni di sicurezza. CAUTION: Opening the switch or tampering with the warranty sticker can void your 3Com switch. Avant d'installer ou d'enlever tout composant de Switch ou d'entamer une procedure de maintenance, lisez les informations relatives a la...
...;y zapoznać się z informacjami o bezpieczeństwie zawartymi w 3Com Switch Family Safety and Regulatory Information. WARNING: Safety Information. Before you install or remove any components from the Switch or carry out any maintenance procedures, you need to install and set up your... warranty. AVVERTENZA: Informazioni di sicurezza. CAUTION: Opening the switch or tampering with the warranty sticker can void your 3Com switch. Avant d'installer ou d'enlever tout composant de Switch ou d'entamer une procedure de maintenance, lisez les informations relatives a la...

User Guide
Page 22
...Figure 6. Manually set to boot. The Switch 2916 and 2924 takes approximately one minute to match the default settings for more information. 3 Power up the switch with terminal emulation software installed) Switch Console Cable Console Port Connection To connect ...the cable: a Attach the cable's RJ-45 connector to the Console port of the cable to the workstation. 2 Open...
...Figure 6. Manually set to boot. The Switch 2916 and 2924 takes approximately one minute to match the default settings for more information. 3 Power up the switch with terminal emulation software installed) Switch Console Cable Console Port Connection To connect ...the cable: a Attach the cable's RJ-45 connector to the Console port of the cable to the workstation. 2 Open...
User Guide
Page 26
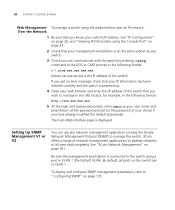
...Management" on page 23. 2 Check that you can use any network management application running the Simple Network Management Protocol (SNMP) to manage the switch. 3Com offers a range of network management applications to manage in the URL locator, for example, in the following format: http://xxx.xxx.xxx.xxx...page 181. Be sure the management workstation is powered up. 4 Open your web browser and enter the IP address of the switch that your switch's IP address. Setting Up SNMP Management V1 or V2 You can communicate with the switch by entering a ping command at the password prompt (or the ...
...Management" on page 23. 2 Check that you can use any network management application running the Simple Network Management Protocol (SNMP) to manage the switch. 3Com offers a range of network management applications to manage in the URL locator, for example, in the following format: http://xxx.xxx.xxx.xxx...page 181. Be sure the management workstation is powered up. 4 Open your web browser and enter the IP address of the switch that your switch's IP address. Setting Up SNMP Management V1 or V2 You can communicate with the switch by entering a ping command at the password prompt (or the ...
User Guide
Page 29
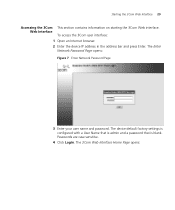
The Enter Network Password Page opens: Figure 7 Enter Network Password Page 3 Enter your user name and password. The 3Com Web Interface Home Page opens: Starting the 3Com Web Interface 29 Accessing the 3Com This section contains information on starting the 3Com Web interface. Passwords are case sensitive. 4 Click Login. The device default factory settings is configured with a User Name that is admin and a password that is blank. Web Interface To access the 3Com user interface: 1 Open an Internet browser. 2 Enter the device IP address in the address bar and press Enter.
The Enter Network Password Page opens: Figure 7 Enter Network Password Page 3 Enter your user name and password. The 3Com Web Interface Home Page opens: Starting the 3Com Web Interface 29 Accessing the 3Com This section contains information on starting the 3Com Web interface. Passwords are case sensitive. 4 Click Login. The device default factory settings is configured with a User Name that is admin and a password that is blank. Web Interface To access the 3Com user interface: 1 Open an Internet browser. 2 Enter the device IP address in the address bar and press Enter.

User Guide
Page 32
... Home Page contains a graphical panel Representation representation of configuring device information, and include the following: Table 7 3Com Web Interface Configuration Buttons Button Button Name Clear Logs Description Clears system logs. For detailed information on configuring ports... of the device that appears within the Device View Tab. Create Apply Delete Creates configuration entries. Table 8 3Com Web Interface Information Tabs Tab Tab Name Help Description Opens the online help. Figure 10 Device Representation 2 By selecting a specific port with your mouse, you can...
... Home Page contains a graphical panel Representation representation of configuring device information, and include the following: Table 7 3Com Web Interface Configuration Buttons Button Button Name Clear Logs Description Clears system logs. For detailed information on configuring ports... of the device that appears within the Device View Tab. Create Apply Delete Creates configuration entries. Table 8 3Com Web Interface Information Tabs Tab Tab Name Help Description Opens the online help. Figure 10 Device Representation 2 By selecting a specific port with your mouse, you can...

User Guide
Page 33
This section contains the following topics: ■ Viewing Configuration Information ■ Adding Configuration Information ■ Modifying Configuration Information ■ Removing Configuration Information Viewing Configuration Information To view configuration information: 1 Click Port > Administration > Summary. The Port Settings Summary Page opens: Figure 11 Port Settings Summary Page Using Screen and Table Options 33 Using Screen and Table Options 3Com contains screens and tables for configuring devices.
This section contains the following topics: ■ Viewing Configuration Information ■ Adding Configuration Information ■ Modifying Configuration Information ■ Removing Configuration Information Viewing Configuration Information To view configuration information: 1 Click Port > Administration > Summary. The Port Settings Summary Page opens: Figure 11 Port Settings Summary Page Using Screen and Table Options 33 Using Screen and Table Options 3Com contains screens and tables for configuring devices.

User Guide
Page 34
For example, to specific 3Com Web Interface pages, by opening the IP Setup Page. 34 CHAPTER 2: USING THE 3COM WEB INTERFACE Adding Configuration Information User-defined information can be added to configure IP Setup: 1 Click Administration > IP Setup. The IP information is configured, and the device is updated. The IP Setup Page opens: Figure 12 IP Setup Page 2 Enter requisite information in the text field. 3 Click Apply.
For example, to specific 3Com Web Interface pages, by opening the IP Setup Page. 34 CHAPTER 2: USING THE 3COM WEB INTERFACE Adding Configuration Information User-defined information can be added to configure IP Setup: 1 Click Administration > IP Setup. The IP information is configured, and the device is updated. The IP Setup Page opens: Figure 12 IP Setup Page 2 Enter requisite information in the text field. 3 Click Apply.

User Guide
Page 35
Using Screen and Table Options 35 Modifying Configuration Information 1 Click Administration > System Access > Modify. The access fields are modified. The System Access Modify Page opens: Figure 13 System Access Modify Page 2 Modify the fields. 3 Click Apply.
Using Screen and Table Options 35 Modifying Configuration Information 1 Click Administration > System Access > Modify. The access fields are modified. The System Access Modify Page opens: Figure 13 System Access Modify Page 2 Modify the fields. 3 Click Apply.

User Guide
Page 36
The System Access Remove Page opens: Figure 14 System Access Remove Page 2 Select the user account to be deleted. 3 Click Remove. The user account is deleted, and the device is updated. 36 CHAPTER 2: USING THE 3COM WEB INTERFACE Removing Configuration Information 1 Click Administration > System Access > Remove.
The System Access Remove Page opens: Figure 14 System Access Remove Page 2 Select the user account to be deleted. 3 Click Remove. The user account is deleted, and the device is updated. 36 CHAPTER 2: USING THE 3COM WEB INTERFACE Removing Configuration Information 1 Click Administration > System Access > Remove.

User Guide
Page 37
... is saved. The Save Configuration tab allows the latest configuration to be saved to flash memory successful message appears. 3 Click OK. The Save Configuration Page opens: Figure 15 Save Configuration Page A message appears: The operation saves your configuration.
... is saved. The Save Configuration tab allows the latest configuration to be saved to flash memory successful message appears. 3 Click OK. The Save Configuration Page opens: Figure 15 Save Configuration Page A message appears: The operation saves your configuration.

User Guide
Page 38
...password to reconnect to the flash memory before resetting the device. To reset the device: 1 Click Administration > Reset. The Reset Page opens: Figure 16 Reset Page 2 Click Reboot. To prevent the current configuration from a remote location. A confirmation message is displayed. 38 CHAPTER 2: USING THE... 3COM WEB INTERFACE Resetting the Device The Reset Page enables resetting the device from being lost, use the Save Configuration Page to save ...
...password to reconnect to the flash memory before resetting the device. To reset the device: 1 Click Administration > Reset. The Reset Page opens: Figure 16 Reset Page 2 Click Reboot. To prevent the current configuration from a remote location. A confirmation message is displayed. 38 CHAPTER 2: USING THE... 3COM WEB INTERFACE Resetting the Device The Reset Page enables resetting the device from being lost, use the Save Configuration Page to save ...
User Guide
Page 39
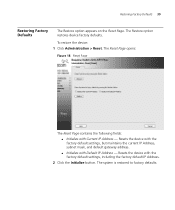
... the factory default settings, but maintains the current IP Address, subnet mask, and default gateway address. ■ Initialize with Current IP Address - The Reset Page opens: Figure 18 Reset Page The Reset Page contains the following fields: ■ Initialize with Default IP Address - The Restore option restores device factory defaults. To...
... the factory default settings, but maintains the current IP Address, subnet mask, and default gateway address. ■ Initialize with Current IP Address - The Reset Page opens: Figure 18 Reset Page The Reset Page contains the following fields: ■ Initialize with Default IP Address - The Restore option restores device factory defaults. To...

User Guide
Page 40
The Logout Page opens. 2 The following message appears: 3 Click OK. The 3Com Web Interface Home Page closes. 40 CHAPTER 2: USING THE 3COM WEB INTERFACE Logging Off the Device To log off the device: 1 Click Logout.
The Logout Page opens. 2 The following message appears: 3 Click OK. The 3Com Web Interface Home Page closes. 40 CHAPTER 2: USING THE 3COM WEB INTERFACE Logging Off the Device To log off the device: 1 Click Logout.

User Guide
Page 41
The Device Summary Page opens: Figure 19 Device Summary Page The Device Summary Page contains the following fields: 3 VIEWING BASIC SETTINGS This section contains information about viewing basic settings available ...
The Device Summary Page opens: Figure 19 Device Summary Page The Device Summary Page contains the following fields: 3 VIEWING BASIC SETTINGS This section contains information about viewing basic settings available ...

User Guide
Page 43
...RJ45 connections which are the physical interface used for terminating twisted pair type cable. ■ SFP - No link detected. Lower speed on 10/100/1000M port. Maximum speed 10/100/1000M RJ45 or RJ45 SFP. Table 9 describes the color and the port status: Table 9 Color Key Definitions Color ...Viewing Color Keys 43 Viewing Color Keys The Color Key Page provides information about the RJ45 or SFP port status. Port or Transceiver has failed POST or Transceivers not recognized. The Color Key Page opens: Figure 20 Color Key Page The Color Key Page contains the following fields: ■ RJ45 ...
...RJ45 connections which are the physical interface used for terminating twisted pair type cable. ■ SFP - No link detected. Lower speed on 10/100/1000M port. Maximum speed 10/100/1000M RJ45 or RJ45 SFP. Table 9 describes the color and the port status: Table 9 Color Key Definitions Color ...Viewing Color Keys 43 Viewing Color Keys The Color Key Page provides information about the RJ45 or SFP port status. Port or Transceiver has failed POST or Transceivers not recognized. The Color Key Page opens: Figure 20 Color Key Page The Color Key Page contains the following fields: ■ RJ45 ...

User Guide
Page 46
...; Management - Displays the predefined Administrative user name. ■ Access Level - To view System Access settings: 1 Click Administration > System Access > Summary. The System Access Summary Page opens: Figure 21 System Access Summary Page The System Access Summary Page contains the following fields: ■ User Name - The lowest user access level is Monitor...
...; Management - Displays the predefined Administrative user name. ■ Access Level - To view System Access settings: 1 Click Administration > System Access > Summary. The System Access Summary Page opens: Figure 21 System Access Summary Page The System Access Summary Page contains the following fields: ■ User Name - The lowest user access level is Monitor...

User Guide
Page 47
... users, passwords, and access levels for users using the System Access Interface. Verifies the password. 2 Define the fields. 3 Click Apply. The System Access Setup Page opens: Figure 22 System Access Setup Page The System Access Setup Page contains the following fields: ■ User Name - Defines the user name. ■ Access Level...
... users, passwords, and access levels for users using the System Access Interface. Verifies the password. 2 Define the fields. 3 Click Apply. The System Access Setup Page opens: Figure 22 System Access Setup Page The System Access Setup Page contains the following fields: ■ User Name - Defines the user name. ■ Access Level...

User Guide
Page 48
... Modify Page allows network administrators to be modified. 3 Modify the fields. 4 Click Apply. Displays the user name. ■ Access Level - The System Access Modify Page opens: Figure 23 System Access Modify Page The System Access Modify Page contains the following fields: ■ User Name - The lowest user access level is Monitoring...
... Modify Page allows network administrators to be modified. 3 Modify the fields. 4 Click Apply. Displays the user name. ■ Access Level - The System Access Modify Page opens: Figure 23 System Access Modify Page The System Access Modify Page contains the following fields: ■ User Name - The lowest user access level is Monitoring...

User Guide
Page 49
... read access rights. 2 Select a User to this page. The lowest user access level is Monitoring and the highest is updated. The System Access Remove Page opens: Figure 24 System Access Remove Page The System Access Remove Page contains the following fields: ■ Remove User(s) - The last user with read and write...
... read access rights. 2 Select a User to this page. The lowest user access level is Monitoring and the highest is updated. The System Access Remove Page opens: Figure 24 System Access Remove Page The System Access Remove Page contains the following fields: ■ Remove User(s) - The last user with read and write...