

Owners Manual
Page 6
...and warming up a cold engine ...6-1 Starting a warm engine ...6-2 Shifting ...6-2 Engine break-in ...6-4 Parking ...6-4 PERIODIC MAINTENANCE AND ADJUSTMENT ...7-1 Owner's tool kit ...7-2 Periodic maintenance chart for the emission control system ...7-3 General maintenance and lubrication chart ...7-5 Removing and installing the panel ...7-9 Checking the spark plugs ...7-9 Canister (for California only) ...7-11 Engine oil and oil filter element ...7-11 Cleaning the air filter element ...7-14 Carburetor ...7-16 Checking the engine idling speed ...7-16 Checking the throttle grip free play ...7-16...
...and warming up a cold engine ...6-1 Starting a warm engine ...6-2 Shifting ...6-2 Engine break-in ...6-4 Parking ...6-4 PERIODIC MAINTENANCE AND ADJUSTMENT ...7-1 Owner's tool kit ...7-2 Periodic maintenance chart for the emission control system ...7-3 General maintenance and lubrication chart ...7-5 Removing and installing the panel ...7-9 Checking the spark plugs ...7-9 Canister (for California only) ...7-11 Engine oil and oil filter element ...7-11 Cleaning the air filter element ...7-14 Carburetor ...7-16 Checking the engine idling speed ...7-16 Checking the throttle grip free play ...7-16...

Owners Manual
Page 7
... LIMITED WARRANTY ...10-7 YAMAHA EXTENDED SERVICE (Y.E.S.) ...10-9 TABLE OF CONTENTS Battery ...7-30 Replacing the fuses ...7-32 Replacing the headlight bulb ...7-33 Replacing the tail/brake light bulb ...7-34 Replacing a turn signal light bulb ...7-35 Supporting the motorcycle ...7-35 Front wheel ...7-36 Rear wheel ...7-38 Troubleshooting ...7-39 Troubleshooting chart ...7-41 MOTORCYCLE CARE AND STORAGE ...8-1 Matte color caution ...8-1 Care ...8-1 Storage ...8-3 SPECIFICATIONS ...9-1 CONSUMER INFORMATION...10-1 Identification numbers ...10-1 Reporting safety defects ...10-3 Motorcycle noise...
... LIMITED WARRANTY ...10-7 YAMAHA EXTENDED SERVICE (Y.E.S.) ...10-9 TABLE OF CONTENTS Battery ...7-30 Replacing the fuses ...7-32 Replacing the headlight bulb ...7-33 Replacing the tail/brake light bulb ...7-34 Replacing a turn signal light bulb ...7-35 Supporting the motorcycle ...7-35 Front wheel ...7-36 Rear wheel ...7-38 Troubleshooting ...7-39 Troubleshooting chart ...7-41 MOTORCYCLE CARE AND STORAGE ...8-1 Matte color caution ...8-1 Care ...8-1 Storage ...8-3 SPECIFICATIONS ...9-1 CONSUMER INFORMATION...10-1 Identification numbers ...10-1 Reporting safety defects ...10-3 Motorcycle noise...
Owners Manual
Page 12
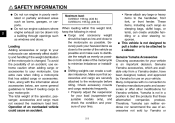
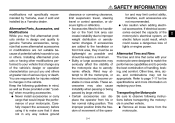
... possible on your vehicle. This vehicle is not in poorly ventilated or partially enclosed areas such as windows and doors. SAFETY INFORMATION G G 2 Do not run engine outdoors where engine exhaust can adversely affect stability and handling if the weight distribution of the motorcycle is an important decision. Therefore, Yamaha can neither endorse nor recommend the use of the operator, passenger, accessories and cargo must...
... possible on your vehicle. This vehicle is not in poorly ventilated or partially enclosed areas such as windows and doors. SAFETY INFORMATION G G 2 Do not run engine outdoors where engine exhaust can adversely affect stability and handling if the weight distribution of the motorcycle is an important decision. Therefore, Yamaha can neither endorse nor recommend the use of the operator, passenger, accessories and cargo must...
Owners Manual
Page 13
... a Yamaha dealer. If electrical accessories exceed the capacity of the motorcycle's electrical system, an electric failure could result, which could cause a dangerous loss of lights or engine power. 2 Aftermarket Tires and Rims The tires and rims that came with your motorcycle. G Remove all loose items from his or her normal riding position. Aftermarket Parts, Accessories, and Modifications While you and others . Use caution when adding electrical accessories. Other tires, rims, sizes...
... a Yamaha dealer. If electrical accessories exceed the capacity of the motorcycle's electrical system, an electric failure could result, which could cause a dangerous loss of lights or engine power. 2 Aftermarket Tires and Rims The tires and rims that came with your motorcycle. G Remove all loose items from his or her normal riding position. Aftermarket Parts, Accessories, and Modifications While you and others . Use caution when adding electrical accessories. Other tires, rims, sizes...
Owners Manual
Page 16
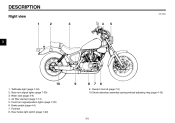
Tail/brake light (page 7-34) Rear turn signal lights (page 7-35) Rider seat (page 4-9) Air filter element (page 7-14) Front turn signal/position lights (page 7-35) Brake pedal (page 4-4) Footrest Rear brake light switch (page 7-22) 3-2 9. Owner's tool kit (page 7-2) 10.Shock absorber assembly spring preload adjusting ring (page 4-10) DESCRIPTION EAU10420 Right view 3 1. 2. 3. 4. 5. 6. 7. 8.
Tail/brake light (page 7-34) Rear turn signal lights (page 7-35) Rider seat (page 4-9) Air filter element (page 7-14) Front turn signal/position lights (page 7-35) Brake pedal (page 4-4) Footrest Rear brake light switch (page 7-22) 3-2 9. Owner's tool kit (page 7-2) 10.Shock absorber assembly spring preload adjusting ring (page 4-10) DESCRIPTION EAU10420 Right view 3 1. 2. 3. 4. 5. 6. 7. 8.

Owners Manual
Page 18
... an extended length of control or an accident. EAU11070 OFF All electrical systems are off . ECA11020 1. Turn signal indicator light "TURN" EAU11040 ON All electrical systems are described below. EAU10510 P (Parking) The taillight and position lights are on , and the engine can be removed. The key can be started. The key can be removed. The key cannot be removed. INSTRUMENT AND CONTROL FUNCTIONS EAU10450 EWA10072 EAU10981 Main switch WARNING Never turn signal switch...
... an extended length of control or an accident. EAU11070 OFF All electrical systems are off . ECA11020 1. Turn signal indicator light "TURN" EAU11040 ON All electrical systems are described below. EAU10510 P (Parking) The taillight and position lights are on , and the engine can be removed. The key can be started. The key can be removed. The key cannot be removed. INSTRUMENT AND CONTROL FUNCTIONS EAU10450 EWA10072 EAU10981 Main switch WARNING Never turn signal switch...
Owners Manual
Page 19
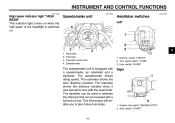
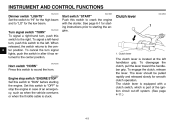
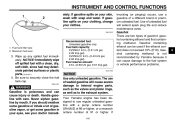
... . Right 1. The speedometer shows riding speed. Dimmer switch "LIGHTS" 2. The odometer shows the total distance traveled. This information will enable you to estimate the distance that can be used to plan future fuel stops. Speedometer unit Handlebar switches Left 4 1. 2. 3. 4. The tripmeter can be traveled with the reset knob. Engine stop switch "ENGINE STOP" 2. Turn signal switch "TURN" 3. Start switch "START" 4-2 Odometer Tripmeter Tripmeter reset knob...
... . Right 1. The speedometer shows riding speed. Dimmer switch "LIGHTS" 2. The odometer shows the total distance traveled. This information will enable you to estimate the distance that can be used to plan future fuel stops. Speedometer unit Handlebar switches Left 4 1. 2. 3. 4. The tripmeter can be traveled with the reset knob. Engine stop switch "ENGINE STOP" 2. Turn signal switch "TURN" 3. Start switch "START" 4-2 Odometer Tripmeter Tripmeter reset knob...
Owners Manual
Page 20
... is equipped with the starter. Clutch lever 1. EAU12650 Engine stop switch "ENGINE STOP" Set this switch to "OFF" to stop the engine in after it has returned to the center position. To cancel the turn , push this switch to the left handlebar grip. When released, the switch returns to the center position. INSTRUMENT AND CONTROL FUNCTIONS EAU12410 EAU12691 EAU12820 Dimmer switch "LIGHTS" Set the switch to "HI" for...
... is equipped with the starter. Clutch lever 1. EAU12650 Engine stop switch "ENGINE STOP" Set this switch to "OFF" to stop the engine in after it has returned to the center position. To cancel the turn , push this switch to the left handlebar grip. When released, the switch returns to the center position. INSTRUMENT AND CONTROL FUNCTIONS EAU12410 EAU12691 EAU12820 Dimmer switch "LIGHTS" Set the switch to "HI" for...
Owners Manual
Page 23
...). Handle gasoline with a clean, dry, soft cloth, since fuel may deteriorate painted surfaces or plastic parts. [ECA10071] 4. If gasoline spills on your skin, wash with a pump octane number [(R+M)/2] of 86 or higher, or a research octane number of leaded gasoline will extend spark plug life and reduce maintenance costs. If gasoline spills on your clothing, change your doctor immedi- If 4-6 WARNING...
...). Handle gasoline with a clean, dry, soft cloth, since fuel may deteriorate painted surfaces or plastic parts. [ECA10071] 4. If gasoline spills on your skin, wash with a pump octane number [(R+M)/2] of 86 or higher, or a research octane number of leaded gasoline will extend spark plug life and reduce maintenance costs. If gasoline spills on your clothing, change your doctor immedi- If 4-6 WARNING...
Owners Manual
Page 27
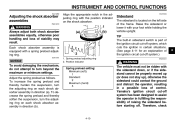
... handling and loss of raising the sidestand before starting off. Each shock absorber assembly is located on the left side of control. Adjust the spring preload as follows. Position indicator EWA10241 WARNING The vehicle must not be ridden with a spring preload adjusting ring. INSTRUMENT AND CONTROL FUNCTIONS EAU14882 Adjusting the shock absorber assemblies EWA10210 Align the appropriate notch in direction (b). 1. Spring preload adjusting ring 2. Yamaha's ignition...
... handling and loss of raising the sidestand before starting off. Each shock absorber assembly is located on the left side of control. Adjust the spring preload as follows. Position indicator EWA10241 WARNING The vehicle must not be ridden with a spring preload adjusting ring. INSTRUMENT AND CONTROL FUNCTIONS EAU14882 Adjusting the shock absorber assemblies EWA10210 Align the appropriate notch in direction (b). 1. Spring preload adjusting ring 2. Yamaha's ignition...
Owners Manual
Page 33
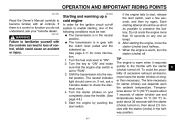
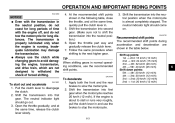
... preserve the battery. Each starting the engine, move the starter (choke) back halfway. 7. G The transmission is warm when it responds quickly to the throttle with the starter (choke) in the neutral position. If not, ask a Yamaha dealer to "ON". 2. If there is set to "RUN". 3. Turn the fuel cock lever to check the electrical circuit. 4. WARNING Failure to familiarize yourself with all controls. Turn the key to...
... preserve the battery. Each starting the engine, move the starter (choke) back halfway. 7. G The transmission is warm when it responds quickly to the throttle with the starter (choke) in the neutral position. If not, ask a Yamaha dealer to "ON". 2. If there is set to "RUN". 3. Turn the fuel cock lever to check the electrical circuit. 4. WARNING Failure to familiarize yourself with all controls. Turn the key to...
Owners Manual
Page 35
... clutch while changing gears to avoid damaging the engine, transmission, and drive train, which are shown in the following table, close the throttle, and at the same time, release the clutch lever slowly. At the recommended shift points shown in the table below. Open the throttle part way and gradually release the clutch lever. 7. Pull the clutch lever to the next higher gear. Shift the transmission into second gear...
... clutch while changing gears to avoid damaging the engine, transmission, and drive train, which are shown in the following table, close the throttle, and at the same time, release the clutch lever slowly. At the recommended shift points shown in the table below. Open the throttle part way and gradually release the clutch lever. 7. Pull the clutch lever to the next higher gear. Shift the transmission into second gear...
Owners Manual
Page 37
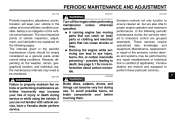
... the vehicle or performing maintenance activities incorrectly may be simply considered as a general guide under normal riding conditions. Safety is certified (if applicable). EWA15460 Emission controls not only function to ensure cleaner air, but are also vital to emissions control are not familiar with vehicle service, have a Yamaha dealer perform service. To avoid possible burns, let brake components cool before touching them. 7-1 EWA10321 Turn off the engine when performing maintenance...
... the vehicle or performing maintenance activities incorrectly may be simply considered as a general guide under normal riding conditions. Safety is certified (if applicable). EWA15460 Emission controls not only function to ensure cleaner air, but are also vital to emissions control are not familiar with vehicle service, have a Yamaha dealer perform service. To avoid possible burns, let brake components cool before touching them. 7-1 EWA10321 Turn off the engine when performing maintenance...
Owners Manual
Page 39
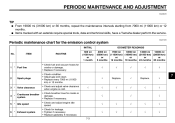
.... • Check and adjust valve clearance when engine is cold. • Check breather hose for cracks or damage. • Replace if necessary. • Check and adjust engine idle speed. • Check for the emission control system INITIAL No. Items marked with an asterisk require special tools, data and technical skills, have a Yamaha dealer perform the service. PERIODIC MAINTENANCE AND ADJUSTMENT EAU48470 TIP G G From...
.... • Check and adjust valve clearance when engine is cold. • Check breather hose for cracks or damage. • Replace if necessary. • Check and adjust engine idle speed. • Check for the emission control system INITIAL No. Items marked with an asterisk require special tools, data and technical skills, have a Yamaha dealer perform the service. PERIODIC MAINTENANCE AND ADJUSTMENT EAU48470 TIP G G From...
Owners Manual
Page 42
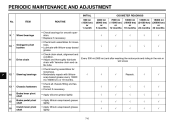
...-soap-based grease lightly. 10 * Swingarm pivot bushes √ √ √ √ √ 11 Drive chain Every 300 mi (500 km) and after washing the motorcycle and riding in the rain or wet areas 7 12 * Steering bearings √ √ √ Repack. √ √ 13 * Chassis fasteners Brake lever pivot shaft Brake pedal pivot shaft Clutch lever pivot shaft...
...-soap-based grease lightly. 10 * Swingarm pivot bushes √ √ √ √ √ 11 Drive chain Every 300 mi (500 km) and after washing the motorcycle and riding in the rain or wet areas 7 12 * Steering bearings √ √ √ Repack. √ √ 13 * Chassis fasteners Brake lever pivot shaft Brake pedal pivot shaft Clutch lever pivot shaft...
Owners Manual
Page 81
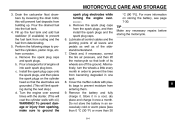
... tires from entering them. from the spark plugs, and then install the spark plugs and the spark plug caps. b. Lubricate all control cables and the pivoting points of all levers and pedals as well as of engine oil into the fuel tank. 4. e. Pour the drained fuel into each spark plug bore. Perform the following steps to ground the spark plug electrodes while turning the engine over several times with the starter. (This will limit sparking...
... tires from entering them. from the spark plugs, and then install the spark plugs and the spark plug caps. b. Lubricate all control cables and the pivoting points of all levers and pedals as well as of engine oil into the fuel tank. 4. e. Pour the drained fuel into each spark plug bore. Perform the following steps to ground the spark plug electrodes while turning the engine over several times with the starter. (This will limit sparking...
Owners Manual
Page 82
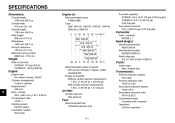
... Manufacturer/model: DENSO/U20FS-U Spark plug gap: 0.6-0.7 mm (0.024-0.028 in) Weight: With oil and fuel: XV250A1 147 kg (324 lb) XV250A1C 148 kg (326 lb) Clutch: Clutch type: Wet, multiple-disc Engine: Engine type: Air cooled 4-stroke, SOHC Cylinder arrangement: V-type 2-cylinder Displacement: 249 cm³ Bore × stroke: 49.0 × 66.0 mm (1.93 × 2.60 in) Compression ratio: 10.00 :1 Starting system: Electric starter Lubrication...
... Manufacturer/model: DENSO/U20FS-U Spark plug gap: 0.6-0.7 mm (0.024-0.028 in) Weight: With oil and fuel: XV250A1 147 kg (324 lb) XV250A1C 148 kg (326 lb) Clutch: Clutch type: Wet, multiple-disc Engine: Engine type: Air cooled 4-stroke, SOHC Cylinder arrangement: V-type 2-cylinder Displacement: 249 cm³ Bore × stroke: 49.0 × 66.0 mm (1.93 × 2.60 in) Compression ratio: 10.00 :1 Starting system: Electric starter Lubrication...
Owners Manual
Page 91
... so as a result of owner abuse and/or lack of proper maintenance, are not qualitatively equivalent to normal wear or routine maintenance. P.O. MODELS EXCLUDED FROM WARRANTY include those resulting from the date of the product's warranty period. e) Accident or collision damage. SPECIFIC EXCLUSIONS from this warranty with headlight, stoplight, and turn signals shall be charged for warranty by Yamaha due to certain stated...
... so as a result of owner abuse and/or lack of proper maintenance, are not qualitatively equivalent to normal wear or routine maintenance. P.O. MODELS EXCLUDED FROM WARRANTY include those resulting from the date of the product's warranty period. e) Accident or collision damage. SPECIFIC EXCLUSIONS from this warranty with headlight, stoplight, and turn signals shall be charged for warranty by Yamaha due to certain stated...
Owners Manual
Page 92
... specified in the Owner's Manual instead of normal maintenance services, non-warranty repairs, accident and collision damages, and oil, oil filters, air filters, spark plugs, and brake shoes. A. Since all costs of having the dealer do them? This list is in accordance with a broken or damaged part which causes another part to fail, damage or failure due to a failure? P.O. Q. Specific examples include: Running the machine out...
... specified in the Owner's Manual instead of normal maintenance services, non-warranty repairs, accident and collision damages, and oil, oil filters, air filters, spark plugs, and brake shoes. A. Since all costs of having the dealer do them? This list is in accordance with a broken or damaged part which causes another part to fail, damage or failure due to a failure? P.O. Q. Specific examples include: Running the machine out...

Owners Manual
Page 95
... ...7-3 Maintenance record ...10-5 Matte color, caution...8-1 Model label...10-2 T Tail/brake light bulb, replacing ...7-34 Throttle grip and cable, checking and lubricating ...7-27 Throttle grip free play, checking...7-16 Tires...7-17 Tool kit ...7-2 Troubleshooting ...7-39 Troubleshooting chart ...7-41 Turn signal indicator light ...4-1 Turn signal light bulb, replacing ...7-35 D Dimmer switch ...4-3 Drive chain, cleaning and lubricating...7-26 Drive chain slack ...7-24 E Engine break-in ...6-4 Engine idling speed, checking ...7-16 Engine oil and oil filter element...7-11 Engine, starting...
... ...7-3 Maintenance record ...10-5 Matte color, caution...8-1 Model label...10-2 T Tail/brake light bulb, replacing ...7-34 Throttle grip and cable, checking and lubricating ...7-27 Throttle grip free play, checking...7-16 Tires...7-17 Tool kit ...7-2 Troubleshooting ...7-39 Troubleshooting chart ...7-41 Turn signal indicator light ...4-1 Turn signal light bulb, replacing ...7-35 D Dimmer switch ...4-3 Drive chain, cleaning and lubricating...7-26 Drive chain slack ...7-24 E Engine break-in ...6-4 Engine idling speed, checking ...7-16 Engine oil and oil filter element...7-11 Engine, starting...