
Owners Manual
Page 3
... attempt to operate this vehicle. It also includes basic maintenance and inspection procedures. With the purchase of this Yamaha, you can now appreciate the high degree of craftsmanship and reliability that you have attained adequate knowledge of fine sporting, touring, and pace-setting racing vehicles. WARNING Please read this manual carefully before operating this vehicle. It represents the result...
... attempt to operate this vehicle. It also includes basic maintenance and inspection procedures. With the purchase of this Yamaha, you can now appreciate the high degree of craftsmanship and reliability that you have attained adequate knowledge of fine sporting, touring, and pace-setting racing vehicles. WARNING Please read this manual carefully before operating this vehicle. It represents the result...

Owners Manual
Page 6
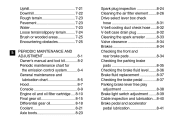
... ...5-1 Front and rear brakes ...5-3 Fuel ...5-4 Engine oil ...5-6 Coolant...5-6 Final gear oil ...5-7 Differential gear oil ...5-7 Accelerator pedal...5-7 EVU00050 CONTENTS 1 LOCATION OF THE WARNING AND SPECIFICATION LABELS...1-1 SAFETY INFORMATION...2-1 DESCRIPTION ...3-1 INSTRUMENT AND CONTROL FUNCTIONS ...4-1 Main switch...4-1 Indicator lights and warning lights ...4-2 Multi-function meter unit...4-6 Light switch...4-12 Accelerator pedal ...4-14 Brake pedal ...4-14 Parking brake lever ...4-15 Drive select lever...4-15 Fuel tank cap...4-16 Doors ...4-16 Seats ...4-17 Seat belts...4-18...
... ...5-1 Front and rear brakes ...5-3 Fuel ...5-4 Engine oil ...5-6 Coolant...5-6 Final gear oil ...5-7 Differential gear oil ...5-7 Accelerator pedal...5-7 EVU00050 CONTENTS 1 LOCATION OF THE WARNING AND SPECIFICATION LABELS...1-1 SAFETY INFORMATION...2-1 DESCRIPTION ...3-1 INSTRUMENT AND CONTROL FUNCTIONS ...4-1 Main switch...4-1 Indicator lights and warning lights ...4-2 Multi-function meter unit...4-6 Light switch...4-12 Accelerator pedal ...4-14 Brake pedal ...4-14 Parking brake lever ...4-15 Drive select lever...4-15 Fuel tank cap...4-16 Doors ...4-16 Seats ...4-17 Seat belts...4-18...

Owners Manual
Page 7
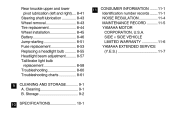
...-drive switch and differential gear lock switch ...6-6 Parking ...6-8 Loading ...6-9 BASIC GUIDE FOR SAFE USE...7-1 KNOW YOUR VEHICLE...7-1 Driver requirements ...7-3 Passenger requirements...7-4 Occupant protection system ...7-4 7 Protective structure...7-6 Seat belts...7-6 Doors ...7-9 Passenger handholds...7-10 Seat and hip restraints ...7-11 Floorboard ...7-11 Steering wheel...7-12 LEARNING TO OPERATE YOUR VEHICLE...7-13 Personal protective equipment...7-13 Practice for new Rhino users ...7-14 Getting ready to ride ...7-15 Turning...7-15 Accelerating...7-16 Braking...7-17 Engine braking...
...-drive switch and differential gear lock switch ...6-6 Parking ...6-8 Loading ...6-9 BASIC GUIDE FOR SAFE USE...7-1 KNOW YOUR VEHICLE...7-1 Driver requirements ...7-3 Passenger requirements...7-4 Occupant protection system ...7-4 7 Protective structure...7-6 Seat belts...7-6 Doors ...7-9 Passenger handholds...7-10 Seat and hip restraints ...7-11 Floorboard ...7-11 Steering wheel...7-12 LEARNING TO OPERATE YOUR VEHICLE...7-13 Personal protective equipment...7-13 Practice for new Rhino users ...7-14 Getting ready to ride ...7-15 Turning...7-15 Accelerating...7-16 Braking...7-17 Engine braking...
Owners Manual
Page 8
... Owner's manual and tool kit...8-2 Periodic maintenance chart for the emission control system...8-4 General maintenance and lubrication chart ...8-5 Hood ...8-7 Console ...8-9 Engine oil and oil filter cartridge ...8-10 Final gear oil ...8-15 Differential gear oil...8-18 Coolant ...8-21 Axle boots...8-23 Spark plug inspection ...8-24 Cleaning the air filter element ...8-26 Drive select lever box check hose ...8-31 V-belt cooling duct check hose...8-32 V-belt case drain plug ...8-32 Cleaning the spark arrester ...8-33 Valve clearance ...8-34 Brakes...8-34 Checking the front and rear brake pads...
... Owner's manual and tool kit...8-2 Periodic maintenance chart for the emission control system...8-4 General maintenance and lubrication chart ...8-5 Hood ...8-7 Console ...8-9 Engine oil and oil filter cartridge ...8-10 Final gear oil ...8-15 Differential gear oil...8-18 Coolant ...8-21 Axle boots...8-23 Spark plug inspection ...8-24 Cleaning the air filter element ...8-26 Drive select lever box check hose ...8-31 V-belt cooling duct check hose...8-32 V-belt case drain plug ...8-32 Cleaning the spark arrester ...8-33 Valve clearance ...8-34 Brakes...8-34 Checking the front and rear brake pads...
Owners Manual
Page 9
SIDE × SIDE VEHICLE LIMITED WARRANTY ...11-6 YAMAHA EXTENDED SERVICE (Y.E.S.) ...11-7 10 Cleaning...9-1 B. Rear knuckle upper and lower pivot lubrication (left and right)...8-41 Steering shaft lubrication ...8-43 Wheel removal ...8-43 Tire replacement ...8-44 Wheel installation ...8-45 Battery ...8-46 Jump-starting ...8-51 Fuse replacement ...8-53 Replacing a headlight bulb ...8-55 Headlight beam adjustment ...8-57 Tail/brake light bulb replacement ...8-58 Troubleshooting ...8-60 Troubleshooting charts ...8-61 9 CLEANING AND STORAGE...9-1 A. Storage ...9-2 SPECIFICATIONS...10-1 11...
SIDE × SIDE VEHICLE LIMITED WARRANTY ...11-6 YAMAHA EXTENDED SERVICE (Y.E.S.) ...11-7 10 Cleaning...9-1 B. Rear knuckle upper and lower pivot lubrication (left and right)...8-41 Steering shaft lubrication ...8-43 Wheel removal ...8-43 Tire replacement ...8-44 Wheel installation ...8-45 Battery ...8-46 Jump-starting ...8-51 Fuse replacement ...8-53 Replacing a headlight bulb ...8-55 Headlight beam adjustment ...8-57 Tail/brake light bulb replacement ...8-58 Troubleshooting ...8-60 Troubleshooting charts ...8-61 9 CLEANING AND STORAGE...9-1 A. Storage ...9-2 SPECIFICATIONS...10-1 11...
Owners Manual
Page 17
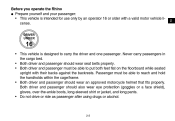
... their backs against the backrests. Never carry passengers in the cargo bed. • Both driver and passenger should wear seat belts properly. • Both driver and passenger must be able to put both feet flat on the floorboard while seated upright with a valid motor vehicle license. Before you operate the Rhino G Prepare yourself and your passenger: • This vehicle is designed to carry the...
... their backs against the backrests. Never carry passengers in the cargo bed. • Both driver and passenger should wear seat belts properly. • Both driver and passenger must be able to put both feet flat on the floorboard while seated upright with a valid motor vehicle license. Before you operate the Rhino G Prepare yourself and your passenger: • This vehicle is designed to carry the...
Owners Manual
Page 27
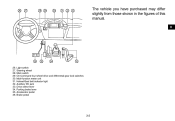
Light switch 27. Accelerator pedal 36. Multi-function meter unit 31. Auxiliary DC jack 33. Main switch 29. Drive select lever 34. Brake pedal 3-2 Steering wheel 28. Helmet/Seat belt indicator light 32. Parking brake lever 35. On-Command four-wheel-drive and differential gear lock switches 30. P Q RS T U V W The vehicle you have purchased may differ slightly from those shown in the figures of this manual. 1 2 3 4 5 6 7 Z Y X H 8 9 10 11 12 13 14 26.
Light switch 27. Accelerator pedal 36. Multi-function meter unit 31. Auxiliary DC jack 33. Main switch 29. Drive select lever 34. Brake pedal 3-2 Steering wheel 28. Helmet/Seat belt indicator light 32. Parking brake lever 35. On-Command four-wheel-drive and differential gear lock switches 30. P Q RS T U V W The vehicle you have purchased may differ slightly from those shown in the figures of this manual. 1 2 3 4 5 6 7 Z Y X H 8 9 10 11 12 13 14 26.
Owners Manual
Page 48
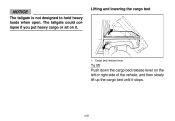
The tailgate could collapse if you put heavy cargo or sit on the left or right side of the vehicle, and then slowly lift up the cargo bed until it . Cargo bed release lever To lift Push down the cargo bed release lever on it stops. 4-21 Lifting and lowering the cargo bed 1. NOTICE The tailgate is not designed to hold heavy loads when open.
The tailgate could collapse if you put heavy cargo or sit on the left or right side of the vehicle, and then slowly lift up the cargo bed until it . Cargo bed release lever To lift Push down the cargo bed release lever on it stops. 4-21 Lifting and lowering the cargo bed 1. NOTICE The tailgate is not designed to hold heavy loads when open.
Owners Manual
Page 66
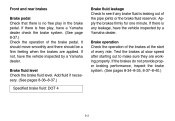
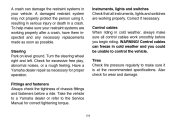
..., have the vehicle inspected by a Yamaha dealer. Add fluid if necessary. (See pages 8-36-8-37.) Specified brake fluid: DOT 4 Brake fluid leakage Check to make sure they are applied. Test the brakes at the start of the pipe joints or the brake fluid reservoir. Brake fluid level Check the brake fluid level. If there is any brake fluid is leaking out of every ride. EVU00390 Front and rear brakes Brake pedal Check...
..., have the vehicle inspected by a Yamaha dealer. Add fluid if necessary. (See pages 8-36-8-37.) Specified brake fluid: DOT 4 Brake fluid leakage Check to make sure they are applied. Test the brakes at the start of the pipe joints or the brake fluid reservoir. Brake fluid level Check the brake fluid level. If there is any brake fluid is leaking out of every ride. EVU00390 Front and rear brakes Brake pedal Check...
Owners Manual
Page 67
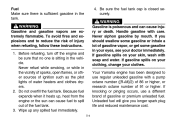
... the risk of water heaters and clothes dryers. 2. If knocking or pinging occurs, use regular unleaded gasoline with a pump octane number ([R+M]/2) of 86 or higher, or research octane number of the fuel tank. 3. Handle gasoline with soap and water. If you longer spark plug life and reduced maintenance cost. 5-4 WARNING Gasoline and gasoline vapors are extremely flammable. To avoid fires and explosions and...
... the risk of water heaters and clothes dryers. 2. If knocking or pinging occurs, use regular unleaded gasoline with a pump octane number ([R+M]/2) of 86 or higher, or research octane number of the fuel tank. 3. Handle gasoline with soap and water. If you longer spark plug life and reduced maintenance cost. 5-4 WARNING Gasoline and gasoline vapors are extremely flammable. To avoid fires and explosions and...
Owners Manual
Page 71
... control cables work smoothly before a ride. Control cables When riding in cold weather, always make sure all instruments, lights and switches are working properly. WARNING! Also check for correct tightening torque. 5-8 Take the vehicle to a Yamaha dealer or refer to make sure your vehicle. Check for proper operation. Have a Yamaha dealer repair as possible. Control cables can damage the restraint systems in a crash. EVU00500 Steering Park on level ground...
... control cables work smoothly before a ride. Control cables When riding in cold weather, always make sure all instruments, lights and switches are working properly. WARNING! Also check for correct tightening torque. 5-8 Take the vehicle to a Yamaha dealer or refer to make sure your vehicle. Check for proper operation. Have a Yamaha dealer repair as possible. Control cables can damage the restraint systems in a crash. EVU00500 Steering Park on level ground...
Owners Manual
Page 75
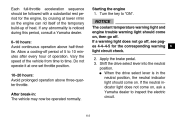
... NOTICE The coolant temperature warning light and engine trouble warning light should come on. If a warning light does not go off period of 5 to 10 minutes after every hour of the vehicle from time to inspect the electric circuit. 6-2 If any abnormality is in : The vehicle may now be followed with a substantial rest period for the corresponding warning light circuit check. 2. Vary the speed of...
... NOTICE The coolant temperature warning light and engine trouble warning light should come on. If a warning light does not go off period of 5 to 10 minutes after every hour of the vehicle from time to inspect the electric circuit. 6-2 If any abnormality is in : The vehicle may now be followed with a substantial rest period for the corresponding warning light circuit check. 2. Vary the speed of...
Owners Manual
Page 76
... when the engine is recommended to "START". NOTICE: Do not crank the engine more than 5 seconds on each operation of the electric starter to preserve battery energy. Do not turn the key to the electric starter may result. 6-3 otherwise, damage to the "START" position with the engine running; Wait a few seconds before starting it cool. Each attempt should be started in any gear if the brake pedal is...
... when the engine is recommended to "START". NOTICE: Do not crank the engine more than 5 seconds on each operation of the electric starter to preserve battery energy. Do not turn the key to the electric starter may result. 6-3 otherwise, damage to the "START" position with the engine running; Wait a few seconds before starting it cool. Each attempt should be started in any gear if the brake pedal is...
Owners Manual
Page 78
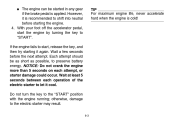
... the accelerator pedal, and check behind you . Drive select lever 3. G When in reverse, the reverse indicator light should be on , ask a Yamaha dealer to inspect the reverse indicator light electrical circuit. 6-5 2 3 4 5 1. G If the light does not come on until the vehicle starts moving the drive select lever along the shift guide. R (Reverse) 2. N (Neutral) 4. Release the parking brake. 5. Due to the synchronizing mechanism in...
... the accelerator pedal, and check behind you . Drive select lever 3. G When in reverse, the reverse indicator light should be on , ask a Yamaha dealer to inspect the reverse indicator light electrical circuit. 6-5 2 3 4 5 1. G If the light does not come on until the vehicle starts moving the drive select lever along the shift guide. R (Reverse) 2. N (Neutral) 4. Release the parking brake. 5. Due to the synchronizing mechanism in...
Owners Manual
Page 148
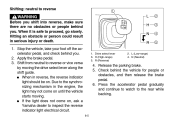
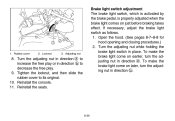
... cover to decrease the free play or in direction b. 8-39 Reinstall the seats. If necessary, adjust the brake light switch as follows. 1. Turn the adjusting nut while holding the brake light switch in direction a. To make the brake light come on just before braking takes effect. Brake light switch adjustment The brake light switch, which is activated by the brake pedal, is properly adjusted when the brake light comes on earlier, turn...
... cover to decrease the free play or in direction b. 8-39 Reinstall the seats. If necessary, adjust the brake light switch as follows. 1. Turn the adjusting nut while holding the brake light switch in direction a. To make the brake light come on just before braking takes effect. Brake light switch adjustment The brake light switch, which is activated by the brake pedal, is properly adjusted when the brake light comes on earlier, turn...
Owners Manual
Page 149
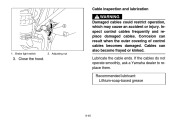
Brake light switch 2. Close the hood. 8-40 Lubricate the cable ends. Cables can result when the outer covering of control cables becomes damaged. Recommended lubricant: Lithium-soap-based grease 1. Adjusting nut 3. If the cables do not operate smoothly, ask a Yamaha dealer to replace them. Corrosion can also become frayed or kinked. Inspect control cables frequently and replace damaged cables. EVU00890 Cable inspection and lubrication WARNING 1 a 2 b Damaged cables could restrict operation, which may cause an accident or injury.
Brake light switch 2. Close the hood. 8-40 Lubricate the cable ends. Cables can result when the outer covering of control cables becomes damaged. Recommended lubricant: Lithium-soap-based grease 1. Adjusting nut 3. If the cables do not operate smoothly, ask a Yamaha dealer to replace them. Corrosion can also become frayed or kinked. Inspect control cables frequently and replace damaged cables. EVU00890 Cable inspection and lubrication WARNING 1 a 2 b Damaged cables could restrict operation, which may cause an accident or injury.
Owners Manual
Page 163
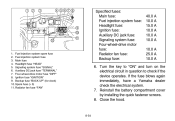
... Spare fuse (× 3) 11. Ignition fuse "IGNITION" 9. Radiator fan fuse "FAN" Specified fuses: Main fuse: Fuel injection system fuse: Headlight fuse: Ignition fuse: Auxiliary DC jack fuse: Signaling system fuse: Four-wheel-drive motor fuse: Radiator fan fuse: Backup fuse: 40.0 A 10.0 A 15.0 A 10.0 A 10.0 A 10.0 A 10.0 A 25.0 A 10.0 A 6. Reinstall the battery compartment cover by installing the quick fastener screws. 8. Turn the key to "ON" and turn on the electrical circuit in question to check if the device operates. Signaling system fuse "SIGNAL" 6. Four-wheel-drive motor fuse "DIFF...
... Spare fuse (× 3) 11. Ignition fuse "IGNITION" 9. Radiator fan fuse "FAN" Specified fuses: Main fuse: Fuel injection system fuse: Headlight fuse: Ignition fuse: Auxiliary DC jack fuse: Signaling system fuse: Four-wheel-drive motor fuse: Radiator fan fuse: Backup fuse: 40.0 A 10.0 A 15.0 A 10.0 A 10.0 A 10.0 A 10.0 A 25.0 A 10.0 A 6. Reinstall the battery compartment cover by installing the quick fastener screws. 8. Turn the key to "ON" and turn on the electrical circuit in question to check if the device operates. Signaling system fuse "SIGNAL" 6. Four-wheel-drive motor fuse "DIFF...

Owners Manual
Page 172
... chance of wheel bearings, brakes, transmission seals and electrical devices. Block off with a paint brush. WARNING! Apply the brakes several times at slow speeds to the wheel axles. 3. Use only enough pressure to prevent water entry. A plastic bag and strong rubber band may cause water seepage and deterioration of an accident. Make sure the spark plug and all filler caps are properly installed. 2. EVU01030 1- Before cleaning the vehicle: a. Rinse the...
... chance of wheel bearings, brakes, transmission seals and electrical devices. Block off with a paint brush. WARNING! Apply the brakes several times at slow speeds to the wheel axles. 3. Use only enough pressure to prevent water entry. A plastic bag and strong rubber band may cause water seepage and deterioration of an accident. Make sure the spark plug and all filler caps are properly installed. 2. EVU01030 1- Before cleaning the vehicle: a. Rinse the...
Owners Manual
Page 178
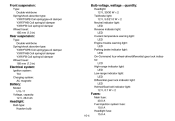
...range indicator light: LED Low-range indicator light: LED Differential gear lock indicator light: LED Helmet/Seat belt indicator light: 12 V, 0.7 W × 2 Rear suspension: Type: Double wishbone Spring/shock absorber type: YXR7FSPB Coil spring/gas-oil damper YXR7FHB Coil spring/oil damper YXR7FB Coil spring/oil damper Wheel travel: 185 mm (7.3 in) Electrical system: Ignition system: TCI Charging system: AC magneto Battery: Model: U1L-11 Voltage, capacity: 12 V, 28.0 Ah Fuses: Main fuse: 40.0 A Fuel injection system fuse: 10.0 A Headlight fuse: 15.0 A Headlight: Bulb type: Krypton bulb 10...
...range indicator light: LED Low-range indicator light: LED Differential gear lock indicator light: LED Helmet/Seat belt indicator light: 12 V, 0.7 W × 2 Rear suspension: Type: Double wishbone Spring/shock absorber type: YXR7FSPB Coil spring/gas-oil damper YXR7FHB Coil spring/oil damper YXR7FB Coil spring/oil damper Wheel travel: 185 mm (7.3 in) Electrical system: Ignition system: TCI Charging system: AC magneto Battery: Model: U1L-11 Voltage, capacity: 12 V, 28.0 Ah Fuses: Main fuse: 40.0 A Fuel injection system fuse: 10.0 A Headlight fuse: 15.0 A Headlight: Bulb type: Krypton bulb 10...
Owners Manual
Page 185
... 2006 and later model Yamaha Side × Side vehicle covered by : a. Competition or racing use. Operate and maintain the Side × Side vehicle as spark plugs, oil, oil filter, air filter, and brake pads. Failures other commercial purposes. THE PERIOD OF WARRANTY for inspection and repairs at that it is free from defects in warranty repairs will be six (6) months from defects in the appropriate Owner's Manual, and 2. ALSO EXCLUDED...
... 2006 and later model Yamaha Side × Side vehicle covered by : a. Competition or racing use. Operate and maintain the Side × Side vehicle as spark plugs, oil, oil filter, air filter, and brake pads. Failures other commercial purposes. THE PERIOD OF WARRANTY for inspection and repairs at that it is free from defects in warranty repairs will be six (6) months from defects in the appropriate Owner's Manual, and 2. ALSO EXCLUDED...