
Owners Manual
Page 5
... ...18 Fuel level warning indicator ...20 Oil level warning indicator ...21 Coolant temperature warning indicator ...21 Self-diagnosis device ...22 Engine stop switch ...22 Headlight beam switch "LIGHTS" ...23 Grip/thumb warmer adjusting switch ...23 Auxiliary DC jack ...24 Helmet shield heater jack (RS90GT / RS90LTGT / RST90GT) ...25 Brake lever ...25 Parking brake lever ...26 Shift lever ...26 Drive guard ...27 V-belt holders ...28 Passenger grips (RST90GT) ...29 Passenger grip warmer switch (RST90 / RST90GT) ...29 Passenger footrests...
... ...18 Fuel level warning indicator ...20 Oil level warning indicator ...21 Coolant temperature warning indicator ...21 Self-diagnosis device ...22 Engine stop switch ...22 Headlight beam switch "LIGHTS" ...23 Grip/thumb warmer adjusting switch ...23 Auxiliary DC jack ...24 Helmet shield heater jack (RS90GT / RS90LTGT / RST90GT) ...25 Brake lever ...25 Parking brake lever ...26 Shift lever ...26 Drive guard ...27 V-belt holders ...28 Passenger grips (RST90GT) ...29 Passenger grip warmer switch (RST90 / RST90GT) ...29 Passenger footrests...
Owners Manual
Page 6
... YAMAHA EXTENDED SERVICE (Y.E.S.)...130 Contents Carburetors (RST90) ...77 High-altitude settings ...77 Valve clearance ...77 Engine oil and oil filter cartridge ...77 Cooling system ...83 V-belt ...88 Drive chain housing ...91 Brake and parking brake ...92 Extrovert drive sprocket (RS90GT / RS90LTGT) ...95 Skis and ski runners ...95 Steering system ...96 Drive track and slide runners ...98 Lubrication ...102 Replacing a headlight bulb ...103 Adjusting the headlight beams ...107 Fittings and fasteners ...108 Battery ...108 Replacing a fuse...
... YAMAHA EXTENDED SERVICE (Y.E.S.)...130 Contents Carburetors (RST90) ...77 High-altitude settings ...77 Valve clearance ...77 Engine oil and oil filter cartridge ...77 Cooling system ...83 V-belt ...88 Drive chain housing ...91 Brake and parking brake ...92 Extrovert drive sprocket (RS90GT / RS90LTGT) ...95 Skis and ski runners ...95 Steering system ...96 Drive track and slide runners ...98 Lubrication ...102 Replacing a headlight bulb ...103 Adjusting the headlight beams ...107 Fittings and fasteners ...108 Battery ...108 Replacing a fuse...

Owners Manual
Page 12
...snowmobile. Carrying a passenger can cause loss of pre-operation checks. Apply the parking brake before starting the engine. Perform the pre-operation checks each time you use on surfaces other snowmobilers when going on public streets, roads, or highways. ...controls and their function. Ride slowly and cautiously when you do not understand. Consult a Yamaha dealer about any of your snowmobile G G Read the Owner's Manual and all of alcohol or drugs. Safety information ESU10193 G As the vehicle's owner, you are designed to carry the OPERATOR ONLY. Passengers...
...snowmobile. Carrying a passenger can cause loss of pre-operation checks. Apply the parking brake before starting the engine. Perform the pre-operation checks each time you use on surfaces other snowmobilers when going on public streets, roads, or highways. ...controls and their function. Ride slowly and cautiously when you do not understand. Consult a Yamaha dealer about any of your snowmobile G G Read the Owner's Manual and all of alcohol or drugs. Safety information ESU10193 G As the vehicle's owner, you are designed to carry the OPERATOR ONLY. Passengers...

Owners Manual
Page 13
... you can rapidly reach dangerous levels. Yamaha is an important decision. Genuine Yamaha Accessories, which are present such as windows and doors. G Do not run the engine outdoors where engine exhaust can neither endorse nor recommend the use . Therefore, Yamaha can be drawn into a building through openings such as hot water and space heaters, an open windows and doors, carbon monoxide can quickly be...
... you can rapidly reach dangerous levels. Yamaha is an important decision. Genuine Yamaha Accessories, which are present such as windows and doors. G Do not run the engine outdoors where engine exhaust can neither endorse nor recommend the use . Therefore, Yamaha can be drawn into a building through openings such as hot water and space heaters, an open windows and doors, carbon monoxide can quickly be...
Owners Manual
Page 43
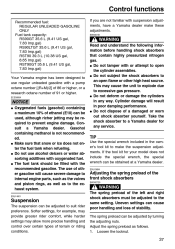
... to excessive gas pressure. ESU10894 Adjusting the spring preload of the front shock absorbers EWS00720 WARNING The spring preload of a damaged or worn out shock absorber yourself. G Do not dispose of the left and right shock absorbers must be obtained at a Yamaha dealer. Consult a Yamaha dealer. Gasohol containing methanol is not recommended. Control functions Recommended fuel: REGULAR UNLEADED GASOLINE ONLY Fuel tank capacity: RS90GT 35...
... to excessive gas pressure. ESU10894 Adjusting the spring preload of the front shock absorbers EWS00720 WARNING The spring preload of a damaged or worn out shock absorber yourself. G Do not dispose of the left and right shock absorbers must be obtained at a Yamaha dealer. Consult a Yamaha dealer. Gasohol containing methanol is not recommended. Control functions Recommended fuel: REGULAR UNLEADED GASOLINE ONLY Fuel tank capacity: RS90GT 35...
Owners Manual
Page 45
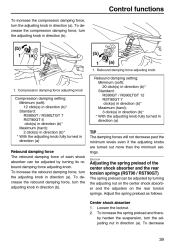
... knob fully turned in direction (a) Rebound damping force The rebound damping force of the center shock absorber and the rear torsion springs (RST90 / RST90GT) The spring preload can be adjusted by turning its rebound damping...suspension, turn the adjusting nut in direction (a). Control functions To increase the compression damping force, turn the adjusting knob in direction (a). Loosen the locknut. 2. To decrease the compression damping force, turn the adjusting knob in direction (b). 1. Rebound damping force adjusting knob 1. ESU13134 Adjusting the spring preload of each shock...
... knob fully turned in direction (a) Rebound damping force The rebound damping force of the center shock absorber and the rear torsion springs (RST90 / RST90GT) The spring preload can be adjusted by turning its rebound damping...suspension, turn the adjusting nut in direction (a). Control functions To increase the compression damping force, turn the adjusting knob in direction (a). Loosen the locknut. 2. To decrease the compression damping force, turn the adjusting knob in direction (b). 1. Rebound damping force adjusting knob 1. ESU13134 Adjusting the spring preload of each shock...

Owners Manual
Page 57
... to perform it at low speeds many times, in the desired direction. You should be practiced at higher speeds or in this area is the key to turning. G Many surfaces such as the turn the handlebar in a large flat area with added safety and a more reliable snowmobile. With the engine idling, release the parking brake. As you from injury if an accident occurs. WARNING! Always...
... to perform it at low speeds many times, in the desired direction. You should be practiced at higher speeds or in this area is the key to turning. G Many surfaces such as the turn the handlebar in a large flat area with added safety and a more reliable snowmobile. With the engine idling, release the parking brake. As you from injury if an accident occurs. WARNING! Always...

Owners Manual
Page 74
... center electrode. Periodic maintenance and adjustment ECS01040 EWS00710 NOTICE G WARNING Be sure to slowly break down and erode. The condition of the spark plugs can indicate the condition of the threaded portion. The ideal coloration at this point is a medium-tolight tan color for that cylinder. Spark plug reach Before installing any spark plug shows a distinctly different color, there could indicate an intake track air leak or carburetion problem...
... center electrode. Periodic maintenance and adjustment ECS01040 EWS00710 NOTICE G WARNING Be sure to slowly break down and erode. The condition of the spark plugs can indicate the condition of the threaded portion. The ideal coloration at this point is a medium-tolight tan color for that cylinder. Spark plug reach Before installing any spark plug shows a distinctly different color, there could indicate an intake track air leak or carburetion problem...
Owners Manual
Page 75
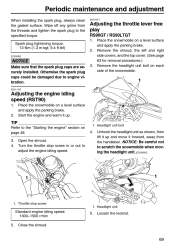
... the headlight unit bolt on a level surface and apply the parking brake. NOTICE: Be careful not to adjust the engine idling speed. 4. Headlight unit Standard engine idling speed: 1300-1500 r/min 5. ESU11795 3. 1 Adjusting the engine idling speed (RST90) 1. 2. Start the engine and warm it forward, away from the threads and tighten the spark plug to the specified torque. Turn the throttle stop screw 1. NOTICE Make sure that the spark plug caps are securely...
... the headlight unit bolt on a level surface and apply the parking brake. NOTICE: Be careful not to adjust the engine idling speed. 4. Headlight unit Standard engine idling speed: 1300-1500 r/min 5. ESU11795 3. 1 Adjusting the engine idling speed (RST90) 1. 2. Start the engine and warm it forward, away from the threads and tighten the spark plug to the specified torque. Turn the throttle stop screw 1. NOTICE Make sure that the spark plug caps are securely...

Owners Manual
Page 79
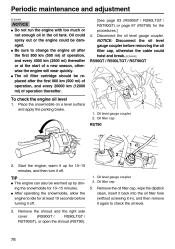
... parking brake. Periodic maintenance and adjustment RS90GT / RS90LTGT 1. 2. Remove the shroud, the left and right side covers, and the top cover. (See page 63 for the clutch engagement speed.) WARNING! Place the snowmobile on the riding conditions. 5. Throttle lever Unhook the headlight unit as shown, then lift it up and move it rearward, away from the air filter case cover. Operating the snowmobile with a malfunctioning T.O.R.S. Engine...
... parking brake. Periodic maintenance and adjustment RS90GT / RS90LTGT 1. 2. Remove the shroud, the left and right side covers, and the top cover. (See page 63 for the clutch engagement speed.) WARNING! Place the snowmobile on the riding conditions. 5. Throttle lever Unhook the headlight unit as shown, then lift it up and move it rearward, away from the air filter case cover. Operating the snowmobile with a malfunctioning T.O.R.S. Engine...
Owners Manual
Page 82
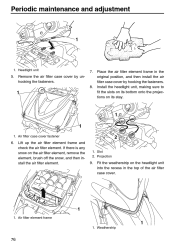
.... 9. Projection 6. Lift up the air filter element frame and check the air filter element. Remove the air filter case cover by unhooking the fasteners. 8. 1 Place the air filter element frame in the top of the air filter case cover. 1 1. Air filter case cover fastener 2 1. Weatherstrip 76 Slot 2. Air filter element frame 1 1. Periodic maintenance and adjustment 1 1. If there is any snow on its stay. 1 1 1. Fit the weatherstrip on the headlight unit...
.... 9. Projection 6. Lift up the air filter element frame and check the air filter element. Remove the air filter case cover by unhooking the fasteners. 8. 1 Place the air filter element frame in the top of the air filter case cover. 1 1. Air filter case cover fastener 2 1. Weatherstrip 76 Slot 2. Air filter element frame 1 1. Periodic maintenance and adjustment 1 1. If there is any snow on its stay. 1 1 1. Fit the weatherstrip on the headlight unit...
Owners Manual
Page 84
.... NOTICE: Disconnect the oil level gauge coupler before turning it off . RST90 2. Oil filler cap TIP G 5. The oil filter cartridge should be warmed up for at the start of operation thereafter. [See page 63 (RS90GT / RS90LTGT / RST90GT) or page 67 (RST90) for 10-15 minutes. Start the engine, warm it off . Oil level gauge coupler 2. The engine can also be replaced after the first...
.... NOTICE: Disconnect the oil level gauge coupler before turning it off . RST90 2. Oil filler cap TIP G 5. The oil filter cartridge should be warmed up for at the start of operation thereafter. [See page 63 (RS90GT / RS90LTGT / RST90GT) or page 67 (RST90) for 10-15 minutes. Start the engine, warm it off . Oil level gauge coupler 2. The engine can also be replaced after the first...
Owners Manual
Page 115
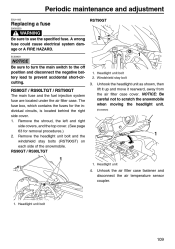
... fuse. Unhook the air filter case fastener and disconnect the air temperature sensor coupler. 1. Windshield stay bolt 3. Periodic maintenance and adjustment ESU14192 Replacing a fuse EWS00550 RST90GT WARNING Be sure to scratch the snowmobile when moving the headlight unit. [ECS00920] 1 1 1. The fuse box, which contains the fuses for removal procedures.) 2. ECS00631 2 1 NOTICE Be sure to turn the main switch to the off position and disconnect the negative battery...
... fuse. Unhook the air filter case fastener and disconnect the air temperature sensor coupler. 1. Windshield stay bolt 3. Periodic maintenance and adjustment ESU14192 Replacing a fuse EWS00550 RST90GT WARNING Be sure to scratch the snowmobile when moving the headlight unit. [ECS00920] 1 1 1. The fuse box, which contains the fuses for removal procedures.) 2. ECS00631 2 1 NOTICE Be sure to turn the main switch to the off position and disconnect the negative battery...
Owners Manual
Page 117
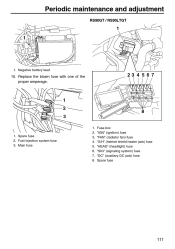
Negative battery lead 10. Spare fuse 2. Main fuse 1. 2. 3. 4. 5. 6. 7. 8. Fuel injection system fuse 3. Fuse box "IGN" (ignition) fuse "FAN" (radiator fan) fuse "S/H" (helmet shield heater jack) fuse "HEAD" (headlight) fuse "SIG" (signaling system) fuse "DC" (auxiliary DC jack) fuse Spare fuse 111 Replace the blown fuse with one of the proper amperage. 23 4 5 6 7 8 1. Periodic maintenance and adjustment RS90GT / RS90LTGT 1 1 1.
Negative battery lead 10. Spare fuse 2. Main fuse 1. 2. 3. 4. 5. 6. 7. 8. Fuel injection system fuse 3. Fuse box "IGN" (ignition) fuse "FAN" (radiator fan) fuse "S/H" (helmet shield heater jack) fuse "HEAD" (headlight) fuse "SIG" (signaling system) fuse "DC" (auxiliary DC jack) fuse Spare fuse 111 Replace the blown fuse with one of the proper amperage. 23 4 5 6 7 8 1. Periodic maintenance and adjustment RS90GT / RS90LTGT 1 1 1.
Owners Manual
Page 118
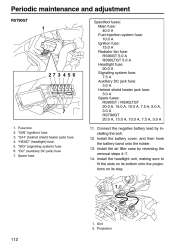
Install the air filter case by installing the bolt. 12. Install the battery cover, and then hook the battery band onto the holder. 13. Slot 2. Projection 112 Periodic maintenance and adjustment RST90GT 1 27 3 4 5 6 7 Specified fuses: Main fuse: 40.0 A Fuel injection system fuse: 10.0 A Ignition fuse: 15.0 A Radiator fan fuse: RS90GT 5.0 A RS90LTGT 5.0 A Headlight fuse: 20.0 A Signaling system fuse: 7.5 A Auxiliary DC jack fuse: 3.0 A Helmet shield heater jack fuse: 3.0 A Spare fuses: RS90GT / RS90LTGT 20.0 A, 15.0 A, 10.0 A, 7.5 A, 5.0 A, 3.0 A RST90GT 20.0 A, 15.0 A, 10...
Install the air filter case by installing the bolt. 12. Install the battery cover, and then hook the battery band onto the holder. 13. Slot 2. Projection 112 Periodic maintenance and adjustment RST90GT 1 27 3 4 5 6 7 Specified fuses: Main fuse: 40.0 A Fuel injection system fuse: 10.0 A Ignition fuse: 15.0 A Radiator fan fuse: RS90GT 5.0 A RS90LTGT 5.0 A Headlight fuse: 20.0 A Signaling system fuse: 7.5 A Auxiliary DC jack fuse: 3.0 A Helmet shield heater jack fuse: 3.0 A Spare fuses: RS90GT / RS90LTGT 20.0 A, 15.0 A, 10.0 A, 7.5 A, 5.0 A, 3.0 A RST90GT 20.0 A, 15.0 A, 10...
Owners Manual
Page 120
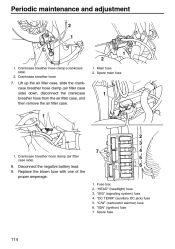
... battery lead. Spare main fuse 7. Lift up the air filter case, slide the crankcase breather hose clamp (air filter case side) down, disconnect the crankcase breather hose from the air filter case, and then remove the air filter case. 1 2 3 7 1. Crankcase breather hose clamp (air filter case side) 4 5 6 8. 9. Fuse box "HEAD" (headlight) fuse "SIG" (signaling system) fuse "DC TERM" (auxiliary DC jack) fuse "C/W" (carburetor warmer) fuse "IGN" (ignition) fuse Spare fuse 114 Crankcase breather hose clamp (crankcase side) 2. Periodic maintenance...
... battery lead. Spare main fuse 7. Lift up the air filter case, slide the crankcase breather hose clamp (air filter case side) down, disconnect the crankcase breather hose from the air filter case, and then remove the air filter case. 1 2 3 7 1. Crankcase breather hose clamp (air filter case side) 4 5 6 8. 9. Fuse box "HEAD" (headlight) fuse "SIG" (signaling system) fuse "DC TERM" (auxiliary DC jack) fuse "C/W" (carburetor warmer) fuse "IGN" (ignition) fuse Spare fuse 114 Crankcase breather hose clamp (crankcase side) 2. Periodic maintenance...
Owners Manual
Page 121
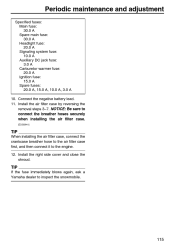
... then connect it to inspect the snowmobile. 115 TIP If the fuse immediately blows again, ask a Yamaha dealer to the engine. 12. Install the air filter case by reversing the removal steps 3-7. Periodic maintenance and adjustment Specified fuses: Main fuse: 30.0 A Spare main fuse: 30.0 A Headlight fuse: 20.0 A Signaling system fuse: 10.0 A Auxiliary DC jack fuse: 3.0 A Carburetor warmer fuse: 20.0 A Ignition fuse: 15.0 A Spare fuses: 20.0 A, 15.0 A, 10.0 A, 3.0 A 10.
... then connect it to inspect the snowmobile. 115 TIP If the fuse immediately blows again, ask a Yamaha dealer to the engine. 12. Install the air filter case by reversing the removal steps 3-7. Periodic maintenance and adjustment Specified fuses: Main fuse: 30.0 A Spare main fuse: 30.0 A Headlight fuse: 20.0 A Signaling system fuse: 10.0 A Auxiliary DC jack fuse: 3.0 A Carburetor warmer fuse: 20.0 A Ignition fuse: 15.0 A Spare fuses: 20.0 A, 15.0 A, 10.0 A, 3.0 A 10.
Owners Manual
Page 126
... Yamaha Fuel Stabilizer and Conditioner, or an equivalent stabilizer, to the fuel tank to help prevent fuel oxidation and gum and varnish deposits, and to guard against deterioration. Some cleaning compounds for water to remove the intake silencer (RS90GT / RS90LTGT / RST90GT) or air filter case (RST90), and squirt oil into the throttle bodies 120 Engine Proper storage of the windshield to internal engine components. Use Yamaha Stor-Rite Engine Fogging Oil...
... Yamaha Fuel Stabilizer and Conditioner, or an equivalent stabilizer, to the fuel tank to help prevent fuel oxidation and gum and varnish deposits, and to guard against deterioration. Some cleaning compounds for water to remove the intake silencer (RS90GT / RS90LTGT / RST90GT) or air filter case (RST90), and squirt oil into the throttle bodies 120 Engine Proper storage of the windshield to internal engine components. Use Yamaha Stor-Rite Engine Fogging Oil...

Owners Manual
Page 133
... or routine maintenance including oil, spark plugs, clutch drive belts, slide runners, and track. Operation on surfaces other than snow or ice. 3. Lack of time stated herein, subject to faulty workmanship or material from the date of Yamaha Motor Corporation, U.S.A. An inspection and registration fee will , free of charge, repair or replace, at the time of each 2006 and later model Yamaha snowmobile covered by Yamaha due...
... or routine maintenance including oil, spark plugs, clutch drive belts, slide runners, and track. Operation on surfaces other than snow or ice. 3. Lack of time stated herein, subject to faulty workmanship or material from the date of Yamaha Motor Corporation, U.S.A. An inspection and registration fee will , free of charge, repair or replace, at the time of each 2006 and later model Yamaha snowmobile covered by Yamaha due...

Owners Manual
Page 135
... to : 1. In addition, each manufacturer of a motor vehicle to maintain a complete, up every new machine before sale. 2. Q. If the dealer is not able to do so, he is expected to contact Yamaha Motor Corporation, U.S.A., for his setup, service and warranty repair work. If a question or problem arises regarding warranty, first contact the owner of all warranty matters are still not satisfied and require...
... to : 1. In addition, each manufacturer of a motor vehicle to maintain a complete, up every new machine before sale. 2. Q. If the dealer is not able to do so, he is expected to contact Yamaha Motor Corporation, U.S.A., for his setup, service and warranty repair work. If a question or problem arises regarding warranty, first contact the owner of all warranty matters are still not satisfied and require...