

Owners Manual
Page 7
... control system ...6-3 General maintenance and lubrication chart ...6-4 Checking the spark plugs ...6-8 Canister (for California only) ...6-9 Engine oil and oil filter cartridge ...6-9 Transfer case oil ...6-12 Air filter element ...6-13 Checking the throttle cable free play ...6-13 Valve clearance ...6-13 Tires ...6-14 Cast wheels ...6-15 Accessories and replacement parts ...6-16 Clutch lever ...6-16 Adjusting the rear brake light switch ...6-17 Checking the front and rear brake pads ...6-17 Checking the brake and clutch fluid levels ...6-18 Changing the brake and clutch fluids ...6-19 Drive...
... control system ...6-3 General maintenance and lubrication chart ...6-4 Checking the spark plugs ...6-8 Canister (for California only) ...6-9 Engine oil and oil filter cartridge ...6-9 Transfer case oil ...6-12 Air filter element ...6-13 Checking the throttle cable free play ...6-13 Valve clearance ...6-13 Tires ...6-14 Cast wheels ...6-15 Accessories and replacement parts ...6-16 Clutch lever ...6-16 Adjusting the rear brake light switch ...6-17 Checking the front and rear brake pads ...6-17 Checking the brake and clutch fluid levels ...6-18 Changing the brake and clutch fluids ...6-19 Drive...
Owners Manual
Page 11
... operator, passenger, accessories and cargo must personally be responsible for use of non-Yamaha accessories. Make sure to distribute the weight as evenly as possible on this weight limit, keep the following guidelines in any way reduce ground clearance or cornering clearance, limit suspension travel, steering travel or control operation, or obscure lights or reflectors. • Accessories fitted to aerodynamic effects. G Shifting weights can...
... operator, passenger, accessories and cargo must personally be responsible for use of non-Yamaha accessories. Make sure to distribute the weight as evenly as possible on this weight limit, keep the following guidelines in any way reduce ground clearance or cornering clearance, limit suspension travel, steering travel or control operation, or obscure lights or reflectors. • Accessories fitted to aerodynamic effects. G Shifting weights can...
Owners Manual
Page 12
... to spill any length of the fuel tank. Use caution when adding electrical accessories. If any gasoline, inhale a lot of an open flame), otherwise it may limit control ability, therefore, such accessories are poisonous and may leak out of time in another vehicle, make sure that has adequate ventilation. G 1 G Gasoline and exhaust gas G GASOLINE IS HIGHLY FLAMMABLE: • Always turn the engine off when...
... to spill any length of the fuel tank. Use caution when adding electrical accessories. If any gasoline, inhale a lot of an open flame), otherwise it may limit control ability, therefore, such accessories are poisonous and may leak out of time in another vehicle, make sure that has adequate ventilation. G 1 G Gasoline and exhaust gas G GASOLINE IS HIGHLY FLAMMABLE: • Always turn the engine off when...
Owners Manual
Page 19
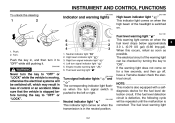
... may result in , and then turn the key to "OFF" or "LOCK" while the vehicle is stopped before turning the key to the left or right. INSTRUMENT AND CONTROL FUNCTIONS To unlock the steering EAU11003 EAU11080 Indicator and warning lights High beam indicator light " " This indicator light comes on when the high beam of the headlight is switched on when the fuel level drops below approximately...
... may result in , and then turn the key to "OFF" or "LOCK" while the vehicle is stopped before turning the key to the left or right. INSTRUMENT AND CONTROL FUNCTIONS To unlock the steering EAU11003 EAU11080 Indicator and warning lights High beam indicator light " " This indicator light comes on when the high beam of the headlight is switched on when the fuel level drops below approximately...

Owners Manual
Page 25
... manually by pushing the switch in either light, otherwise the headlight fuse may blow or the battery may discharge. 3-8 CAUTION: Do not install a bulb which exceeds 12 V, 35 W in after the vehicle has traveled both about 150 m (490 ft) and for approximately 15 seconds. ECA10050 Turn signal switch " / " To signal a right-hand turn the optional lights on when the key is turned to "ON" and the start switch...
... manually by pushing the switch in either light, otherwise the headlight fuse may blow or the battery may discharge. 3-8 CAUTION: Do not install a bulb which exceeds 12 V, 35 W in after the vehicle has traveled both about 150 m (490 ft) and for approximately 15 seconds. ECA10050 Turn signal switch " / " To signal a right-hand turn the optional lights on when the key is turned to "ON" and the start switch...
Owners Manual
Page 29
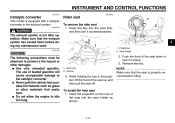
... precautions must be observed to lock it counterclockwise. G Do not allow the engine to the catalytic converter. Seat lock 2. While holding the key in the exhaust system. Insert the key into the seat holder as grass or other damages. WARNING The exhaust system is properly secured before doing any maintenance work. Make sure that the exhaust system has cooled down to prevent a fire hazard or other materials...
... precautions must be observed to lock it counterclockwise. G Do not allow the engine to the catalytic converter. Seat lock 2. While holding the key in the exhaust system. Insert the key into the seat holder as grass or other damages. WARNING The exhaust system is properly secured before doing any maintenance work. Make sure that the exhaust system has cooled down to prevent a fire hazard or other materials...
Owners Manual
Page 37
... locknut to an open the gas cylinder. ECA10191 WARNING This shock absorber contains highly pressurized nitrogen gas. The manufacturer cannot be heard when the main switch is turned on, have a Yamaha dealer service the shock absorber. Changing these settings without sufficient technical knowledge may result from improper handling. This system boosts engine power by a computer-controlled servomotor. G Do not subject the shock absorber to the specified torque...
... locknut to an open the gas cylinder. ECA10191 WARNING This shock absorber contains highly pressurized nitrogen gas. The manufacturer cannot be heard when the main switch is turned on, have a Yamaha dealer service the shock absorber. Changing these settings without sufficient technical knowledge may result from improper handling. This system boosts engine power by a computer-controlled servomotor. G Do not subject the shock absorber to the specified torque...
Owners Manual
Page 44
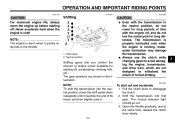
... preserve the battery. Shift the transmission into the neutral position. Each starting out, make sure that the sidestand is set to "ON" and make sure that the engine stop switch is up . Turn the key to " ". Do not crank the engine more than 10 seconds on , otherwise have a Yamaha dealer check the electrical circuit. 3. Before starting attempt should be on any length of consciousness...
... preserve the battery. Shift the transmission into the neutral position. Each starting out, make sure that the sidestand is set to "ON" and make sure that the engine stop switch is up . Turn the key to " ". Do not crank the engine more than 10 seconds on , otherwise have a Yamaha dealer check the electrical circuit. 3. Before starting attempt should be on any length of consciousness...
Owners Manual
Page 45
... the engine, transmission, and drive train, which are shown in the neutral position, do not coast for long periods of engine power available for long distances. NOTE: To shift the transmission into first gear. Inadequate lubrication may damage the transmission. EAU16680 5 To start out and accelerate 1. Open the throttle gradually, and at the same time, release the clutch lever slowly. 5-2 Shifting CAUTION: G 1. Always use the clutch while changing gears...
... the engine, transmission, and drive train, which are shown in the neutral position, do not coast for long periods of engine power available for long distances. NOTE: To shift the transmission into first gear. Inadequate lubrication may damage the transmission. EAU16680 5 To start out and accelerate 1. Open the throttle gradually, and at the same time, release the clutch lever slowly. 5-2 Shifting CAUTION: G 1. Always use the clutch while changing gears...
Owners Manual
Page 54
... the brake or clutch master cylinders, caliper cylinders or clutch release cylinder, always change the fluid. Regularly check the brake and clutch fluid levels and fill the reservoirs as required. • Replace the oil seals on the inner parts of the brake or clutch master cylinders, caliper cylinders and clutch release cylinder every two years. • Replace the brake and clutch hoses every four years or if cracked or damaged. 6-7 EAU38440 6 NOTE: G Air filter • This model's air filter is...
... the brake or clutch master cylinders, caliper cylinders or clutch release cylinder, always change the fluid. Regularly check the brake and clutch fluid levels and fill the reservoirs as required. • Replace the oil seals on the inner parts of the brake or clutch master cylinders, caliper cylinders and clutch release cylinder every two years. • Replace the brake and clutch hoses every four years or if cracked or damaged. 6-7 EAU38440 6 NOTE: G Air filter • This model's air filter is...
Owners Manual
Page 55
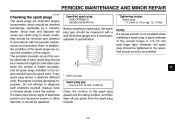
... finger tight. Spark plug gap Spark plug gap: 0.8-0.9 mm (0.031-0.035 in) Clean the surface of the engine. PERIODIC MAINTENANCE AND MINOR REPAIR EAU19642 Checking the spark plugs The spark plugs are important engine components, which should be a medium-to-light tan (the ideal color when the vehicle is ridden normally), and all spark plugs installed in accordance with a wire thickness gauge and, if necessary, adjusted to specification. NOTE: If...
... finger tight. Spark plug gap Spark plug gap: 0.8-0.9 mm (0.031-0.035 in) Clean the surface of the engine. PERIODIC MAINTENANCE AND MINOR REPAIR EAU19642 Checking the spark plugs The spark plugs are important engine components, which should be a medium-to-light tan (the ideal color when the vehicle is ridden normally), and all spark plugs installed in accordance with a wire thickness gauge and, if necessary, adjusted to specification. NOTE: If...
Owners Manual
Page 59
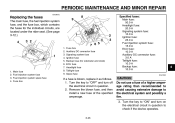
.... Remove the engine oil filler cap, and then gradually fill the oil tank with a diesel specification of "CD" or oils of recommended engine oil through the filler hole, insert the dipstick, and then tighten the oil filler cap. 12. Recommended engine oil: See page 8-1. If any chemical additives. Start the engine, and then let it idle for several times, and then turn the engine off . 13. PERIODIC MAINTENANCE AND MINOR REPAIR 11...
.... Remove the engine oil filler cap, and then gradually fill the oil tank with a diesel specification of "CD" or oils of recommended engine oil through the filler hole, insert the dipstick, and then tighten the oil filler cap. 12. Recommended engine oil: See page 8-1. If any chemical additives. Start the engine, and then let it idle for several times, and then turn the engine off . 13. PERIODIC MAINTENANCE AND MINOR REPAIR 11...

Owners Manual
Page 64
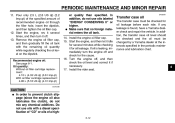
... in the periodic maintenance and lubrication chart. Turn the adjusting nut while holding the rear brake light switch in ), have a Yamaha dealer replace the brake pads as follows. Lining thickness 1. If a brake pad has worn to disassemble the brake. EAU22500 Rear brake pads Front brake pads 1. If necessary, adjust the brake light switch as a set . 6-17 To make the brake light come on earlier, turn the adjusting nut in direction (a). If a brake pad is damaged or...
... in the periodic maintenance and lubrication chart. Turn the adjusting nut while holding the rear brake light switch in ), have a Yamaha dealer replace the brake pads as follows. Lining thickness 1. If a brake pad has worn to disassemble the brake. EAU22500 Rear brake pads Front brake pads 1. If necessary, adjust the brake light switch as a set . 6-17 To make the brake light come on earlier, turn the adjusting nut in direction (a). If a brake pad is damaged or...
Owners Manual
Page 73
... Turn the key to the electrical system and possibly a fire. 3. PERIODIC MAINTENANCE AND MINOR REPAIR EAU38372 Replacing the fuses The main fuse, the fuel injection system fuse, and the fuse box, which contains the fuses for odometer and clock) ECU fuse Headlight fuse Taillight fuse Spare fuse Specified fuses: Main fuse: 50.0 A Headlight fuse: 20.0 A Signaling system fuse: 10.0 A Ignition fuse: 25.0 A Fuel injection system fuse: 15.0 A ECU fuse: 10.0 A Auxiliary DC connector fuse: 3.0 A Taillight fuse: 10.0 A Backup fuse: 10.0 A ECA10640 6 If a fuse...
... Turn the key to the electrical system and possibly a fire. 3. PERIODIC MAINTENANCE AND MINOR REPAIR EAU38372 Replacing the fuses The main fuse, the fuel injection system fuse, and the fuse box, which contains the fuses for odometer and clock) ECU fuse Headlight fuse Taillight fuse Spare fuse Specified fuses: Main fuse: 50.0 A Headlight fuse: 20.0 A Signaling system fuse: 10.0 A Ignition fuse: 25.0 A Fuel injection system fuse: 15.0 A ECU fuse: 10.0 A Auxiliary DC connector fuse: 3.0 A Taillight fuse: 10.0 A Backup fuse: 10.0 A ECA10640 6 If a fuse...
Owners Manual
Page 85
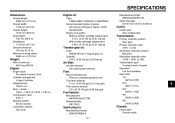
... qt) (0.48 Imp.qt) Weight: With oil and fuel: 364.0 kg (802 lb) Air filter: Air filter element: Oil-coated paper element Engine: Engine type: Air cooled 4-stroke, OHV Cylinder arrangement: V-type 2-cylinder Displacement: 1854.0 cm³ Bore × stroke: 100.0 × 118.0 mm (3.94 × 4.65 in) Compression ratio: 9.48 :1 Starting system: Electric starter Lubrication system: Dry sump Fuel: Recommended fuel: Premium unleaded gasoline only Fuel tank capacity: 17.0 L (4.49 US...
... qt) (0.48 Imp.qt) Weight: With oil and fuel: 364.0 kg (802 lb) Air filter: Air filter element: Oil-coated paper element Engine: Engine type: Air cooled 4-stroke, OHV Cylinder arrangement: V-type 2-cylinder Displacement: 1854.0 cm³ Bore × stroke: 100.0 × 118.0 mm (3.94 × 4.65 in) Compression ratio: 9.48 :1 Starting system: Electric starter Lubrication system: Dry sump Fuel: Recommended fuel: Premium unleaded gasoline only Fuel tank capacity: 17.0 L (4.49 US...

Owners Manual
Page 86
... (link suspension) Spring/shock absorber type: Coil spring/gas-oil damper Wheel travel: 110.0 mm (4.33 in) Front wheel: Wheel type: Cast wheel Rim size: 18M/C x MT4.00 Rear tire: Type: Tubeless Size: 190/60R17M/C 78H Manufacturer/model: DUNLOP/D251 Manufacturer/model: BRIDGESTONE/G850 RADIAL G Rear wheel: Wheel type: Cast wheel Rim size: 17M/C x MT5.50 Electrical system: Ignition system: Transistorized coil ignition (digital) Charging system: AC magneto Front brake: Type: Dual disc brake Operation: Right hand operation Recommended fluid: DOT 4 Battery: Model...
... (link suspension) Spring/shock absorber type: Coil spring/gas-oil damper Wheel travel: 110.0 mm (4.33 in) Front wheel: Wheel type: Cast wheel Rim size: 18M/C x MT4.00 Rear tire: Type: Tubeless Size: 190/60R17M/C 78H Manufacturer/model: DUNLOP/D251 Manufacturer/model: BRIDGESTONE/G850 RADIAL G Rear wheel: Wheel type: Cast wheel Rim size: 17M/C x MT5.50 Electrical system: Ignition system: Transistorized coil ignition (digital) Charging system: AC magneto Front brake: Type: Dual disc brake Operation: Right hand operation Recommended fluid: DOT 4 Battery: Model...
Owners Manual
Page 87
SPECIFICATIONS Front turn signal/position light: 12 V, 23 W/8.0 W × 2 Rear turn signal light: 12 V, 21.0 W × 2 License plate light: 12 V, 5.0 W Meter lighting: LED Neutral indicator light: LED High beam indicator light: LED Turn signal indicator light: LED Fuel level warning light: LED Engine trouble warning light: LED Auxiliary DC connector fuse: 3.0 A Backup fuse: 10.0 A Fuses: Main fuse: 50.0 A Headlight fuse: 20.0 A Taillight fuse: 10.0 A Signaling system fuse: 10.0 A Ignition fuse: 25.0 A ECU fuse: 10.0 A Fuel injection system fuse: 15.0 A 8 8-3
SPECIFICATIONS Front turn signal/position light: 12 V, 23 W/8.0 W × 2 Rear turn signal light: 12 V, 21.0 W × 2 License plate light: 12 V, 5.0 W Meter lighting: LED Neutral indicator light: LED High beam indicator light: LED Turn signal indicator light: LED Fuel level warning light: LED Engine trouble warning light: LED Auxiliary DC connector fuse: 3.0 A Backup fuse: 10.0 A Fuses: Main fuse: 50.0 A Headlight fuse: 20.0 A Taillight fuse: 10.0 A Signaling system fuse: 10.0 A Ignition fuse: 25.0 A ECU fuse: 10.0 A Fuel injection system fuse: 15.0 A 8 8-3
Owners Manual
Page 94
... warranty repairs will , free of Yamaha Motor Corporation, U.S.A. THE CUSTOMER'S RESPONSIBILITY under warranty become property of charge, repair or replace any part adjudged defective by : a) Competition or racing use. In order for non-Yamaha-authorized renting, leasing or other than those resulting from this warranty shall be warranted for inspection and repairs at the time of proper maintenance. EMISSION CONTROL SYSTEM WARRANTY: Yamaha Motor Corporation, U.S.A. ALL IMPLIED WARRANTIES...
... warranty repairs will , free of Yamaha Motor Corporation, U.S.A. THE CUSTOMER'S RESPONSIBILITY under warranty become property of charge, repair or replace any part adjudged defective by : a) Competition or racing use. In order for non-Yamaha-authorized renting, leasing or other than those resulting from this warranty shall be warranted for inspection and repairs at the time of proper maintenance. EMISSION CONTROL SYSTEM WARRANTY: Yamaha Motor Corporation, U.S.A. ALL IMPLIED WARRANTIES...
Owners Manual
Page 95
... my new motorcycle exactly as it to Yamaha Motor Corporation, U.S.A. CUSTOMER RELATIONS DEPARTMENT P.O. Box 6555 Cypress, California 90630 When contacting Yamaha Motor Corporation, U.S.A., don't forget to repair of normal maintenance services, non-warranty repairs, accident and collision damages, and oil, oil filters, air filters, spark plugs, and brake shoes. by the selling dealer at the time of the existing warranty can be covered under this person is limited to include...
... my new motorcycle exactly as it to Yamaha Motor Corporation, U.S.A. CUSTOMER RELATIONS DEPARTMENT P.O. Box 6555 Cypress, California 90630 When contacting Yamaha Motor Corporation, U.S.A., don't forget to repair of normal maintenance services, non-warranty repairs, accident and collision damages, and oil, oil filters, air filters, spark plugs, and brake shoes. by the selling dealer at the time of the existing warranty can be covered under this person is limited to include...

Owners Manual
Page 98
... and replacement parts...6-16 Air filter element ...6-13 Auxiliary DC connector ...3-23 Fuel level warning light ...3-2 Fuel tank cap ...3-10 Fuses, replacing ...6-26 Part locations ...2-1 Passenger backrest ...3-13 Pre-operation check list...4-2 H Handlebar switches ...3-7 Headlight bulb, replacing ...6-27 Helmet holder ...3-14 High beam indicator light ...3-2 Horn switch...3-8 R Rear brake light switch, adjusting ...6-17 Rear suspension, lubricating...6-22 Rider seat...3-12 B Battery...6-24 Brake and clutch fluid levels, checking ...6-18 Brake and clutch fluids, changing ...6-19 Brake and...
... and replacement parts...6-16 Air filter element ...6-13 Auxiliary DC connector ...3-23 Fuel level warning light ...3-2 Fuel tank cap ...3-10 Fuses, replacing ...6-26 Part locations ...2-1 Passenger backrest ...3-13 Pre-operation check list...4-2 H Handlebar switches ...3-7 Headlight bulb, replacing ...6-27 Helmet holder ...3-14 High beam indicator light ...3-2 Horn switch...3-8 R Rear brake light switch, adjusting ...6-17 Rear suspension, lubricating...6-22 Rider seat...3-12 B Battery...6-24 Brake and clutch fluid levels, checking ...6-18 Brake and clutch fluids, changing ...6-19 Brake and...