
Owners Manual
Page 6
......3-1 Controls and instruments ...3-2 INSTRUMENT AND CONTROL FUNCTIONS ...4-1 Main switch ...4-1 Indicator lights and warning light ...4-2 Handlebar switches ...4-3 Throttle lever ...4-4 Speed limiter ...4-4 Front brake lever ...4-5 Brake pedal and rear brake lever ...4-6 Parking brake ...4-7 Drive select lever ...4-7 Recoil starter ...4-8 Fuel tank cap ...4-9 Fuel ...4-9 Fuel cock ...4-10 Starter (choke) ...4-12 Seat ...4-12 Storage compartment ...4-13 Front carrier ...4-14 Rear carrier ...4-14 Adjusting the front shock absorber assemblies ...4-15 Adjusting the rear shock absorber assembly...
......3-1 Controls and instruments ...3-2 INSTRUMENT AND CONTROL FUNCTIONS ...4-1 Main switch ...4-1 Indicator lights and warning light ...4-2 Handlebar switches ...4-3 Throttle lever ...4-4 Speed limiter ...4-4 Front brake lever ...4-5 Brake pedal and rear brake lever ...4-6 Parking brake ...4-7 Drive select lever ...4-7 Recoil starter ...4-8 Fuel tank cap ...4-9 Fuel ...4-9 Fuel cock ...4-10 Starter (choke) ...4-12 Seat ...4-12 Storage compartment ...4-13 Front carrier ...4-14 Rear carrier ...4-14 Adjusting the front shock absorber assemblies ...4-15 Adjusting the rear shock absorber assembly...
Owners Manual
Page 7
... PERIODIC MAINTENANCE AND MINOR REPAIR ...8-1 Owner's manual and tool kit ...8-1 Periodic maintenance chart for the emission control system ...8-3 General maintenance and lubrication chart ...8-5 Removing and installing the panel ...8-8 Checking the spark plug ...8-9 Engine oil and oil filter cartridge ...8-11 Final gear oil ...8-15 Cleaning the air filter element ...8-17 Cleaning the spark arrester ...8-21 V-belt cooling duct check hose ...8-22 V-belt case drain plug ...8-22 Adjusting the carburetor ...8-23 Adjusting the engine idling speed ...8-23 Adjusting the throttle cable...
... PERIODIC MAINTENANCE AND MINOR REPAIR ...8-1 Owner's manual and tool kit ...8-1 Periodic maintenance chart for the emission control system ...8-3 General maintenance and lubrication chart ...8-5 Removing and installing the panel ...8-8 Checking the spark plug ...8-9 Engine oil and oil filter cartridge ...8-11 Final gear oil ...8-15 Cleaning the air filter element ...8-17 Cleaning the spark arrester ...8-21 V-belt cooling duct check hose ...8-22 V-belt case drain plug ...8-22 Adjusting the carburetor ...8-23 Adjusting the engine idling speed ...8-23 Adjusting the throttle cable...
Owners Manual
Page 8
... the upper and lower arm pivots ...8-34 Lubricating the knuckle shafts ...8-34 Lubricating the steering shaft ...8-34 Battery ...8-34 Replacing a fuse ...8-36 Replacing a headlight bulb ...8-38 Adjusting a headlight beam ...8-40 Replacing the tail/brake light bulb ...8-40 Removing a wheel ...8-40 Installing a wheel ...8-41 Troubleshooting ...8-42 Troubleshooting chart ...8-44 CLEANING AND STORAGE ...9-1 Cleaning ...9-1 Storage ...9-2 SPECIFICATIONS ...10-1 CONSUMER INFORMATION...11-1 Identification numbers ...11-1 Noise regulation ...11-3 Maintenance record ...11-4 YAMAHA MOTOR CORPORATION...
... the upper and lower arm pivots ...8-34 Lubricating the knuckle shafts ...8-34 Lubricating the steering shaft ...8-34 Battery ...8-34 Replacing a fuse ...8-36 Replacing a headlight bulb ...8-38 Adjusting a headlight beam ...8-40 Replacing the tail/brake light bulb ...8-40 Removing a wheel ...8-40 Installing a wheel ...8-41 Troubleshooting ...8-42 Troubleshooting chart ...8-44 CLEANING AND STORAGE ...9-1 Cleaning ...9-1 Storage ...9-2 SPECIFICATIONS ...10-1 CONSUMER INFORMATION...11-1 Identification numbers ...11-1 Noise regulation ...11-3 Maintenance record ...11-4 YAMAHA MOTOR CORPORATION...

Owners Manual
Page 10
... to make sure it to control the ATV on smaller hills before attempting to turn at high speed. Shift your weight to changing terrain conditions when operating the ATV. Always...time you stall or 1-2 Shift your weight backward. Always follow the inspection and maintenance procedures and schedules described in this manual. Always be extra careful when operating on these kinds of a steep hill if possible. Practice turning at low speeds before attempting larger hills. Practice on such terrain. Maintain a steady speed when climbing a hill. Shift your weight...
... to make sure it to control the ATV on smaller hills before attempting to turn at high speed. Shift your weight to changing terrain conditions when operating the ATV. Always...time you stall or 1-2 Shift your weight backward. Always follow the inspection and maintenance procedures and schedules described in this manual. Always be extra careful when operating on these kinds of a steep hill if possible. Practice turning at low speeds before attempting larger hills. Practice on such terrain. Maintain a steady speed when climbing a hill. Shift your weight...
Owners Manual
Page 18
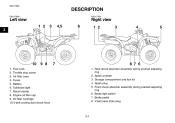
Fuses 5. Battery 6. Recoil starter 8. Spark plug 5. V-belt case drain plug 3-1 Throttle stop screw 3. Air filter case 4. Spark arrester 3. Front shock absorber assembly spring preload adjusting ring 6. EBU17680 DESCRIPTION EBU17690 EBU17700 Left view 3 Right view 1. Oil filter cartridge 10.V-belt cooling duct check hose 1. Engine oil filler cap 9. Tail/brake light 7. Rear shock absorber assembly spring preload adjusting ring 2. Brake pedal 8. Storage compartment and tool kit 4. Brake light switch 7. Fuel cock 2.
Fuses 5. Battery 6. Recoil starter 8. Spark plug 5. V-belt case drain plug 3-1 Throttle stop screw 3. Air filter case 4. Spark arrester 3. Front shock absorber assembly spring preload adjusting ring 6. EBU17680 DESCRIPTION EBU17690 EBU17700 Left view 3 Right view 1. Oil filter cartridge 10.V-belt cooling duct check hose 1. Engine oil filler cap 9. Tail/brake light 7. Rear shock absorber assembly spring preload adjusting ring 2. Brake pedal 8. Storage compartment and tool kit 4. Brake light switch 7. Fuel cock 2.
Owners Manual
Page 22
... taillight. Engine stop switch controls the ignition and stops the engine when it . 4-3 Set the switch to "OFF" to " ". Set the switch to " " to " " before starting the engine. 4 EBU18151 1. Start switch " " EBU18080 /OFF" / " Light switch " / /OFF" Set this switch to turn off for an extended period of time, otherwise the battery may discharge to the point that the starter motor will not start or run when this switch is running. Light switch " / 2. The engine stop switch " 3. The engine will...
... taillight. Engine stop switch controls the ignition and stops the engine when it . 4-3 Set the switch to "OFF" to " ". Set the switch to " " to " " before starting the engine. 4 EBU18151 1. Start switch " " EBU18080 /OFF" / " Light switch " / /OFF" Set this switch to turn off for an extended period of time, otherwise the battery may discharge to the point that the starter motor will not start or run when this switch is running. Light switch " / 2. The engine stop switch " 3. The engine will...
Owners Manual
Page 40
... brakes at the start of the throttle lever. If a problem cannot be a leak in this manual, have a Yamaha dealer check for the cause. If the brakes do not provide proper braking performance, check the brake pads and shoes for one minute. It must open smoothly and spring back to make sure they are working properly. If there is any brake fluid is leaking out of the hose, joint or brake fluid...
... brakes at the start of the throttle lever. If a problem cannot be a leak in this manual, have a Yamaha dealer check for the cause. If the brakes do not provide proper braking performance, check the brake pads and shoes for one minute. It must open smoothly and spring back to make sure they are working properly. If there is any brake fluid is leaking out of the hose, joint or brake fluid...
Owners Manual
Page 47
... engine. EBU20370 7. NOTE: The engine is discharged, pull the recoil starter to start the engine with the throttle slightly open. Shift from neutral to position (3) before starting a cold engine, with the exception that the drive select lever is warm. G If the battery is warm when it idles smoothly, then return the starter (choke) to forward and vice versa by moving the drive select lever along the shift guide...
... engine. EBU20370 7. NOTE: The engine is discharged, pull the recoil starter to start the engine with the throttle slightly open. Shift from neutral to position (3) before starting a cold engine, with the exception that the drive select lever is warm. G If the battery is warm when it idles smoothly, then return the starter (choke) to forward and vice versa by moving the drive select lever along the shift guide...
Owners Manual
Page 48
... then release the brake pedal. 5. Shifting: Reverse 1. Bring the ATV to reverse and vice versa by moving the drive select lever along the shift guide. 4. Shift from neutral to a complete stop. 2. Apply the brake pedal. 3. Open the throttle lever gradually and continue to watch to the rear while backing. 6-4 If the indicator light does not come on , have a Yamaha dealer check the electrical circuit...
... then release the brake pedal. 5. Shifting: Reverse 1. Bring the ATV to reverse and vice versa by moving the drive select lever along the shift guide. 4. Shift from neutral to a complete stop. 2. Apply the brake pedal. 3. Open the throttle lever gradually and continue to watch to the rear while backing. 6-4 If the indicator light does not come on , have a Yamaha dealer check the electrical circuit...
Owners Manual
Page 70
... increasing the possibility of the turn together at the same speed. A special turning technique must be 7-17 hot when riding and afterwards; If the throttle is applied too abruptly, the front wheels may lift off -road, the two rear wheels are mounted solidly on one axle and turn is designed for off-road use of the brakes can cause the tires to come in this...
... increasing the possibility of the turn together at the same speed. A special turning technique must be 7-17 hot when riding and afterwards; If the throttle is applied too abruptly, the front wheels may lift off -road, the two rear wheels are mounted solidly on one axle and turn is designed for off-road use of the brakes can cause the tires to come in this...
Owners Manual
Page 87
...-pressure tire gauge under normal riding conditions. Electrical components can catch clothing or parts of the body, causing injury. EBU21720 Owner's manual and tool kit Be sure to put this owner's manual in the plastic bag and always carry it on the following pages. WHAT CAN HAPPEN Moving parts can cause shocks or start fires. 8-1 EWB01820 HOW TO AVOID THE HAZARD Turn off the engine when performing maintenance...
...-pressure tire gauge under normal riding conditions. Electrical components can catch clothing or parts of the body, causing injury. EBU21720 Owner's manual and tool kit Be sure to put this owner's manual in the plastic bag and always carry it on the following pages. WHAT CAN HAPPEN Moving parts can cause shocks or start fires. 8-1 EWB01820 HOW TO AVOID THE HAZARD Turn off the engine when performing maintenance...
Owners Manual
Page 118
... the brake light come on earlier, turn the adjusting nut in place. Recommended lubricant: Engine oil EWB02120 WARNING POTENTIAL HAZARD Damaged control cables. Replace damaged cables. EBU24911 8 1. essary. If a cable is damaged or does not move smoothly, have a Yamaha dealer check or replace it. HOW TO AVOID THE HAZARD Inspect cables frequently. Checking and lubricating the front and rear brake levers The...
... the brake light come on earlier, turn the adjusting nut in place. Recommended lubricant: Engine oil EWB02120 WARNING POTENTIAL HAZARD Damaged control cables. Replace damaged cables. EBU24911 8 1. essary. If a cable is damaged or does not move smoothly, have a Yamaha dealer check or replace it. HOW TO AVOID THE HAZARD Inspect cables frequently. Checking and lubricating the front and rear brake levers The...
Owners Manual
Page 131
... with a garden hose. EBU25860 CLEANING AND STORAGE EBU25870 Cleaning Frequent, thorough cleaning of your ATV will not only enhance its appearance but will improve its general performance and extend the useful life of wheel bearings, brakes, transmission seals and electrical devices. Block off immediately with clean water and dry all filler caps are properly installed. 2. Make sure the spark plug and all...
... with a garden hose. EBU25860 CLEANING AND STORAGE EBU25870 Cleaning Frequent, thorough cleaning of your ATV will not only enhance its appearance but will improve its general performance and extend the useful life of wheel bearings, brakes, transmission seals and electrical devices. Block off immediately with clean water and dry all filler caps are properly installed. 2. Make sure the spark plug and all...

Owners Manual
Page 134
...SPECIFICATIONS Dimensions: Overall length: 1984 mm (78.1 in) Overall width: 1085 mm (42.7 in) Overall height: 1120 mm (44.1 in) Seat height: 827 mm (32.6 in) Wheelbase: 1233 mm (48.5 in) Ground clearance: 245 mm (9.6 in) Minimum turning radius: 3000 mm (118 in) Compression ratio: 9.20 :1 Starting system: Electric and recoil starter Lubrication system: Wet sump Engine oil...Weight: With oil and fuel: 245.0 kg (540 lb) YAMALUBE 4 (20W40) or SAE 20W40 YAMALUBE 4 (10W30) or SAE 10W30 SAE 5W30 Engine: 10 Engine type: Air cooled 4-stroke, SOHC Cylinder arrangement: Forward-inclined single cylinder...
...SPECIFICATIONS Dimensions: Overall length: 1984 mm (78.1 in) Overall width: 1085 mm (42.7 in) Overall height: 1120 mm (44.1 in) Seat height: 827 mm (32.6 in) Wheelbase: 1233 mm (48.5 in) Ground clearance: 245 mm (9.6 in) Minimum turning radius: 3000 mm (118 in) Compression ratio: 9.20 :1 Starting system: Electric and recoil starter Lubrication system: Wet sump Engine oil...Weight: With oil and fuel: 245.0 kg (540 lb) YAMALUBE 4 (20W40) or SAE 20W40 YAMALUBE 4 (10W30) or SAE 10W30 SAE 5W30 Engine: 10 Engine type: Air cooled 4-stroke, SOHC Cylinder arrangement: Forward-inclined single cylinder...
Owners Manual
Page 136
Rear tire: Type: Tubeless Size: AT25 x 10-12 Manufacturer/model: MAXXIS/M980 Rim size: 12 x 6.0AT Rear wheel: Wheel type: Panel wheel Rim size: 12 x 7.5AT Loading: Maximum loading limit: 210.0 kg (463 lb) (Total weight of rider, cargo, accessories, and tongue) Front brake: Type: Dual disc brake Operation: Right hand operation Recommended fluid: DOT 4 Tire air pressure (measured on cold tires): Recommended: Front: 25.0 kPa (3.6 psi) (0.250 kgf/cm²) Rear: 25.0 kPa (3.6 psi...
Rear tire: Type: Tubeless Size: AT25 x 10-12 Manufacturer/model: MAXXIS/M980 Rim size: 12 x 6.0AT Rear wheel: Wheel type: Panel wheel Rim size: 12 x 7.5AT Loading: Maximum loading limit: 210.0 kg (463 lb) (Total weight of rider, cargo, accessories, and tongue) Front brake: Type: Dual disc brake Operation: Right hand operation Recommended fluid: DOT 4 Tire air pressure (measured on cold tires): Recommended: Front: 25.0 kPa (3.6 psi) (0.250 kgf/cm²) Rear: 25.0 kPa (3.6 psi...
Owners Manual
Page 137
Wheel travel: 180 mm (7.1 in) Electrical system: Ignition system: DC. CDI Charging system: AC magneto Signaling system fuse: 10.0 A Ignition fuse: 15.0 A Battery: Model: YTX14AH Voltage, capacity: 12 V, 12.0 Ah Headlight: Bulb type: Halogen bulb Bulb voltage, wattage x quantity: Headlight: 12 V, 30.0/30.0 W × 2 Tail/brake light: 12 V, 5.0/21.0 W × 1 Neutral indicator light: 12 V, 1.7 W × 1 Reverse indicator light: 12 V, 1.7 W × 1 Oil temperature warning light: 12 V, 1.7 W × 1 10 Fuses: Main fuse: 30.0 A Headlight fuse: 15.0 A 10-4
Wheel travel: 180 mm (7.1 in) Electrical system: Ignition system: DC. CDI Charging system: AC magneto Signaling system fuse: 10.0 A Ignition fuse: 15.0 A Battery: Model: YTX14AH Voltage, capacity: 12 V, 12.0 Ah Headlight: Bulb type: Halogen bulb Bulb voltage, wattage x quantity: Headlight: 12 V, 30.0/30.0 W × 2 Tail/brake light: 12 V, 5.0/21.0 W × 1 Neutral indicator light: 12 V, 1.7 W × 1 Reverse indicator light: 12 V, 1.7 W × 1 Oil temperature warning light: 12 V, 1.7 W × 1 10 Fuses: Main fuse: 30.0 A Headlight fuse: 15.0 A 10-4
Owners Manual
Page 142
... EXCLUSIONS from the factory. Modification to improper transportation. Operate and maintain the ATV as spark plugs, oil, oil filter, air filter, and brake shoes. ALSO EXCLUDED FROM THIS WARRANTY ARE ANY INCIDENTAL OR CONSEQUENTIAL DAMAGES INCLUDING LOSS OF USE. e. ATV LIMITED WARRANTY Yamaha Motor Corporation, U.S.A. DURING THE PERIOD OF WARRANTY any failures caused by this warranty to genuine Yamaha parts. All parts replaced under this service. Competition or...
... EXCLUSIONS from the factory. Modification to improper transportation. Operate and maintain the ATV as spark plugs, oil, oil filter, air filter, and brake shoes. ALSO EXCLUDED FROM THIS WARRANTY ARE ANY INCIDENTAL OR CONSEQUENTIAL DAMAGES INCLUDING LOSS OF USE. e. ATV LIMITED WARRANTY Yamaha Motor Corporation, U.S.A. DURING THE PERIOD OF WARRANTY any failures caused by this warranty to genuine Yamaha parts. All parts replaced under this service. Competition or...
Owners Manual
Page 143
... itself. Be sure to -date registration record in the Owner's and Service Manual. If a question or problem arises regarding warranty, first contact the owner of "abnormal" strain, neglect, or abuse? has an up-to bring your request at the time of normal maintenance services, non-warranty repairs, accident and collision damages, and oil, oil filters, air filters, spark plugs, and brake shoes. These terms are a qualified mechanic and follow...
... itself. Be sure to -date registration record in the Owner's and Service Manual. If a question or problem arises regarding warranty, first contact the owner of "abnormal" strain, neglect, or abuse? has an up-to bring your request at the time of normal maintenance services, non-warranty repairs, accident and collision damages, and oil, oil filters, air filters, spark plugs, and brake shoes. These terms are a qualified mechanic and follow...
Owners Manual
Page 147
...33 Brakes, front and rear ...5-3 F Final gear oil ...5-3, 8-15 Fuel ...4-9, 5-3 Fuel cock ...4-10 Fuel tank cap ...4-9 Fuses, replacing ...8-36 H Handlebar switches ...4-3 Headlight beam, adjusting ...8-40 Headlight bulb, replacing ...8-38 C Cables, checking and lubricating ...8-32 Carburetor, adjusting ...8-23 Carrier, front ...4-14 Carrier, rear ...4-14 Chassis fasteners ...5-8 Cleaning ...9-1 I Identification numbers ...11-1 Indicator lights and warning light ...4-2 Instruments, lights and switches ...5-8 K Key identification number ...11-1 Knuckle shafts, lubricating ...8-34 D Drive...
...33 Brakes, front and rear ...5-3 F Final gear oil ...5-3, 8-15 Fuel ...4-9, 5-3 Fuel cock ...4-10 Fuel tank cap ...4-9 Fuses, replacing ...8-36 H Handlebar switches ...4-3 Headlight beam, adjusting ...8-40 Headlight bulb, replacing ...8-38 C Cables, checking and lubricating ...8-32 Carburetor, adjusting ...8-23 Carrier, front ...4-14 Carrier, rear ...4-14 Chassis fasteners ...5-8 Cleaning ...9-1 I Identification numbers ...11-1 Indicator lights and warning light ...4-2 Instruments, lights and switches ...5-8 K Key identification number ...11-1 Knuckle shafts, lubricating ...8-34 D Drive...
Owners Manual
Page 148
... ...11-4 Model label ...11-2 N Neutral indicator light ...4-2 Noise regulation ...11-3 Speed limiter ...4-4 Starter (choke) ...4-12 Start switch ...4-3 Steering shaft, lubricating ...8-34 Storage ...9-2 Storage compartment ...4-13 Suspension, lubricating the upper and lower arm pivots ...8-34 T Tail/brake light bulb, replacing ...8-40 Throttle cable free play, adjusting ...8-24 Throttle lever ...4-4, 5-4 Tire pressure, measuring ...5-7 Tires ...5-6 Tire wear limit ...5-8 Troubleshooting ...8-42 Troubleshooting chart ...8-44 O Oil temperature warning light ...4-2 Owner's manual and tool kit...
... ...11-4 Model label ...11-2 N Neutral indicator light ...4-2 Noise regulation ...11-3 Speed limiter ...4-4 Starter (choke) ...4-12 Start switch ...4-3 Steering shaft, lubricating ...8-34 Storage ...9-2 Storage compartment ...4-13 Suspension, lubricating the upper and lower arm pivots ...8-34 T Tail/brake light bulb, replacing ...8-40 Throttle cable free play, adjusting ...8-24 Throttle lever ...4-4, 5-4 Tire pressure, measuring ...5-7 Tires ...5-6 Tire wear limit ...5-8 Troubleshooting ...8-42 Troubleshooting chart ...8-44 O Oil temperature warning light ...4-2 Owner's manual and tool kit...