
Owners Manual
Page 3
... degree of craftsmanship and reliability that you have made Yamaha a leader in the production of the Yamaha Road Star™. If you and your purchase of fine sporting, touring, and pacesetting racing machines. To maintain these standards without reducing the performance or economy of operation of Yamaha's vast experience in these fields. This model is important that have...
... degree of craftsmanship and reliability that you have made Yamaha a leader in the production of the Yamaha Road Star™. If you and your purchase of fine sporting, touring, and pacesetting racing machines. To maintain these standards without reducing the performance or economy of operation of Yamaha's vast experience in these fields. This model is important that have...
Owners Manual
Page 7
... oil ...6-13 Cleaning the air filter element ...6-15 Carburetor ...6-16 Checking the throttle cable free play ...6-17 Valve clearance ...6-17 Tires (For spoke wheel model) ...6-17 Tires (For cast wheel models) ...6-19 Spoke wheels ...6-22 Cast wheels ...6-22 Accessories and replacement parts ...6-22 Adjusting the clutch lever free play ...6-23 Adjusting the brake lever free play ...6-24 Adjusting the rear brake light switch ...6-25 Checking the front and rear brake pads ...6-25 Checking the brake fluid...
... oil ...6-13 Cleaning the air filter element ...6-15 Carburetor ...6-16 Checking the throttle cable free play ...6-17 Valve clearance ...6-17 Tires (For spoke wheel model) ...6-17 Tires (For cast wheel models) ...6-19 Spoke wheels ...6-22 Cast wheels ...6-22 Accessories and replacement parts ...6-22 Adjusting the clutch lever free play ...6-23 Adjusting the brake lever free play ...6-24 Adjusting the rear brake light switch ...6-25 Checking the front and rear brake pads ...6-25 Checking the brake fluid...
Owners Manual
Page 8
... the steering ...6-32 Checking the wheel bearings ...6-33 Battery ...6-33 Replacing the fuses ...6-35 Replacing the headlight bulb ...6-36 Tail/brake light ...6-37 Replacing a turn signal light bulb ...6-38 Replacing a license plate light bulb ...6-38 Supporting the motorcycle ...6-39 Troubleshooting ...6-39 Troubleshooting chart ...6-40 MOTORCYCLE CARE AND STORAGE ...7-1 Care ...7-1 Storage ...7-4 SPECIFICATIONS ...8-1 CONSUMER INFORMATION ...9-1 Identification numbers ...9-1 Reporting safety defects ...9-3 Motorcycle noise regulation ...9-4 Maintenance record ...9-5 YAMAHA MOTOR CORPORATION...
... the steering ...6-32 Checking the wheel bearings ...6-33 Battery ...6-33 Replacing the fuses ...6-35 Replacing the headlight bulb ...6-36 Tail/brake light ...6-37 Replacing a turn signal light bulb ...6-38 Replacing a license plate light bulb ...6-38 Supporting the motorcycle ...6-39 Troubleshooting ...6-39 Troubleshooting chart ...6-40 MOTORCYCLE CARE AND STORAGE ...7-1 Care ...7-1 Storage ...7-4 SPECIFICATIONS ...8-1 CONSUMER INFORMATION ...9-1 Identification numbers ...9-1 Reporting safety defects ...9-3 Motorcycle noise regulation ...9-4 Maintenance record ...9-5 YAMAHA MOTOR CORPORATION...
Owners Manual
Page 10
...to use extreme caution when adding cargo or accessories to maintain control of the motorcycle. • The passenger should always hold onto the operator, seat strap, or grab bar, if equipped, with both hands and ...speed limit and never travel faster than warranted by Yamaha, or the removal of original equipment, may cause severe personal injury. Make sure that other drugs. Wind in preventing or reducing abrasions or lacerations. SAFETY INFORMATION wide on a turn due to this motorcycle not approved by road and traffic conditions. • Always signal before turning or changing...
...to use extreme caution when adding cargo or accessories to maintain control of the motorcycle. • The passenger should always hold onto the operator, seat strap, or grab bar, if equipped, with both hands and ...speed limit and never travel faster than warranted by Yamaha, or the removal of original equipment, may cause severe personal injury. Make sure that other drugs. Wind in preventing or reducing abrasions or lacerations. SAFETY INFORMATION wide on a turn due to this motorcycle not approved by road and traffic conditions. • Always signal before turning or changing...

Owners Manual
Page 11
... in any way reduce ground clearance or cornering clearance, limit suspension travel, steering travel or control operation, or obscure lights or reflectors. • Accessories fitted to the handlebar or the front fork area can create unstable handling or slow steering response. These items, including such cargo as possible. Keep the following in cross winds. G Shifting weights can displace the operator...
... in any way reduce ground clearance or cornering clearance, limit suspension travel, steering travel or control operation, or obscure lights or reflectors. • Accessories fitted to the handlebar or the front fork area can create unstable handling or slow steering response. These items, including such cargo as possible. Keep the following in cross winds. G Shifting weights can displace the operator...

Owners Manual
Page 12
... exhaust gas G GASOLINE IS HIGHLY FLAMMABLE: • Always turn the engine off when refueling. • Take care not to "ON" or "RES" (for vacuum type) / "OFF" (for any length of lights or engine power. When transporting the motorcycle in another vehicle, make sure that it is kept upright and that has adequate ventilation. If electrical accessories exceed the capacity of the carburetor or fuel tank...
... exhaust gas G GASOLINE IS HIGHLY FLAMMABLE: • Always turn the engine off when refueling. • Take care not to "ON" or "RES" (for vacuum type) / "OFF" (for any length of lights or engine power. When transporting the motorcycle in another vehicle, make sure that it is kept upright and that has adequate ventilation. If electrical accessories exceed the capacity of the carburetor or fuel tank...
Owners Manual
Page 21
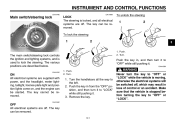
INSTRUMENT AND CONTROL FUNCTIONS EAU10460 EAU10680 Main switch/steering lock LOCK The steering is locked, and all the way to the left. 2. Turn. Turn. WARNING Never turn it to "LOCK" while still pushing it . Remove the key. OFF All electrical systems are described below. The key can be removed. 3-1 The main switch/steering lock controls the ignition and lighting systems, and is stopped before turning the key to "OFF" or "LOCK" while the vehicle is moving, otherwise...
INSTRUMENT AND CONTROL FUNCTIONS EAU10460 EAU10680 Main switch/steering lock LOCK The steering is locked, and all the way to the left. 2. Turn. Turn. WARNING Never turn it to "LOCK" while still pushing it . Remove the key. OFF All electrical systems are described below. The key can be removed. 3-1 The main switch/steering lock controls the ignition and lighting systems, and is stopped before turning the key to "OFF" or "LOCK" while the vehicle is moving, otherwise...
Owners Manual
Page 22
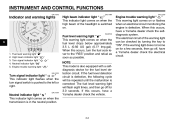
... fuel level warning light will be checked by turning the key to the left or right. Fuel level warning light " " High beam indicator light " " Turn signal indicator light " Neutral indicator light " " Engine trouble warning light " Fuel level warning light " " This warning light comes on . The electrical circuit of the headlight is switched on when the fuel level drops below approximately 3.5 L (0.92 US gal) (0.77 Imp.gal). NOTE: This model is in the neutral position. If this occurs, have a Yamaha...
... fuel level warning light will be checked by turning the key to the left or right. Fuel level warning light " " High beam indicator light " " Turn signal indicator light " Neutral indicator light " " Engine trouble warning light " Fuel level warning light " " This warning light comes on . The electrical circuit of the headlight is switched on when the fuel level drops below approximately 3.5 L (0.92 US gal) (0.77 Imp.gal). NOTE: This model is in the neutral position. If this occurs, have a Yamaha...
Owners Manual
Page 25
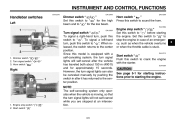
... center position. INSTRUMENT AND CONTROL FUNCTIONS EAU12343 EAU12400 EAU12500 Handlebar switches Left Dimmer switch " / " Set this switch to " " before starting the engine. 1. However, the turn , push this switch to sound the horn. Dimmer switch " / " 2. Engine stop switch " 2. ECA10050 CAUTION: See page 5-1 for approximately 15 seconds. NOTE: The self-canceling system only operates when the vehicle is moving, so that the turn , push this model is stuck. Turn signal switch " / " 3. Horn switch " " Right Turn signal switch...
... center position. INSTRUMENT AND CONTROL FUNCTIONS EAU12343 EAU12400 EAU12500 Handlebar switches Left Dimmer switch " / " Set this switch to " " before starting the engine. 1. However, the turn , push this switch to sound the horn. Dimmer switch " / " 2. Engine stop switch " 2. ECA10050 CAUTION: See page 5-1 for approximately 15 seconds. NOTE: The self-canceling system only operates when the vehicle is moving, so that the turn , push this model is stuck. Turn signal switch " / " 3. Horn switch " " Right Turn signal switch...
Owners Manual
Page 42
... described on when the key is in the neutral position. Shift the transmission into the neutral position. CAUTION: The engine trouble warning light should be met: G The transmission is turned to start, release the start switch. Always make sure that there is up. Do not crank the engine more than 10 seconds on , otherwise have a Yamaha dealer check the electrical circuit. 4. ECA11370 WARNING G G Before starting out, make sure that...
... described on when the key is in the neutral position. Shift the transmission into the neutral position. CAUTION: The engine trouble warning light should be met: G The transmission is turned to start, release the start switch. Always make sure that there is up. Do not crank the engine more than 10 seconds on , otherwise have a Yamaha dealer check the electrical circuit. 4. ECA11370 WARNING G G Before starting out, make sure that...
Owners Manual
Page 44
... to stall or runs very roughly, pull the clutch lever in the illustration. EAU16700 To start out and accelerate 1. Shift the transmission into first gear. Shift pedal 2. Open the throttle part way and gradually release the clutch lever. 7. Pull the clutch lever to the next higher gear. Apply both the front and the rear brakes to withstand the shock of time with the engine off , accelerating, climbing...
... to stall or runs very roughly, pull the clutch lever in the illustration. EAU16700 To start out and accelerate 1. Shift the transmission into first gear. Shift pedal 2. Open the throttle part way and gradually release the clutch lever. 7. Pull the clutch lever to the next higher gear. Apply both the front and the rear brakes to withstand the shock of time with the engine off , accelerating, climbing...
Owners Manual
Page 49
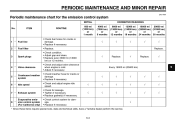
...; Replace gasket(s) if necessary. • Check control system for the emission control system INITIAL No. Replace. 4 * Valve clearance Every 16000 mi (25000 km) 6 5 * Crankcase breather system Idle speed √ √ √ √ √ √ √ √ √ 6 * 7 * Exhaust system Evaporative emission control system (For California only) 8 * √ * Since these items require special tools, data and technical skills, have a Yamaha dealer perform the service...
...; Replace gasket(s) if necessary. • Check control system for the emission control system INITIAL No. Replace. 4 * Valve clearance Every 16000 mi (25000 km) 6 5 * Crankcase breather system Idle speed √ √ √ √ √ √ √ √ √ 6 * 7 * Exhaust system Evaporative emission control system (For California only) 8 * √ * Since these items require special tools, data and technical skills, have a Yamaha dealer perform the service...
Owners Manual
Page 52
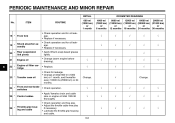
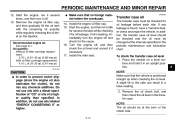
... free play if necessary. • Lubricate the throttle grip housing and cable. 6-6 √ √ 19 * Shock absorber assembly Rear suspension link pivots Engine oil Engine oil filter cartridge √ √ √ √ √ √ 20 * 21 √ √ √ √ √ √ √ 6 22 * 23 * Transfer case oil Change. √ Change. 24 * Front and rear brake switches Control cables √ √ √ √ √ √ √ √...
... free play if necessary. • Lubricate the throttle grip housing and cable. 6-6 √ √ 19 * Shock absorber assembly Rear suspension link pivots Engine oil Engine oil filter cartridge √ √ √ √ √ √ 20 * 21 √ √ √ √ √ √ √ 6 22 * 23 * Transfer case oil Change. √ Change. 24 * Front and rear brake switches Control cables √ √ √ √ √ √ √ √...
Owners Manual
Page 59
... found, have a Yamaha dealer check and repair the vehicle. Recommended engine oil: See page 8-1. Place the vehicle on the dipstick. A slight tilt to prevent clutch slippage (since the engine oil also lubricates the clutch), do not use oils with the remaining oil quantity while regularly checking the oil level on a level surface and hold it idle for several times, and then turn the engine off , and then...
... found, have a Yamaha dealer check and repair the vehicle. Recommended engine oil: See page 8-1. Place the vehicle on the dipstick. A slight tilt to prevent clutch slippage (since the engine oil also lubricates the clutch), do not use oils with the remaining oil quantity while regularly checking the oil level on a level surface and hold it idle for several times, and then turn the engine off , and then...
Owners Manual
Page 64
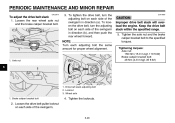
... the suspension for this model) does not exceed the maximum load of the vehicle. Minimum tire tread depth (front and rear): 1.0 mm (0.04 in it as soon as handling, braking, performance and safety. Tire inspection if the tire has a nail or glass fragments in ) EWA10560 WARNING G 6 G WARNING Proper loading of your tires. Tire wear indicator Always check the tires before operating the motorcycle. PERIODIC MAINTENANCE AND MINOR REPAIR Tire air pressure...
... the suspension for this model) does not exceed the maximum load of the vehicle. Minimum tire tread depth (front and rear): 1.0 mm (0.04 in it as soon as handling, braking, performance and safety. Tire inspection if the tire has a nail or glass fragments in ) EWA10560 WARNING G 6 G WARNING Proper loading of your tires. Tire wear indicator Always check the tires before operating the motorcycle. PERIODIC MAINTENANCE AND MINOR REPAIR Tire air pressure...
Owners Manual
Page 65
... Yamaha Motor Co., Ltd. EWA11010 WARNING Tire inflation pressure should be of the same make and design, otherwise the handling characteristics of the vehicle cannot be checked and adjusted when the temperature of cargo, rider, passenger, and accessories (windshield, saddlebags, etc. PERIODIC MAINTENANCE AND MINOR REPAIR Tire information This motorcycle is equipped with spoke wheels and tube tires. Tire inflation pressure must be adjusted according to total weight...
... Yamaha Motor Co., Ltd. EWA11010 WARNING Tire inflation pressure should be of the same make and design, otherwise the handling characteristics of the vehicle cannot be checked and adjusted when the temperature of cargo, rider, passenger, and accessories (windshield, saddlebags, etc. PERIODIC MAINTENANCE AND MINOR REPAIR Tire information This motorcycle is equipped with spoke wheels and tube tires. Tire inflation pressure must be adjusted according to total weight...
Owners Manual
Page 74
... adjusting bolt the same amount for proper wheel alignment. Brake caliper bracket bolt 4. Tightening torques: Axle nut: 150 Nm (15.0 m·kgf, 110 ft·lbf) Brake caliper bracket bolt: 48 Nm (4.8 m·kgf, 35 ft·lbf) 1. Wheel axle 1. Tighten the axle nut and the brake caliper bracket bolt to the specified torques. Locknut 3. PERIODIC MAINTENANCE AND MINOR REPAIR EAU23070 To adjust the drive belt...
... adjusting bolt the same amount for proper wheel alignment. Brake caliper bracket bolt 4. Tightening torques: Axle nut: 150 Nm (15.0 m·kgf, 110 ft·lbf) Brake caliper bracket bolt: 48 Nm (4.8 m·kgf, 35 ft·lbf) 1. Wheel axle 1. Tighten the axle nut and the brake caliper bracket bolt to the specified torques. Locknut 3. PERIODIC MAINTENANCE AND MINOR REPAIR EAU23070 To adjust the drive belt...
Owners Manual
Page 81
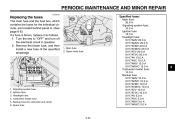
Spare main fuse 1. 2. 3. 4. 5. 6. Signaling system fuse Ignition fuse Headlight fuse Carburetor heater fuse Backup fuse (for the individual circuits, are located behind panel A. (See page 6-8.) If a fuse is blown, replace it as follows. 1. Main fuse 2. Remove the blown fuse, and then install a new fuse of the specified amperage. 1. Turn the key to "OFF" and turn off the electrical circuit in question. 2. PERIODIC MAINTENANCE AND MINOR REPAIR EAU23524 Replacing the fuses The main fuse and the fuse box...
Spare main fuse 1. 2. 3. 4. 5. 6. Signaling system fuse Ignition fuse Headlight fuse Carburetor heater fuse Backup fuse (for the individual circuits, are located behind panel A. (See page 6-8.) If a fuse is blown, replace it as follows. 1. Main fuse 2. Remove the blown fuse, and then install a new fuse of the specified amperage. 1. Turn the key to "OFF" and turn off the electrical circuit in question. 2. PERIODIC MAINTENANCE AND MINOR REPAIR EAU23524 Replacing the fuses The main fuse and the fuse box...
Owners Manual
Page 92
...: Electric starter Lubrication system: Dry sump Fuel: Recommended fuel: Unleaded gasoline only Fuel tank capacity: 20.0 L (5.28 US gal) (4.40 Imp.gal) Fuel reserve amount: 3.5 L (0.92 US gal) (0.77 Imp.gal) Carburetor: Manufacturer: MIKUNI Type × quantity: BSR40 x 1 Spark plug (s): Manufacturer/model: NGK/DPR7EA-9 Manufacturer/model: DENSO/X22EPR-U9 Spark plug gap: 0.8-0.9 mm (0.031-0.035 in) Engine oil: Type: YAMALUBE 4 (20W40) or SAE20W40 Recommended engine oil grade: API service...
...: Electric starter Lubrication system: Dry sump Fuel: Recommended fuel: Unleaded gasoline only Fuel tank capacity: 20.0 L (5.28 US gal) (4.40 Imp.gal) Fuel reserve amount: 3.5 L (0.92 US gal) (0.77 Imp.gal) Carburetor: Manufacturer: MIKUNI Type × quantity: BSR40 x 1 Spark plug (s): Manufacturer/model: NGK/DPR7EA-9 Manufacturer/model: DENSO/X22EPR-U9 Spark plug gap: 0.8-0.9 mm (0.031-0.035 in) Engine oil: Type: YAMALUBE 4 (20W40) or SAE20W40 Recommended engine oil grade: API service...
Owners Manual
Page 106
INDEX A Accessories and replacement parts...6-22 Air filter element, cleaning...6-15 Fuel...3-8 Fuel cock ...3-9 Fuel gauge...3-4 Fuel level warning light ...3-2 Fuel tank cap ...3-7 Fuses, replacing ...6-35 Part locations ...2-1 Pre-operation check list...4-2 R Rear brake light switch, adjusting ...6-25 Rear suspension, lubricating...6-31 Rider seat...3-10 B Battery...6-33 Brake and clutch levers, checking and lubricating ...6-30 Brake and shift pedals, checking and lubricating ...6-29 Brake fluid, changing ...6-27 Brake fluid level, checking ...6-26 Brake lever...3-6 Brake lever free play,...
INDEX A Accessories and replacement parts...6-22 Air filter element, cleaning...6-15 Fuel...3-8 Fuel cock ...3-9 Fuel gauge...3-4 Fuel level warning light ...3-2 Fuel tank cap ...3-7 Fuses, replacing ...6-35 Part locations ...2-1 Pre-operation check list...4-2 R Rear brake light switch, adjusting ...6-25 Rear suspension, lubricating...6-31 Rider seat...3-10 B Battery...6-33 Brake and clutch levers, checking and lubricating ...6-30 Brake and shift pedals, checking and lubricating ...6-29 Brake fluid, changing ...6-27 Brake fluid level, checking ...6-26 Brake lever...3-6 Brake lever free play,...