

Owners Manual
Page 6
... Spark plug holders...5-14 Carburetor coolant shut-off knob ...5-14 Storage compartment ...5-14 PRE-OPERATION CHECKS ...6-1 Fuel ...6-1 Engine oil...6-2 Coolant ...6-2 Throttle lever ...6-3 Recoil starter ...6-3 Throttle override system (T.O.R.S.) ...6-3 Brake ...6-4 Brake fluid leakage ...6-5 V-belt ...6-5 Drive guard ...6-5 Drive track ...6-6 51-mm (2.0-in) high-profile pattern drive track...6-6 Slide runners ...6-6 Skis and ski runners ...6-7 Steering system...6-7 Lights ...6-7 Air filter ...6-8 Fittings and fasteners ...6-8 Tool kit and recommended equipment...6-9 OPERATION ...7-1 Starting...
... Spark plug holders...5-14 Carburetor coolant shut-off knob ...5-14 Storage compartment ...5-14 PRE-OPERATION CHECKS ...6-1 Fuel ...6-1 Engine oil...6-2 Coolant ...6-2 Throttle lever ...6-3 Recoil starter ...6-3 Throttle override system (T.O.R.S.) ...6-3 Brake ...6-4 Brake fluid leakage ...6-5 V-belt ...6-5 Drive guard ...6-5 Drive track ...6-6 51-mm (2.0-in) high-profile pattern drive track...6-6 Slide runners ...6-6 Skis and ski runners ...6-7 Steering system...6-7 Lights ...6-7 Air filter ...6-8 Fittings and fasteners ...6-8 Tool kit and recommended equipment...6-9 OPERATION ...7-1 Starting...
Owners Manual
Page 7
... MAINTENANCE ...8-1 Periodic maintenance chart ...8-1 Tool kit ...8-4 Spark plug inspection ...8-4 Engine idle speed adjustment ...8-5 Throttle cable adjustment ...8-6 Oil pump cable adjustment ...8-6 Carburetor adjustment...8-7 Yamaha Power Valve System (Y.P.V.S.)...8-9 High altitude adjustments ...8-10 Cooling system ...8-11 V-belt replacement ...8-13 Checking the drive chain housing oil level and the drive chain tension ...8-15 Checking the brake pads...8-17 Checking the parking brake pads...8-17 Checking the brake fluid level...8-18 Brake fluid replacement...8-18 Suspension...8-18 Drive...
... MAINTENANCE ...8-1 Periodic maintenance chart ...8-1 Tool kit ...8-4 Spark plug inspection ...8-4 Engine idle speed adjustment ...8-5 Throttle cable adjustment ...8-6 Oil pump cable adjustment ...8-6 Carburetor adjustment...8-7 Yamaha Power Valve System (Y.P.V.S.)...8-9 High altitude adjustments ...8-10 Cooling system ...8-11 V-belt replacement ...8-13 Checking the drive chain housing oil level and the drive chain tension ...8-15 Checking the brake pads...8-17 Checking the parking brake pads...8-17 Checking the brake fluid level...8-18 Brake fluid replacement...8-18 Suspension...8-18 Drive...

Owners Manual
Page 15
Become familiar with the parking brake applied. Passengers are prohibited. For safety and proper care of the snowmobile, always perform the pre-operation checks on public streets, roads, or highways. ESU00080 3- SAFETY INFORMATION When you ride your safety. Read the Owner's Manual and all of the following for proper operation every time before starting the engine. Consult a Yamaha dealer about any control or function you ignore...
Become familiar with the parking brake applied. Passengers are prohibited. For safety and proper care of the snowmobile, always perform the pre-operation checks on public streets, roads, or highways. ESU00080 3- SAFETY INFORMATION When you ride your safety. Read the Owner's Manual and all of the following for proper operation every time before starting the engine. Consult a Yamaha dealer about any control or function you ignore...
Owners Manual
Page 16
...Open the outside doors; 7. Handle fuel with extreme care. Do not run the engine indoors, except when starting , inspecting, or adjusting the snowmobile. exhaust fumes are dangerous. 2. Be careful where you swallow some gasoline, inhale a lot of gasoline vapor, or get some gasoline into wires could be obstacles ... by the track could cause an accident and injury. 3-2 G Never add fuel when the engine is HIGHLY FLAMMABLE. Allow the engine to cool for operation of established trails. G Fill the fuel tank outdoors with care; G Make sure that will permit use of your clothes....
...Open the outside doors; 7. Handle fuel with extreme care. Do not run the engine indoors, except when starting , inspecting, or adjusting the snowmobile. exhaust fumes are dangerous. 2. Be careful where you swallow some gasoline, inhale a lot of gasoline vapor, or get some gasoline into wires could be obstacles ... by the track could cause an accident and injury. 3-2 G Never add fuel when the engine is HIGHLY FLAMMABLE. Allow the engine to cool for operation of established trails. G Fill the fuel tank outdoors with care; G Make sure that will permit use of your clothes....
Owners Manual
Page 17
... side for an extended period. 5. Operation under such conditions will damage or result in the fuel tank inside a building where ignition sources are present such as hot water and space heaters, an open flame, sparks, clothes dryers, and the like. The best braking method on dirt, sand, grass, rocks, or bare pavement may cause loss of control and may also...
... side for an extended period. 5. Operation under such conditions will damage or result in the fuel tank inside a building where ignition sources are present such as hot water and space heaters, an open flame, sparks, clothes dryers, and the like. The best braking method on dirt, sand, grass, rocks, or bare pavement may cause loss of control and may also...
Owners Manual
Page 19
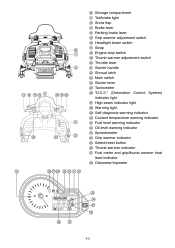
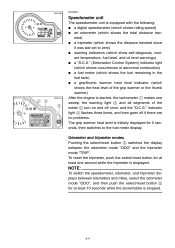
...compartment Tail/brake light Snow flap Brake lever Parking brake lever Grip warmer adjustment switch Headlight beam switch Strap Engine stop switch Thumb warmer adjustment switch Throttle lever Starter handle Shroud latch Main switch Starter lever Tachometer "D.C.S." (Detonation Control System) indicator light High beam indicator light Warning light Self-diagnosis warning indicator Coolant temperature warning indicator Fuel level warning indicator Oil level warning indicator Speedometer Grip warmer indicator Select/reset button Thumb warmer indicator Fuel meter and grip/thumb warmer heat level...
...compartment Tail/brake light Snow flap Brake lever Parking brake lever Grip warmer adjustment switch Headlight beam switch Strap Engine stop switch Thumb warmer adjustment switch Throttle lever Starter handle Shroud latch Main switch Starter lever Tachometer "D.C.S." (Detonation Control System) indicator light High beam indicator light Warning light Self-diagnosis warning indicator Coolant temperature warning indicator Fuel level warning indicator Oil level warning indicator Speedometer Grip warmer indicator Select/reset button Thumb warmer indicator Fuel meter and grip/thumb warmer heat level...
Owners Manual
Page 21
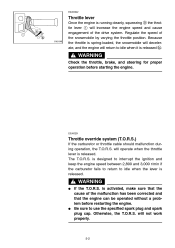
... to idle when it is released b. Because the throttle is spring-loaded, the snowmobile will decelerate, and the engine will increase the engine speed and cause engagement of the drive system. is designed to interrupt the ignition and keep the engine speed between 2,800 and 3,000 r/min if the carburetor fails to return to use the specified spark plug and spark plug cap. WARNING @ G G If the T.O.R.S. Regulate the speed...
... to idle when it is released b. Because the throttle is spring-loaded, the snowmobile will decelerate, and the engine will increase the engine speed and cause engagement of the drive system. is designed to interrupt the ignition and keep the engine speed between 2,800 and 3,000 r/min if the carburetor fails to return to use the specified spark plug and spark plug cap. WARNING @ G G If the T.O.R.S. Regulate the speed...
Owners Manual
Page 23
... to zero) G warning indicators (which show self-diagnosis, coolant temperature, fuel level, and oil level warnings) G a "D.C.S." (Detonation Control System) indicator light (which shows occurrences of abnormal combustion) G a fuel meter (which shows the fuel remaining in the fuel tank) G a grip/thumb warmer heat level indicator (which shows the heat level of the grip warmer or the thumb warmer) After the engine is started, the tachometer 1 makes...
... to zero) G warning indicators (which show self-diagnosis, coolant temperature, fuel level, and oil level warnings) G a "D.C.S." (Detonation Control System) indicator light (which shows occurrences of abnormal combustion) G a fuel meter (which shows the fuel remaining in the fuel tank) G a grip/thumb warmer heat level indicator (which shows the heat level of the grip warmer or the thumb warmer) After the engine is started, the tachometer 1 makes...
Owners Manual
Page 45
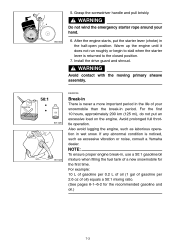
.... Install the drive guard and shroud. Also avoid lugging the engine, such as excessive vibration or noise, consult a Yamaha dealer. Grasp the screwdriver handle and pull briskly. Warm up the engine until it does not run roughly or begin to stall when the starter lever is noticed, such as laborious operation in , use a 50:1 gasoline/oil mixture when filling the fuel tank of...
.... Install the drive guard and shroud. Also avoid lugging the engine, such as excessive vibration or noise, consult a Yamaha dealer. Grasp the screwdriver handle and pull briskly. Warm up the engine until it does not run roughly or begin to stall when the starter lever is noticed, such as laborious operation in , use a 50:1 gasoline/oil mixture when filling the fuel tank of...
Owners Manual
Page 46
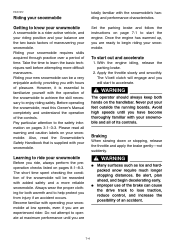
... alert, plan ahead, and begin riding your new snowmobile can cause the drive track to start the engine. Also, read this Owner's Manual completely and understand the operation of the controls. Pay particular attention to the safety information on the handlebar. Avoid high speeds until you are @ WARNING G G Many surfaces such as ice and hardpacked snow require much longer...
... alert, plan ahead, and begin riding your new snowmobile can cause the drive track to start the engine. Also, read this Owner's Manual completely and understand the operation of the controls. Pay particular attention to the safety information on the handlebar. Avoid high speeds until you are @ WARNING G G Many surfaces such as ice and hardpacked snow require much longer...
Owners Manual
Page 47
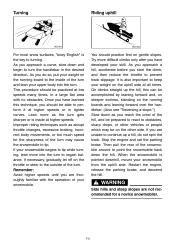
...turning. Restart the engine, release the parking brake, and descend the hill. Once you have developed your snowmobile from the uphill side. As you approach a hill, accelerate before you are not recommended for the sharpness of the turn and lean your weight on the running board to the inside of the turn to tip. WARNING... turn . Stop the engine and set the parking brake. Then pull the rear of the hill, and be prepared to react to prevent track slippage. When the snowmobile is pointed downhill, mount your skill. If you start the climb, and then reduce the throttle...
...turning. Restart the engine, release the parking brake, and descend the hill. Once you have developed your snowmobile from the uphill side. As you approach a hill, accelerate before you are not recommended for the sharpness of the turn and lean your weight on the running board to the inside of the turn to tip. WARNING... turn . Stop the engine and set the parking brake. Then pull the rear of the hill, and be prepared to react to prevent track slippage. When the snowmobile is pointed downhill, mount your skill. If you start the climb, and then reduce the throttle...
Owners Manual
Page 48
...WARNING @ WARNING @ Use extra caution when applying the brake during a descent. Avoid accelerating, turning, and braking rapidly. If this happens, steer in your uphill leg on ice or icy surfaces can be prepared for a novice snowmobiler. @ Traversing a slope requires you wish to kneel with light pressure. As you to keep the clutch...Traversing a slope WARNING @ WARNING @ When you to use engine compression to help slow the snowmobile, and to position your body weight as needed. Steering is important to apply just enough throttle to shift your weight towards the ...
...WARNING @ WARNING @ Use extra caution when applying the brake during a descent. Avoid accelerating, turning, and braking rapidly. If this happens, steer in your uphill leg on ice or icy surfaces can be prepared for a novice snowmobiler. @ Traversing a slope requires you wish to kneel with light pressure. As you to keep the clutch...Traversing a slope WARNING @ WARNING @ When you to use engine compression to help slow the snowmobile, and to position your body weight as needed. Steering is important to apply just enough throttle to shift your weight towards the ...
Owners Manual
Page 53
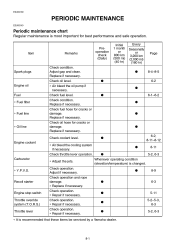
... mi) (160 hr) G Page Spark plugs Check condition. Check throttle lever operation. ∗ Adjust the jets. Carburetor ∗ Y.P.V.S. Replace if necessary. G G G G G 8-9 6-3 5-11 5-2-5-3, 6-3 5-2, 6-3 8-11 5-2, 6-3 Engine coolant ∗ Air bleed the cooling system if necessary. Check operation. ∗ Repair if necessary. Check operation. ∗ Repair if necessary. G G 8-4-8-5 6-2 Engine oil Fuel ∗ Fuel filter ∗ Fuel line G 6-1-6-2 G G ∗ Oil line G 6-2, 8-11-8-12 G G Whenever operating condition (elevation/temperature) is recommended that...
... mi) (160 hr) G Page Spark plugs Check condition. Check throttle lever operation. ∗ Adjust the jets. Carburetor ∗ Y.P.V.S. Replace if necessary. G G G G G 8-9 6-3 5-11 5-2-5-3, 6-3 5-2, 6-3 8-11 5-2, 6-3 Engine coolant ∗ Air bleed the cooling system if necessary. Check operation. ∗ Repair if necessary. Check operation. ∗ Repair if necessary. G G 8-4-8-5 6-2 Engine oil Fuel ∗ Fuel filter ∗ Fuel line G 6-1-6-2 G G ∗ Oil line G 6-2, 8-11-8-12 G G Whenever operating condition (elevation/temperature) is recommended that...
Owners Manual
Page 54
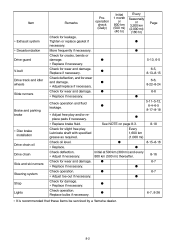
...) (40 hr) Every Seasonally or 3,200 km (2,000 mi) (160 hr) G G Page ∗ Exhaust system ∗ Decarbonization Drive guard V-belt Drive track and idler wheels Slide runners Check for slight free play and/or replace pads if necessary. ∗ Replace brake fluid. Check operation. Check for leakage. G G G G G G G G G 5-13, 6-5 6-5, 8-13-8-15 6-6, 8-22-8-24 6-6 G 5-11-5-12, 6-4-6-5 8-17-8-18 G Brake and parking brake See NOTE on page 8-3.
...) (40 hr) Every Seasonally or 3,200 km (2,000 mi) (160 hr) G G Page ∗ Exhaust system ∗ Decarbonization Drive guard V-belt Drive track and idler wheels Slide runners Check for slight free play and/or replace pads if necessary. ∗ Replace brake fluid. Check operation. Check for leakage. G G G G G G G G G 5-13, 6-5 6-5, 8-13-8-15 6-6, 8-22-8-24 6-6 G 5-11-5-12, 6-4-6-5 8-17-8-18 G Brake and parking brake See NOTE on page 8-3.
Owners Manual
Page 57
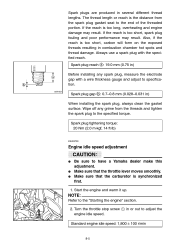
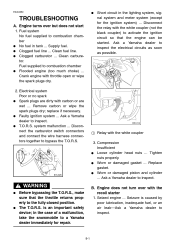
... installing any grime from the spark plug gasket seat to adjust the engine idle speed. Always use a spark plug with a wire thickness gauge and adjust to the specified torque. Spark plug gap b: 0.7-0.8 mm (0.028-0.031 in several different thread lengths. Spark plug tightening torque: 20 Nm (2.0 m·kgf, 14 ft·lb) ESU03700 Engine idle speed adjustment CAUTION: @ G G G @ Be sure to the "Starting the engine" section. @ 2. Standard engine idle speed: 1,800 ± 100 r/min...
... installing any grime from the spark plug gasket seat to adjust the engine idle speed. Always use a spark plug with a wire thickness gauge and adjust to the specified torque. Spark plug gap b: 0.7-0.8 mm (0.028-0.031 in several different thread lengths. Spark plug tightening torque: 20 Nm (2.0 m·kgf, 14 ft·lb) ESU03700 Engine idle speed adjustment CAUTION: @ G G G @ Be sure to the "Starting the engine" section. @ 2. Standard engine idle speed: 1,800 ± 100 r/min...
Owners Manual
Page 60
... and the throttle operates smoothly after assembling the carburetor. @ 3. Make sure that the throttle outer cable is hot. Place a rag under the carburetor before removing the drain plug or float chamber to the setting chart which could ignite and cause injury. WARNING @ G G G @ Never remove the drain plug or the float chamber while the engine is firmly seated in place...
... and the throttle operates smoothly after assembling the carburetor. @ 3. Make sure that the throttle outer cable is hot. Place a rag under the carburetor before removing the drain plug or float chamber to the setting chart which could ignite and cause injury. WARNING @ G G G @ Never remove the drain plug or the float chamber while the engine is firmly seated in place...
Owners Manual
Page 61
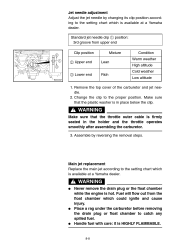
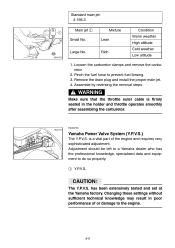
.... @ ESU00156 Yamaha Power Valve System (Y.P.V.S.) The Y.P .V.S. Pinch the fuel hose to do so properly. .V.S. 1 Y.P CAUTION: @ The Y.P.V.S. WARNING @ Make sure that the throttle outer cable is a vital part of or damage to the engine. @ 8-9 has been extensively tested and set at the Yamaha factory. Assemble by reversing the removal steps. Standard main jet: # 156.3 CD-04E Main jet 1 Mixture Lean Rich Condition Warm...
.... @ ESU00156 Yamaha Power Valve System (Y.P.V.S.) The Y.P .V.S. Pinch the fuel hose to do so properly. .V.S. 1 Y.P CAUTION: @ The Y.P.V.S. WARNING @ Make sure that the throttle outer cable is a vital part of or damage to the engine. @ 8-9 has been extensively tested and set at the Yamaha factory. Assemble by reversing the removal steps. Standard main jet: # 156.3 CD-04E Main jet 1 Mixture Lean Rich Condition Warm...
Owners Manual
Page 79
... G 9- Engine turns over with carbon or are dirty with the recoil starter 1. Fuel supplied to activate the ignition circuit so that the throttle returns properly to bypass the T.O.R.S. Short circuit in the lighting system, signal system and meter system (except for repair. @ 9-1 Compression Insufficient G Loose cylinder head nuts ...Tighten nuts properly. is caused by poor lubrication, inadequate fuel, or an air leak-Ask a Yamaha...
... G 9- Engine turns over with carbon or are dirty with the recoil starter 1. Fuel supplied to activate the ignition circuit so that the throttle returns properly to bypass the T.O.R.S. Short circuit in the lighting system, signal system and meter system (except for repair. @ 9-1 Compression Insufficient G Loose cylinder head nuts ...Tighten nuts properly. is caused by poor lubrication, inadequate fuel, or an air leak-Ask a Yamaha...
Owners Manual
Page 80
... the spark plugs and turn the engine over several times with flat spots ...Replace. 4. Leaking coolant ...Ask a Yamaha dealer to expel excess fuel. above . Air in drive chain and sprockets 1. Worn or sticking secondary sheave assembly ...Ask a Yamaha dealer to inspect. 3. Worn or damaged drive track ...Ask a Yamaha dealer to inspect. Ask a Yamaha dealer to inspect. 9-2 Improper fuel flow ...See A.1. above . D. Engine overheats 1. Improper V-belt ...Replace with the driveline ...See G above . 4. I. Incorrect V-belt clutch...
... the spark plugs and turn the engine over several times with flat spots ...Replace. 4. Leaking coolant ...Ask a Yamaha dealer to expel excess fuel. above . Air in drive chain and sprockets 1. Worn or sticking secondary sheave assembly ...Ask a Yamaha dealer to inspect. 3. Worn or damaged drive track ...Ask a Yamaha dealer to inspect. Ask a Yamaha dealer to inspect. 9-2 Improper fuel flow ...See A.1. above . D. Engine overheats 1. Improper V-belt ...Replace with the driveline ...See G above . 4. I. Incorrect V-belt clutch...
Owners Manual
Page 87
...Yellow/Black Y/G...Yellow/Green Y/L...Yellow/Blue Y/R ...Yellow/Red Y/W ...Yellow/White AC magneto Rectifier/regulator Condenser Main fuse Starter relay Battery Starter motor Main switch Engine stop switch Throttle switch Carburetor switch Grip warmer Thumb warmer CDI unit Servo motor Throttle position sensor Grip warmer adjustment switch Thumb warmer adjustment switch Engine ground Ignition coil Spark plug Frame ground Coolant temperature sensor DC back buzzer Gear position switch Knock sensor Brake light switch Tail/brake light Speed sensor Fuel sender Oil level switch High beam indicator...
...Yellow/Black Y/G...Yellow/Green Y/L...Yellow/Blue Y/R ...Yellow/Red Y/W ...Yellow/White AC magneto Rectifier/regulator Condenser Main fuse Starter relay Battery Starter motor Main switch Engine stop switch Throttle switch Carburetor switch Grip warmer Thumb warmer CDI unit Servo motor Throttle position sensor Grip warmer adjustment switch Thumb warmer adjustment switch Engine ground Ignition coil Spark plug Frame ground Coolant temperature sensor DC back buzzer Gear position switch Knock sensor Brake light switch Tail/brake light Speed sensor Fuel sender Oil level switch High beam indicator...