

Owners Manual
Page 6
...belt holders ...5-14 Spark plug holders...5-14 Carburetor coolant shut-off lever ...5-14 Backrest ...5-15 Storage compartment ...5-15 PRE-OPERATION CHECKS ...6-1 Fuel ...6-1 Engine oil...6-2 Coolant ...6-2 Throttle lever ...6-3 Recoil starter ...6-3 Throttle override system (T.O.R.S.) ...6-3 Brake ...6-4 Brake fluid leakage ...6-5 V-belt ...6-5 Drive guard ...6-5 Drive track ...6-6 Slide runners ...6-6 Skis and ski runners ...6-7 Steering system...6-7 Lights ...6-7 Battery ...6-7 Air filter ...6-8 Fittings and fasteners ...6-9 Tool kit and recommended equipment...6-9 OPERATION ...7-1 Starting...
...belt holders ...5-14 Spark plug holders...5-14 Carburetor coolant shut-off lever ...5-14 Backrest ...5-15 Storage compartment ...5-15 PRE-OPERATION CHECKS ...6-1 Fuel ...6-1 Engine oil...6-2 Coolant ...6-2 Throttle lever ...6-3 Recoil starter ...6-3 Throttle override system (T.O.R.S.) ...6-3 Brake ...6-4 Brake fluid leakage ...6-5 V-belt ...6-5 Drive guard ...6-5 Drive track ...6-6 Slide runners ...6-6 Skis and ski runners ...6-7 Steering system...6-7 Lights ...6-7 Battery ...6-7 Air filter ...6-8 Fittings and fasteners ...6-9 Tool kit and recommended equipment...6-9 OPERATION ...7-1 Starting...

Owners Manual
Page 7
... ...8-11 V-belt replacement ...8-13 Checking the drive chain housing oil level and the drive chain tension ...8-15 Checking the brake pads...8-17 Checking the parking brake pads...8-17 Checking the brake fluid level...8-18 Brake fluid replacement...8-18 Suspension...8-19 Drive track adjustment...8-23 Ski alignment ...8-25 Lubrication ...8-26 Headlight bulb replacement...8-27 Headlight beam adjustment...8-27 Battery ...8-28 Fuse replacement...8-29 TROUBLESHOOTING ...9-1 STORAGE ...10-1 SPECIFICATIONS ...11-1 Dimensions...11-1 Engine ...11-1 Chassis...11-2 Electric...11-3 WIRING DIAGRAM ...12-1
... ...8-11 V-belt replacement ...8-13 Checking the drive chain housing oil level and the drive chain tension ...8-15 Checking the brake pads...8-17 Checking the parking brake pads...8-17 Checking the brake fluid level...8-18 Brake fluid replacement...8-18 Suspension...8-19 Drive track adjustment...8-23 Ski alignment ...8-25 Lubrication ...8-26 Headlight bulb replacement...8-27 Headlight beam adjustment...8-27 Battery ...8-28 Fuse replacement...8-29 TROUBLESHOOTING ...9-1 STORAGE ...10-1 SPECIFICATIONS ...11-1 Dimensions...11-1 Engine ...11-1 Chassis...11-2 Electric...11-3 WIRING DIAGRAM ...12-1

Owners Manual
Page 14
... injury or death may overheat the brake disc and reduce braking ability. 3-1 Check the throttle, brake, and steering for use on pages 6-1-6-9 before starting the engine. Become familiar with all labels before starting the engine. Never drive the snowmobile with another vehicle. 3. Such use the following . For safety and proper care of the operating controls and their function. Your ability to operate the...
... injury or death may overheat the brake disc and reduce braking ability. 3-1 Check the throttle, brake, and steering for use on pages 6-1-6-9 before starting the engine. Become familiar with all labels before starting the engine. Never drive the snowmobile with another vehicle. 3. Such use the following . For safety and proper care of the operating controls and their function. Your ability to operate the...
Owners Manual
Page 15
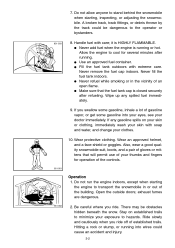
...doors; Never fill the fuel tank indoors. G Make sure that will permit use of gasoline vapor, or get some gasoline into wires could be obstacles hidden beneath the snow. Do not run the engine indoors, except when starting , inspecting, or adjusting the snowmobile. Stay on your skin or clothing, immediately wash your skin with soap and water, and change... controls. Hitting a rock or stump, or running into your eyes, see your thumbs and fingers for several minutes after refueling. 7. G Fill the fuel tank outdoors with care; If any spilled fuel immediately. 9. exhaust...
...doors; Never fill the fuel tank indoors. G Make sure that will permit use of gasoline vapor, or get some gasoline into wires could be obstacles hidden beneath the snow. Do not run the engine indoors, except when starting , inspecting, or adjusting the snowmobile. Stay on your skin or clothing, immediately wash your skin with soap and water, and change... controls. Hitting a rock or stump, or running into your eyes, see your thumbs and fingers for several minutes after refueling. 7. G Fill the fuel tank outdoors with care; If any spilled fuel immediately. 9. exhaust...
Owners Manual
Page 16
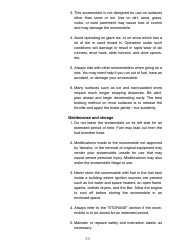
... run out of time. Maintain or replace safety and instruction labels, as ice and hard-packed snow require much longer stopping distances. Avoid operating on glare ice, or on most surfaces is to cool off before storing the snowmobile in the fuel tank inside a building where ignition sources are present such as hot water and space heaters, an open flame, sparks...
... run out of time. Maintain or replace safety and instruction labels, as ice and hard-packed snow require much longer stopping distances. Avoid operating on glare ice, or on most surfaces is to cool off before storing the snowmobile in the fuel tank inside a building where ignition sources are present such as hot water and space heaters, an open flame, sparks...
Owners Manual
Page 18
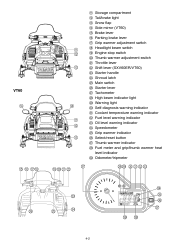
... compartment Tail/brake light Snow flap Side mirror (VT60) Brake lever Parking brake lever Grip warmer adjustment switch Headlight beam switch Engine stop switch Thumb warmer adjustment switch Throttle lever Shift lever (SXV60ER/VT60) Starter handle Shroud latch Main switch Starter lever Tachometer High beam indicator light Warning light Self-diagnosis warning indicator Coolant temperature warning indicator Fuel level warning indicator Oil level warning indicator Speedometer Grip warmer indicator Select/reset button Thumb warmer indicator Fuel meter and grip/thumb warmer heat...
... compartment Tail/brake light Snow flap Side mirror (VT60) Brake lever Parking brake lever Grip warmer adjustment switch Headlight beam switch Engine stop switch Thumb warmer adjustment switch Throttle lever Shift lever (SXV60ER/VT60) Starter handle Shroud latch Main switch Starter lever Tachometer High beam indicator light Warning light Self-diagnosis warning indicator Coolant temperature warning indicator Fuel level warning indicator Oil level warning indicator Speedometer Grip warmer indicator Select/reset button Thumb warmer indicator Fuel meter and grip/thumb warmer heat...
Owners Manual
Page 20
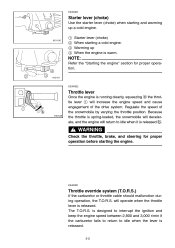
... the ignition and keep the engine speed between 2,800 and 3,000 r/min if the carburetor fails to return to idle when it is released. 5-2 The T.O.R.S. Regulate the speed of the drive system. ESU00201 Starter lever (choke) Use the starter lever (choke) when starting and warming up When the engine is released. WARNING @ Check the throttle, brake, and steering for proper operation. @ ESU00022 Throttle lever Once the engine is running cleanly...
... the ignition and keep the engine speed between 2,800 and 3,000 r/min if the carburetor fails to return to idle when it is released. 5-2 The T.O.R.S. Regulate the speed of the drive system. ESU00201 Starter lever (choke) Use the starter lever (choke) when starting and warming up When the engine is released. WARNING @ Check the throttle, brake, and steering for proper operation. @ ESU00022 Throttle lever Once the engine is running cleanly...
Owners Manual
Page 22
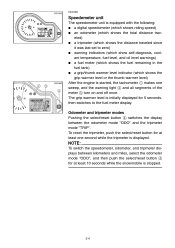
... last set to zero) G warning indicators (which show self-diagnosis, coolant temperature, fuel level, and oil level warnings) G a fuel meter (which shows the fuel remaining in the fuel tank) G a grip/thumb warmer level indicator (which shows the grip warmer level or the thumb warmer level) After the engine is initially displayed for 5 seconds, then switches to the fuel meter display. Odometer and...
... last set to zero) G warning indicators (which show self-diagnosis, coolant temperature, fuel level, and oil level warnings) G a fuel meter (which shows the fuel remaining in the fuel tank) G a grip/thumb warmer level indicator (which shows the grip warmer level or the thumb warmer level) After the engine is initially displayed for 5 seconds, then switches to the fuel meter display. Odometer and...
Owners Manual
Page 43
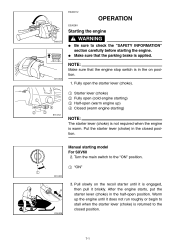
... run roughly or begin to check the "SAFETY INFORMATION" section carefully before starting ) NOTE: @ The starter lever (choke) is not required when the engine is engaged, then pull it is warm. Turn the main switch to the closed position. @ Manual starting model For SXV60 2. NOTE: @ Make sure that the parking brake is applied. Pull slowly on position. @ 1. ESU00112 7- After the engine starts, put the starter...
... run roughly or begin to check the "SAFETY INFORMATION" section carefully before starting ) NOTE: @ The starter lever (choke) is not required when the engine is engaged, then pull it is warm. Turn the main switch to the closed position. @ Manual starting model For SXV60 2. NOTE: @ Make sure that the parking brake is applied. Pull slowly on position. @ 1. ESU00112 7- After the engine starts, put the starter...
Owners Manual
Page 47
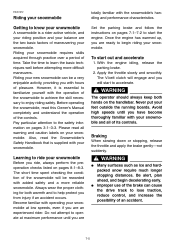
... start the engine. The V-belt clutch will start to the safety information on pages 7-1-7-2 to help protect you are @ WARNING G G Many surfaces such as ice and hardpacked snow require much longer stopping distances. Do not attempt to learn the basic techniques well before attempting more reliable snowmobile. Riding your snowmobile. Take the time to operate at low speeds, even if...
... start the engine. The V-belt clutch will start to the safety information on pages 7-1-7-2 to help protect you are @ WARNING G G Many surfaces such as ice and hardpacked snow require much longer stopping distances. Do not attempt to learn the basic techniques well before attempting more reliable snowmobile. Riding your snowmobile. Take the time to operate at low speeds, even if...
Owners Manual
Page 48
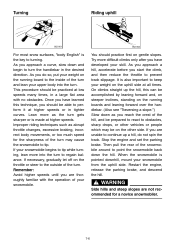
... is the key to the inside of the turn gets sharper or is also important to perform it at all times. As you approach a hill, accelerate before you reach the crest of the hill, and be on the throttle or steer to the outside of the turn and lean your upper body into the turn . Restart the engine, release the parking brake, and...
... is the key to the inside of the turn gets sharper or is also important to perform it at all times. As you approach a hill, accelerate before you reach the crest of the hill, and be on the throttle or steer to the outside of the turn and lean your upper body into the turn . Restart the engine, release the parking brake, and...
Owners Manual
Page 49
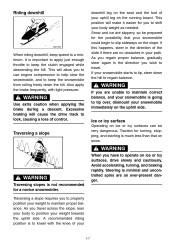
...control. @ If you wish to travel across the slope, lean your uphill leg on the slope. downhill leg on the seat and the foot of the slide if there are an ever-present danger. @ Traversing slopes is important to apply just enough throttle to keep speed to a minimum. If this happens, steer... prepared for turning, stopping, and starting is to lock, causing a loss of your body weight as needed. A recommended riding position is much less than that your snowmobile could begin to shift your 7-7 Excessive braking will cause the drive track to kneel with light pressure. Traction for...
...control. @ If you wish to travel across the slope, lean your uphill leg on the slope. downhill leg on the seat and the foot of the slide if there are an ever-present danger. @ Traversing slopes is important to apply just enough throttle to keep speed to a minimum. If this happens, steer... prepared for turning, stopping, and starting is to lock, causing a loss of your body weight as needed. A recommended riding position is much less than that your snowmobile could begin to shift your 7-7 Excessive braking will cause the drive track to kneel with light pressure. Traction for...
Owners Manual
Page 55
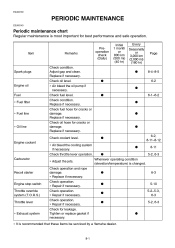
... items be serviced by a Yamaha dealer. 8-1 Check oil level. Tighten or replace gasket if necessary. Check operation. ∗ Repair if necessary. PERIODIC MAINTENANCE ESU00140 Periodic maintenance chart Regular maintenance is most important for cracks or damage. Replace if necessary. Check for cracks or damage. G G G G G 6-3 5-10 5-2-5-3, 6-3 5-2, 6-3 8-11 5-2, 6-3 Engine coolant ∗ Air bleed the cooling system if necessary. Carburetor Recoil starter Engine stop switch Throttle override system (T.O.R.S.) Throttle lever ∗ Exhaust system...
... items be serviced by a Yamaha dealer. 8-1 Check oil level. Tighten or replace gasket if necessary. Check operation. ∗ Repair if necessary. PERIODIC MAINTENANCE ESU00140 Periodic maintenance chart Regular maintenance is most important for cracks or damage. Replace if necessary. Check for cracks or damage. G G G G G 6-3 5-10 5-2-5-3, 6-3 5-2, 6-3 8-11 5-2, 6-3 Engine coolant ∗ Air bleed the cooling system if necessary. Carburetor Recoil starter Engine stop switch Throttle override system (T.O.R.S.) Throttle lever ∗ Exhaust system...
Owners Manual
Page 56
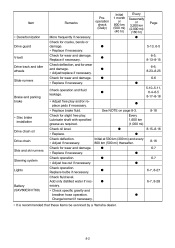
Check for wear and damage. ∗ Replace if necessary. Lubricate shaft with specified grease as required. Add only distilled water if necessary. ∗ Check specific gravity and breather hose operation. Charge/correct if necessary. Every 1,600 km (1,000 mi) 8-18 ∗ Disc brake installation Drive chain oil Drive chain Skis and ski runners Steering system Lights 8-15-8-16 G Initial at 500 km (300...
Check for wear and damage. ∗ Replace if necessary. Lubricate shaft with specified grease as required. Add only distilled water if necessary. ∗ Check specific gravity and breather hose operation. Charge/correct if necessary. Every 1,600 km (1,000 mi) 8-18 ∗ Disc brake installation Drive chain oil Drive chain Skis and ski runners Steering system Lights 8-15-8-16 G Initial at 500 km (300...
Owners Manual
Page 57
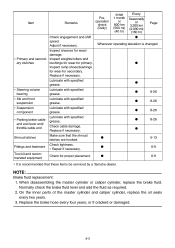
... that these items be serviced by a Yamaha dealer. Check tightness. ∗ Repair if necessary. When disassembling the master cylinder or caliper cylinder, replace the brake fluid. Adjust if necessary. Lubricate with specified grease. ∗ Steering column bearing ∗ Ski and front suspension ∗ Suspension component ∗ Parking brake cable end and lever end/ throttle cable end Shroud latches Fittings and fasteners Tool kit and recommended equipment Lubricate...
... that these items be serviced by a Yamaha dealer. Check tightness. ∗ Repair if necessary. When disassembling the master cylinder or caliper cylinder, replace the brake fluid. Adjust if necessary. Lubricate with specified grease. ∗ Steering column bearing ∗ Ski and front suspension ∗ Suspension component ∗ Parking brake cable end and lever end/ throttle cable end Shroud latches Fittings and fasteners Tool kit and recommended equipment Lubricate...
Owners Manual
Page 63
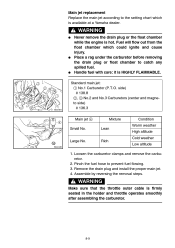
... the proper main jet. 4. Assemble by reversing the removal steps. WARNING @ G G G @ Never remove the drain plug or the float chamber while the engine is HIGHLY FLAMMABLE. Standard main jet: 1 No.1 Carburetor (P.T.O. Loosen the carburetor clamps and remove the carburetor. 2. Pinch the fuel hose to catch any spilled fuel. WARNING @ Make sure that the throttle outer cable is available at...
... the proper main jet. 4. Assemble by reversing the removal steps. WARNING @ G G G @ Never remove the drain plug or the float chamber while the engine is HIGHLY FLAMMABLE. Standard main jet: 1 No.1 Carburetor (P.T.O. Loosen the carburetor clamps and remove the carburetor. 2. Pinch the fuel hose to catch any spilled fuel. WARNING @ Make sure that the throttle outer cable is available at...
Owners Manual
Page 84
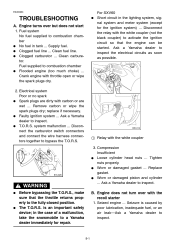
... fuel line. Electrical system Poor or no spark G Spark plugs are dirty with the recoil starter 1. G T.O.R.S. WARNING @ G G Before bypassing the T.O.R.S., make sure that the engine can be started. is caused by poor lubrication, inadequate fuel, or an air leak-Ask a Yamaha dealer to activate the ignition circuit so that the throttle returns properly to bypass the T.O.R.S. system malfunction ...Disconnect the carburetor switch connectors and connect the wire harness...
... fuel line. Electrical system Poor or no spark G Spark plugs are dirty with the recoil starter 1. G T.O.R.S. WARNING @ G G Before bypassing the T.O.R.S., make sure that the engine can be started. is caused by poor lubrication, inadequate fuel, or an air leak-Ask a Yamaha dealer to activate the ignition circuit so that the throttle returns properly to bypass the T.O.R.S. system malfunction ...Disconnect the carburetor switch connectors and connect the wire harness...
Owners Manual
Page 85
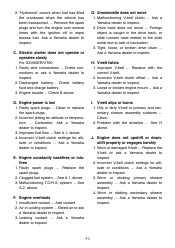
... assembly ...Ask a Yamaha dealer to expel excess fuel. "Hydrolock" occurs when fuel has filled the crankcase when the vehicle has been transported...Remove the spark plugs and turn the engine over several times with the ignition off to inspect. 9-2 Discharged battery...Check battery fluid and charge battery. 3. Engine trouble ...Check B above . 4. Improper fuel flow ...See A.1. Incorrect V-belt clutch settings for altitude or temperature ...Carburetor. Faulty spark plugs ...Replace the spark plugs. 2. Engine overheats 1. V-belt twists 1. Incorrect V-belt clutch...
... assembly ...Ask a Yamaha dealer to expel excess fuel. "Hydrolock" occurs when fuel has filled the crankcase when the vehicle has been transported...Remove the spark plugs and turn the engine over several times with the ignition off to inspect. 9-2 Discharged battery...Check battery fluid and charge battery. 3. Engine trouble ...Check B above . 4. Improper fuel flow ...See A.1. Incorrect V-belt clutch settings for altitude or temperature ...Carburetor. Faulty spark plugs ...Replace the spark plugs. 2. Engine overheats 1. V-belt twists 1. Incorrect V-belt clutch...

Owners Manual
Page 92
...B O W (BLACK) R R/ W B (BLACK) R/ W R B (BLACK) a Z L/Y W É L/R G/Y B G Lg Y B U Y B Y [ Y Z R/ B B/G R/B G/B R/ B A R/ B G/R G/ R A G/ R G/ B G/ B A G/ B Ê O/B L/R B G/Y L/R O/B G/Y B O É L Y X B/G A B/G T B B G WIRE HARNESS SUB-WIRE HARNESS 3 Y R B B L (BLACK) (BLACK) B G B G É L/R G/Y B B Y G Gy B R/B Br B Y G W G B V G/B B/G (GREEN) (GREEN) B/G G G Y B Y B G/ Y L /R B O/B L/R B G/Y Ê Ê L G/ Y B L /R G/ Y B ` ` B B T B G B B F B L/R O/B G/Y B SUB-WIRE TAIL / BRAKE LIGHT SUB-WIRE HARNESS 3 HARNESS B A B ESU00233 1-
...B O W (BLACK) R R/ W B (BLACK) R/ W R B (BLACK) a Z L/Y W É L/R G/Y B G Lg Y B U Y B Y [ Y Z R/ B B/G R/B G/B R/ B A R/ B G/R G/ R A G/ R G/ B G/ B A G/ B Ê O/B L/R B G/Y L/R O/B G/Y B O É L Y X B/G A B/G T B B G WIRE HARNESS SUB-WIRE HARNESS 3 Y R B B L (BLACK) (BLACK) B G B G É L/R G/Y B B Y G Gy B R/B Br B Y G W G B V G/B B/G (GREEN) (GREEN) B/G G G Y B Y B G/ Y L /R B O/B L/R B G/Y Ê Ê L G/ Y B L /R G/ Y B ` ` B B T B G B B F B L/R O/B G/Y B SUB-WIRE TAIL / BRAKE LIGHT SUB-WIRE HARNESS 3 HARNESS B A B ESU00233 1-
Owners Manual
Page 93
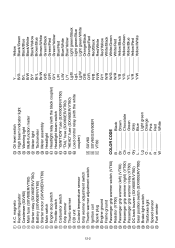
... Starter relay (SXV60ER/VT60) Battery (SXV60ER/VT60) Starter motor (SXV60ER/VT60) Main switch Engine stop switch Throttle switch Carburetor switch Grip warmer Thumb warmer CDI unit Coolant temperature sensor Grip warmer adjustment switch Thumb warmer adjustment switch Ignition coil Spark plug Engine ground Frame ground Passenger grip warmer switch (VT60) Resistor (VT60) Passenger grip warmer (left) (VT60) Passenger grip warmer (right) (VT60) Passenger grip warmer relay (VT60) DC back buzzer (SXV60ER/VT60) Gear position switch (SXV60ER/VT60) Brake light switch Tail/brake light Speed sensor Fuel...
... Starter relay (SXV60ER/VT60) Battery (SXV60ER/VT60) Starter motor (SXV60ER/VT60) Main switch Engine stop switch Throttle switch Carburetor switch Grip warmer Thumb warmer CDI unit Coolant temperature sensor Grip warmer adjustment switch Thumb warmer adjustment switch Ignition coil Spark plug Engine ground Frame ground Passenger grip warmer switch (VT60) Resistor (VT60) Passenger grip warmer (left) (VT60) Passenger grip warmer (right) (VT60) Passenger grip warmer relay (VT60) DC back buzzer (SXV60ER/VT60) Gear position switch (SXV60ER/VT60) Brake light switch Tail/brake light Speed sensor Fuel...