
Owners Manual
Page 6
......5-3 Engine break-in ...5-3 Parking ...5-4 PERIODIC MAINTENANCE AND MINOR REPAIR ...6-1 PERIODIC MAINTENANCE 6-1 Owner's tool kit ...6-1 Periodic maintenance chart for the emission control system ...6-2 General maintenance and lubrication chart ...6-3 Removing and installing panels ...6-6 Checking the spark plug ...6-7 Air filter and V-belt case air filter elements ...6-8 EAU10210 1 2 3 4 5 6 7 8 9 Replacing the tail/brake light bulb ...6-11 Replacing a turn signal light bulb ...6-11 Checking the front brake pads and rear brake shoes ...6-12 Checking the brake fluid level ...6-13 Changing...
......5-3 Engine break-in ...5-3 Parking ...5-4 PERIODIC MAINTENANCE AND MINOR REPAIR ...6-1 PERIODIC MAINTENANCE 6-1 Owner's tool kit ...6-1 Periodic maintenance chart for the emission control system ...6-2 General maintenance and lubrication chart ...6-3 Removing and installing panels ...6-6 Checking the spark plug ...6-7 Air filter and V-belt case air filter elements ...6-8 EAU10210 1 2 3 4 5 6 7 8 9 Replacing the tail/brake light bulb ...6-11 Replacing a turn signal light bulb ...6-11 Checking the front brake pads and rear brake shoes ...6-12 Checking the brake fluid level ...6-13 Changing...
Owners Manual
Page 7
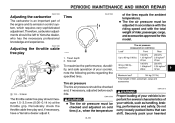
TABLE OF CONTENTS Tires ...6-19 Cast wheels ...6-21 Adjusting the brake lever free play ...6-21 Adjusting the rear brake lever free play ...6-21 Battery ...6-22 Replacing the fuse ...6-23 Engine oil and oil strainer ...6-24 Troubleshooting ...6-26 Troubleshooting chart ...6-27 SCOOTER CARE AND STORAGE ...7-1 Care...7-1 Storage ...7-3 SPECIFICATIONS ...8-1 CONSUMER INFORMATION 9-1 Identification numbers ...9-1 Reporting safety defects ...9-3 Motorcycle noise regulation .. 9-4 YAMAHA MOTOR CORPORATION, U.S.A STREET AND ENDURO MOTORCYCLE LIMITED WARRANTY ...9-5 YAMAHA EXTENDED SERVICE (Y.E.S.) ...
TABLE OF CONTENTS Tires ...6-19 Cast wheels ...6-21 Adjusting the brake lever free play ...6-21 Adjusting the rear brake lever free play ...6-21 Battery ...6-22 Replacing the fuse ...6-23 Engine oil and oil strainer ...6-24 Troubleshooting ...6-26 Troubleshooting chart ...6-27 SCOOTER CARE AND STORAGE ...7-1 Care...7-1 Storage ...7-3 SPECIFICATIONS ...8-1 CONSUMER INFORMATION 9-1 Identification numbers ...9-1 Reporting safety defects ...9-3 Motorcycle noise regulation .. 9-4 YAMAHA MOTOR CORPORATION, U.S.A STREET AND ENDURO MOTORCYCLE LIMITED WARRANTY ...9-5 YAMAHA EXTENDED SERVICE (Y.E.S.) ...
Owners Manual
Page 10
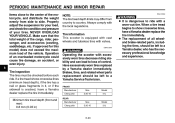
... way reduce ground clearance or cornering clearance, limit suspension travel, steering travel or control operation, or obscure lights or reflectors. 9 Accessories fitted to the handlebar or the front fork area can create unstable handling or a slow steering response. Check accessory mounts and cargo restraints frequently. 8 Never attach any accessories. Such items can create instability due to improper weight distribution or aerodynamic changes. Wind...
... way reduce ground clearance or cornering clearance, limit suspension travel, steering travel or control operation, or obscure lights or reflectors. 9 Accessories fitted to the handlebar or the front fork area can create unstable handling or a slow steering response. Check accessory mounts and cargo restraints frequently. 8 Never attach any accessories. Such items can create instability due to improper weight distribution or aerodynamic changes. Wind...
Owners Manual
Page 11
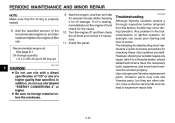
... run for any length of gasoline vapor, or allow gasoline to touch these hot areas. 9 Do not park the scooter on a slope or soft ground, otherwise it may cause loss of lights or engine power. Always operate your doctor immediately. Q SAFETY INFORMATION tric failure could result, which could catch fire. 8 If you should swallow any gasoline, inhale a lot of time...
... run for any length of gasoline vapor, or allow gasoline to touch these hot areas. 9 Do not park the scooter on a slope or soft ground, otherwise it may cause loss of lights or engine power. Always operate your doctor immediately. Q SAFETY INFORMATION tric failure could result, which could catch fire. 8 If you should swallow any gasoline, inhale a lot of time...

Owners Manual
Page 18
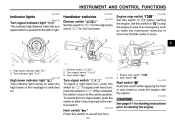
... with power, the taillight comes on automatically when the engine is started . NOTE: The headlight and meter lighting come on , and the engine can be removed. 1. Push the key in from the "OFF" position, and then turn it to "OFF" while still pushing it . 3. Make sure that the vehicle is used to lock the steering. To lock the steering 1. Release The main switch/steering lock controls the ignition and lighting systems...
... with power, the taillight comes on automatically when the engine is started . NOTE: The headlight and meter lighting come on , and the engine can be removed. 1. Push the key in from the "OFF" position, and then turn it to "OFF" while still pushing it . 3. Make sure that the vehicle is used to lock the steering. To lock the steering 1. Release The main switch/steering lock controls the ignition and lighting systems...
Owners Manual
Page 19
... the headlight is switched on. Horn switch "*" Press this switch while applying the front or rear brake to "4". Start switch "," Start switch "," Push this switch to the center position. Dimmer switch "%/&" Set this switch to "&" for the high beam and to the left -hand turn, push this switch to crank the engine with the starter. Engine stop the engine in after it has returned to starting instructions prior to the center position. Turn signal switch "4/6" 3. INSTRUMENT AND CONTROL...
... the headlight is switched on. Horn switch "*" Press this switch while applying the front or rear brake to "4". Start switch "," Start switch "," Push this switch to the center position. Dimmer switch "%/&" Set this switch to "&" for the high beam and to the left -hand turn, push this switch to crank the engine with the starter. Engine stop the engine in after it has returned to starting instructions prior to the center position. Turn signal switch "4/6" 3. INSTRUMENT AND CONTROL...
Owners Manual
Page 21
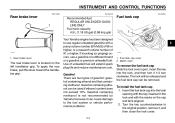
... to the fuel system or vehicle performance problems. Fuel tank cap 2 1 2 3 4 5 6 7 8 To install the fuel tank cap 1. The lock will extend spark plug life and reduce maintenance cost. Gasohol containing ethanol can be removed. 3-4 Gasohol containing methanol is located on the cap and tank aligned. 2. Rear brake lever The rear brake lever is not recommended by Yamaha because it can be used if ethanol content does not exceed 10%. Turn the key counterclockwise to...
... to the fuel system or vehicle performance problems. Fuel tank cap 2 1 2 3 4 5 6 7 8 To install the fuel tank cap 1. The lock will extend spark plug life and reduce maintenance cost. Gasohol containing ethanol can be removed. 3-4 Gasohol containing methanol is located on the cap and tank aligned. 2. Rear brake lever The rear brake lever is not recommended by Yamaha because it can be used if ethanol content does not exceed 10%. Turn the key counterclockwise to...
Owners Manual
Page 22
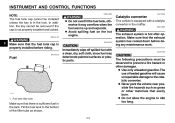
... hot engine. Make sure that there is in the lock. ZAUM00** 1. In addition, the key cannot be removed if the cap is hot after operation. EWA10860 1 2 w The exhaust system is not properly installed and locked. cC Immediately wipe off spilled fuel with a catalytic converter in the muffler. Fuel tank filler tube Make sure that the exhaust system has cooled down before riding. INSTRUMENT AND CONTROL FUNCTIONS...
... hot engine. Make sure that there is in the lock. ZAUM00** 1. In addition, the key cannot be removed if the cap is hot after operation. EWA10860 1 2 w The exhaust system is not properly installed and locked. cC Immediately wipe off spilled fuel with a catalytic converter in the muffler. Fuel tank filler tube Make sure that the exhaust system has cooled down before riding. INSTRUMENT AND CONTROL FUNCTIONS...
Owners Manual
Page 26
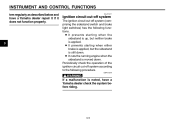
... . EWA10250 w If a malfunction is moved down . 8 It cuts the running engine when the sidestand is noted, have a Yamaha dealer repair it if it does not function properly. 1 2 3 4 5 6 7 8 9 EAU15371 Ignition circuit cut-off system The ignition circuit cut -off system (comprising the sidestand switch and brake light switches) has the following procedure. INSTRUMENT AND CONTROL FUNCTIONS tem regularly as described below and have...
... . EWA10250 w If a malfunction is moved down . 8 It cuts the running engine when the sidestand is noted, have a Yamaha dealer repair it if it does not function properly. 1 2 3 4 5 6 7 8 9 EAU15371 Ignition circuit cut-off system The ignition circuit cut -off system (comprising the sidestand switch and brake light switches) has the following procedure. INSTRUMENT AND CONTROL FUNCTIONS tem regularly as described below and have...
Owners Manual
Page 31
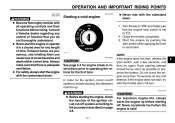
..., always warm the engine up . Consult a Yamaha dealer regarding any one attempt. Turn the key to the procedure described on any control or function that the engine stop switch is set to "#". 2. EWA10290 NOTE: If the engine does not start, release the start the engine or operate it in instructions prior to operating the vehicle for any length of time. Each starting the engine, check the function...
..., always warm the engine up . Consult a Yamaha dealer regarding any one attempt. Turn the key to the procedure described on any control or function that the engine stop switch is set to "#". 2. EWA10290 NOTE: If the engine does not start, release the start the engine or operate it in instructions prior to operating the vehicle for any length of time. Each starting the engine, check the function...
Owners Manual
Page 36
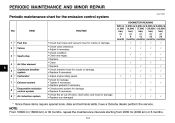
... 30 months, repeat the maintenance intervals starting from 2000 mi (4000 km) or 6 months. 6-2 PERIODIC MAINTENANCE AND MINOR REPAIR EAU17560* Periodic maintenance chart for damage. • Replace any damaged. 5 4 Air filter element Crankcase breather system Carburetor Exhaust system Evaporative emission control system Air induction system 6 5 7 8 9 6 7 8 9 * Since these items require special tools, data and technical skills, have a Yamaha dealer perform the service. ITEM ROUTINE 2 3 4 3 1 2 600...
... 30 months, repeat the maintenance intervals starting from 2000 mi (4000 km) or 6 months. 6-2 PERIODIC MAINTENANCE AND MINOR REPAIR EAU17560* Periodic maintenance chart for damage. • Replace any damaged. 5 4 Air filter element Crankcase breather system Carburetor Exhaust system Evaporative emission control system Air induction system 6 5 7 8 9 6 7 8 9 * Since these items require special tools, data and technical skills, have a Yamaha dealer perform the service. ITEM ROUTINE 2 3 4 3 1 2 600...
Owners Manual
Page 38
... • Check operation. • Check operation and for oil leakage. • Change. • Check oil level and vehicle for oil leakage. Lights, signals and switches • Check operation. • Adjust headlight beam. — — * Since these items require special tools, data and technical skills, have a Yamaha dealer perform the service. PERIODIC MAINTENANCE AND MINOR REPAIR ODOMETER READING 600 mi 2,000 mi 4,000 mi 6,000...
... • Check operation. • Check operation and for oil leakage. • Change. • Check oil level and vehicle for oil leakage. Lights, signals and switches • Check operation. • Adjust headlight beam. — — * Since these items require special tools, data and technical skills, have a Yamaha dealer perform the service. PERIODIC MAINTENANCE AND MINOR REPAIR ODOMETER READING 600 mi 2,000 mi 4,000 mi 6,000...
Owners Manual
Page 41
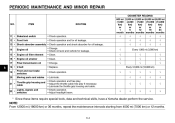
... vehicle. 2. PERIODIC MAINTENANCE AND MINOR REPAIR EAUT1170 Checking the spark plug 1 To check the spark plug 1. In addition, the condition of the spark plug can reveal the condition of the spark plug gasket and its mating surface, and then wipe off any spark plug to specification. 1 2 1 ZAUM0037 3 4 5 6 7 8 9 ZAUM00** 1. Remove the spark plug as shown, with the periodic maintenance and lubrication chart. Spark plug gap: 0.7~0.8 mm (0.028~0.032 in the owner's tool kit. Check the spark plug...
... vehicle. 2. PERIODIC MAINTENANCE AND MINOR REPAIR EAUT1170 Checking the spark plug 1 To check the spark plug 1. In addition, the condition of the spark plug can reveal the condition of the spark plug gasket and its mating surface, and then wipe off any spark plug to specification. 1 2 1 ZAUM0037 3 4 5 6 7 8 9 ZAUM00** 1. Remove the spark plug as shown, with the periodic maintenance and lubrication chart. Spark plug gap: 0.7~0.8 mm (0.028~0.032 in the owner's tool kit. Check the spark plug...
Owners Manual
Page 53
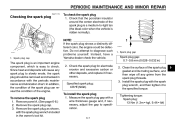
... can shift. EAU21380 Tires 1 2 of the tires equals the ambient temperature). 8 The tire air pressure must be adjusted in ) at the throttle grip. Side wall a To maximize the performance, durability, and safe operation of your vehicle, such as handling, braking, performance and safety. Tire air pressure The tire air pressure should measure 1.5~3.5 mm (0.06~0.14 in accordance with the riding speed and with the total weight of rider, passenger, cargo, and accessories approved...
... can shift. EAU21380 Tires 1 2 of the tires equals the ambient temperature). 8 The tire air pressure must be adjusted in ) at the throttle grip. Side wall a To maximize the performance, durability, and safe operation of your vehicle, such as handling, braking, performance and safety. Tire air pressure The tire air pressure should measure 1.5~3.5 mm (0.06~0.14 in accordance with the riding speed and with the total weight of rider, passenger, cargo, and accessories approved...
Owners Manual
Page 54
... a Yamaha Service Technician. Have excessively worn tires replaced by a Yamaha dealer immediately. Operation of control. When a tire tread begins to loss of an overloaded motorcycle could cause tire damage, an accident, or even injury. Make sure that the total weight of your load, and check the condition and pressure of the cargo, rider, passenger, and accessories (cowling, saddlebags, etc. Properly adjust the suspension for...
... a Yamaha Service Technician. Have excessively worn tires replaced by a Yamaha dealer immediately. Operation of control. When a tire tread begins to loss of an overloaded motorcycle could cause tire damage, an accident, or even injury. Make sure that the total weight of your load, and check the condition and pressure of the cargo, rider, passenger, and accessories (cowling, saddlebags, etc. Properly adjust the suspension for...
Owners Manual
Page 60
... amount of a higher quality than specified. Turn the engine off and check for oil leakage. Recommended engine oil: See page 8-1. If oil is properly seated. 1 2 3 4 5 6 7 8 9 8. Install the panel. In addition, do not use oils with a diesel specification of "CD" or oils of the recommended engine oil, and then install and tighten the engine oil filler cap. Start the engine, and then let it idle for checking these vital systems yourself.
... amount of a higher quality than specified. Turn the engine off and check for oil leakage. Recommended engine oil: See page 8-1. If oil is properly seated. 1 2 3 4 5 6 7 8 9 8. Install the panel. In addition, do not use oils with a diesel specification of "CD" or oils of the recommended engine oil, and then install and tighten the engine oil filler cap. Start the engine, and then let it idle for checking these vital systems yourself.
Owners Manual
Page 62
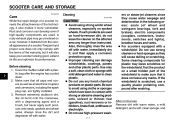
... (of wheel and swingarm bearings, fork and brakes), electric components (couplers, connectors, instruments, switches and lights), breather hoses and vents. 8 For scooters equipped with a plastic bag after washing. A rusty exhaust pipe may leave scratches on the affected area any longer than instructed. Frequent and proper care does not only comply with water. Cover the muffler outlet with a windshield: Do not use high-pressure wash7...
... (of wheel and swingarm bearings, fork and brakes), electric components (couplers, connectors, instruments, switches and lights), breather hoses and vents. 8 For scooters equipped with a plastic bag after washing. A rusty exhaust pipe may leave scratches on the affected area any longer than instructed. Frequent and proper care does not only comply with water. Cover the muffler outlet with a windshield: Do not use high-pressure wash7...
Owners Manual
Page 66
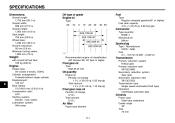
... reduction system Spur gear Secondary reduction ratio 38/13(2.923) Transmission type Single speed automatic(V-belt type) Operation Centrifugal automatic type Final gear oil Type SAE 85 W 140 Engine: Engine type Air-cooled 4-stroke, SOHC Cylinder arrangement: Forward-inclined single cylinder Displacement: 125 cm3 Bore Stroke 51.5×60.0 mm (2.0×2.4 in) Compression ratio: 9.8:1 Starting system: Electric / kick starter Lubrication system: Wet sump Oil quantity Engine oil Periodic oil change 1.0 L (1.09 US qt...
... reduction system Spur gear Secondary reduction ratio 38/13(2.923) Transmission type Single speed automatic(V-belt type) Operation Centrifugal automatic type Final gear oil Type SAE 85 W 140 Engine: Engine type Air-cooled 4-stroke, SOHC Cylinder arrangement: Forward-inclined single cylinder Displacement: 125 cm3 Bore Stroke 51.5×60.0 mm (2.0×2.4 in) Compression ratio: 9.8:1 Starting system: Electric / kick starter Lubrication system: Wet sump Oil quantity Engine oil Periodic oil change 1.0 L (1.09 US qt...
Owners Manual
Page 67
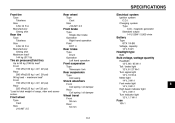
...* 144 kg (317 lb) Battery Type GTX 7A-BS Voltage, capacity 12 V, 6 AH Rear brake Type Drum Operation Left hand operation Headlight type Bulb Bulb voltage, wattage quantity Headlight 12 V, 60 / 65 W×1 Tail / brake light 12 V, 8 / 27 W×1 Turn signal light 12 V, 10 W×4 Meter light 14 V, 3 W×1 Fuel meter light 14 V, 3 W×1 High beam indicator light 12 V, 3 W×1 Turn indicator light 12 V, 1.7 W×1 Tire air pressure(Cold tire) Up to 90 kg (198...
...* 144 kg (317 lb) Battery Type GTX 7A-BS Voltage, capacity 12 V, 6 AH Rear brake Type Drum Operation Left hand operation Headlight type Bulb Bulb voltage, wattage quantity Headlight 12 V, 60 / 65 W×1 Tail / brake light 12 V, 8 / 27 W×1 Turn signal light 12 V, 10 W×4 Meter light 14 V, 3 W×1 Fuel meter light 14 V, 3 W×1 High beam indicator light 12 V, 3 W×1 Turn indicator light 12 V, 1.7 W×1 Tire air pressure(Cold tire) Up to 90 kg (198...
Owners Manual
Page 76
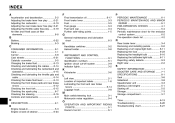
... Fuel gauge ...3-3 Fuel tank cap ...3-4 Further safe-riding points ...1-5 P PERIODIC MAINTENANCE ...6-1 PERIODIC MAINTENANCE AND MINOR REPAIR ...6-1 PRE-OPERATION CHECKS ...4-1 Parking ...5-4 Periodic maintenance chart for the emission control system ...6-2 Pre-operation check list ...4-2 1 2 3 4 5 6 7 8 9 G General maintenance and lubrication chart ...6-3 B Battery ...6-22 Braking ...5-3 R Rear brake lever ...3-4 Removing and installing panels ...6-6 Replacing a turn signal light bulb ...6-11 Replacing the fuse ...6-23 Replacing the headlight bulb ...6-16 Replacing the tail/brake light...
... Fuel gauge ...3-3 Fuel tank cap ...3-4 Further safe-riding points ...1-5 P PERIODIC MAINTENANCE ...6-1 PERIODIC MAINTENANCE AND MINOR REPAIR ...6-1 PRE-OPERATION CHECKS ...4-1 Parking ...5-4 Periodic maintenance chart for the emission control system ...6-2 Pre-operation check list ...4-2 1 2 3 4 5 6 7 8 9 G General maintenance and lubrication chart ...6-3 B Battery ...6-22 Braking ...5-3 R Rear brake lever ...3-4 Removing and installing panels ...6-6 Replacing a turn signal light bulb ...6-11 Replacing the fuse ...6-23 Replacing the headlight bulb ...6-16 Replacing the tail/brake light...