
Owners Manual
Page 6
...17 PRE-OPERATION CHECKS ...6-1 Fuel ...6-1 Engine oil...6-2 Coolant ...6-2 Throttle lever ...6-3 Recoil starter ...6-3 Throttle override system (T.O.R.S.) ...6-3 Brake ...6-4 Brake fluid leakage ...6-5 V-belt ...6-5 Drive guard ...6-5 Drive track ...6-6 51-mm (2.0-in) high-profile pattern drive track...6-6 Slide runners ...6-6 Skis and ski runners ...6-7 Steering system...6-7 Lights ...6-7 Battery ...6-8 Air filter ...6-8 Fittings and fasteners ...6-9 Tool kit and recommended equipment...6-9 OPERATION ...7-1 Starting the engine ...7-1 Emergency engine starting...7-2 Break-in ...7-4 Riding your...
...17 PRE-OPERATION CHECKS ...6-1 Fuel ...6-1 Engine oil...6-2 Coolant ...6-2 Throttle lever ...6-3 Recoil starter ...6-3 Throttle override system (T.O.R.S.) ...6-3 Brake ...6-4 Brake fluid leakage ...6-5 V-belt ...6-5 Drive guard ...6-5 Drive track ...6-6 51-mm (2.0-in) high-profile pattern drive track...6-6 Slide runners ...6-6 Skis and ski runners ...6-7 Steering system...6-7 Lights ...6-7 Battery ...6-8 Air filter ...6-8 Fittings and fasteners ...6-9 Tool kit and recommended equipment...6-9 OPERATION ...7-1 Starting the engine ...7-1 Emergency engine starting...7-2 Break-in ...7-4 Riding your...

Owners Manual
Page 7
... ...8-10 Cooling system ...8-11 V-belt replacement ...8-13 Checking the oil level of the drive chain housing ...8-15 Checking the brake pads...8-17 Checking the parking brake pads...8-17 Checking the brake fluid level...8-18 Brake fluid replacement...8-18 Suspension...8-18 Drive track adjustment...8-26 Ski alignment ...8-28 Lubrication ...8-29 Headlight bulb replacement...8-30 Headlight beam adjustment...8-30 Battery ...8-31 Fuse replacement...8-32 TROUBLESHOOTING ...9-1 STORAGE ...10-1 SPECIFICATIONS ...11-1 Dimensions...11-1 Engine ...11-1 Chassis...11-2 Electric...11-3 WIRING DIAGRAM ...12...
... ...8-10 Cooling system ...8-11 V-belt replacement ...8-13 Checking the oil level of the drive chain housing ...8-15 Checking the brake pads...8-17 Checking the parking brake pads...8-17 Checking the brake fluid level...8-18 Brake fluid replacement...8-18 Suspension...8-18 Drive track adjustment...8-26 Ski alignment ...8-28 Lubrication ...8-29 Headlight bulb replacement...8-30 Headlight beam adjustment...8-30 Battery ...8-31 Fuse replacement...8-32 TROUBLESHOOTING ...9-1 STORAGE ...10-1 SPECIFICATIONS ...11-1 Dimensions...11-1 Engine ...11-1 Chassis...11-2 Electric...11-3 WIRING DIAGRAM ...12...
Owners Manual
Page 14
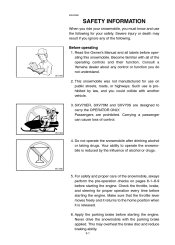
Before operating 1. Passengers are designed to carry the OPERATOR ONLY. Apply the parking brake before starting the engine. Never drive the snowmobile with another vehicle. 3. SAFETY INFORMATION When you ride your safety. Severe injury or death may overheat the brake disc and reduce braking ability. 3-1 Consult a Yamaha dealer about any control or function you ignore any of the following for your snowmobile, you could...
Before operating 1. Passengers are designed to carry the OPERATOR ONLY. Apply the parking brake before starting the engine. Never drive the snowmobile with another vehicle. 3. SAFETY INFORMATION When you ride your safety. Severe injury or death may overheat the brake disc and reduce braking ability. 3-1 Consult a Yamaha dealer about any control or function you ignore any of the following for your snowmobile, you could...

Owners Manual
Page 15
... starting the engine to cool for operation of your doctor immediately. If you ride. Operation 1. Be careful where you swallow some gasoline into wires could be obstacles hidden beneath the snow. Handle fuel with extreme care. Never fill the fuel tank indoors. Do not allow anyone to hazards. G Use an approved fuel container. Open the outside doors; Never remove the fuel cap...
... starting the engine to cool for operation of your doctor immediately. If you ride. Operation 1. Be careful where you swallow some gasoline into wires could be obstacles hidden beneath the snow. Handle fuel with extreme care. Never fill the fuel tank indoors. Do not allow anyone to hazards. G Use an approved fuel container. Open the outside doors; Never remove the fuel cap...

Owners Manual
Page 16
... pavement may cause loss of control and may damage the snowmobile. 4. Maintain or replace safety and instruction labels, as hot water and space heaters, an open flame, sparks, clothes dryers, and the like. Allow the engine to be stored for use . 3. Operation under such conditions will damage or result in the fuel tank inside a building where ignition sources are present such...
... pavement may cause loss of control and may damage the snowmobile. 4. Maintain or replace safety and instruction labels, as hot water and space heaters, an open flame, sparks, clothes dryers, and the like. Allow the engine to be stored for use . 3. Operation under such conditions will damage or result in the fuel tank inside a building where ignition sources are present such...

Owners Manual
Page 18
...[ \ ] _ a Storage compartment Tail/brake light Snow flap Side mirror (VT70) Brake lever Parking brake lever Grip warmer adjustment switch Headlight beam switch Strap (SXV70M) Engine stop switch Thumb warmer adjustment switch Throttle lever Shift lever (SXV70ER/VT70) Starter handle Shroud latch Main switch Starter lever Tachometer "D.C.S." (Detonation Control System) indicator light High beam indicator light Warning light Self-diagnosis warning indicator Coolant temperature warning indicator Fuel level warning indicator Oil level warning indicator Speedometer Grip warmer indicator Select/reset...
...[ \ ] _ a Storage compartment Tail/brake light Snow flap Side mirror (VT70) Brake lever Parking brake lever Grip warmer adjustment switch Headlight beam switch Strap (SXV70M) Engine stop switch Thumb warmer adjustment switch Throttle lever Shift lever (SXV70ER/VT70) Starter handle Shroud latch Main switch Starter lever Tachometer "D.C.S." (Detonation Control System) indicator light High beam indicator light Warning light Self-diagnosis warning indicator Coolant temperature warning indicator Fuel level warning indicator Oil level warning indicator Speedometer Grip warmer indicator Select/reset...

Owners Manual
Page 19
The key can be removed only in this position. A 2 "ON" The ignition circuit is switched on . CONTROL FUNCTIONS ESU00256 Main switch The main switch controls the following items. 1 "OFF" The ignition circuit is switched on . The starter motor starts. ESU00013 5- The engine can be started. CAUTION: @ Release the switch immediately after the engine starts. @ B For SXV70ER/VT70 3 "START" The starting circuit is switched off. NOTE: @ The headlight, meter lights, and taillight will come on after the engine starts. @ È SXV70M/SXV70S É SXV70ER/VT70 5-1
The key can be removed only in this position. A 2 "ON" The ignition circuit is switched on . CONTROL FUNCTIONS ESU00256 Main switch The main switch controls the following items. 1 "OFF" The ignition circuit is switched on . The starter motor starts. ESU00013 5- The engine can be started. CAUTION: @ Release the switch immediately after the engine starts. @ B For SXV70ER/VT70 3 "START" The starting circuit is switched off. NOTE: @ The headlight, meter lights, and taillight will come on after the engine starts. @ È SXV70M/SXV70S É SXV70ER/VT70 5-1

Owners Manual
Page 20
Regulate the speed of the drive system. Because the throttle is spring-loaded, the snowmobile will decelerate, and the engine will operate when the throttle lever is released. The T.O.R.S. will return to idle when the lever is released. 5-2 WARNING @ Check the throttle, brake, and steering for proper operation. @ ESU00022 Throttle lever Once the engine is running cleanly, squeezing a the throttle lever 1 will increase the engine speed and cause engagement of the...
Regulate the speed of the drive system. Because the throttle is spring-loaded, the snowmobile will decelerate, and the engine will operate when the throttle lever is released. The T.O.R.S. will return to idle when the lever is released. 5-2 WARNING @ Check the throttle, brake, and steering for proper operation. @ ESU00022 Throttle lever Once the engine is running cleanly, squeezing a the throttle lever 1 will increase the engine speed and cause engagement of the...
Owners Manual
Page 21
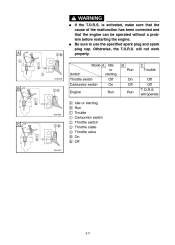
... has been corrected and that the engine can be operated without a problem before restarting the engine. will operate CA-01E Mode A Idle or Switch starting Throttle switch Off Carburetor switch On B Engine È É Ê 1 2 3 4 a b Idle or starting Run Trouble Carburetor switch Throttle switch Throttle cable Throttle valve On Off Run C 5-3 WARNING @ G G A @ If the T.O.R.S. Otherwise, the T.O.R.S. Be sure to use the specified spark plug and spark plug cap. will not work properly. B Run On Off Run C Trouble Off Off T.O.R.S.
... has been corrected and that the engine can be operated without a problem before restarting the engine. will operate CA-01E Mode A Idle or Switch starting Throttle switch Off Carburetor switch On B Engine È É Ê 1 2 3 4 a b Idle or starting Run Trouble Carburetor switch Throttle switch Throttle cable Throttle valve On Off Run C 5-3 WARNING @ G G A @ If the T.O.R.S. Otherwise, the T.O.R.S. Be sure to use the specified spark plug and spark plug cap. will not work properly. B Run On Off Run C Trouble Off Off T.O.R.S.

Owners Manual
Page 22
... to zero) G warning indicators (which show self-diagnosis, coolant temperature, fuel level, and oil level warnings) G a "D.C.S." (Detonation Control System) indicator light (which shows occurrences of abnormal combustion) G a fuel meter (which shows the fuel remaining in the fuel tank) G a grip/thumb warmer heat level indicator (which shows the heat level of the grip warmer or the thumb warmer) After the engine is started, the tachometer 1 makes...
... to zero) G warning indicators (which show self-diagnosis, coolant temperature, fuel level, and oil level warnings) G a "D.C.S." (Detonation Control System) indicator light (which shows occurrences of abnormal combustion) G a fuel meter (which shows the fuel remaining in the fuel tank) G a grip/thumb warmer heat level indicator (which shows the heat level of the grip warmer or the thumb warmer) After the engine is started, the tachometer 1 makes...
Owners Manual
Page 49
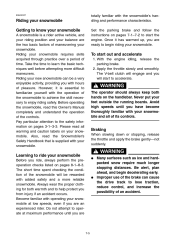
..., read this Owner's Manual completely and understand the operation of time. With the engine idling, release the parking brake. 2. Set the parking brake and follow the instructions on pages 7-1-7-2 to accelerate. To start the engine. WARNING Learning to lose traction, reduce control, and increase the possibility of the snowmobile will start to start out and accelerate 1. Riding your new snowmobile can cause the drive track to ride...
..., read this Owner's Manual completely and understand the operation of time. With the engine idling, release the parking brake. 2. Set the parking brake and follow the instructions on pages 7-1-7-2 to accelerate. To start the engine. WARNING Learning to lose traction, reduce control, and increase the possibility of the snowmobile will start to start out and accelerate 1. Riding your new snowmobile can cause the drive track to ride...

Owners Manual
Page 50
...throttle changes, excessive braking, incorrect body movements, or too much speed for a novice snowmobiler. @ 7-6 WARNING @ Side hills and steep slopes are unable to continue up the hill this technique, you have learned this can be practiced at higher speeds or in a large flat area with the operation of your snowmobile. Stop the engine and set the parking brake... turn may be able to perform it at low speed many times, in tighter curves. Turning Riding uphill For most snow surfaces, "body English" is also important to keep your weight on the throttle or steer ...
...throttle changes, excessive braking, incorrect body movements, or too much speed for a novice snowmobiler. @ 7-6 WARNING @ Side hills and steep slopes are unable to continue up the hill this technique, you have learned this can be practiced at higher speeds or in a large flat area with the operation of your snowmobile. Stop the engine and set the parking brake... turn may be able to perform it at low speed many times, in tighter curves. Turning Riding uphill For most snow surfaces, "body English" is also important to keep your weight on the throttle or steer ...

Owners Manual
Page 51
...throttle to keep the clutch engaged while descending the hill. downhill leg on the seat and the foot of control. @ If you wish to travel across the slope, lean your body to position your snowmobile starts to tip, steer down the hill. Steering...accelerating, turning, or braking rapidly. WARNING @ WARNING @ Use extra caution when applying the brake during a descent. Traversing a slope WARNING @ WARNING @ When you travel . Excessive braking will make it easier for a novice snowmobiler. @ Traversing a slope requires you to shift your path. Also apply the brake frequently,...
...throttle to keep the clutch engaged while descending the hill. downhill leg on the seat and the foot of control. @ If you wish to travel across the slope, lean your body to position your snowmobile starts to tip, steer down the hill. Steering...accelerating, turning, or braking rapidly. WARNING @ WARNING @ Use extra caution when applying the brake during a descent. Traversing a slope WARNING @ WARNING @ When you travel . Excessive braking will make it easier for a novice snowmobiler. @ Traversing a slope requires you to shift your path. Also apply the brake frequently,...

Owners Manual
Page 58
... starter Engine stop switch Throttle override system (T.O.R.S.) Throttle lever ∗ It is changed. ESU00139 8- G G 8-4-8-5 6-2 Engine oil Fuel ∗ Fuel filter ∗ Fuel line G 6-1-6-2 G G ∗ Oil line G 6-2, 8-11-8-12 G G Whenever operating condition (elevation/temperature) is recommended that these items be serviced by a Yamaha dealer. 8-1 Adjust if necessary. Check operation. ∗ Repair if necessary. Check operation. ∗ Repair if necessary. Adjust gap and clean. Check fuel hose for cracks or damage. Check coolant...
... starter Engine stop switch Throttle override system (T.O.R.S.) Throttle lever ∗ It is changed. ESU00139 8- G G 8-4-8-5 6-2 Engine oil Fuel ∗ Fuel filter ∗ Fuel line G 6-1-6-2 G G ∗ Oil line G 6-2, 8-11-8-12 G G Whenever operating condition (elevation/temperature) is recommended that these items be serviced by a Yamaha dealer. 8-1 Adjust if necessary. Check operation. ∗ Repair if necessary. Check operation. ∗ Repair if necessary. Adjust gap and clean. Check fuel hose for cracks or damage. Check coolant...

Owners Manual
Page 59
...; Disc brake installation Drive chain oil Drive chain Skis and ski runners Steering system Strap (SXV70M) 8-15-8-16 G Initial at 500 km (300 mi) and every 800 km (500 mi) thereafter. G G 8-16 6-7 6-7 G Lights 6-7, 8-28 6-8, 8-29 Battery (SXV70ER/VT70) G ∗ It is recommended that these items be serviced by a Yamaha dealer. 8-2 Check deflection. ∗ Adjust if necessary. Check for damage. ∗ Replace if...
...; Disc brake installation Drive chain oil Drive chain Skis and ski runners Steering system Strap (SXV70M) 8-15-8-16 G Initial at 500 km (300 mi) and every 800 km (500 mi) thereafter. G G 8-16 6-7 6-7 G Lights 6-7, 8-28 6-8, 8-29 Battery (SXV70ER/VT70) G ∗ It is recommended that these items be serviced by a Yamaha dealer. 8-2 Check deflection. ∗ Adjust if necessary. Check for damage. ∗ Replace if...

Owners Manual
Page 62
... grime from the spark plug gasket seat to the end of the threaded portion. If the reach is too short, carbon will form on the exposed threads resulting in ) When installing the spark plug, always clean the gasket surface. Spark plugs are produced in or out to adjust the engine idle speed. Always use a spark plug with a wire thickness gauge and adjust to specification. Spark plug gap b: 0.7-0.8 mm (0.028...
... grime from the spark plug gasket seat to the end of the threaded portion. If the reach is too short, carbon will form on the exposed threads resulting in ) When installing the spark plug, always clean the gasket surface. Spark plugs are produced in or out to adjust the engine idle speed. Always use a spark plug with a wire thickness gauge and adjust to specification. Spark plug gap b: 0.7-0.8 mm (0.028...

Owners Manual
Page 66
is firmly seated in poor performance of the engine and requires very sophisticated adjustment. Changing these settings without sufficient technical knowledge may result in the holder and throttle operates smoothly after assembling the carburetor. @ ESU00156 Yamaha Power Valve System (Y.P.V.S.) The Y.P .V.S. Large No. 1. Remove the drain plug and install the proper main jet. 4. has been extensively tested and set at the Yamaha factory. WARNING @ Make...
is firmly seated in poor performance of the engine and requires very sophisticated adjustment. Changing these settings without sufficient technical knowledge may result in the holder and throttle operates smoothly after assembling the carburetor. @ ESU00156 Yamaha Power Valve System (Y.P.V.S.) The Y.P .V.S. Large No. 1. Remove the drain plug and install the proper main jet. 4. has been extensively tested and set at the Yamaha factory. WARNING @ Make...

Owners Manual
Page 90
..., inadequate fuel, or an air leak-Ask a Yamaha dealer to inspect the electrical circuits as soon as possible. 1 Relay with throttle open or wipe the spark plugs dry. 2. Electrical system Poor or no spark G Spark plugs are wet ...Remove carbon or wipe the spark plugs dry; For SXV70M/SXV70S Short circuit in the lighting system, signal system and meter system (except for repair. @ 9-1 Compression Insufficient G Loose cylinder head...
..., inadequate fuel, or an air leak-Ask a Yamaha dealer to inspect the electrical circuits as soon as possible. 1 Relay with throttle open or wipe the spark plugs dry. 2. Electrical system Poor or no spark G Spark plugs are wet ...Remove carbon or wipe the spark plugs dry; For SXV70M/SXV70S Short circuit in the lighting system, signal system and meter system (except for repair. @ 9-1 Compression Insufficient G Loose cylinder head...

Owners Manual
Page 91
... the ignition off to inspect. 3. Oily or dirty V-belt or primary and secondary sheave assembly surfaces ...Clean. 2. "Hydrolock" occurs when fuel has filled the crankcase when the vehicle has been transported...Remove the spark plugs and turn the engine over several times with the correct V-belt. 2. Electric starter does not operate or operates slowly For SXV70ER/VT70 1. Engine overheats 1. V-belt twists 1. Loose or broken engine mount ...Ask a Yamaha...
... the ignition off to inspect. 3. Oily or dirty V-belt or primary and secondary sheave assembly surfaces ...Clean. 2. "Hydrolock" occurs when fuel has filled the crankcase when the vehicle has been transported...Remove the spark plugs and turn the engine over several times with the correct V-belt. 2. Electric starter does not operate or operates slowly For SXV70ER/VT70 1. Engine overheats 1. V-belt twists 1. Loose or broken engine mount ...Ask a Yamaha...

Owners Manual
Page 99
...(SXV70ER/VT70) Battery (SXV70ER/VT70) Starter motor (SXV70ER/VT70) Main switch Engine stop switch Throttle switch Carburetor switch Grip warmer Thumb warmer CDI unit Servo motor Throttle position sensor Grip warmer adjustment switch Thumb warmer adjustment switch Engine ground Ignition coil Spark plug Frame ground Coolant temperature sensor Passenger grip warmer switch (VT70) Resistor (VT70) Passenger grip warmer (left) (VT70) Passenger grip warmer (right) (VT70) Passenger grip warmer relay (VT70) DC back buzzer (SXV70ER/VT70) Gear position switch (SXV70ER/VT70) Knock sensor Brake light switch
...(SXV70ER/VT70) Battery (SXV70ER/VT70) Starter motor (SXV70ER/VT70) Main switch Engine stop switch Throttle switch Carburetor switch Grip warmer Thumb warmer CDI unit Servo motor Throttle position sensor Grip warmer adjustment switch Thumb warmer adjustment switch Engine ground Ignition coil Spark plug Frame ground Coolant temperature sensor Passenger grip warmer switch (VT70) Resistor (VT70) Passenger grip warmer (left) (VT70) Passenger grip warmer (right) (VT70) Passenger grip warmer relay (VT70) DC back buzzer (SXV70ER/VT70) Gear position switch (SXV70ER/VT70) Knock sensor Brake light switch