
Owners Manual
Page 3
... date of the Yamaha Road Star™/Road Star™ Silverado™. EAU00002 INTRODUCTION Congratulations on your purchase of manufacture. It represents the high degree of fine sporting, touring, and pacesetting racing machines. This model is important that have any questions concerning the operation or maintenance of your Yamaha dealer pay close attention to the recommended maintenance schedules and operating...
... date of the Yamaha Road Star™/Road Star™ Silverado™. EAU00002 INTRODUCTION Congratulations on your purchase of manufacture. It represents the high degree of fine sporting, touring, and pacesetting racing machines. This model is important that have any questions concerning the operation or maintenance of your Yamaha dealer pay close attention to the recommended maintenance schedules and operating...
Owners Manual
Page 13
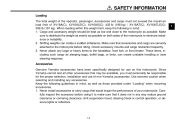
... this weight limit, keep the following guidelines in mind, as well as those provided under "Loading" when mounting accessories. 1. Since Yamaha cannot test all other accessories that accessories and cargo are securely attached to the motorcycle before using it does not in any way reduce ground clearance or cornering clearance, limit suspension travel, steering travel or control operation, or obscure lights...
... this weight limit, keep the following guidelines in mind, as well as those provided under "Loading" when mounting accessories. 1. Since Yamaha cannot test all other accessories that accessories and cargo are securely attached to the motorcycle before using it does not in any way reduce ground clearance or cornering clearance, limit suspension travel, steering travel or control operation, or obscure lights...
Owners Manual
Page 20
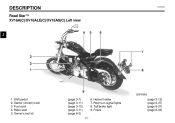
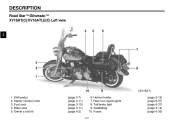
Fuses (page 3-12) (page 6-37) (page 6-37) (page 6-33) 2- Shift pedal 2. DESCRIPTION EAU00026 Road Star™ XV16A(C)/XV16ALE(C)/XV16AS(C) Left view 2 (XV16A) 1. Starter (choke) knob 3. Fuel cock 4. Owner's tool kit (page 3-7) (page 3-11) (page 3-10) (page 3-11) (page 6-2) 2-1 6. Rear turn signal lights 8. Helmet holder 7. Rider seat 5. Tail/brake light 9.
Fuses (page 3-12) (page 6-37) (page 6-37) (page 6-33) 2- Shift pedal 2. DESCRIPTION EAU00026 Road Star™ XV16A(C)/XV16ALE(C)/XV16AS(C) Left view 2 (XV16A) 1. Starter (choke) knob 3. Fuel cock 4. Owner's tool kit (page 3-7) (page 3-11) (page 3-10) (page 3-11) (page 6-2) 2-1 6. Rear turn signal lights 8. Helmet holder 7. Rider seat 5. Tail/brake light 9.
Owners Manual
Page 21
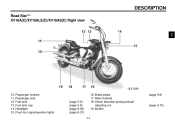
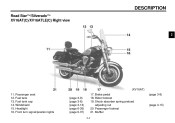
DESCRIPTION Road Star™ XV16A(C)/XV16ALE(C)/XV16AS(C) Right view 2 (XV16A) 10. Headlight 15. Passenger footrest 11. Shock absorber spring preload adjusting nut 19. Front turn signal/position lights 16. Passenger seat 12. Fuel tank cap 14. Muffler 2-2 (page 3-8) (page 3-9) (page 3-8) (page 6-35) (page 6-37) (page 3-15) Brake pedal 17. Fuel tank 13. Rider footrest 18.
DESCRIPTION Road Star™ XV16A(C)/XV16ALE(C)/XV16AS(C) Right view 2 (XV16A) 10. Headlight 15. Passenger footrest 11. Shock absorber spring preload adjusting nut 19. Front turn signal/position lights 16. Passenger seat 12. Fuel tank cap 14. Muffler 2-2 (page 3-8) (page 3-9) (page 3-8) (page 6-35) (page 6-37) (page 3-15) Brake pedal 17. Fuel tank 13. Rider footrest 18.
Owners Manual
Page 22
Starter (choke) knob 3. Rear turn signal lights 8. Saddlebag 10. DESCRIPTION Road Star™/Silverado™ XV16AT(C)/XV16ATLE(C) Left view 2 (XV16AT) 1. Owner's tool kit (page 3-7) (page 3-11) (page 3-10) (page 3-11) (page 6-2) 2-3 6. Tail/brake light 9. Rider seat 5. Helmet holder 7. Fuses (page 3-12) (page 6-37) (page 6-37) (page 3-14) (page 6-33) Fuel cock 4. Shift pedal 2.
Starter (choke) knob 3. Rear turn signal lights 8. Saddlebag 10. DESCRIPTION Road Star™/Silverado™ XV16AT(C)/XV16ATLE(C) Left view 2 (XV16AT) 1. Owner's tool kit (page 3-7) (page 3-11) (page 3-10) (page 3-11) (page 6-2) 2-3 6. Tail/brake light 9. Rider seat 5. Helmet holder 7. Fuses (page 3-12) (page 6-37) (page 6-37) (page 3-14) (page 6-33) Fuel cock 4. Shift pedal 2.
Owners Manual
Page 23
Fuel tank cap 14. Windshield 15. Headlight 16. Rider footrest 19. Front turn signal/position lights (page 3-9) (page 3-8) (page 3-13) (page 6-35) (page 6-37) 2-4 17. Brake pedal 18. Muffler (page 3-8) (page 3-15) Passenger footrest 21. Fuel tank 13. Shock absorber spring preload adjusting nut 20. Passenger seat 12. DESCRIPTION Road Star™/Silverado™ XV16AT(C)/XV16ATLE(C) Right view 2 (XV16AT) 11.
Fuel tank cap 14. Windshield 15. Headlight 16. Rider footrest 19. Front turn signal/position lights (page 3-9) (page 3-8) (page 3-13) (page 6-35) (page 6-37) 2-4 17. Brake pedal 18. Muffler (page 3-8) (page 3-15) Passenger footrest 21. Fuel tank 13. Shock absorber spring preload adjusting nut 20. Passenger seat 12. DESCRIPTION Road Star™/Silverado™ XV16AT(C)/XV16ATLE(C) Right view 2 (XV16AT) 11.
Owners Manual
Page 24
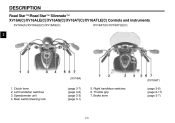
Brake lever (page 3-6) (page 6-17) (page 3-7) 1. DESCRIPTION Road Star™/Road Star™ Silverado™ XV16A(C)/XV16ALE(C)/XV16AS(C)/XV16AT(C)/XV16ATLE(C) Controls and instruments XV16A(C)/XV16ALE(C)/XV16AS(C) 2 XV16AT(C)/XV16ATLE(C) (XV16A) (XV16AT) 5. Throttle grip 7. Left handlebar switches 3. Main switch/steering lock (page 3-7) (page 3-6) (page 3-3) (page 3-1) 2-5 Speedometer unit 4. Right handlebar switches 6. Clutch lever 2.
Brake lever (page 3-6) (page 6-17) (page 3-7) 1. DESCRIPTION Road Star™/Road Star™ Silverado™ XV16A(C)/XV16ALE(C)/XV16AS(C)/XV16AT(C)/XV16ATLE(C) Controls and instruments XV16A(C)/XV16ALE(C)/XV16AS(C) 2 XV16AT(C)/XV16ATLE(C) (XV16A) (XV16AT) 5. Throttle grip 7. Left handlebar switches 3. Main switch/steering lock (page 3-7) (page 3-6) (page 3-3) (page 3-1) 2-5 Speedometer unit 4. Right handlebar switches 6. Clutch lever 2.
Owners Manual
Page 25
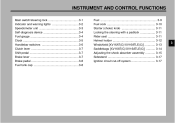
... CONTROL FUNCTIONS Main switch/steering lock ...3-1 Indicator and warning lights ...3-2 Speedometer unit ...3-3 Self-diagnosis device ...3-4 Fuel gauge ...3-4 Clock ...3-5 Handlebar switches ...3-6 Clutch lever ...3-7 Shift pedal ...3-7 Brake lever ...3-7 Brake pedal ...3-8 Fuel tank cap ...3-8 Fuel ...3-9 Fuel cock ...3-10 Starter (choke) knob ...3-11 Locking the steering with a padlock ...3-11 Rider seat ...3-11 Helmet holder ...3-12 Windshield [XV16AT(C)/XV16ATLE(C)] ...3-13 Saddlebags [XV16AT(C)/XV16ATLE(C)] ...3-14 Adjusting the shock absorber assembly ...3-15 Sidestand ...3-17 Ignition...
... CONTROL FUNCTIONS Main switch/steering lock ...3-1 Indicator and warning lights ...3-2 Speedometer unit ...3-3 Self-diagnosis device ...3-4 Fuel gauge ...3-4 Clock ...3-5 Handlebar switches ...3-6 Clutch lever ...3-7 Shift pedal ...3-7 Brake lever ...3-7 Brake pedal ...3-8 Fuel tank cap ...3-8 Fuel ...3-9 Fuel cock ...3-10 Starter (choke) knob ...3-11 Locking the steering with a padlock ...3-11 Rider seat ...3-11 Helmet holder ...3-12 Windshield [XV16AT(C)/XV16ATLE(C)] ...3-13 Saddlebags [XV16AT(C)/XV16ATLE(C)] ...3-14 Adjusting the shock absorber assembly ...3-15 Sidestand ...3-17 Ignition...
Owners Manual
Page 50
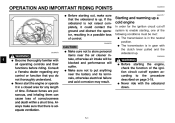
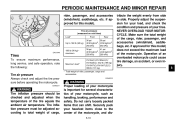
... is up a cold engine In order for any length of consciousness and death within a short time. CAUTION: ● Make sure not to store personal items near the air cleaner intake, otherwise air intake will suffer. ● Make sure not to put anything near the battery and its terminals, otherwise electrical failure and acid corrosion may result. @ @ WARNING Before starting the engine, check the...
... is up a cold engine In order for any length of consciousness and death within a short time. CAUTION: ● Make sure not to store personal items near the air cleaner intake, otherwise air intake will suffer. ● Make sure not to put anything near the battery and its terminals, otherwise electrical failure and acid corrosion may result. @ @ WARNING Before starting the engine, check the...
Owners Manual
Page 52
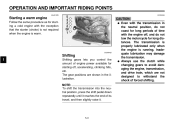
... lubricated only when the engine is warm. @ EAU00423 Shifting 5 Shifting gears lets you control the amount of engine power available for long distances. The gear positions are not designed to avoid damaging the engine, transmission, and drive train, which are shown in the illustration. @ CAUTION: ● Even with the transmission in the neutral position, do not tow the motorcycle for starting off, accelerating, climbing...
... lubricated only when the engine is warm. @ EAU00423 Shifting 5 Shifting gears lets you control the amount of engine power available for long distances. The gear positions are not designed to avoid damaging the engine, transmission, and drive train, which are shown in the illustration. @ CAUTION: ● Even with the transmission in the neutral position, do not tow the motorcycle for starting off, accelerating, climbing...
Owners Manual
Page 57
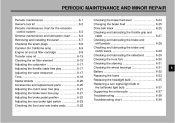
... MINOR REPAIR Periodic maintenance ...6-1 Owner's tool kit ...6-2 Periodic maintenance chart for the emission control system ...6-3 General maintenance and lubrication chart ...6-4 Removing and installing the panel ...6-7 Checking the spark plugs ...6-8 Canister (for California only) ...6-9 Engine oil and oil filter cartridge ...6-9 Transfer case oil ...6-13 Cleaning the air filter element ...6-15 Adjusting the carburetor ...6-17 Adjusting the throttle cable free play ...6-17 Adjusting the valve clearance ...6-17 Tires...6-18 Spoke wheels ...6-20 Accessories and replacement...
... MINOR REPAIR Periodic maintenance ...6-1 Owner's tool kit ...6-2 Periodic maintenance chart for the emission control system ...6-3 General maintenance and lubrication chart ...6-4 Removing and installing the panel ...6-7 Checking the spark plugs ...6-8 Canister (for California only) ...6-9 Engine oil and oil filter cartridge ...6-9 Transfer case oil ...6-13 Cleaning the air filter element ...6-15 Adjusting the carburetor ...6-17 Adjusting the throttle cable free play ...6-17 Adjusting the valve clearance ...6-17 Tires...6-18 Spoke wheels ...6-20 Accessories and replacement...
Owners Manual
Page 60
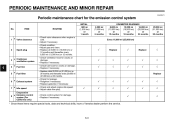
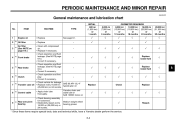
...; Replace gasket(s) if necessary. • Check and adjust engine idle speed. • Adjust cable free play. • Check control system for the emission control system No. PERIODIC MAINTENANCE AND MINOR REPAIR EAU00471 Periodic maintenance chart for damage. • Replace if necessary. 2 Spark plug √ Replace √ Replace √ 3 4 5 * * * * * * Crankcase ventilation system Fuel line Fuel filter √ √ √ √ √ √ √ √ √ √ Replace 6 6 7 Exhaust system Idle speed Evaporative Emission control...
...; Replace gasket(s) if necessary. • Check and adjust engine idle speed. • Adjust cable free play. • Check control system for the emission control system No. PERIODIC MAINTENANCE AND MINOR REPAIR EAU00471 Periodic maintenance chart for damage. • Replace if necessary. 2 Spark plug √ Replace √ Replace √ 3 4 5 * * * * * * Crankcase ventilation system Fuel line Fuel filter √ √ √ √ √ √ √ √ √ √ Replace 6 6 7 Exhaust system Idle speed Evaporative Emission control...
Owners Manual
Page 61
...; Oil filter Air filter (See NOTE on page 6-6.) Front brake √ √ √ √ Replace brake fluid √ 4 - √ √ √ √ √ 5 Rear brake - √ √ √ √ Replace brake fluid √ 6 6 Clutch - √ Replace √ √ Check √ √ Replace √ 7 • Check vehicle for looseness. • Moderately repack every 16,000 mi (25,000 km) or 24 months. Yamaha chain and cable lube or SAE 10W30 motor oil...
...; Oil filter Air filter (See NOTE on page 6-6.) Front brake √ √ √ √ Replace brake fluid √ 4 - √ √ √ √ √ 5 Rear brake - √ √ √ √ Replace brake fluid √ 6 6 Clutch - √ Replace √ √ Check √ √ Replace √ 7 • Check vehicle for looseness. • Moderately repack every 16,000 mi (25,000 km) or 24 months. Yamaha chain and cable lube or SAE 10W30 motor oil...
Owners Manual
Page 65
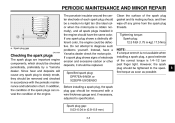
... all spark plugs installed in the engine should have a Yamaha dealer check the motorcycle. Instead, have the same color. Spark plug gap EAU01639 Checking the spark plugs The spark plugs are important engine components, which should be a medium-to diagnose such problems yourself. PERIODIC MAINTENANCE AND MINOR REPAIR The porcelain insulator around the center electrode of each spark plug should be checked periodically, preferably by a Yamaha dealer. However, the spark plug...
... all spark plugs installed in the engine should have a Yamaha dealer check the motorcycle. Instead, have the same color. Spark plug gap EAU01639 Checking the spark plugs The spark plugs are important engine components, which should be a medium-to diagnose such problems yourself. PERIODIC MAINTENANCE AND MINOR REPAIR The porcelain insulator around the center electrode of each spark plug should be checked periodically, preferably by a Yamaha dealer. However, the spark plug...
Owners Manual
Page 75
... as handling, braking, performance and safety. EWA00011 198 lb (90 kg)- Tire inflation pressure must be checked and adjusted when the temperature of your tires. Properly adjust the suspension for this model) does not exceed the maximum load of the cargo, rider, passenger, and accessories (windshield, saddlebags, etc. if approved for your load, and check the condition and pressure of the tire equals the ambient air...
... as handling, braking, performance and safety. EWA00011 198 lb (90 kg)- Tire inflation pressure must be checked and adjusted when the temperature of your tires. Properly adjust the suspension for this model) does not exceed the maximum load of the cargo, rider, passenger, and accessories (windshield, saddlebags, etc. if approved for your load, and check the condition and pressure of the tire equals the ambient air...
Owners Manual
Page 82
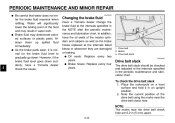
... that water does not enter the brake fluid reservoir when refilling. EAU03976 Changing the brake fluid Have a Yamaha dealer change the brake fluid at the intervals specified in the NOTE after the periodic maintenance and lubrication chart. Water will significantly lower the boiling point of the drive belt using the marks near the drive belt check hole are damaged or leaking. ● Oil seals: Replace every two years. ● Brake hoses: Replace every...
... that water does not enter the brake fluid reservoir when refilling. EAU03976 Changing the brake fluid Have a Yamaha dealer change the brake fluid at the intervals specified in the NOTE after the periodic maintenance and lubrication chart. Water will significantly lower the boiling point of the drive belt using the marks near the drive belt check hole are damaged or leaking. ● Oil seals: Replace every two years. ● Brake hoses: Replace every...
Owners Manual
Page 90
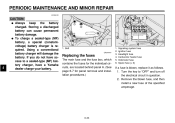
... blown fuse, and then install a new fuse of the specified amperage. 6-33 Signaling system fuse Ignition fuse Headlight fuse Carburetor heater fuse Odometer fuse Spare fuse (× 3) If a fuse is required. If you do not have a Yamaha dealer charge your battery. 1. PERIODIC MAINTENANCE AND MINOR REPAIR EC000102 @ 6 @ CAUTION: keep the battery ● Always charged. Turn the key to a sealed-type (MF) battery charger, have access to "OFF" and turn off the electrical circuit...
... blown fuse, and then install a new fuse of the specified amperage. 6-33 Signaling system fuse Ignition fuse Headlight fuse Carburetor heater fuse Odometer fuse Spare fuse (× 3) If a fuse is required. If you do not have a Yamaha dealer charge your battery. 1. PERIODIC MAINTENANCE AND MINOR REPAIR EC000102 @ 6 @ CAUTION: keep the battery ● Always charged. Turn the key to a sealed-type (MF) battery charger, have access to "OFF" and turn off the electrical circuit...
Owners Manual
Page 91
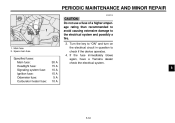
... a Yamaha dealer check the electrical system. 6 6-34 PERIODIC MAINTENANCE AND MINOR REPAIR EC000103 CAUTION: Do not use a fuse of a higher amperage rating than recommended to avoid causing extensive damage to check if the device operates. 4. Turn the key to "ON" and turn on the electrical circuit in question to the electrical system and possibly a fire. _ _ 1. Spare main fuse Specified fuses: Main fuse: Headlight fuse: Signaling system fuse: Ignition fuse: Odometer fuse: Carburetor heater fuse...
... a Yamaha dealer check the electrical system. 6 6-34 PERIODIC MAINTENANCE AND MINOR REPAIR EC000103 CAUTION: Do not use a fuse of a higher amperage rating than recommended to avoid causing extensive damage to check if the device operates. 4. Turn the key to "ON" and turn on the electrical circuit in question to the electrical system and possibly a fire. _ _ 1. Spare main fuse Specified fuses: Main fuse: Headlight fuse: Signaling system fuse: Ignition fuse: Odometer fuse: Carburetor heater fuse...
Owners Manual
Page 109
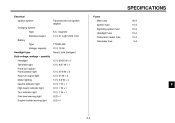
...@ 5,000 r/min Transistorized coil ignition (digital) Fuses Main fuse Ignition fuse Signaling system fuse Headlight fuse Carburetor heater fuse Odometer fuse 30 A 15 A 10 A 15 A 10 A 5A 8 8-4 SPECIFICATIONS Electrical Ignition system Charging system Type Standard output Battery Type Voltage, capacity Headlight type Bulb voltage, wattage × quantity Headlight Tail/brake light Front turn signal / Front position light Rear turn signal light Meter lighting Neutral indicator light High beam indicator light Turn indicator light Fuel level warning light Engine trouble warning light 12 V, 60/55...
...@ 5,000 r/min Transistorized coil ignition (digital) Fuses Main fuse Ignition fuse Signaling system fuse Headlight fuse Carburetor heater fuse Odometer fuse 30 A 15 A 10 A 15 A 10 A 5A 8 8-4 SPECIFICATIONS Electrical Ignition system Charging system Type Standard output Battery Type Voltage, capacity Headlight type Bulb voltage, wattage × quantity Headlight Tail/brake light Front turn signal / Front position light Rear turn signal light Meter lighting Neutral indicator light High beam indicator light Turn indicator light Fuel level warning light Engine trouble warning light 12 V, 60/55...
Owners Manual
Page 122
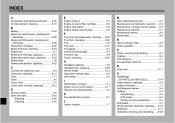
... fluid level, checking...6-24 Brake lever...3-7 Brake lever free play, adjusting ...6-21 Brake light switch (rear), adjusting ...6-23 Brake pedal...3-8 Brake pedal position, adjusting ...6-22 F Front and rear brake pads, checking ...6-23 Front fork, checking ...6-30 Fuel ...3-9 Fuel cock...3-10 Fuel gauge ...3-4 Fuel level warning light ...3-2 Fuel tank cap...3-8 Fuses, replacing ...6-33 N Neutral indicator light ...3-2 Noise regulation ...9-4 P Panel, removing and installing...6-7 Parking...5-6 Part locations ...2-1 Pre-operation check list...4-1 H Handlebar switches ...3-6 Headlight bulb...
... fluid level, checking...6-24 Brake lever...3-7 Brake lever free play, adjusting ...6-21 Brake light switch (rear), adjusting ...6-23 Brake pedal...3-8 Brake pedal position, adjusting ...6-22 F Front and rear brake pads, checking ...6-23 Front fork, checking ...6-30 Fuel ...3-9 Fuel cock...3-10 Fuel gauge ...3-4 Fuel level warning light ...3-2 Fuel tank cap...3-8 Fuses, replacing ...6-33 N Neutral indicator light ...3-2 Noise regulation ...9-4 P Panel, removing and installing...6-7 Parking...5-6 Part locations ...2-1 Pre-operation check list...4-1 H Handlebar switches ...3-6 Headlight bulb...