
Owners Manual
Page 6
...Identification number records...3-2 Key identification number...3-2 Vehicle identification number ...3-3 Model label ...3-3 2 3 CONTROL FUNCTIONS...4-1 Main switch ...4-1 Indicator and warning lights ...4-2 Oil temperature warning light checking method...4-3 Speedometer ...4-4 Fuel gauge ...4-4 Handlebar switches ...4-5 Throttle lever ...4-7 Speed limiter ...4-8 Front brake lever...4-9 Rear brake pedal and lever ...4-9 Parking brake...4-10 Shift pedal ...4-11 Reverse knob "REV"...4-11 Recoil starter...4-12 Fuel tank cap ...4-13 Fuel cock...4-14 Starter (choke) ...4-15 Seat...4-16 Storage box...
...Identification number records...3-2 Key identification number...3-2 Vehicle identification number ...3-3 Model label ...3-3 2 3 CONTROL FUNCTIONS...4-1 Main switch ...4-1 Indicator and warning lights ...4-2 Oil temperature warning light checking method...4-3 Speedometer ...4-4 Fuel gauge ...4-4 Handlebar switches ...4-5 Throttle lever ...4-7 Speed limiter ...4-8 Front brake lever...4-9 Rear brake pedal and lever ...4-9 Parking brake...4-10 Shift pedal ...4-11 Reverse knob "REV"...4-11 Recoil starter...4-12 Fuel tank cap ...4-13 Fuel cock...4-14 Starter (choke) ...4-15 Seat...4-16 Storage box...
Owners Manual
Page 7
... DC jack...4-21 5 PRE-OPERATION CHECKS ...5-1 Front and rear brakes ...5-3 Fuel ...5-5 Engine oil ...5-7 Final gear oil...5-8 Differential gear oil ...5-8 Throttle lever ...5-8 Fittings and Fasteners ...5-8 Lights...5-9 Switches...5-9 Tires ...5-9 How to measure tire pressure...5-11 Tire wear limit...5-12 6 OPERATION ...6-1 Starting a cold engine...6-1 Starting a warm engine ...6-3 Warming up ...6-3 Reverse knob operation and reverse driving ...6-4 Shifting...6-5 To start out and accelerate:...6-5 To decelerate:...6-6 Engine break-in ...6-7 Parking...6-8 Parking on a slope...6-9 Accessories...
... DC jack...4-21 5 PRE-OPERATION CHECKS ...5-1 Front and rear brakes ...5-3 Fuel ...5-5 Engine oil ...5-7 Final gear oil...5-8 Differential gear oil ...5-8 Throttle lever ...5-8 Fittings and Fasteners ...5-8 Lights...5-9 Switches...5-9 Tires ...5-9 How to measure tire pressure...5-11 Tire wear limit...5-12 6 OPERATION ...6-1 Starting a cold engine...6-1 Starting a warm engine ...6-3 Warming up ...6-3 Reverse knob operation and reverse driving ...6-4 Shifting...6-5 To start out and accelerate:...6-5 To decelerate:...6-6 Engine break-in ...6-7 Parking...6-8 Parking on a slope...6-9 Accessories...
Owners Manual
Page 8
... ...8-3 Engine oil...8-5 Final gear oil ...8-9 Differential gear oil replacement ...8-11 Axle boots...8-13 Spark plug inspection...8-13 Air filter cleaning ...8-14 Spark arrester cleaning ...8-17 Carburetor adjustment...8-18 Idle speed adjustment ...8-19 Valve clearance adjustment ...8-20 Throttle lever adjustment...8-20 Front brake pad inspection...8-21 Rear brake shoe inspection...8-21 Brake fluid level inspection ...8-22 Brake fluid replacement ...8-23 Front brake adjustment...8-24 Rear brake pedal and lever adjustment ...8-25 Adjusting the rear brake light switch ...8-28 Clutch adjustment...
... ...8-3 Engine oil...8-5 Final gear oil ...8-9 Differential gear oil replacement ...8-11 Axle boots...8-13 Spark plug inspection...8-13 Air filter cleaning ...8-14 Spark arrester cleaning ...8-17 Carburetor adjustment...8-18 Idle speed adjustment ...8-19 Valve clearance adjustment ...8-20 Throttle lever adjustment...8-20 Front brake pad inspection...8-21 Rear brake shoe inspection...8-21 Brake fluid level inspection ...8-22 Brake fluid replacement ...8-23 Front brake adjustment...8-24 Rear brake pedal and lever adjustment ...8-25 Adjusting the rear brake light switch ...8-28 Clutch adjustment...
Owners Manual
Page 21
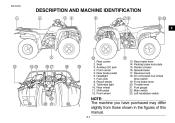
... four-wheel drive switch 19. Fuel gauge 22. Left handlebar switch 8 9 10 11 12 13 14 NOTE: The machine you have purchased may differ slightly from those shown in the figures of this manual. 3-1 EBU00032 DESCRIPTION AND MACHINE IDENTIFICATION 1 2 3 4 5 6 7 1. Rear carrier 2. Headlight 7. Front brake lever 20. Front carrier 5. Tail/brake light 10. Shift pedal 12. Rear brake pedal 6. Speedometer 17. Main switch 23. Auxiliary DC jack 4. Recoil starter 9. Rear wheel 11. Parking brake lock...
... four-wheel drive switch 19. Fuel gauge 22. Left handlebar switch 8 9 10 11 12 13 14 NOTE: The machine you have purchased may differ slightly from those shown in the figures of this manual. 3-1 EBU00032 DESCRIPTION AND MACHINE IDENTIFICATION 1 2 3 4 5 6 7 1. Rear carrier 2. Headlight 7. Front brake lever 20. Front carrier 5. Tail/brake light 10. Shift pedal 12. Rear brake pedal 6. Speedometer 17. Main switch 23. Auxiliary DC jack 4. Recoil starter 9. Rear wheel 11. Parking brake lock...

Owners Manual
Page 25
... specification. Reverse indicator light "REVERSE" Neutral indicator light "NEUTRAL" Oil temperature warning light " " Four-wheel drive indicator light " " _ G The engine may cause damage to the engine. EBU00045 EBU00605 Four-wheel-drive indicator light " " This indicator light comes on during operation, stop the engine as soon as it is in reverse. If the light comes on when the 2WD/ 4WD switch is safe to do so and allow the engine to warn...
... specification. Reverse indicator light "REVERSE" Neutral indicator light "NEUTRAL" Oil temperature warning light " " Four-wheel drive indicator light " " _ G The engine may cause damage to the engine. EBU00045 EBU00605 Four-wheel-drive indicator light " " This indicator light comes on during operation, stop the engine as soon as it is in reverse. If the light comes on when the 2WD/ 4WD switch is safe to do so and allow the engine to warn...

Owners Manual
Page 28
... times to turn on the high beam and the tail/brake light. The battery may discharge to turn on the low beam and the tail/brake light. Start switch " " " Light switch " / /OFF" Set the switch to the " " position to the point that the engine stop switch is pushed. Set the switch to the " " position to stop switch " "/" " Make sure that the starter motor will not start or run when the engine stop switch " "/" 3. The engine stop switch controls ignition...
... times to turn on the high beam and the tail/brake light. The battery may discharge to turn on the low beam and the tail/brake light. Start switch " " " Light switch " / /OFF" Set the switch to the " " position to the point that the engine stop switch is pushed. Set the switch to the " " position to stop switch " "/" " Make sure that the starter motor will not start or run when the engine stop switch " "/" 3. The engine stop switch controls ignition...
Owners Manual
Page 30
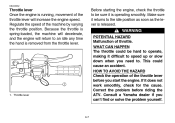
.... Make sure it does not work smoothly, check for the cause. Correct the problem before you can't find or solve the problem yourself. 1. Regulate the speed of throttle. Because the throttle is spring-loaded, the machine will decelerate, and the engine will increase the engine speed. If it returns to an idle any time the hand is released. WARNING POTENTIAL HAZARD Malfunction of the machine...
.... Make sure it does not work smoothly, check for the cause. Correct the problem before you can't find or solve the problem yourself. 1. Regulate the speed of throttle. Because the throttle is spring-loaded, the machine will decelerate, and the engine will increase the engine speed. If it returns to an idle any time the hand is released. WARNING POTENTIAL HAZARD Malfunction of the machine...
Owners Manual
Page 49
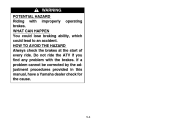
HOW TO AVOID THE HAZARD Always check the brakes at the start of every ride. Do not ride the ATV if you find any problem with improperly operating brakes. If a problem cannot be corrected by the adjustment procedures provided in this manual, have a Yamaha dealer check for the cause. 5-4 WARNING POTENTIAL HAZARD Riding with the brakes. WHAT CAN HAPPEN You could lose braking ability, which could lead to an accident.
HOW TO AVOID THE HAZARD Always check the brakes at the start of every ride. Do not ride the ATV if you find any problem with improperly operating brakes. If a problem cannot be corrected by the adjustment procedures provided in this manual, have a Yamaha dealer check for the cause. 5-4 WARNING POTENTIAL HAZARD Riding with the brakes. WHAT CAN HAPPEN You could lose braking ability, which could lead to an accident.
Owners Manual
Page 58
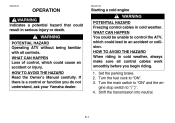
... Owner's Manual carefully. HOW TO AVOID THE HAZARD When riding in cold weather, always make sure all controls. Set the parking brake. 2. WARNING POTENTIAL HAZARD Operating ATV without being familiar with all control cables work smoothly before you do not understand, ask your Yamaha dealer. 6-1 Starting a cold engine WARNING POTENTIAL HAZARD Freezing control cables in serious injury or death. Shift the transmission into neutral. If there is a control...
... Owner's Manual carefully. HOW TO AVOID THE HAZARD When riding in cold weather, always make sure all controls. Set the parking brake. 2. WARNING POTENTIAL HAZARD Operating ATV without being familiar with all control cables work smoothly before you do not understand, ask your Yamaha dealer. 6-1 Starting a cold engine WARNING POTENTIAL HAZARD Freezing control cables in serious injury or death. Shift the transmission into neutral. If there is a control...
Owners Manual
Page 59
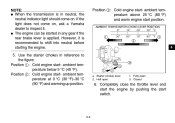
... the transmission is in neutral, the neutral indicator light should come on . Fully-open 1. a. If the light does not come on , ask a Yamaha dealer to inspect it is applied. G The engine can be started in reference to shift into neutral before starting the engine. _ _ Position 3: Cold engine start- Use the starter (choke) in any gear if the rear brake lever is recommended to the figure: Position 1: Cold engine start switch. 6-2
... the transmission is in neutral, the neutral indicator light should come on . Fully-open 1. a. If the light does not come on , ask a Yamaha dealer to inspect it is applied. G The engine can be started in reference to shift into neutral before starting the engine. _ _ Position 3: Cold engine start- Use the starter (choke) in any gear if the rear brake lever is recommended to the figure: Position 1: Cold engine start switch. 6-2
Owners Manual
Page 62
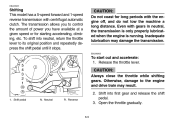
Even with centrifugal automatic clutch. Inadequate lubrication may result. 2. Release the throttle lever. Open the throttle gradually. 1. Reverse 6-5 CAUTION: Always close the throttle while shifting gears. Otherwise, damage to the engine and drive train may damage the transmission. To shift into first gear and release the shift pedal. 3. EBU00205 To start out and accelerate: 1. Neutral R. EBU00201 Shifting This model has a 5-speed forward and 1-speed reverse transmission with gears in neutral, the transmission is only...
Even with centrifugal automatic clutch. Inadequate lubrication may result. 2. Release the throttle lever. Open the throttle gradually. 1. Reverse 6-5 CAUTION: Always close the throttle while shifting gears. Otherwise, damage to the engine and drive train may damage the transmission. To shift into first gear and release the shift pedal. 3. EBU00205 To start out and accelerate: 1. Neutral R. EBU00201 Shifting This model has a 5-speed forward and 1-speed reverse transmission with gears in neutral, the transmission is only...
Owners Manual
Page 65
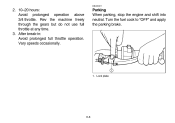
Parking When parking, stop the engine and shift into neutral. Lock plate 6-8 After break-in: Avoid prolonged full throttle operation. Turn the fuel cock to "OFF" and apply the parking brake. 1. Rev the machine freely through the gears but do not use full throttle at any time. 3. Vary speeds occasionally. EBU00211 2. 10-20 hours: Avoid prolonged operation above 3/4 throttle.
Parking When parking, stop the engine and shift into neutral. Lock plate 6-8 After break-in: Avoid prolonged full throttle operation. Turn the fuel cock to "OFF" and apply the parking brake. 1. Rev the machine freely through the gears but do not use full throttle at any time. 3. Vary speeds occasionally. EBU00211 2. 10-20 hours: Avoid prolonged operation above 3/4 throttle.
Owners Manual
Page 91
... the higher gears. Remember that this same procedure as you will be sure not to perform on pavement. If the throttle is applied too abruptly or if the throttle is not released during shifting, or if the shift pedal is designed for off-road use of directional control. Make sure that the engine and exhaust pipe will start the engine. The centrifugal clutch will...
... the higher gears. Remember that this same procedure as you will be sure not to perform on pavement. If the throttle is applied too abruptly or if the throttle is not released during shifting, or if the shift pedal is designed for off-road use of directional control. Make sure that the engine and exhaust pipe will start the engine. The centrifugal clutch will...
Owners Manual
Page 114
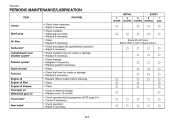
.... • Replace every 12 months. • Check operation/fluid leakage/see NOTE page 8-4. • Correct if necessary. • Check operation. • Adjust if necessary. Every 20-40 hours (More often in wet or dusty areas.) ROUTINE 1 month EVERY 1 year 3 6 6 months months months Valves* Spark plug Air filter Carburetor* Cylinderhead cover breather system* Exhaust system* Spark arrester Fuel line* Engine oil Engine oil filter Engine oil strainer Final gear oil Differential gear oil Front brake* Rear brake* 8-3
.... • Replace every 12 months. • Check operation/fluid leakage/see NOTE page 8-4. • Correct if necessary. • Check operation. • Adjust if necessary. Every 20-40 hours (More often in wet or dusty areas.) ROUTINE 1 month EVERY 1 year 3 6 6 months months months Valves* Spark plug Air filter Carburetor* Cylinderhead cover breather system* Exhaust system* Spark arrester Fuel line* Engine oil Engine oil filter Engine oil strainer Final gear oil Differential gear oil Front brake* Rear brake* 8-3
Owners Manual
Page 139
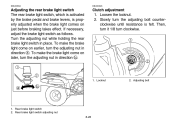
... direction a. Then, turn it 1/8 turn the adjusting bolt counterclockwise until resistance is properly adjusted when the brake light comes on earlier, turn the adjusting nut in place. Locknut 2. Adjusting bolt 1. Clutch adjustment 1. To make the brake light come on just before braking takes effect. EBU00834 EBU00346 Adjusting the rear brake light switch The rear brake light switch, which is activated by the brake pedal and brake levers, is felt. Slowly turn clockwise. 1. Rear brake light switch 2.
... direction a. Then, turn it 1/8 turn the adjusting bolt counterclockwise until resistance is properly adjusted when the brake light comes on earlier, turn the adjusting nut in place. Locknut 2. Adjusting bolt 1. Clutch adjustment 1. To make the brake light come on just before braking takes effect. EBU00834 EBU00346 Adjusting the rear brake light switch The rear brake light switch, which is activated by the brake pedal and brake levers, is felt. Slowly turn clockwise. 1. Rear brake light switch 2.
Owners Manual
Page 141
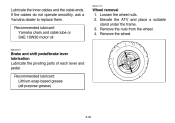
Recommended lubricant: Yamaha chain and cable lube or SAE 10W30 motor oil Wheel removal 1. Remove the wheel. EBU00727 Brake and shift pedal/brake lever lubrication Lubricate the pivoting parts of each lever and pedal. Remove the nuts from the wheel. 4. Elevate the ATV and place a suitable stand under the frame. 3. Recommended lubricant: Lithium-soap-based grease (all-purpose grease) 8-30 If the cables do not operate smoothly, ask a Yamaha dealer to replace them. EBU01112 Lubricate the inner cables and the cable ends. Loosen the wheel nuts. 2.
Recommended lubricant: Yamaha chain and cable lube or SAE 10W30 motor oil Wheel removal 1. Remove the wheel. EBU00727 Brake and shift pedal/brake lever lubrication Lubricate the pivoting parts of each lever and pedal. Remove the nuts from the wheel. 4. Elevate the ATV and place a suitable stand under the frame. 3. Recommended lubricant: Lithium-soap-based grease (all-purpose grease) 8-30 If the cables do not operate smoothly, ask a Yamaha dealer to replace them. EBU01112 Lubricate the inner cables and the cable ends. Loosen the wheel nuts. 2.
Owners Manual
Page 144
... used for recharging a sealed-type battery. EBU00385 EBU00853 Battery maintenance 1. The main fuse case and the fuse box are correct when putting the battery back in a cool, dark place. Then turn off the main switch and install a new fuse of the specified amperage. Completely recharge the battery before reinstallation. Specified fuses: Main fuse: Headlight fuse: Ignition fuse: Auxiliary DC jack fuse: Carburetor warmer fuse: Four-wheel-drive fuse: 30 A 15 A 10 A 10 A 10...
... used for recharging a sealed-type battery. EBU00385 EBU00853 Battery maintenance 1. The main fuse case and the fuse box are correct when putting the battery back in a cool, dark place. Then turn off the main switch and install a new fuse of the specified amperage. Completely recharge the battery before reinstallation. Specified fuses: Main fuse: Headlight fuse: Ignition fuse: Auxiliary DC jack fuse: Carburetor warmer fuse: Four-wheel-drive fuse: 30 A 15 A 10 A 10 A 10...
Owners Manual
Page 145
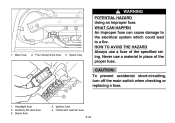
HOW TO AVOID THE HAZARD Always use a material in place of the specified rating. Spare fuse CAUTION: _ To prevent accidental short-circuiting, turn off the main switch when checking or replacing a fuse. _ 1. Ignition fuse 4. Carburetor warmer fuse 8-34 Main fuse 2. Headlight fuse 3. Four-wheel-drive fuse 3. Auxiliary DC jack fuse 5. Spare fuse 2. WHAT CAN HAPPEN An improper fuse can cause damage to the electrical system which could lead to a fire. Never use a fuse of the proper fuse. 1. WARNING POTENTIAL HAZARD Using an improper fuse.
HOW TO AVOID THE HAZARD Always use a material in place of the specified rating. Spare fuse CAUTION: _ To prevent accidental short-circuiting, turn off the main switch when checking or replacing a fuse. _ 1. Ignition fuse 4. Carburetor warmer fuse 8-34 Main fuse 2. Headlight fuse 3. Four-wheel-drive fuse 3. Auxiliary DC jack fuse 5. Spare fuse 2. WHAT CAN HAPPEN An improper fuse can cause damage to the electrical system which could lead to a fire. Never use a fuse of the proper fuse. 1. WARNING POTENTIAL HAZARD Using an improper fuse.
Owners Manual
Page 152
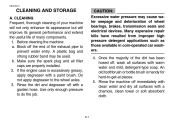
... its general performance and extend the useful life of the exhaust pipe to -get-at places. 5. Make sure the spark plug and all surfaces with a garden hose. Rinse the machine off , wash all filler caps are properly installed. 2. Do not apply degreaser to do the job. 9-1 Use only enough pressure to the wheel axles. 3. Block off with warm water and mild...
... its general performance and extend the useful life of the exhaust pipe to -get-at places. 5. Make sure the spark plug and all surfaces with a garden hose. Rinse the machine off , wash all filler caps are properly installed. 2. Do not apply degreaser to do the job. 9-1 Use only enough pressure to the wheel axles. 3. Block off with warm water and mild...
Owners Manual
Page 160
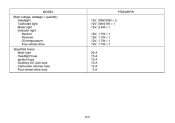
MODEL Bulb voltage, wattage × quantity: Headlight Tail/brake light Meter light Indicator light: Neutral Reverse Oil temparature Four-wheel-drive Specified fuses: Main fuse Headlight fuse Ignition fuse Auxiliary DC jack fuse Carburetor warmer fuse Four-wheel-drive fuse 12V, 30W/30W × 2 12V, 5W/21W × 1 12V, 3.4W × 1 12V, 1.7W × 1 12V, 1.7W × 1 12V, 1.7W × 1 12V, 1.7W × 1 30 A 15 A 10 A 10 A 10 A 3A YFM400FW 10-5
MODEL Bulb voltage, wattage × quantity: Headlight Tail/brake light Meter light Indicator light: Neutral Reverse Oil temparature Four-wheel-drive Specified fuses: Main fuse Headlight fuse Ignition fuse Auxiliary DC jack fuse Carburetor warmer fuse Four-wheel-drive fuse 12V, 30W/30W × 2 12V, 5W/21W × 1 12V, 3.4W × 1 12V, 1.7W × 1 12V, 1.7W × 1 12V, 1.7W × 1 12V, 1.7W × 1 30 A 15 A 10 A 10 A 10 A 3A YFM400FW 10-5