Owners Manual
Page 2
...handle. (3) Put the socket adapter on the spare tire clamp bolt. Seat belts-Shoulder belt anchor OVERVIEW Push up, or squeeze lock release to... make changes at the time of printing. 2010 Highlander This Quick Reference Guide is not a full description of Highlander operations. A word about safe vehicle operations...the spare tire (1) (2) (3) SAFETY AND EMERGENCY FEATURES (1) Remove the cover under the center deck board to review the Owner's Manual and supplementary...vehicle's main equipment quickly and easily. Toyota reserves the right to the Owner's Manual for the Owner's Manual...
...handle. (3) Put the socket adapter on the spare tire clamp bolt. Seat belts-Shoulder belt anchor OVERVIEW Push up, or squeeze lock release to... make changes at the time of printing. 2010 Highlander This Quick Reference Guide is not a full description of Highlander operations. A word about safe vehicle operations...the spare tire (1) (2) (3) SAFETY AND EMERGENCY FEATURES (1) Remove the cover under the center deck board to review the Owner's Manual and supplementary...vehicle's main equipment quickly and easily. Toyota reserves the right to the Owner's Manual for the Owner's Manual...
Owners Manual
Page 119
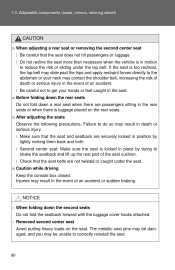
...position by trying to reduce the risk of an accident. n Before folding down the rear seats Do not fold down the second seats Do not fold the seatback forward with the luggage cover hooks attached. The metallic seat pins may be unable to get your neck may be damaged, and you may contact ...the shoulder belt, increasing the risk of death or serious injury in place by lightly rocking them back and forth. l Be careful not to correctly reinstall the seat. 90...
...position by trying to reduce the risk of an accident. n Before folding down the rear seats Do not fold down the second seats Do not fold the seatback forward with the luggage cover hooks attached. The metallic seat pins may be unable to get your neck may be damaged, and you may contact ...the shoulder belt, increasing the risk of death or serious injury in place by lightly rocking them back and forth. l Be careful not to correctly reinstall the seat. 90...

Owners Manual
Page 131
1-3. Doing so may lead to mishandling of the mirror while driving. Adjustable components (seats, mirrors, steering wheel) n To prevent sensor error (vehicles with auto anti-glare inside rear view mirror) To ensure that the sensors operate properly, do not touch or cover them. CAUTION n Caution while driving Do not adjust the position of the vehicle and an accident, resulting in death or serious injury. 102
1-3. Doing so may lead to mishandling of the mirror while driving. Adjustable components (seats, mirrors, steering wheel) n To prevent sensor error (vehicles with auto anti-glare inside rear view mirror) To ensure that the sensors operate properly, do not touch or cover them. CAUTION n Caution while driving Do not adjust the position of the vehicle and an accident, resulting in death or serious injury. 102

Owners Manual
Page 159
...SRS airbag system is controlled by the airbag sensor assembly. l Parts of the airbag module (steering wheel hub, airbag cover and inflator) as well as the front seats, and parts of the front and rear pillars and roof side rail, may result from contact with non-toxic gas ... the airbag sensor assembly, front airbag sensors, side and curtain shield airbag sensor assemblies, curtain shield airbag sensor assemblies, driver's seat position sensor, driver's seat belt buckle switch, front passenger occupant classification system, "AIR BAG ON" and "AIR BAG OFF" indicator lights, front passenger...
...SRS airbag system is controlled by the airbag sensor assembly. l Parts of the airbag module (steering wheel hub, airbag cover and inflator) as well as the front seats, and parts of the front and rear pillars and roof side rail, may result from contact with non-toxic gas ... the airbag sensor assembly, front airbag sensors, side and curtain shield airbag sensor assemblies, curtain shield airbag sensor assemblies, driver's seat position sensor, driver's seat belt buckle switch, front passenger occupant classification system, "AIR BAG ON" and "AIR BAG OFF" indicator lights, front passenger...

Owners Manual
Page 167
...portion of these items could become projectiles when SRS driver, front passenger and knee airbags deploy. l If the vinyl cover is put on the coat hooks. l Do not use seat accessories which cover the parts where the SRS side airbags inflate as the door, windshield glass, side door glass, front and rear...138 l Do not hang coat hangers or other hard objects on the area where the SRS knee airbag will deploy, be thrust into the driver's seat area by the force of the airbags. 1-7. Safety information CAUTION n SRS airbag precautions l Do not attach anything to or lean anything to areas such...
...portion of these items could become projectiles when SRS driver, front passenger and knee airbags deploy. l If the vinyl cover is put on the coat hooks. l Do not use seat accessories which cover the parts where the SRS side airbags inflate as the door, windshield glass, side door glass, front and rear...138 l Do not hang coat hangers or other hard objects on the area where the SRS knee airbag will deploy, be thrust into the driver's seat area by the force of the airbags. 1-7. Safety information CAUTION n SRS airbag precautions l Do not attach anything to or lean anything to areas such...

Owners Manual
Page 174
...contact the front seatbacks. l Do not kick the front passenger seat or subject it is illuminated, ask the passenger to indicate a malfunction of the front seat. 1 Before driving 145 l Do not use a seat accessory, such as a cushion or seat cover, that is illuminated. If the "AIR BAG OFF" indicator ...the SRS warning light may come on the front passenger seat in the front passenger seat, the "AIR BAG ON" indicator light is not possible, move to severe impact. l When it to the rear seat, or if that covers the seat cushion surface. l Do not modify or replace the upholstery...
...contact the front seatbacks. l Do not kick the front passenger seat or subject it is illuminated, ask the passenger to indicate a malfunction of the front seat. 1 Before driving 145 l Do not use a seat accessory, such as a cushion or seat cover, that is illuminated. If the "AIR BAG OFF" indicator ...the SRS warning light may come on the front passenger seat in the front passenger seat, the "AIR BAG ON" indicator light is not possible, move to severe impact. l When it to the rear seat, or if that covers the seat cushion surface. l Do not modify or replace the upholstery...

Owners Manual
Page 188
... anchorages The LATCH system conforms to the downmost position. Safety information STEP 2 Front of vehicle Outside seat: Open the anchor bracket cover, latch the hook onto the anchor bracket and tighten the top tether strap. 1 Center seat: Latch the hook onto the anchor bracket and tighten the top tether strap. Child restraint systems...
... anchorages The LATCH system conforms to the downmost position. Safety information STEP 2 Front of vehicle Outside seat: Open the anchor bracket cover, latch the hook onto the anchor bracket and tighten the top tether strap. 1 Center seat: Latch the hook onto the anchor bracket and tighten the top tether strap. Child restraint systems...

Owners Manual
Page 263
...CAUTION n Things that has no lid l Secure all items in the luggage compartment. Failing to suffer serious bodily injury, in their seats with their seat belts properly fastened. l Never allow anyone to ride in the occupant compartment, as the item may shift and injure someone during ...driver's vision, or hit the driver or passengers, causing an accident. • Driver's feet • Front passenger or rear seats (when stacking items) • Luggage cover • Instrument panel • Dashboard • Auxiliary box or tray that must not be carried in the luggage compartment The ...
...CAUTION n Things that has no lid l Secure all items in the luggage compartment. Failing to suffer serious bodily injury, in their seats with their seat belts properly fastened. l Never allow anyone to ride in the occupant compartment, as the item may shift and injure someone during ...driver's vision, or hit the driver or passengers, causing an accident. • Driver's feet • Front passenger or rear seats (when stacking items) • Luggage cover • Instrument panel • Dashboard • Auxiliary box or tray that must not be carried in the luggage compartment The ...

Owners Manual
Page 333
STEP 1 Open the cover and connect the portable audio device. Vehicles without seat heater 3 Vehicles with seat heater Interior features STEP 2 Press . 307 3 -2 . U sing t he a udio syst e m U sing t he AU X a da pt e r This adapter can be used to connect a portable audio device and listen to it through the vehicle's speakers.
STEP 1 Open the cover and connect the portable audio device. Vehicles without seat heater 3 Vehicles with seat heater Interior features STEP 2 Press . 307 3 -2 . U sing t he a udio syst e m U sing t he AU X a da pt e r This adapter can be used to connect a portable audio device and listen to it through the vehicle's speakers.

Owners Manual
Page 341
... Using the rear audio system n Before using 3 AA batteries Batteries can be purchased at your Toyota dealer, electric appliance shop, or camera stores. n When using the remote controller (for new vehicle owners) STEP 1 Remove the cover. l The rear seat entertainment system control will not function properly. STEP 2 Remove the insulating sheet. 3 Interior features...
... Using the rear audio system n Before using 3 AA batteries Batteries can be purchased at your Toyota dealer, electric appliance shop, or camera stores. n When using the remote controller (for new vehicle owners) STEP 1 Remove the cover. l The rear seat entertainment system control will not function properly. STEP 2 Remove the insulating sheet. 3 Interior features...

Owners Manual
Page 359
... outlet The power outlet is used to the A/V input adapter. Using the adapter 3 Open the cover. Yellow: Image input adapter White: Left channel audio input adapter Red: Right channel audio input adapter n A/V input adapter The rear seat entertainment system plays videos and sound when audiovideo equipment is composed of 3 input adapters. The...
... outlet The power outlet is used to the A/V input adapter. Using the adapter 3 Open the cover. Yellow: Image input adapter White: Left channel audio input adapter Red: Right channel audio input adapter n A/V input adapter The rear seat entertainment system plays videos and sound when audiovideo equipment is composed of 3 input adapters. The...

Owners Manual
Page 369
... cellular phone does not support HFP, you cannot use the Bluetooth® phone. 343 If the mobile phone is behind the seat or in the console box, or touching or covered by metal objects, connection status may not correspond exactly with HFP (Hands Free Profile) Ver. 1.0 and OPP (Object Push Profile) Ver...
... cellular phone does not support HFP, you cannot use the Bluetooth® phone. 343 If the mobile phone is behind the seat or in the console box, or touching or covered by metal objects, connection status may not correspond exactly with HFP (Hands Free Profile) Ver. 1.0 and OPP (Object Push Profile) Ver...

Owners Manual
Page 423
... Persons who have taken alcohol or drugs that induce sleep (sleeping drugs, cold remedies, etc.) l Do not cover the seat with the seat heater on the seat and do not stick sharp objects (needles, nails, etc.) into the seat. n To prevent battery discharge Turn the switches off when the engine is not running. 3-7. Interior features...
... Persons who have taken alcohol or drugs that induce sleep (sleeping drugs, cold remedies, etc.) l Do not cover the seat with the seat heater on the seat and do not stick sharp objects (needles, nails, etc.) into the seat. n To prevent battery discharge Turn the switches off when the engine is not running. 3-7. Interior features...

Owners Manual
Page 428
...the grooves shown in the illustration and stand the cover upright. 402 STEP 2 Engage both ends of the luggage cover with the third seat: When using the luggage cover, the third seat must be fold down. (→P. 86) STEP 2 Pull out the luggage cover and engage both ends. n When taking out ...luggage through the glass hatch (vehicles with luggage cover) STEP 1 Hang the hooks on...
...the grooves shown in the illustration and stand the cover upright. 402 STEP 2 Engage both ends of the luggage cover with the third seat: When using the luggage cover, the third seat must be fold down. (→P. 86) STEP 2 Pull out the luggage cover and engage both ends. n When taking out ...luggage through the glass hatch (vehicles with luggage cover) STEP 1 Hang the hooks on...

Owners Manual
Page 429
Then raise the right side and pull the luggage cover out. Other interior features n Removing the luggage cover (vehicles with luggage cover) The luggage cover can be removed by following the procedure below. 3-7. Push in the left side of the luggage cover while keeping hold of the right side. Detach the hooks. n Luggage storage box (vehicles without third seat) STEP 1 Lift the deck board. 3 Interior features STEP 2 Secure the board using the hook. 403
Then raise the right side and pull the luggage cover out. Other interior features n Removing the luggage cover (vehicles with luggage cover) The luggage cover can be removed by following the procedure below. 3-7. Push in the left side of the luggage cover while keeping hold of the right side. Detach the hooks. n Luggage storage box (vehicles without third seat) STEP 1 Lift the deck board. 3 Interior features STEP 2 Secure the board using the hook. 403

Owners Manual
Page 431
Other interior features NOTICE n Shopping bag hook weight capacity Do not hang any object heavier than 4 lb. (2 kg) on shopping bag hooks. n While driving Do not drive with the hook attached, or the hook may fall down. n Closing the back door (vehicles without third seat) Do not close the back door with the luggage cover standing upright in the grooves as the luggage cover may be damaged. 3 Interior features 405 n Before inserting the center deck board into the luggage compartment Make sure the luggage cover is not stowed. 3-7.
Other interior features NOTICE n Shopping bag hook weight capacity Do not hang any object heavier than 4 lb. (2 kg) on shopping bag hooks. n While driving Do not drive with the hook attached, or the hook may fall down. n Closing the back door (vehicles without third seat) Do not close the back door with the luggage cover standing upright in the grooves as the luggage cover may be damaged. 3 Interior features 405 n Before inserting the center deck board into the luggage compartment Make sure the luggage cover is not stowed. 3-7.

Owners Manual
Page 792
Make sure the top tether strap is securely latched. Hook Top strap Anchor bracket STEP 3 Adjust the head restraint to the downmost position. 1-7. Safety information STEP 2 Front of vehicle Outside seat: Open the anchor bracket cover, latch the hook onto the anchor bracket and tighten the top tether strap. Center seat: Latch the hook onto the anchor bracket and tighten the top tether strap.
Make sure the top tether strap is securely latched. Hook Top strap Anchor bracket STEP 3 Adjust the head restraint to the downmost position. 1-7. Safety information STEP 2 Front of vehicle Outside seat: Open the anchor bracket cover, latch the hook onto the anchor bracket and tighten the top tether strap. Center seat: Latch the hook onto the anchor bracket and tighten the top tether strap.

Owners Manual
Page 936
Vehicles without seat heater 3 Vehicles with seat heater Interior features STEP 2 Press . 311 U sing t he a udio syst e m U sing t he AU X a da pt e r This adapter can be used to connect a portable audio device and listen to it through the vehicle's speakers. 3 -2 . STEP 1 Open the cover and connect the portable audio device.
Vehicles without seat heater 3 Vehicles with seat heater Interior features STEP 2 Press . 311 U sing t he a udio syst e m U sing t he AU X a da pt e r This adapter can be used to connect a portable audio device and listen to it through the vehicle's speakers. 3 -2 . STEP 1 Open the cover and connect the portable audio device.
Owners Manual
Page 1222
...177, 181 Identification number...557 If the engine will not start ...539 Ignition switch...177, 181 Overheating...549 Engine compartment cover...443 Engine coolant Capacity ...565 Checking ...448 Preparing and checking before winter ...242 Engine coolant temperature gauge ...192 Engine immobilizer...211 Wattage...573 Front manual air conditioning system ...260 Front passenger occupant classification system ...145 Front passenger's seat belt reminder light ...517 Front seats Adjustment ...83 Front side marker lights Replacing light bulbs...489 Switch ...207 Wattage...573 Front turn signal lights...
...177, 181 Identification number...557 If the engine will not start ...539 Ignition switch...177, 181 Overheating...549 Engine compartment cover...443 Engine coolant Capacity ...565 Checking ...448 Preparing and checking before winter ...242 Engine coolant temperature gauge ...192 Engine immobilizer...211 Wattage...573 Front manual air conditioning system ...260 Front passenger occupant classification system ...145 Front passenger's seat belt reminder light ...517 Front seats Adjustment ...83 Front side marker lights Replacing light bulbs...489 Switch ...207 Wattage...573 Front turn signal lights...

Owners Manual
Page 1396
Make sure the top tether strap is securely latched. Safety information STEP 2 Front of vehicle Outside seat: Open the anchor bracket cover, latch the hook onto the anchor bracket and tighten the top tether strap. 1 Center seat: Latch the hook onto the anchor bracket and tighten the top tether strap. 1-7. Before driving Hook Top strap Anchor bracket STEP 3 Adjust the head restraint to the downmost position.
Make sure the top tether strap is securely latched. Safety information STEP 2 Front of vehicle Outside seat: Open the anchor bracket cover, latch the hook onto the anchor bracket and tighten the top tether strap. 1 Center seat: Latch the hook onto the anchor bracket and tighten the top tether strap. 1-7. Before driving Hook Top strap Anchor bracket STEP 3 Adjust the head restraint to the downmost position.


