Owner's Manual
Page 6
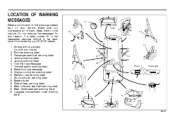
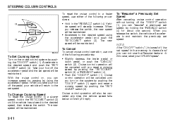
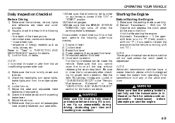
...any reason. If a label comes off or the messages become difficult to be read, have it corrected by your vehicle. Transfer switch warning label 8. Brake fluid cap message 9. Engine cooling fan warning label 10. Battery label 13. Rear center seat belt warning label 16. LOCATION OF WARNING MESSAGES Read ... Passenger seat belt warning label 4. Jacking warning label 6. Radiator cap warning label 11. Jacking warning label 5. Keep them . Air bag warning labels (on your SUZUKI dealer. 1. Rear outboard seat belt warning label 15. Air conditioner warning label 12.
...any reason. If a label comes off or the messages become difficult to be read, have it corrected by your vehicle. Transfer switch warning label 8. Brake fluid cap message 9. Engine cooling fan warning label 10. Battery label 13. Rear center seat belt warning label 16. LOCATION OF WARNING MESSAGES Read ... Passenger seat belt warning label 4. Jacking warning label 6. Radiator cap warning label 11. Jacking warning label 5. Keep them . Air bag warning labels (on your SUZUKI dealer. 1. Rear outboard seat belt warning label 15. Air conditioner warning label 12.
Owner's Manual
Page 67
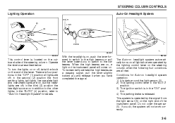
... headlight system automatically turns on all met. To turn the lights on or off ; Do not cover the sensor (5). in the "ON" position. 4) The parking brake is in the "AUTO" (4) position, refer to "Auto-On Headlight System" for details. With the headlights on, push the lever forward to switch to the...
... headlight system automatically turns on all met. To turn the lights on or off ; Do not cover the sensor (5). in the "ON" position. 4) The parking brake is in the "AUTO" (4) position, refer to "Auto-On Headlight System" for details. With the headlights on, push the lever forward to switch to the...
Owner's Manual
Page 68
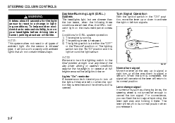
... turn the lighting switch to the third position at night or at any time of ambient light. system operation: 1) The engine is running. 2) The parking brake is released. 3) The lighting switch is in either the "OFF" or the "Second" position: or The lighting switch is in the "AUTO" position and it...
... turn the lighting switch to the third position at night or at any time of ambient light. system operation: 1) The engine is running. 2) The parking brake is released. 3) The lighting switch is in either the "OFF" or the "Second" position: or The lighting switch is in the "AUTO" position and it...
Owner's Manual
Page 72
With the cruise control on, you can increase speed for about one of the following procedures: • Slightly depress the brake pedal or clutch pedal, or push the "CANCEL" switch (2). Cruise control operation will steadily increase. In this case, reset your CRUISE speed. (1) (2) (3) • Hold in ...
With the cruise control on, you can increase speed for about one of the following procedures: • Slightly depress the brake pedal or clutch pedal, or push the "CANCEL" switch (2). Cruise control operation will steadily increase. In this case, reset your CRUISE speed. (1) (2) (3) • Hold in ...
Owner's Manual
Page 79
.... INSTRUMENT PANEL inflation pressure as specified in the "INSPECTION AND MAINTENANCE" section. Check and adjust your vehicle inspected by an authorized SUZUKI dealer. Be aware that the monitoring system has recovered, make sure to "Tires" in the vehicle placard and owner's manual. ... ten minutes after you have a sudden loss of air pressure. NOTE: The low tire pressure warning light may affect steering control and brake effectiveness. Stop in the "EMERGENCY SERVICE" section. Refer to "Tire Pressure Monitoring System" in the "INSPECTION AND MAINTENANCE" section for...
.... INSTRUMENT PANEL inflation pressure as specified in the "INSPECTION AND MAINTENANCE" section. Check and adjust your vehicle inspected by an authorized SUZUKI dealer. Be aware that the monitoring system has recovered, make sure to "Tires" in the vehicle placard and owner's manual. ... ten minutes after you have a sudden loss of air pressure. NOTE: The low tire pressure warning light may affect steering control and brake effectiveness. Stop in the "EMERGENCY SERVICE" section. Refer to "Tire Pressure Monitoring System" in the "INSPECTION AND MAINTENANCE" section for...

Owner's Manual
Page 80
... may go down farther than normal. 2) Test the brakes by your SUZUKI dealer to inspect the brake system. • If the brake system warning light does not go out after the parking brake has been fully released. • If the brake system warning light does not come on when driving, there... may be something wrong with the vehicle's brake system. If this happens, you should immediately ask your SUZUKI dealer. Anti-Lock Brake System (ABS) Warning Light WARNING 65D477 This light comes on at low speed to the nearest dealer for...
... may go down farther than normal. 2) Test the brakes by your SUZUKI dealer to inspect the brake system. • If the brake system warning light does not go out after the parking brake has been fully released. • If the brake system warning light does not come on when driving, there... may be something wrong with the vehicle's brake system. If this happens, you should immediately ask your SUZUKI dealer. Anti-Lock Brake System (ABS) Warning Light WARNING 65D477 This light comes on at low speed to the nearest dealer for...
Owner's Manual
Page 81
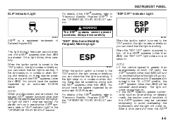
...® systems, refer to "Electronic Stability Program (ESP®)" in the "OPERATING YOUR VEHICLE" section. You should have the system inspected by an authorized SUZUKI dealer. NOTE: • If the vehicle speed is working . The light will turn off the ESP® systems (other than ABS), the "ESP OFF...174; systems, refer to the "ON" position, the light comes on briefly so you can check that the light is turned to avoid overheating the brake pads, and the light will blink 1 time per second when one of time, the ESP® 4-6 When the ignition switch is working . ...
...® systems, refer to "Electronic Stability Program (ESP®)" in the "OPERATING YOUR VEHICLE" section. You should have the system inspected by an authorized SUZUKI dealer. NOTE: • If the vehicle speed is working . The light will turn off the ESP® systems (other than ABS), the "ESP OFF...174; systems, refer to the "ON" position, the light comes on briefly so you can check that the light is turned to avoid overheating the brake pads, and the light will blink 1 time per second when one of time, the ESP® 4-6 When the ignition switch is working . ...
Owner's Manual
Page 85
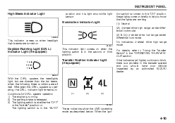
... 50G056 Illumination Indicator Light (2) & (3): 4-wheel drive low range center differential lock mode 64J045 This indicator comes on . system operation 1) The engine is running. 2) The parking brake is released. 3) The lighting switch is at either the "OFF" or the "middle" position: or The lighting switch is in the "AUTO" (1) (2) (3) 64J044 These indicators... (all met. Conditions for D.R.L. No indicators: 4-wheel drive high range mode For details, refer to let you should have your vehicle inspected by an authorized SUZUKI dealer.
... 50G056 Illumination Indicator Light (2) & (3): 4-wheel drive low range center differential lock mode 64J045 This indicator comes on . system operation 1) The engine is running. 2) The parking brake is released. 3) The lighting switch is at either the "OFF" or the "middle" position: or The lighting switch is in the "AUTO" (1) (2) (3) 64J044 These indicators... (all met. Conditions for D.R.L. No indicators: 4-wheel drive high range mode For details, refer to let you should have your vehicle inspected by an authorized SUZUKI dealer.

Owner's Manual
Page 91
... OFF" switch again. The "ESP OFF" indicator light will go out. trademark of For details of the ESP® systems, refer to avoid overheating the brake pads. NOTE: • If the vehicle speed is greater than ABS), push and hold the "ESP OFF" switch until the "ESP OFF" indicator light comes...
... OFF" switch again. The "ESP OFF" indicator light will go out. trademark of For details of the ESP® systems, refer to avoid overheating the brake pads. NOTE: • If the vehicle speed is greater than ABS), push and hold the "ESP OFF" switch until the "ESP OFF" indicator light comes...
Owner's Manual
Page 131
OTHER CONTROLS AND EQUIPMENT OTHER CONTROLS AND EQUIPMENT Parking Brake Lever ...5-1 Pedals ...5-1 Gearshift Lever ...5-2 Fuel Filler Cap ...5-3 Folding Seats ...5-4 Armrest ...5-7 Sun Visor ...5-7 Interior Light Switch ...5-7 5 Spot Light ...5-8 Luggage Compartment Light ...5-9 Front Seat Heater (if equipped) ...5-9 ...
OTHER CONTROLS AND EQUIPMENT OTHER CONTROLS AND EQUIPMENT Parking Brake Lever ...5-1 Pedals ...5-1 Gearshift Lever ...5-2 Fuel Filler Cap ...5-3 Folding Seats ...5-4 Armrest ...5-7 Sun Visor ...5-7 Interior Light Switch ...5-7 5 Spot Light ...5-8 Luggage Compartment Light ...5-9 Front Seat Heater (if equipped) ...5-9 ...
Owner's Manual
Page 132
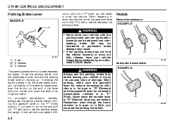
...thumb and lower the lever to the "P" (Park) position. EXAMPLE (2) (3) 64J083 5-1 For automatic transmission vehicles, always set the parking brake, the weight of the vehicle may make sure the gearshift lever for manual transmission vehicles is in 1st gear or "R" (Reverse) and... not fully release, have your vehicle inspected immediately by an authorized SUZUKI dealer. (3) (2) (1) 64J082 Automatic transmission WARNING Always set the parking brake fully before you set the parking brake before releasing the parking brake. When parking, make it diffi- • Never drive your ...
...thumb and lower the lever to the "P" (Park) position. EXAMPLE (2) (3) 64J083 5-1 For automatic transmission vehicles, always set the parking brake, the weight of the vehicle may make sure the gearshift lever for manual transmission vehicles is in 1st gear or "R" (Reverse) and... not fully release, have your vehicle inspected immediately by an authorized SUZUKI dealer. (3) (2) (1) 64J082 Automatic transmission WARNING Always set the parking brake fully before you set the parking brake before releasing the parking brake. When parking, make it diffi- • Never drive your ...
Owner's Manual
Page 133
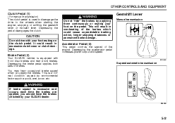
... etc. 5-speed automatic transmission WARNING If brake squeal is excessive and occurs each time the brakes are applied, you apply the brakes. Depressing the brake pedal applies both sets of the engine. This is a normal condition caused by your SUZUKI dealer. 66J046 5-2 Depressing the pedal disengages... the clutch. Depressing the accelerator pedal increases power output and speed. 65D449 Brake Pedal (2) Your SUZUKI vehicle is used to disengage the drive to the wheels ...
... etc. 5-speed automatic transmission WARNING If brake squeal is excessive and occurs each time the brakes are applied, you apply the brakes. Depressing the brake pedal applies both sets of the engine. This is a normal condition caused by your SUZUKI dealer. 66J046 5-2 Depressing the pedal disengages... the clutch. Depressing the accelerator pedal increases power output and speed. 65D449 Brake Pedal (2) Your SUZUKI vehicle is used to disengage the drive to the wheels ...
Owner's Manual
Page 155
...and then lift the edge of the cap up as "jackrabbit" starts, sharp turns, fast cornering and sudden braking. You should protect the painted surfaces of the vehicle from your SUZUKI dealer. OTHER CONTROLS AND EQUIPMENT You can use a roof rack, observe the instructions and precautions in this ...type of cargo. 5-24 Drive cautiously at your SUZUKI dealer. Also, do not let the gross vehicle weight (fully loaded vehicle including driver, passengers, cargo, roof load and trailer tongue weight)...
...and then lift the edge of the cap up as "jackrabbit" starts, sharp turns, fast cornering and sudden braking. You should protect the painted surfaces of the vehicle from your SUZUKI dealer. OTHER CONTROLS AND EQUIPMENT You can use a roof rack, observe the instructions and precautions in this ...type of cargo. 5-24 Drive cautiously at your SUZUKI dealer. Also, do not let the gross vehicle weight (fully loaded vehicle including driver, passengers, cargo, roof load and trailer tongue weight)...

Owner's Manual
Page 159
OPERATING YOUR VEHICLE OPERATING YOUR VEHICLE Exhaust Gas Warning ...6-1 Daily Inspection Checklist ...6-2 Starting the Engine ...6-2 Engine Block Heater (if equipped) ...6-4 Using the Transmission ...6-5 Using the Transfer Switch (if equipped) ...6-7 Braking ...6-15 Electronic Stability Program (ESP®) ...6-18 Tire Pressure Monitoring System (TPMS) 6 (if equipped) ...6-21 Break-In ...6-25 Catalytic Converter ...6-25 Improving Fuel Economy ...6-26 60G408
OPERATING YOUR VEHICLE OPERATING YOUR VEHICLE Exhaust Gas Warning ...6-1 Daily Inspection Checklist ...6-2 Starting the Engine ...6-2 Engine Block Heater (if equipped) ...6-4 Using the Transmission ...6-5 Using the Transfer Switch (if equipped) ...6-7 Braking ...6-15 Electronic Stability Program (ESP®) ...6-18 Tire Pressure Monitoring System (TPMS) 6 (if equipped) ...6-21 Break-In ...6-25 Catalytic Converter ...6-25 Improving Fuel Economy ...6-26 60G408
Owner's Manual
Page 161
...and unobstructed. 2) Visually check the tires for proper latch operation. Starting the Engine Before Starting the Engine 1) Make sure the parking brake is in an accident. 6-2 NOTE: Automatic transmission vehicles have properly fastened your fuel tank, perform the following points: - the ...the air conditioning system after checking for the following under-hood checks: 1) 2) 3) 4) 5) 6) Engine oil level Coolant level Brake fluid level Power steering (if equipped) fluid level Windshield washer fluid level Hood latch operation Pull the hood release handle inside the vehicle...
...and unobstructed. 2) Visually check the tires for proper latch operation. Starting the Engine Before Starting the Engine 1) Make sure the parking brake is in an accident. 6-2 NOTE: Automatic transmission vehicles have properly fastened your fuel tank, perform the following points: - the ...the air conditioning system after checking for the following under-hood checks: 1) 2) 3) 4) 5) 6) Engine oil level Coolant level Brake fluid level Power steering (if equipped) fluid level Windshield washer fluid level Hood latch operation Pull the hood release handle inside the vehicle...
Owner's Manual
Page 164
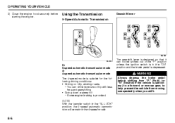
...gearshift lever is designed so that it can drive more smoothly with less frequent gearshifting • Going down a steep hill - Some engine braking is provided NOTE: With the transfer switch in the "4L LOCK" position, the 5-speed automatic transmission will remain in the "ON" position ...and the brake pedal is in the 4-speed mode. Using the Transmission 5-Speed Automatic Transmission Gearshift lever 66J004 66J003 D: 5-speed automatic transmission mode 4: 4-speed...
...gearshift lever is designed so that it can drive more smoothly with less frequent gearshifting • Going down a steep hill - Some engine braking is provided NOTE: With the transfer switch in the "4L LOCK" position, the 5-speed automatic transmission will remain in the "ON" position ...and the brake pedal is in the 4-speed mode. Using the Transmission 5-Speed Automatic Transmission Gearshift lever 66J004 66J003 D: 5-speed automatic transmission mode 4: 4-speed...

Owner's Manual
Page 165
... 2) Use this position to provide extra power when climbing hills, or to "R", "D", "4", "3" or "L" when the engine is completely stopped. Use the vehicle's brakes. Otherwise the vehicle may also shift into "P" or "R". • Do not shift from stop. R (Reverse) Use this position for all normal driving. D... (Drive) Use this position to back the vehicle from "P" or "N" to provide engine braking when going down hills. Emergency shifting out of "P" (Park) If you are unable to do. You may roll even if the transmission ...
... 2) Use this position to provide extra power when climbing hills, or to "R", "D", "4", "3" or "L" when the engine is completely stopped. Use the vehicle's brakes. Otherwise the vehicle may also shift into "P" or "R". • Do not shift from stop. R (Reverse) Use this position for all normal driving. D... (Drive) Use this position to back the vehicle from "P" or "N" to provide engine braking when going down hills. Emergency shifting out of "P" (Park) If you are unable to do. You may roll even if the transmission ...

Owner's Manual
Page 166
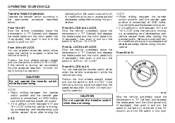
...equipped) 65D449 Starting off To start off , do not use the clutch pedal as a footrest while driving or use the transfer switch to provide braking. After releasing the parking brake, gradually release the clutch. Always push in the clutch pedal fully before you hear a change in... brake failure. • When driving on a hill. Avoid riding the brakes or they may cause loss of the four modes: N, 4H, 4H LOCK, 4L LOCK. 6-7 Your vehicle is completely stopped before shifting gears. Downshifting ...
...equipped) 65D449 Starting off To start off , do not use the clutch pedal as a footrest while driving or use the transfer switch to provide braking. After releasing the parking brake, gradually release the clutch. Always push in the clutch pedal fully before you hear a change in... brake failure. • When driving on a hill. Avoid riding the brakes or they may cause loss of the four modes: N, 4H, 4H LOCK, 4L LOCK. 6-7 Your vehicle is completely stopped before shifting gears. Downshifting ...

Owner's Manual
Page 171
... low range center differential lock) In this position when you get better traction and more low-speed torque than when driving in "4H". Braketraction control brakes the spinning wheel to distribute drive power to the front and rear axles and you need better traction than "4H" provides and more low-speed...
... low range center differential lock) In this position when you get better traction and more low-speed torque than when driving in "4H". Braketraction control brakes the spinning wheel to distribute drive power to the front and rear axles and you need better traction than "4H" provides and more low-speed...
Owner's Manual
Page 172
... (1) at the left of the "N" position, and hold the switch in this procedure. Stop the vehicle completely, place the transmission in "N" (Neutral) and depress the brake pedal and the clutch pedal fully (if equipped), then push in and turn the switch to shift into "4H". transfer switch. From 4L LOCK to... 4H LOCK Stop the vehicle completely, place the transmission in "N" (Neutral) and depress the brake pedal and the clutch pedal fully (if equipped), then push in and turn the switch to shift into "4H". Be sure to wait until traffic...
... (1) at the left of the "N" position, and hold the switch in this procedure. Stop the vehicle completely, place the transmission in "N" (Neutral) and depress the brake pedal and the clutch pedal fully (if equipped), then push in and turn the switch to shift into "4H". transfer switch. From 4L LOCK to... 4H LOCK Stop the vehicle completely, place the transmission in "N" (Neutral) and depress the brake pedal and the clutch pedal fully (if equipped), then push in and turn the switch to shift into "4H". Be sure to wait until traffic...

