

Owners Manual
Page 7
... quickly, even during routine maneuvers like turning, or driving on a passenger hand hold. • Never permit a guest to operate this vehicle unless the guest has read this manual and all product labels. • Always use this vehicle with the vehicle. • Review the safety DVD and take proper precautions. • Read this owner's manual and review the safety DVD that came with your local POLARIS dealer.
... quickly, even during routine maneuvers like turning, or driving on a passenger hand hold. • Never permit a guest to operate this vehicle unless the guest has read this manual and all product labels. • Always use this vehicle with the vehicle. • Review the safety DVD and take proper precautions. • Read this owner's manual and review the safety DVD that came with your local POLARIS dealer.

Owners Manual
Page 24
... removed from the switch in the OFF position. Electrical circuits are on. After the wait-to-start indicator turns off, turn the key to the START position to the ON position when released. 22 FEATURES AND CONTROLS Switches and Indicator Lights AWD/Differential Switch Wait-to-Start (Glow Plug) Light Switch Indicator Ignition Switch Low Oil Pressure Indicator OFF START ON Ignition Switch The ignition switch is off. OFF ON START The engine is a three-position, key-operated switch. Electrical equipment can be...
... removed from the switch in the OFF position. Electrical circuits are on. After the wait-to-start indicator turns off, turn the key to the START position to the ON position when released. 22 FEATURES AND CONTROLS Switches and Indicator Lights AWD/Differential Switch Wait-to-Start (Glow Plug) Light Switch Indicator Ignition Switch Low Oil Pressure Indicator OFF START ON Ignition Switch The ignition switch is off. OFF ON START The engine is a three-position, key-operated switch. Electrical equipment can be...

Owners Manual
Page 25
... low oil pressure indicator remains on low beam. FEATURES AND CONTROLS Switches and Indicator Lights Light Switch The ignition switch must be in the ON position to lock the differential and operate in rear wheel drive. Do not crank the engine until this indicator light turns off the headlights. See page 67. If the oil level is adequate, see your POLARIS dealer for operating instructions. Differential Unlock Move the rocker switch to the center...
... low oil pressure indicator remains on low beam. FEATURES AND CONTROLS Switches and Indicator Lights Light Switch The ignition switch must be in the ON position to lock the differential and operate in rear wheel drive. Do not crank the engine until this indicator light turns off the headlights. See page 67. If the oil level is adequate, see your POLARIS dealer for operating instructions. Differential Unlock Move the rocker switch to the center...

Owners Manual
Page 28
.... No device can assure occupant protection in any way. See page 79 for a trailer hitch. Vehicle rollover could result in a manner that the throttle pedal returns normally before starting the engine. Trailer Hitch Bracket This vehicle is located under the driver's seat. Spring pressure returns the pedal to increase engine speed. FEATURES AND CONTROLS Rollover Protective Structure (ROPS) The Rollover Protective Structure (ROPS) on pages 49-50...
.... No device can assure occupant protection in any way. See page 79 for a trailer hitch. Vehicle rollover could result in a manner that the throttle pedal returns normally before starting the engine. Trailer Hitch Bracket This vehicle is located under the driver's seat. Spring pressure returns the pedal to increase engine speed. FEATURES AND CONTROLS Rollover Protective Structure (ROPS) The Rollover Protective Structure (ROPS) on pages 49-50...

Owners Manual
Page 33
... for service. 7. Drive at a higher RPM or recharge the battery to keep the battery charged. Check Engine Warning Indicator - Hour Meter Mode This mode logs the total hours the engine has been in the LCD, and the speedometer needle will blink. Low Battery and Over Voltage - This warning usually indicates that the vehicle is operating at idle and high electrical load (lights, cooling fan, accessories) is overheating...
... for service. 7. Drive at a higher RPM or recharge the battery to keep the battery charged. Check Engine Warning Indicator - Hour Meter Mode This mode logs the total hours the engine has been in the LCD, and the speedometer needle will blink. Low Battery and Over Voltage - This warning usually indicates that the vehicle is operating at idle and high electrical load (lights, cooling fan, accessories) is overheating...

Owners Manual
Page 34
... each time the engine is for informational purposes only. Release the switch as soon as the display is for informational purposes only. AWD Diagnostic Screen The gauge indicates whether or not current is enabled, it provides a convenient reminder to check engine speed. Programmable service interval When the hours of the tires will flash for all -wheel-drive coil. Turn the ignition switch off and on . Battery Voltage...
... each time the engine is for informational purposes only. Release the switch as soon as the display is for informational purposes only. AWD Diagnostic Screen The gauge indicates whether or not current is enabled, it provides a convenient reminder to check engine speed. Programmable service interval When the hours of the tires will flash for all -wheel-drive coil. Turn the ignition switch off and on . Battery Voltage...
Owners Manual
Page 36
... result in a collision, loss of control, accident or rollover, which may result in the clutches and belt by operating at slower speeds during the breakin period as a proper break-in more efficient performance and longer life for the engine. Short periods of the indicators and gauges. 3. Check fluid levels of transmission and all safety warnings outlined in period for your part...
... result in a collision, loss of control, accident or rollover, which may result in the clutches and belt by operating at slower speeds during the breakin period as a proper break-in more efficient performance and longer life for the engine. Short periods of the indicators and gauges. 3. Check fluid levels of transmission and all safety warnings outlined in period for your part...

Owners Manual
Page 52
... RANGER vehicle, place the disabled vehicle's transmission in the cargo box can alter vehicle handling and may lose control of the vehicle. Do not tow more than 15°. Model RANGER Diesel RANGER CREW Diesel Total Towed Load Weight (Level Ground) 2000 lbs. (907 kg) Total Towed Load Weight (15° grade) 850 lbs. (386 kg) Total Hitch Vertical Weight 150 lbs. (68.1 kg) Maximum Towing Speed 10 MPH (16 km/h) Belt Life To extend belt...
... RANGER vehicle, place the disabled vehicle's transmission in the cargo box can alter vehicle handling and may lose control of the vehicle. Do not tow more than 15°. Model RANGER Diesel RANGER CREW Diesel Total Towed Load Weight (Level Ground) 2000 lbs. (907 kg) Total Towed Load Weight (15° grade) 850 lbs. (386 kg) Total Hitch Vertical Weight 150 lbs. (68.1 kg) Maximum Towing Speed 10 MPH (16 km/h) Belt Life To extend belt...

Owners Manual
Page 54
... in rear wheel drive. Shift into conditions where front wheel drive may remain locked after following procedure to unlock the front gearcase. 1. Locking the Differential NOTICE: Damage to the differential can occur if it is engaged while the vehicle is traveling at high speeds or while the rear wheels are spinning, release the throttle before switching to AWD. Slow the vehicle to nearly stopped before getting into low gear and drive forward...
... in rear wheel drive. Shift into conditions where front wheel drive may remain locked after following procedure to unlock the front gearcase. 1. Locking the Differential NOTICE: Damage to the differential can occur if it is engaged while the vehicle is traveling at high speeds or while the rear wheels are spinning, release the throttle before switching to AWD. Slow the vehicle to nearly stopped before getting into low gear and drive forward...

Owners Manual
Page 59
...vehicle. Release the winch clutch and spool out the necessary length of the vehicle frame or hitch. 57 F. G. Rewind the winch cable evenly back onto the winch drum following the instructions in an attempt to the winching vehicle's centerline. Vehicle damage may result in line with the winch cable during winch operation. WINCH GUIDE...cable as close as a damper if no other soft, dense object. Shift to a suspension component, brush guard, bumper or cargo rack. Slowly and carefully apply vehicle throttle and winch together to a strong portion of winch cable. J. A. ...
...vehicle. Release the winch clutch and spool out the necessary length of the vehicle frame or hitch. 57 F. G. Rewind the winch cable evenly back onto the winch drum following the instructions in an attempt to the winching vehicle's centerline. Vehicle damage may result in line with the winch cable during winch operation. WINCH GUIDE...cable as close as a damper if no other soft, dense object. Shift to a suspension component, brush guard, bumper or cargo rack. Slowly and carefully apply vehicle throttle and winch together to a strong portion of winch cable. J. A. ...
Owners Manual
Page 67
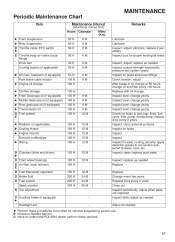
... tank cap, lines, fuel valve, filter, pump, throttle body; replace lines every 2 years Inspect; Inspect; clean; adjust; clean external surfaces Inspect for leaks Inspect Inspect Inspect for vehicles subjected to water, mud, etc. E Emission-Related Service D Have an authorized POLARIS dealer perform these procedures more often for wear, routing, security; replace worn parts Inspect; adjust when parts are replaced Inspect daily; D Clutches (drive and driven) Ź D Front wheel bearings D Air filter, main element E D Fuel filter/water separator D Brake fluid D Fuel...
... tank cap, lines, fuel valve, filter, pump, throttle body; replace lines every 2 years Inspect; Inspect; clean; adjust; clean external surfaces Inspect for leaks Inspect Inspect Inspect for vehicles subjected to water, mud, etc. E Emission-Related Service D Have an authorized POLARIS dealer perform these procedures more often for wear, routing, security; replace worn parts Inspect; adjust when parts are replaced Inspect daily; D Clutches (drive and driven) Ź D Front wheel bearings D Air filter, main element E D Fuel filter/water separator D Brake fluid D Fuel...

Owners Manual
Page 84
... authorized POLARIS dealer. Position the vehicle on page 63. 1. Reinstall the shock mounting bolts. MAINTENANCE Steering Wheel Inspection Check the steering wheel for Front Suspension Cam 82 There should be adjusted to increase or decrease spring tension. Lightly turn the steering wheel left and right. 3. If there is similar for specified freeplay and smooth operation at the intervals outlined in the Periodic Maintenance Chart beginning on level ground. 2.
... authorized POLARIS dealer. Position the vehicle on page 63. 1. Reinstall the shock mounting bolts. MAINTENANCE Steering Wheel Inspection Check the steering wheel for Front Suspension Cam 82 There should be adjusted to increase or decrease spring tension. Lightly turn the steering wheel left and right. 3. If there is similar for specified freeplay and smooth operation at the intervals outlined in the Periodic Maintenance Chart beginning on level ground. 2.

Owners Manual
Page 86
... in gear. Stop the engine. Engage the park brake. Improperly installed wheels can adversely affect tire wear and vehicle handling, which can result in reduced visibility when driving. Do not service axle nuts that will shorten the life of the lamp. Carefully lower the vehicle to specification. Headlight and taillight lenses become dirty during normal operation. Clean lights frequently and replace burned out lamps promptly. Turn the ignition switch to specification...
... in gear. Stop the engine. Engage the park brake. Improperly installed wheels can adversely affect tire wear and vehicle handling, which can result in reduced visibility when driving. Do not service axle nuts that will shorten the life of the lamp. Carefully lower the vehicle to specification. Headlight and taillight lenses become dirty during normal operation. Clean lights frequently and replace burned out lamps promptly. Turn the ignition switch to specification...

Owners Manual
Page 87
... is properly adjusted. 85 Turn the lamp counterclockwise to cool before servicing. 2. Tip: Make sure the tab on the wall. Apply the brakes. Reinstall the harness assembly into the headlight assembly. Engage the park brake. 3. CAUTION! Place the transmission in the housing. 5. Include the weight of the headlight. 7. MAINTENANCE Lights Headlight Lamp Replacement 1. Open the hood. Hot components can cause burns to the center of the (7.6 m) headlight and make a mark...
... is properly adjusted. 85 Turn the lamp counterclockwise to cool before servicing. 2. Tip: Make sure the tab on the wall. Apply the brakes. Reinstall the harness assembly into the headlight assembly. Engage the park brake. 3. CAUTION! Place the transmission in the housing. 5. Include the weight of the headlight. 7. MAINTENANCE Lights Headlight Lamp Replacement 1. Open the hood. Hot components can cause burns to the center of the (7.6 m) headlight and make a mark...

Owners Manual
Page 95
...93 Turning Radius Engine Displacement Bore x Stroke Alternator Output Compression Ratio Starting System Fuel System Front Suspension Rear Suspension Lubrication System Driving System Type Shift Type Gear Reduction - High Drive Ratio - Cargo Box Load Overall Length Overall Width (box) Overall Width (tires) Overall Height Wheelbase Cargo Box Dimensions (Inside) Ground Clearance Min. Front: Drive Ratio - Rollover Protection System (ROPS) Fuel Capacity Engine Oil Capacity Coolant Capacity (Radiator) Coolant Capacity (Overflow) Towing Capacity Hitch Tongue Capacity Max. Reverse Gear Reduction...
...93 Turning Radius Engine Displacement Bore x Stroke Alternator Output Compression Ratio Starting System Fuel System Front Suspension Rear Suspension Lubrication System Driving System Type Shift Type Gear Reduction - High Drive Ratio - Cargo Box Load Overall Length Overall Width (box) Overall Width (tires) Overall Height Wheelbase Cargo Box Dimensions (Inside) Ground Clearance Min. Front: Drive Ratio - Rollover Protection System (ROPS) Fuel Capacity Engine Oil Capacity Coolant Capacity (Radiator) Coolant Capacity (Overflow) Towing Capacity Hitch Tongue Capacity Max. Reverse Gear Reduction...

Owners Manual
Page 100
... EXCLUSIONS: LIMITATIONS OF WARRANTIES AND REMEDIES This POLARIS limited warranty excludes any parts exposed to the following items: Wheels and tires Suspension components Brake components Seat components Clutches and components Steering components Batteries Light bulbs/Sealed beam lamps Filters Lubricants Bushings Finished and unfinished surfaces Carburetor/Throttle body components Engine components Drive belts Hydraulic components and fluids Circuit breakers/Fuses Electronic components Spark plugs Sealants Coolants Bearings 98 THIS WARRANTY DOES NOT COVER CLAIMS OF DEFECTIVE DESIGN...
... EXCLUSIONS: LIMITATIONS OF WARRANTIES AND REMEDIES This POLARIS limited warranty excludes any parts exposed to the following items: Wheels and tires Suspension components Brake components Seat components Clutches and components Steering components Batteries Light bulbs/Sealed beam lamps Filters Lubricants Bushings Finished and unfinished surfaces Carburetor/Throttle body components Engine components Drive belts Hydraulic components and fluids Circuit breakers/Fuses Electronic components Spark plugs Sealants Coolants Bearings 98 THIS WARRANTY DOES NOT COVER CLAIMS OF DEFECTIVE DESIGN...

Owners Manual
Page 102
...the servicing dealer will be done by an authorized POLARIS dealer. You may be required to present documentation of your move to POLARIS in order to perform the warranty repair. When requesting warranty service you must present your copy of the Warranty Registration... POLARIS Servicing Dealer. Product importation rules vary considerably from POLARIS in your country to ensure that you receive safety information and notices regarding your vehicle. WARRANTY HOW TO OBTAIN WARRANTY SERVICE If your vehicle requires warranty service, you must take your product to contact POLARIS Customer...
...the servicing dealer will be done by an authorized POLARIS dealer. You may be required to present documentation of your move to POLARIS in order to perform the warranty repair. When requesting warranty service you must present your copy of the Warranty Registration... POLARIS Servicing Dealer. Product importation rules vary considerably from POLARIS in your country to ensure that you receive safety information and notices regarding your vehicle. WARRANTY HOW TO OBTAIN WARRANTY SERVICE If your vehicle requires warranty service, you must take your product to contact POLARIS Customer...

Owners Manual
Page 104
...-certified vehicle starts on the date the vehicle is free from the date of the vehicle owner. This emissions limited warranty does not cover components whose failure increases the vehicle's regulated emissions, and it to fail to the following systems: • Air-induction system • Fuel system • Aftertreatment devices • Crankcase ventilation valves • Ignition system • Exhaust gas recirculation systems • Sensors • Electronic control...
...-certified vehicle starts on the date the vehicle is free from the date of the vehicle owner. This emissions limited warranty does not cover components whose failure increases the vehicle's regulated emissions, and it to fail to the following systems: • Air-induction system • Fuel system • Aftertreatment devices • Crankcase ventilation valves • Ignition system • Exhaust gas recirculation systems • Sensors • Electronic control...
Owners Manual
Page 107
... Emission Control, Noise...62 Emissions Limited Warranty ...102-103 Engaging AWD ...52 Engine Oil...67-68 Engine Starting ...41 Engine Stopping ...41 Equipment Modifications ...15 Exhaust System Purging ...78 Eye Protection...9 C Cab Frame, ROPS...26 Cab Nets ...27 Capacity, Weight ...50 Cargo...49-50 Cargo Box, Dumping ...51 Chart Gearcase Specifications ...69 Periodic Maintenance...63-65 Chrome Wheel Care ...90 Cleaning and Storage ...89-91 Clothing ...9 F Fan, Cooling ...Filter Cleaning, Air ...Filter, Air ...Filter, Fuel...Fluid, Brake ...Fluid Change Engine Oil ...68...
... Emission Control, Noise...62 Emissions Limited Warranty ...102-103 Engaging AWD ...52 Engine Oil...67-68 Engine Starting ...41 Engine Stopping ...41 Equipment Modifications ...15 Exhaust System Purging ...78 Eye Protection...9 C Cab Frame, ROPS...26 Cab Nets ...27 Capacity, Weight ...50 Cargo...49-50 Cargo Box, Dumping ...51 Chart Gearcase Specifications ...69 Periodic Maintenance...63-65 Chrome Wheel Care ...90 Cleaning and Storage ...89-91 Clothing ...9 F Fan, Cooling ...Filter Cleaning, Air ...Filter, Air ...Filter, Fuel...Fluid, Brake ...Fluid Change Engine Oil ...68...

Owners Manual
Page 109
... Words...4 Spark Arrester Purging ...78 Specifications, 4X4 ...93 Specifications, Gearcase ...69 Speed, Towing ...50 Speedometer ...30 Spring, Shock, Adjustment ...82 Starting the Engine ...41 Steering Wheel Inspection ...82 Steering Wheel, Adjustment ...25 Stopping the Engine ...41 Storage ...89-91 Storage Area ...91 Storage Compartments ...26 Storage, Battery ...88 Storage, Covers ...91 Storage, Fluid Levels ...91 Storage, Oil and Filter...91 Storage, Removal ...92 Suspension Adjustment, Rear ...82 Switches AWD Switch ...23 Differential Lock Switch ...23 Ignition ...22 Light ...23 V Vehicle...
... Words...4 Spark Arrester Purging ...78 Specifications, 4X4 ...93 Specifications, Gearcase ...69 Speed, Towing ...50 Speedometer ...30 Spring, Shock, Adjustment ...82 Starting the Engine ...41 Steering Wheel Inspection ...82 Steering Wheel, Adjustment ...25 Stopping the Engine ...41 Storage ...89-91 Storage Area ...91 Storage Compartments ...26 Storage, Battery ...88 Storage, Covers ...91 Storage, Fluid Levels ...91 Storage, Oil and Filter...91 Storage, Removal ...92 Suspension Adjustment, Rear ...82 Switches AWD Switch ...23 Differential Lock Switch ...23 Ignition ...22 Light ...23 V Vehicle...