

Owners Manual
Page 34
... other towed object does not have brakes or steering. The object may cause changes in handling, which could result in conditions of control or an accident. Never haul cargo or tow a load with highway-approved lights. Never exceed the stated load capacity for this ATV. 31 Never tow or pull an object behind the ATV. Use caution and drive at reduced speeds in...
... other towed object does not have brakes or steering. The object may cause changes in handling, which could result in conditions of control or an accident. Never haul cargo or tow a load with highway-approved lights. Never exceed the stated load capacity for this ATV. 31 Never tow or pull an object behind the ATV. Use caution and drive at reduced speeds in...

Owners Manual
Page 41
Features and Controls Main Key Switch Engine Stop Switch Start Button 38
Features and Controls Main Key Switch Engine Stop Switch Start Button 38

Owners Manual
Page 48
... is equipped with Polaris Electronic Throttle Control (ETC), which is released. Fuel is injected into the intake passage each time throttle is located on the right handlebar. If the throttle cable should stick in an open position when the operator releases the throtThrottle Lever tle lever, the engine will stop, and power to increase engine speed and vehicle movement. Features and Controls Throttle Lever The throttle lever is applied...
... is equipped with Polaris Electronic Throttle Control (ETC), which is released. Fuel is injected into the intake passage each time throttle is located on the right handlebar. If the throttle cable should stick in an open position when the operator releases the throtThrottle Lever tle lever, the engine will stop, and power to increase engine speed and vehicle movement. Features and Controls Throttle Lever The throttle lever is applied...
Owners Manual
Page 56
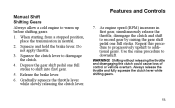
... downshift. Depress the gear shift pedal one full stroke. Gradually squeeze the throttle lever while slowly releasing the clutch lever. 7. WARNING! Release the brake lever. 6. Use the same procedure to disengage the clutch. 4. Shifting without releasing the throttle and disengaging the clutch could cause loss of control or vehicle overturn. Repeat this procedure to progressively upshift to warm up before shifting gears. 1. Features and Controls Manual Shift Shifting Gears Always allow a cold engine to additional gears.
... downshift. Depress the gear shift pedal one full stroke. Gradually squeeze the throttle lever while slowly releasing the clutch lever. 7. WARNING! Release the brake lever. 6. Use the same procedure to disengage the clutch. 4. Shifting without releasing the throttle and disengaging the clutch could cause loss of control or vehicle overturn. Repeat this procedure to progressively upshift to warm up before shifting gears. 1. Features and Controls Manual Shift Shifting Gears Always allow a cold engine to additional gears.

Owners Manual
Page 62
... Period Perform the following break-in and maintenance procedures carefully. 1. close-fitted engine parts. Do not allow engine speed to familiarize 60. Allow the engine sufficient time to maintain the oil level in period (3 hours), change the engine oil and the long and short oil filters. yourself with gasoline. Vary throttle positions. Always 5. Perform regular checks on fluid levels, controls and areas outlined on the daily 4. Drive slowly...
... Period Perform the following break-in and maintenance procedures carefully. 1. close-fitted engine parts. Do not allow engine speed to familiarize 60. Allow the engine sufficient time to maintain the oil level in period (3 hours), change the engine oil and the long and short oil filters. yourself with gasoline. Vary throttle positions. Always 5. Perform regular checks on fluid levels, controls and areas outlined on the daily 4. Drive slowly...

Owners Manual
Page 64
.... Operation Pre-Ride Inspection Pre-Ride Checklist Coolant (if applicable) Coolant hoses (if applicable) Throttle Indicator lights / switches Engine stop switch Air filter Air box sediment tubes Headlamp Brake light / tail lamp Riding gear A-arm ball joints Ensure proper level Inspect for leaks Ensure smooth operation Ensure operation Ensure proper operation Inspect, clean, replace as needed Drain deposits when visible Verify operation, apply Polaris dielectric grease to the socket when the...
.... Operation Pre-Ride Inspection Pre-Ride Checklist Coolant (if applicable) Coolant hoses (if applicable) Throttle Indicator lights / switches Engine stop switch Air filter Air box sediment tubes Headlamp Brake light / tail lamp Riding gear A-arm ball joints Ensure proper level Inspect for leaks Ensure smooth operation Ensure operation Ensure proper operation Inspect, clean, replace as needed Drain deposits when visible Verify operation, apply Polaris dielectric grease to the socket when the...

Owners Manual
Page 80
Follow proper procedures for additional speed control if necessary, until more level ground is reached. 11. Release the parking brake and slowly release the clutch lever, allowing the ATV to proceed slowly. See page 78. 77 Stay in the clutch lever, shift into neutral and restart the engine. 10. Operation Turning Around on a Hill 9. Pull in first gear, using the brakes for driving downhill.
Follow proper procedures for additional speed control if necessary, until more level ground is reached. 11. Release the parking brake and slowly release the clutch lever, allowing the ATV to proceed slowly. See page 78. 77 Stay in the clutch lever, shift into neutral and restart the engine. 10. Operation Turning Around on a Hill 9. Pull in first gear, using the brakes for driving downhill.
Owners Manual
Page 94
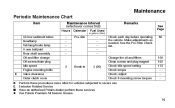
... authorized Polaris dealer perform these services Use Polaris Premium All Season Grease 91 Make adjustments as needed. See the Pre-Ride Checklist. 3 Break-in gallons (liters) Remarks Fuel Used ------ Maintenance Periodic Maintenance Chart Item Maintenance Interval (whichever comes first) Hours Air box sediment tubes Headlamp Tail lamp/brake lamp A-arm ball joint Rear shaft assembly Oil and filter change Oil screen/drain plug Idle speed Engine mounting bolts Valve clearance Outer clutch cover -----Calendar Pre-ride in 5 (20) E X E Q z Change the oil and filters...
... authorized Polaris dealer perform these services Use Polaris Premium All Season Grease 91 Make adjustments as needed. See the Pre-Ride Checklist. 3 Break-in gallons (liters) Remarks Fuel Used ------ Maintenance Periodic Maintenance Chart Item Maintenance Interval (whichever comes first) Hours Air box sediment tubes Headlamp Tail lamp/brake lamp A-arm ball joint Rear shaft assembly Oil and filter change Oil screen/drain plug Idle speed Engine mounting bolts Valve clearance Outer clutch cover -----Calendar Pre-ride in 5 (20) E X E Q z Change the oil and filters...

Owners Manual
Page 98
... for leaks at tank cap, lines, fuel valve, filter, carburetor; measure; replace lines every two years Inspect; replace as needed Visual inspection for wear Perform these services Use Polaris Premium All Season Grease 95 X QE E Check spring length (see dealer) Check ratchet teeth for wear Pressure test system annually Inspect Inspect; Maintenance Periodic Maintenance Chart Item Maintenance Interval (whichever comes first) Hours Clutch springs Cam chain tensioner Coolant system Cooling system hoses Radiator Fuel system Cylinder...
... for leaks at tank cap, lines, fuel valve, filter, carburetor; measure; replace lines every two years Inspect; replace as needed Visual inspection for wear Perform these services Use Polaris Premium All Season Grease 95 X QE E Check spring length (see dealer) Check ratchet teeth for wear Pressure test system annually Inspect Inspect; Maintenance Periodic Maintenance Chart Item Maintenance Interval (whichever comes first) Hours Clutch springs Cam chain tensioner Coolant system Cooling system hoses Radiator Fuel system Cylinder...
Owners Manual
Page 100
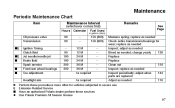
... perform these services Use Polaris Premium All Season Grease 97 replace as needed Inspect periodically; replace as needed 116 Perform these procedures more often for wear; Maintenance Periodic Maintenance Chart Item Maintenance Interval (whichever comes first) Hours Oil pressure valve Transmission QE QE Q Q Q Ignition Timing Clutch fluid Jet needle/needle jet Brake fluid Spark arrestor Front/rear wheel bearings Toe adjustment Headlight aim X E Q z 90 90 -90 180 180 300 300 Calendar --in gallons (liters) Remarks Fuel...
... perform these services Use Polaris Premium All Season Grease 97 replace as needed Inspect periodically; replace as needed 116 Perform these procedures more often for wear; Maintenance Periodic Maintenance Chart Item Maintenance Interval (whichever comes first) Hours Oil pressure valve Transmission QE QE Q Q Q Ignition Timing Clutch fluid Jet needle/needle jet Brake fluid Spark arrestor Front/rear wheel bearings Toe adjustment Headlight aim X E Q z 90 90 -90 180 180 300 300 Calendar --in gallons (liters) Remarks Fuel...

Owners Manual
Page 119
Position the vehicle on the wall at the same height. 3. Measure the distance from a flat wall. 2. Start the engine and turn the headlight switch to the center of the headlight and make a mark on a level surface with the headlight approximately 25 ft. (7.6 m) from the floor to high beam. 25 ft. (7.6 m) Lamp Center Height 2" (5 cm) General Representation 116 Maintenance Lights Headlight Adjustment 1.
Position the vehicle on the wall at the same height. 3. Measure the distance from a flat wall. 2. Start the engine and turn the headlight switch to the center of the headlight and make a mark on a level surface with the headlight approximately 25 ft. (7.6 m) from the floor to high beam. 25 ft. (7.6 m) Lamp Center Height 2" (5 cm) General Representation 116 Maintenance Lights Headlight Adjustment 1.

Owners Manual
Page 120
Loosen the pivot screw and adjust the beam to 27 in. The most intense part of the headlight beam should be aimed 2" (5 cm) below the mark placed on the wall. lbs. (3 Nm). Observe the headlight aim on the wall. Pivot Screw 117 Maintenance Lights Headlight Adjustment 4. Include rider weight on the seat when measuring. 5. Tighten the screw and torque to the desired position. 6.
Loosen the pivot screw and adjust the beam to 27 in. The most intense part of the headlight beam should be aimed 2" (5 cm) below the mark placed on the wall. lbs. (3 Nm). Observe the headlight aim on the wall. Pivot Screw 117 Maintenance Lights Headlight Adjustment 4. Include rider weight on the seat when measuring. 5. Tighten the screw and torque to the desired position. 6.

Owners Manual
Page 121
... that will shorten the life of the lamp. CAUTION! Reinstall the connector to cool before servicing. 3. The bulb must be positioned so the harness installs into the lamp at outer side. 4. Allow lamps to the back of the headlight. 2. Maintenance Lights Headlight Lamp Replacement When servicing a halogen lamp, avoid touching the lamp with denatured alcohol. 1. Oil from the back of the...
... that will shorten the life of the lamp. CAUTION! Reinstall the connector to cool before servicing. 3. The bulb must be positioned so the harness installs into the lamp at outer side. 4. Allow lamps to the back of the headlight. 2. Maintenance Lights Headlight Lamp Replacement When servicing a halogen lamp, avoid touching the lamp with denatured alcohol. 1. Oil from the back of the...

Owners Manual
Page 122
Connect the wire harness to the headlamp. Adjust the lamp as needed (see page 116), then tighten the adjuster screw. 119 Remove the headlamp. 5. Remove the two retaining brackets and the adjuster screw. 4. Install the adjuster screw, leaving it in the slots on the frame tabs. Maintenance Lights Headlight Assembly Replacement 1. Secure the headlamp with the retaining brackets. 6. Remove the front cover. 2. Install the new headlamp, placing it loose so the headlight can be adjusted. 7. Reinstall the front cover. 8. Remove the wire harness connector from the headlight. 3.
Connect the wire harness to the headlamp. Adjust the lamp as needed (see page 116), then tighten the adjuster screw. 119 Remove the headlamp. 5. Remove the two retaining brackets and the adjuster screw. 4. Install the adjuster screw, leaving it in the slots on the frame tabs. Maintenance Lights Headlight Assembly Replacement 1. Secure the headlamp with the retaining brackets. 6. Remove the front cover. 2. Install the new headlamp, placing it loose so the headlight can be adjusted. 7. Reinstall the front cover. 8. Remove the wire harness connector from the headlight. 3.

Owners Manual
Page 173
Weight Capacity Dry Weight Fuel Capacity Overall Length Overall Width Overall Height Wheelbase Ground Clearance Min. Dry Sump/Internal Reservoir 170 Specifications Outlaw 525 S Max. Turning Radius Engine Oil Capacity Coolant Capacity Engine Displacement Bore x Stroke 215 lbs./98 kg 370...Jet Clip Position Jet Needle Alternator Output Compression Ratio Starting System Carburetor Ignition System Ignition Timing Spark Plug Type Spark Plug Gap Lubrication System #45 #138 4 OBDVS 200 w @ 3000 RPM 11:1 Electric Keihin FCR-MX 39mm CDI 25° +/- 3° @ 3500 RPM in neutral NGK DCPR8E 0.6 mm /...
Weight Capacity Dry Weight Fuel Capacity Overall Length Overall Width Overall Height Wheelbase Ground Clearance Min. Dry Sump/Internal Reservoir 170 Specifications Outlaw 525 S Max. Turning Radius Engine Oil Capacity Coolant Capacity Engine Displacement Bore x Stroke 215 lbs./98 kg 370...Jet Clip Position Jet Needle Alternator Output Compression Ratio Starting System Carburetor Ignition System Ignition Timing Spark Plug Type Spark Plug Gap Lubrication System #45 #138 4 OBDVS 200 w @ 3000 RPM 11:1 Electric Keihin FCR-MX 39mm CDI 25° +/- 3° @ 3500 RPM in neutral NGK DCPR8E 0.6 mm /...

Owners Manual
Page 192
... you use your copy of the Warranty Registration form to normal use any of Polaris engine oil. 2. Should your dealer require any warranty issues. however, you must take it to a Polaris dealer authorized to perform warranty service. Polaris suggests that the spark arrestor in effect. When requesting warranty service you may also have other warranty terms will remain in this vehicle will contact the appropriate personnel...
... you use your copy of the Warranty Registration form to normal use any of Polaris engine oil. 2. Should your dealer require any warranty issues. however, you must take it to a Polaris dealer authorized to perform warranty service. Polaris suggests that the spark arrestor in effect. When requesting warranty service you may also have other warranty terms will remain in this vehicle will contact the appropriate personnel...

Owners Manual
Page 194
...selling dealer's authorized location as your vehicle. You must be requested from any authorized Polaris dealer who sells the same line as proof of residence. You may be authorized to perform the warranty repair. Upon residence verification, the servicing dealer will be required to present ...documentation of the destination country before you should take your vehicle to an authorized Polaris dealer. If You Move: If you move ....
...selling dealer's authorized location as your vehicle. You must be requested from any authorized Polaris dealer who sells the same line as proof of residence. You may be authorized to perform the warranty repair. Upon residence verification, the servicing dealer will be required to present ...documentation of the destination country before you should take your vehicle to an authorized Polaris dealer. If You Move: If you move ....

Owners Manual
Page 202
... Consumer Product Safety...11 Coolant Level, Radiator ...110 Coolant Level, Recovery Bottle. . 109 Cooling System ...108-111 Cooling System Bleeding...111 C Deceleration ...55 Driving Downhill ...78 Driving in Reverse ...82-83 Driving on a Sidehill ...74 Driving on Slippery Surfaces . . 70-71 Driving Over Obstacles...84 Driving Procedures ...68 Driving Through Water...80-81 Driving Uphill ...72-73 Electronic Throttle Control ...45 Emission Control Systems ...85-86 Engine Idle Speed ...113 Equipment...
... Consumer Product Safety...11 Coolant Level, Radiator ...110 Coolant Level, Recovery Bottle. . 109 Cooling System ...108-111 Cooling System Bleeding...111 C Deceleration ...55 Driving Downhill ...78 Driving in Reverse ...82-83 Driving on a Sidehill ...74 Driving on Slippery Surfaces . . 70-71 Driving Over Obstacles...84 Driving Procedures ...68 Driving Through Water...80-81 Driving Uphill ...72-73 Electronic Throttle Control ...45 Emission Control Systems ...85-86 Engine Idle Speed ...113 Equipment...

Owners Manual
Page 203
... Jetting Specifications Outlaw 450 MXR ...169 Outlaw 525 S ...171 Key Switch ...39 K-Turn ...75 Lights ...40-41, 116-119 Headlight Adjustment. 116-117 Headlight Assembly ...119 Headlights...41 Indicator Lights ...40 I J Main Key Switch ...39 Maintenance Chart ...87-97 Making Turns ...69 Manual Shift ...52-55 Master Cylinder ...48-49 Modifications ...12 Oil Change, Engine...100-107 Oil Level, Engine ...99 Oil Recommendations ...98 Operator Restrictions ...15 Parking Brake ...50-51 Parking on a Hill or Incline ...79 Passenger Warning ...37 Periodic Maintenance...
... Jetting Specifications Outlaw 450 MXR ...169 Outlaw 525 S ...171 Key Switch ...39 K-Turn ...75 Lights ...40-41, 116-119 Headlight Adjustment. 116-117 Headlight Assembly ...119 Headlights...41 Indicator Lights ...40 I J Main Key Switch ...39 Maintenance Chart ...87-97 Making Turns ...69 Manual Shift ...52-55 Master Cylinder ...48-49 Modifications ...12 Oil Change, Engine...100-107 Oil Level, Engine ...99 Oil Recommendations ...98 Operator Restrictions ...15 Parking Brake ...50-51 Parking on a Hill or Incline ...79 Passenger Warning ...37 Periodic Maintenance...

Owners Manual
Page 205
... Clean-Out...124-125 Spark Plugs...122-123 Spring Preload ...153 Spring Preload, Front ...154 Spring Preload, Rear ...155 Starting the Engine ...66, 67 Steering Inspection ...151 Storage ...162-165 Suspension Front ...153-154 Rear ...155-157 Suspension Settings ...152 Switches Engine Stop Switch ...39 Main Key Switch...39 Reverse Lock-Out Switch ...54 Start Button ...39 S Throttle Cable Freeplay...141 Throttle Lever ...44-45 Throttle Lever Freeplay...140 Tires Installation ...137 Removal ...136...
... Clean-Out...124-125 Spark Plugs...122-123 Spring Preload ...153 Spring Preload, Front ...154 Spring Preload, Rear ...155 Starting the Engine ...66, 67 Steering Inspection ...151 Storage ...162-165 Suspension Front ...153-154 Rear ...155-157 Suspension Settings ...152 Switches Engine Stop Switch ...39 Main Key Switch...39 Reverse Lock-Out Switch ...54 Start Button ...39 S Throttle Cable Freeplay...141 Throttle Lever ...44-45 Throttle Lever Freeplay...140 Tires Installation ...137 Removal ...136...