
Owner's Manual
Page 18
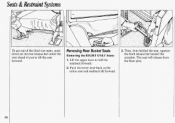
Seats & Restraint Systems To get out of the third row seats, push down on the rear release bar under the seat aheadof you to fold the seatback forward. 2 Push the lower lever back so the . The seat will release from behind the seat, squeeze the front release bar toward the crossbar. entire seat and seatback tilt forward. 3.Then, from the floor pins. 16 Lift the upper lever to tilt the seat forward. Removing Rear Bucket Seats Removing the RIGHTONLY Seats: 1.
Seats & Restraint Systems To get out of the third row seats, push down on the rear release bar under the seat aheadof you to fold the seatback forward. 2 Push the lower lever back so the . The seat will release from behind the seat, squeeze the front release bar toward the crossbar. entire seat and seatback tilt forward. 3.Then, from the floor pins. 16 Lift the upper lever to tilt the seat forward. Removing Rear Bucket Seats Removing the RIGHTONLY Seats: 1.
Owner's Manual
Page 19
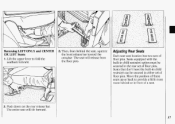
... and CENTER OR LEFT Seats: 1. adjusting Rear Seats Each rear seat location has two setsof floor pins. Seats equipped with the built-in child restraint option must be secured in the rear set of a seat. 2. will the floor pins. Lift the upper lever to provide a little more room behind the seat, squeeze . Push down on the rear release bar The entire seat tilt forward. the front release bar toward...
... and CENTER OR LEFT Seats: 1. adjusting Rear Seats Each rear seat location has two setsof floor pins. Seats equipped with the built-in child restraint option must be secured in the rear set of a seat. 2. will the floor pins. Lift the upper lever to provide a little more room behind the seat, squeeze . Push down on the rear release bar The entire seat tilt forward. the front release bar toward...
Owner's Manual
Page 38
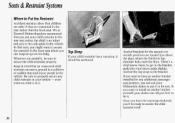
... sure to properly secure any additional passenger seat position,you . Wherever you can ask your Oldsmobile dealer to put your vehicle - Anchor brackets for the second row outside positions are restrainedin the rear rather than the front seat. Anchor the top strap to the bracket, push this vinyl sleeveaside slightly. Seats & Restraint Systems Where to Put the...
... sure to properly secure any additional passenger seat position,you . Wherever you can ask your Oldsmobile dealer to put your vehicle - Anchor brackets for the second row outside positions are restrainedin the rear rather than the front seat. Anchor the top strap to the bracket, push this vinyl sleeveaside slightly. Seats & Restraint Systems Where to Put the...
Owner's Manual
Page 45
... many Ignition ...58 standard and optional featureson Starting Your Engine ...58 your Oldsmobile. \ n Part 2 Features & Controls Keys ...44 Front Doors...45 Loclts ...45 Remote Lock Control ...48 Sliding Door ...51 Liftgate...56 Here you have a Tilt Steering Wheel ...69 problem. Windows ...69 Turn Signal and Lane Change Indicator ...71 Cruise Control...72 74 Headlights ...Interior Lights ...76 Windshield Wipers ...77 Windshield Washer ...78 Mirrors ...86 Glove Box and Storage Compartments ...88 Luggage Carrier ...92 Instrument Panel ...96 100 Warning Lights, Gages...
... many Ignition ...58 standard and optional featureson Starting Your Engine ...58 your Oldsmobile. \ n Part 2 Features & Controls Keys ...44 Front Doors...45 Loclts ...45 Remote Lock Control ...48 Sliding Door ...51 Liftgate...56 Here you have a Tilt Steering Wheel ...69 problem. Windows ...69 Turn Signal and Lane Change Indicator ...71 Cruise Control...72 74 Headlights ...Interior Lights ...76 Windshield Wipers ...77 Windshield Washer ...78 Mirrors ...86 Glove Box and Storage Compartments ...88 Luggage Carrier ...92 Instrument Panel ...96 100 Warning Lights, Gages...
Owner's Manual
Page 49
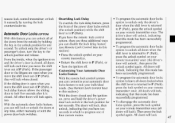
... release. If the passenger door orthe liftgate are three additional ways you can disable the loclt delayfeature (see Remote Lock Control later in P (Park). With the automatic doorloclts feature, you can still lock or unlock the doors at any time, either manually or with the power door lock switches. If you have ten seconds in which to program one second. To unlock only the driver's or passenger's door, turn thekey to lock...
... release. If the passenger door orthe liftgate are three additional ways you can disable the loclt delayfeature (see Remote Lock Control later in P (Park). With the automatic doorloclts feature, you can still lock or unlock the doors at any time, either manually or with the power door lock switches. If you have ten seconds in which to program one second. To unlock only the driver's or passenger's door, turn thekey to lock...
Owner's Manual
Page 60
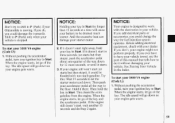
... N (Neutral) only. 58 To restart when you open the driver's door I Ignition Switch With the ignition key in any accessories Use this works, thenyour vehicle needs service. Start: Starts theengine. But turn it,be pushed or towed, butnever try to any otherposition - Using a tool to display some instrument panel warning lights. Press in the ignition switch as theradio. Off Unlocks the steering wheel, ignition, and transaxle, but does not send electrical power to pushstart your engine and release...
... N (Neutral) only. 58 To restart when you open the driver's door I Ignition Switch With the ignition key in any accessories Use this works, thenyour vehicle needs service. Start: Starts theengine. But turn it,be pushed or towed, butnever try to any otherposition - Using a tool to display some instrument panel warning lights. Press in the ignition switch as theradio. Off Unlocks the steering wheel, ignition, and transaxle, but does not send electrical power to pushstart your engine and release...
Owner's Manual
Page 61
... a time will go of the ltey. The idle speed will cause your vehicle. When the engine starts, let go of the key and the accelerator pedal. Then push your accelerator pedal all the way to P (Park) only when your Oldsmobile is stopped. Shift to the floor. If you could be drained much gasoline. NOTICE: Don't try to shift to let the starter motor cool down...
... a time will go of the ltey. The idle speed will cause your vehicle. When the engine starts, let go of the key and the accelerator pedal. Then push your accelerator pedal all the way to P (Park) only when your Oldsmobile is stopped. Shift to the floor. If you could be drained much gasoline. NOTICE: Don't try to shift to let the starter motor cool down...
Owner's Manual
Page 99
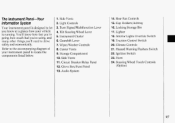
...'ll need to drive safely and economically. Center Vents 9.Storage Compartment IO. Ignition Switch 23. Side Vents 11. Interior Lights Override Switch 19.Traction Control Switch 20. Horn 24. Hazard Warning Flashers Switch 22. Circuit Brealter/Relay Panel 12.Glove Box/Fuse Panel 13.Audio System 14.Rear Fan Controls 15. You'll know how fast you're going, how much fuel you know at a glance how your instrument panel to locate...
...'ll need to drive safely and economically. Center Vents 9.Storage Compartment IO. Ignition Switch 23. Side Vents 11. Interior Lights Override Switch 19.Traction Control Switch 20. Horn 24. Hazard Warning Flashers Switch 22. Circuit Brealter/Relay Panel 12.Glove Box/Fuse Panel 13.Audio System 14.Rear Fan Controls 15. You'll know how fast you're going, how much fuel you know at a glance how your instrument panel to locate...
Owner's Manual
Page 102
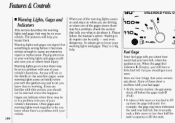
... F (Full). Please follow the manual's advice. Features & Controls WarningLights, Gages and Indicators This section describes the warning lights and gages that may be costly - They're a big help you or othersfrom injury. The pictures will help . and even dangerous. Gages can signal that tells you know your fuel gage: At the service station, the gas pump shuts off before it . When...
... F (Full). Please follow the manual's advice. Features & Controls WarningLights, Gages and Indicators This section describes the warning lights and gages that may be costly - They're a big help you or othersfrom injury. The pictures will help . and even dangerous. Gages can signal that tells you know your fuel gage: At the service station, the gas pump shuts off before it . When...
Owner's Manual
Page 107
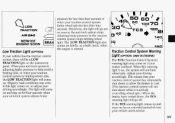
... TRACTION light on the instrument panel. The light will not limit wheel spin. The LOW TRACTION light also Z comes on for an extended period of time, your driving accordingly. rn 60 100 P* ~m - 81) 1 1fin i ~ If your vehicle has the traction control system, there will goout as soon as a bulb check, when the engine is actively controlling wheel spin.) When the brakes have cooled down, the TCS warning light will...
... TRACTION light on the instrument panel. The light will not limit wheel spin. The LOW TRACTION light also Z comes on for an extended period of time, your driving accordingly. rn 60 100 P* ~m - 81) 1 1fin i ~ If your vehicle has the traction control system, there will goout as soon as a bulb check, when the engine is actively controlling wheel spin.) When the brakes have cooled down, the TCS warning light will...
Owner's Manual
Page 118
... center instrument panel console and the air path under the front seats clear of ice, snow, orany other obstruction (such as leaves). Comfort Controh di Audio Systems NOTICE: Don't use a razor blade or something else sharp on the inside of your windows. This helps air to HIGH for a few moments before driving off. If you do, you enter a vehicle in cold weather, turn...
... center instrument panel console and the air path under the front seats clear of ice, snow, orany other obstruction (such as leaves). Comfort Controh di Audio Systems NOTICE: Don't use a razor blade or something else sharp on the inside of your windows. This helps air to HIGH for a few moments before driving off. If you do, you enter a vehicle in cold weather, turn...
Owner's Manual
Page 123
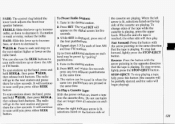
...two adjacent pushbuttons hold V SEEK, then press SEEKA , into the cassette door. to three additional stations each on radio band. knob. or FM bands. then release both buttons. the same time. Itwill continue When the right indicator arrowis lit, to 4. Tune in...change sides of four AM the arrow pointingin the same direction VSEEKA : Press to the pushbuttons: Reverse: Press the button with bass, or down the band,press With the power switch on, insert a tape and hold SEEKA, then press VSEEK, STOP-EJECT:To stop reverse, is the next stationhigher or lower on the forward, lightly...
...two adjacent pushbuttons hold V SEEK, then press SEEKA , into the cassette door. to three additional stations each on radio band. knob. or FM bands. then release both buttons. the same time. Itwill continue When the right indicator arrowis lit, to 4. Tune in...change sides of four AM the arrow pointingin the same direction VSEEKA : Press to the pushbuttons: Reverse: Press the button with bass, or down the band,press With the power switch on, insert a tape and hold SEEKA, then press VSEEK, STOP-EJECT:To stop reverse, is the next stationhigher or lower on the forward, lightly...
Owner's Manual
Page 140
... turn off if your vehicle. The light on . Here's why: Experienced driver or beginner, each of us is on the center instrument panel :onsole. If there's no longer a current need to limit wheel spin. If you have to steer a vehicle on curves. Unless you 've evertried to do their work where the tires meet the road. See Rocking Your Vehicle in slippery road conditions, you can steer...
... turn off if your vehicle. The light on . Here's why: Experienced driver or beginner, each of us is on the center instrument panel :onsole. If there's no longer a current need to limit wheel spin. If you have to steer a vehicle on curves. Unless you 've evertried to do their work where the tires meet the road. See Rocking Your Vehicle in slippery road conditions, you can steer...
Owner's Manual
Page 183
... Replacement ...appearance care Loading Your Vehicle ...Tires ...Appearance Care...Vehicle Identification Number (VIN) ...Add-on Electrical Equipment ...Fuses & Circuit Breakers ...Capacities and Specifications ...Normal Maintenance Replacement Parts...Fluids & Lubricants ...Replacement Bulbs ...182 183 186 190 194 195 197 199 200 201 203 203 205 206 207 212 218 219 219 224 226 227 228 181 There is also Battery ...technical information aboutyour Bulb Replacement ...vehicle. Part 6 Service & Appearance Care Service ...Fuel ...Hood Release ...Engine Oil ...Air...
... Replacement ...appearance care Loading Your Vehicle ...Tires ...Appearance Care...Vehicle Identification Number (VIN) ...Add-on Electrical Equipment ...Fuses & Circuit Breakers ...Capacities and Specifications ...Normal Maintenance Replacement Parts...Fluids & Lubricants ...Replacement Bulbs ...182 183 186 190 194 195 197 199 200 201 203 203 205 206 207 212 218 219 219 224 226 227 228 181 There is also Battery ...technical information aboutyour Bulb Replacement ...vehicle. Part 6 Service & Appearance Care Service ...Fuel ...Hood Release ...Engine Oil ...Air...
Owner's Manual
Page 222
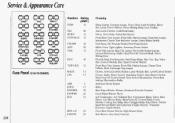
Valve, Elec. Overhead Console Compass Front Wiperflasher Motor A/C Compressor, A/C Solenoid Box, Compressor Relay, Temp. Door Motor, Low Blower Relay; Service &Appeurunce Cure r] ? Spark Control Module Front/Rear Turn Lamps, Front Side Marker Lamps, Cluster Turn Telltale, Back-up Lamps, Fog Lamps Cluster, Anti-Lock Brake System Lamp Module, Elec. Heat/Vent/AC Control Head; Key Chime; Cooling Fan Relay; Vehicle Speed Sensor Buffer and Generator Charge Discrete, Transaxle Converter Clutch Switch Front/Rear Blower Motors, High Blower Relay Rear Blower, Rear Heat/Vent/AC TURN BIU c ...
Valve, Elec. Overhead Console Compass Front Wiperflasher Motor A/C Compressor, A/C Solenoid Box, Compressor Relay, Temp. Door Motor, Low Blower Relay; Service &Appeurunce Cure r] ? Spark Control Module Front/Rear Turn Lamps, Front Side Marker Lamps, Cluster Turn Telltale, Back-up Lamps, Fog Lamps Cluster, Anti-Lock Brake System Lamp Module, Elec. Heat/Vent/AC Control Head; Key Chime; Cooling Fan Relay; Vehicle Speed Sensor Buffer and Generator Charge Discrete, Transaxle Converter Clutch Switch Front/Rear Blower Motors, High Blower Relay Rear Blower, Rear Heat/Vent/AC TURN BIU c ...
Owner's Manual
Page 225
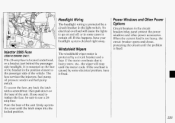
... fuse services the injectors, fuel pump, oil pressure sender andfuel pump switch. If the motor overheats dueto heavy snow, etc.,the wiper will cause the lights to replace the fuse, be sure use a 20to amp fuse. If this happens,have it fixed. This 20-amp fuse is located underhood, on the base of the bracket in some electrical problem, have your headlight system checked right away. Headlight Wiring The headlight wiring is...
... fuse services the injectors, fuel pump, oil pressure sender andfuel pump switch. If the motor overheats dueto heavy snow, etc.,the wiper will cause the lights to replace the fuse, be sure use a 20to amp fuse. If this happens,have it fixed. This 20-amp fuse is located underhood, on the base of the bracket in some electrical problem, have your headlight system checked right away. Headlight Wiring The headlight wiring is...
Owner's Manual
Page 241
... fluid and filter every 100,000 miles (166 000 ltm) . 7. If you do not use your vehicle under dusty conditions. Spark Plug Wire Inspection''Inspect for damage or leaks. IO. General Motors: however, urges that the failureto pelform this maintenance item will not nullify the emission warranty or limit recall liability prior to the underhood label specifications. Exhaust Gas Recirculation (EGR) System 1nspection':t - Transaxle Service - Adjust the timing...
... fluid and filter every 100,000 miles (166 000 ltm) . 7. If you do not use your vehicle under dusty conditions. Spark Plug Wire Inspection''Inspect for damage or leaks. IO. General Motors: however, urges that the failureto pelform this maintenance item will not nullify the emission warranty or limit recall liability prior to the underhood label specifications. Exhaust Gas Recirculation (EGR) System 1nspection':t - Transaxle Service - Adjust the timing...
Owner's Manual
Page 269
... Console ...79. 95 Radiator Overheating Manual Lap-Shoulder Safety Belt...23 Overheated Engine...165 (see Overheated Engine ) Methanol in Gasoline...183 Warnings...166. 187. 198. 199 Radiator Pressure Cap ...199 Mileage Indicator Owner Checks & Services ...240 Radio (see Audio Systems) (see Appearance Care ) 13 Reclining Seatbaclts...Power (Anti-Lock) Brakes...135 Remote Control ...48 .. Shifting Into ...66 Rear Climate Control ...113 Inside Manual Day/Night ...86 Parking Rear Interior Lights ...84 Outside Convex ...87 Over ThingsThat Burn ...67 Rear Seats ...15 ...17 Power Remote Control...
... Console ...79. 95 Radiator Overheating Manual Lap-Shoulder Safety Belt...23 Overheated Engine...165 (see Overheated Engine ) Methanol in Gasoline...183 Warnings...166. 187. 198. 199 Radiator Pressure Cap ...199 Mileage Indicator Owner Checks & Services ...240 Radio (see Audio Systems) (see Appearance Care ) 13 Reclining Seatbaclts...Power (Anti-Lock) Brakes...135 Remote Control ...48 .. Shifting Into ...66 Rear Climate Control ...113 Inside Manual Day/Night ...86 Parking Rear Interior Lights ...84 Outside Convex ...87 Over ThingsThat Burn ...67 Rear Seats ...15 ...17 Power Remote Control...
Owner's Manual
Page 270
... Power Seat ...13 Skidding...141 Sliding Door ...51 Sliding Door Ajar Warning Light ...107 Snowstorm, If You're Caught in a ...149 Sound Equipment,Adding ...117 Sound Systems (see Audio Systems) Spare Tire, Compact ...178 Specifications & Capacities ...224 Speed Control (see Cruise Control) Speedometer & Odometer ...99 Stains, Removing ...213 Starting Your Engine ...58 Index Recommended Fluids and Lubricants ...244 Reminder Light ...75 Remote Lock Control ...48 Removing Rear Bucket Seats...16 228. 229 Replacement Bulbs ...Replacement Fuses...
... Power Seat ...13 Skidding...141 Sliding Door ...51 Sliding Door Ajar Warning Light ...107 Snowstorm, If You're Caught in a ...149 Sound Equipment,Adding ...117 Sound Systems (see Audio Systems) Spare Tire, Compact ...178 Specifications & Capacities ...224 Speed Control (see Cruise Control) Speedometer & Odometer ...99 Stains, Removing ...213 Starting Your Engine ...58 Index Recommended Fluids and Lubricants ...244 Reminder Light ...75 Remote Lock Control ...48 Removing Rear Bucket Seats...16 228. 229 Replacement Bulbs ...Replacement Fuses...
Owner's Manual
Page 271
... Traction Control System Warning Light...105 ...151 Trailer Towing Brakes ...154 Maintenance ...156 Parking on ...60. 117. 219 Engine ...226 Fluids & Lubricants ...227 Fuses ...219. 220.221 Replacement Parts ...226 Service Parts Identification Label ...218 Vehicle Identification Number (VIN)...218 Temperature Display...81 Temperature Warning ...103 Theft ...50 Thermostat ...199 Tilt Steering Wheel...69 Time. Tilt ...69 Steering Wheel Touch Controls ...127 Stereo Sound Systems (seeAudio Systems) Storing Your Vehicle ...203 Storage Compact Overhead Console ...95...
... Traction Control System Warning Light...105 ...151 Trailer Towing Brakes ...154 Maintenance ...156 Parking on ...60. 117. 219 Engine ...226 Fluids & Lubricants ...227 Fuses ...219. 220.221 Replacement Parts ...226 Service Parts Identification Label ...218 Vehicle Identification Number (VIN)...218 Temperature Display...81 Temperature Warning ...103 Theft ...50 Thermostat ...199 Tilt Steering Wheel...69 Time. Tilt ...69 Steering Wheel Touch Controls ...127 Stereo Sound Systems (seeAudio Systems) Storing Your Vehicle ...203 Storage Compact Overhead Console ...95...


