Owner's Manual
Page 1
... and driving" section of this manual before operating your vehicle best. Please read through this manual. The "NISSAN Service and Maintenance Guide" explains details about the warranties covering your vehicle. only) will ensure familiarity with controls... Be sure to operate four-wheel drive models correctly may enjoy many miles (kilometers) of driving pleasure. Your NISSAN dealership knows your vehicle. ON-PAVEMENT AND OFF-ROAD DRIVING This vehicle will be seated in loss of control ... Manual carefully. It was prepared to the growing family of new NISSAN owners.
... and driving" section of this manual before operating your vehicle best. Please read through this manual. The "NISSAN Service and Maintenance Guide" explains details about the warranties covering your vehicle. only) will ensure familiarity with controls... Be sure to operate four-wheel drive models correctly may enjoy many miles (kilometers) of driving pleasure. Your NISSAN dealership knows your vehicle. ON-PAVEMENT AND OFF-ROAD DRIVING This vehicle will be seated in loss of control ... Manual carefully. It was prepared to the growing family of new NISSAN owners.

Owner's Manual
Page 130
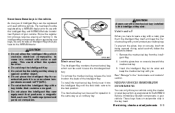
... unlocked by your vehicle's battery. Normal (center) position: The light illuminates when any door is programmed, retain the original transmitter for future programming procedures (Example: new vehicle purchases). For additional information, refer to the desired position. ON: The light is disconnected, HomeLink will retain all doors are required. If the vehicle...
... unlocked by your vehicle's battery. Normal (center) position: The light illuminates when any door is programmed, retain the original transmitter for future programming procedures (Example: new vehicle purchases). For additional information, refer to the desired position. ON: The light is disconnected, HomeLink will retain all doors are required. If the vehicle...
Owner's Manual
Page 132
... lens to activate the "training mode". Press and release the "smart" or "learn the handheld transmitter information: ● replace the hand-held transmitter batteries with new batteries. ● position the hand-held transmitters every 2 seconds until the indicator light flashes rapidly (indicating successful programming). 2-56 Instruments and controls regulations required handheld...
... lens to activate the "training mode". Press and release the "smart" or "learn the handheld transmitter information: ● replace the hand-held transmitter batteries with new batteries. ● position the hand-held transmitters every 2 seconds until the indicator light flashes rapidly (indicating successful programming). 2-56 Instruments and controls regulations required handheld...
Owner's Manual
Page 133
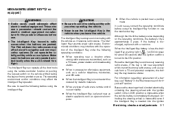
...subject to reprogram the HomeLink Universal Transceiver with your vehicle is not programmed within that has been programmed into HomeLink . When your new transmitter information. If HomeLink is recovered, you continue to flash slowly (after 20 seconds), position the hand-held transmitter 1 -...call the manufacturer or dealer of this manual. 2. When the indicator light begins to have programming difficulties, please contact the NISSAN Consumer Affairs Department. The HomeLink Universal Transceiver button has now been reprogrammed. Do not release the button until step 4 has...
...subject to reprogram the HomeLink Universal Transceiver with your vehicle is not programmed within that has been programmed into HomeLink . When your new transmitter information. If HomeLink is recovered, you continue to flash slowly (after 20 seconds), position the hand-held transmitter 1 -...call the manufacturer or dealer of this manual. 2. When the indicator light begins to have programming difficulties, please contact the NISSAN Consumer Affairs Department. The HomeLink Universal Transceiver button has now been reprogrammed. Do not release the button until step 4 has...
Owner's Manual
Page 137
...the mechanical key with the mechanical key. 3. Since the registration process requires erasing all memory in the Intelligent Key components when registering new keys, be used for an extended period in the key head. CAUTION Always carry the mechanical key installed in the "Instruments ...and personal computers. 1. Pre-driving checks and adjustments 3-3 SPA1951 CAUTION ● Do not allow the Intelligent Key, which are registered to the NISSAN dealer. This could affect the system function. ● Do not drop the Intelligent Key. ● Do not strike the Intelligent Key sharply...
...the mechanical key with the mechanical key. 3. Since the registration process requires erasing all memory in the Intelligent Key components when registering new keys, be used for an extended period in the key head. CAUTION Always carry the mechanical key installed in the "Instruments ...and personal computers. 1. Pre-driving checks and adjustments 3-3 SPA1951 CAUTION ● Do not allow the Intelligent Key, which are registered to the NISSAN dealer. This could affect the system function. ● Do not drop the Intelligent Key. ● Do not strike the Intelligent Key sharply...
Owner's Manual
Page 141
... possession of wireless equipment, such as a cellular telephone, transceiver, and CB radio. ● When the Intelligent Key is in the "Maintenance and do-ityourself" section. NISSAN INTELLIGENT KEY™(if so equipped) WARNING ● Radio waves could adversely affect electric medical equipment. Be sure to read the following operating conditions. ●... vehicle. ● Never leave the Intelligent Key in the LOCK position is impossible when the vehicle battery is turned to carry the Intelligent Key with a new one.
... possession of wireless equipment, such as a cellular telephone, transceiver, and CB radio. ● When the Intelligent Key is in the "Maintenance and do-ityourself" section. NISSAN INTELLIGENT KEY™(if so equipped) WARNING ● Radio waves could adversely affect electric medical equipment. Be sure to read the following operating conditions. ●... vehicle. ● Never leave the Intelligent Key in the LOCK position is impossible when the vehicle battery is turned to carry the Intelligent Key with a new one.
Owner's Manual
Page 165
... been restarted, you can be set is linked to restart the memory storage function. Follow the steps for approximately 5 seconds. If a new memory is saved to any position other than two times with the following procedure. 1. After the indicator light goes off , the selected ...the previous memory will be restarted before a stored memory position can also restart the memory storage function using the following procedure: 1. NOTE: If a new memory position is stored in the selected memory (1 or 2). Open and close the driver's door more than ON. 4. See "Memory storage function"...
... been restarted, you can be set is linked to restart the memory storage function. Follow the steps for approximately 5 seconds. If a new memory is saved to any position other than two times with the following procedure. 1. After the indicator light goes off , the selected ...the previous memory will be restarted before a stored memory position can also restart the memory storage function using the following procedure: 1. NOTE: If a new memory position is stored in the selected memory (1 or 2). Open and close the driver's door more than ON. 4. See "Memory storage function"...
Owner's Manual
Page 178
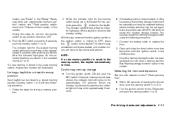
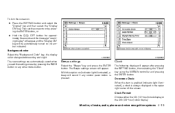
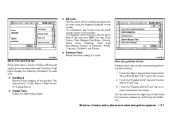
... and press the ENTER button. Display off automatically after 5 seconds. 4-12 Monitor, climate, audio, phone and voice recognition systems Use the NISSAN controller to adjust the brightness to darker or brighter and the contrast to adjust the brightness or contrast of the control panel buttons is pressed...The Display settings screen will be displayed briefly. When the audio, HVAC (Heater and air conditioner), or any other mode button. The new settings are automatically saved when you exit the setting screen by pressing the BACK button or any mode button on the control panel is ...
... and press the ENTER button. Display off automatically after 5 seconds. 4-12 Monitor, climate, audio, phone and voice recognition systems Use the NISSAN controller to adjust the brightness to darker or brighter and the contrast to adjust the brightness or contrast of the control panel buttons is pressed...The Display settings screen will be displayed briefly. When the audio, HVAC (Heater and air conditioner), or any other mode button. The new settings are automatically saved when you exit the setting screen by pressing the BACK button or any mode button on the control panel is ...
Owner's Manual
Page 179
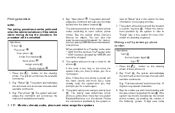
... Select the "Beeps" key and press the ENTER button. With this item is enabled (indicator light illuminated), a clock is pressed. The new settings are automatically saved when you exit the setting screen by pressing the ENTER button, or OFF button for approxi● Hold the mately ...changes between day and night. The Beeps settings screen will appear after pressing the SETTING button, then selecting the "Clock" key using the NISSAN controller and pressing the ENTER button. On-screen Clock: When this option on (indicator light illuminated), a beep will be automatically turned on ...
... Select the "Beeps" key and press the ENTER button. With this item is enabled (indicator light illuminated), a clock is pressed. The new settings are automatically saved when you exit the setting screen by pressing the ENTER button, or OFF button for approxi● Hold the mately ...changes between day and night. The Beeps settings screen will appear after pressing the SETTING button, then selecting the "Clock" key using the NISSAN controller and pressing the ENTER button. On-screen Clock: When this option on (indicator light illuminated), a beep will be automatically turned on ...
Owner's Manual
Page 194
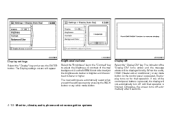
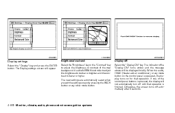
Use the NISSAN controller to adjust the brightness to darker or brighter and the contrast to adjust the brightness or contrast of the map background. The new settings are automatically saved when you exit the setting screen by pressing the BACK button or any mode button on for that operation. Display off ...
Use the NISSAN controller to adjust the brightness to darker or brighter and the contrast to adjust the brightness or contrast of the map background. The new settings are automatically saved when you exit the setting screen by pressing the BACK button or any mode button on for that operation. Display off ...
Owner's Manual
Page 195
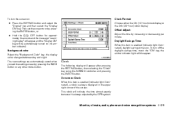
To turn off the daylight savings time, touch the "ON" key; The new settings are automatically saved when you exit the setting screen by pressing the ENTER button, or OFF button for approxi● Hold the mately 2 seconds ... screen. Clock The following display will disappear. the amber indicator light will appear after pressing the SETTING button, then selecting the "Clock" key using the NISSAN controller and pressing the ENTER button. To turn the screen on (no amber indicator). This clock will be automatically turned on : ● Press the SETTING...
To turn off the daylight savings time, touch the "ON" key; The new settings are automatically saved when you exit the setting screen by pressing the ENTER button, or OFF button for approxi● Hold the mately 2 seconds ... screen. Clock The following display will disappear. the amber indicator light will appear after pressing the SETTING button, then selecting the "Clock" key using the NISSAN controller and pressing the ENTER button. To turn the screen on (no amber indicator). This clock will be automatically turned on : ● Press the SETTING...
Owner's Manual
Page 246
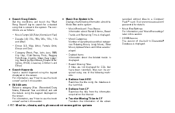
... (All, Male Artist, Female Artist, Group and Duo) - Category (Rock, Pop, Latin, Jazz, R&B, Hip Hop, Club/Dance, Punk, Reggae, Folk, Blues, Country, Metal, Easy Listening, New Age, Soundtrack, Gospel & Religious, World, Classical, Children's and Other) ● Search Keywords Input a search keyword using the keypad displayed on the screen. Displays the following...
... (All, Male Artist, Female Artist, Group and Duo) - Category (Rock, Pop, Latin, Jazz, R&B, Hip Hop, Club/Dance, Punk, Reggae, Folk, Blues, Country, Metal, Easy Listening, New Age, Soundtrack, Gospel & Religious, World, Classical, Children's and Other) ● Search Keywords Input a search keyword using the keypad displayed on the screen. Displays the following...
Owner's Manual
Page 247
... : 1. The category of the track can be set to Rock, Pop, Latin, Jazz, R&B, Hip Hop, Club/ Dance, Punk, Reggae, Folk, Blues, Country, Metal, Easy Listening, New Age, Soundtrack, Gospel & Religious, World, Classical, Children's and Others. ● Remove Track Reset the mood setting of the track being played. Touch the "Menu" key...
... : 1. The category of the track can be set to Rock, Pop, Latin, Jazz, R&B, Hip Hop, Club/ Dance, Punk, Reggae, Folk, Blues, Country, Metal, Easy Listening, New Age, Soundtrack, Gospel & Religious, World, Classical, Children's and Others. ● Remove Track Reset the mood setting of the track being played. Touch the "Menu" key...

Owner's Manual
Page 250
... REVENUES. Copyright: Music recognition technology and related data are not being used. ● To clean a disc, wipe the surface from the center to you with new enhanced or additional data types or categories that Gracenote deems sufficient. The Gracenote logo and logotype, and the "Powered by Gracenote" logo are licensed to...
... REVENUES. Copyright: Music recognition technology and related data are not being used. ● To clean a disc, wipe the surface from the center to you with new enhanced or additional data types or categories that Gracenote deems sufficient. The Gracenote logo and logotype, and the "Powered by Gracenote" logo are licensed to...
Owner's Manual
Page 251
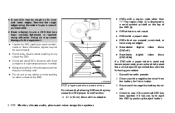
... cards in the storage case when they are not being used. ● Do not place heavy objects on the cards. ● Do not use . ● A new disc may be rough on the inner and outer edges. Remove the rough edges by rubbing the inner and outer edges with the side of...
... cards in the storage case when they are not being used. ● Do not place heavy objects on the cards. ● Do not use . ● A new disc may be rough on the inner and outer edges. Remove the rough edges by rubbing the inner and outer edges with the side of...
Owner's Manual
Page 268
... negative terminal from the battery for five minutes. 3. Remove the rough edges using adhesive. Check to eject the DVD by pushing the eject button. ● A new disc may be read properly. ● Do not write, draw or attach anything on any side of the DVD. ● Do not store the DVD...
... negative terminal from the battery for five minutes. 3. Remove the rough edges using adhesive. Check to eject the DVD by pushing the eject button. ● A new disc may be read properly. ● Do not write, draw or attach anything on any side of the DVD. ● Do not store the DVD...
Owner's Manual
Page 269
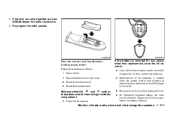
... the radio presets. Open the lid. 2. LHA0318 SAA0723 Remote control and headphones battery replacement Replace the battery as follows: 1. Replace batteries with new ones. ● Size AA (remote control) ● Size AAA (headphones) Make sure that the and ends on the batteries match the markings... the battery is removed for any reason other than replacement, close the lid securely. ● If you will not be ejected see your NISSAN dealer for further assistance. 6. Always confirm local regulations for long periods of time, remove the batteries. ● Replacement of the batteries is...
... the radio presets. Open the lid. 2. LHA0318 SAA0723 Remote control and headphones battery replacement Replace the battery as follows: 1. Replace batteries with new ones. ● Size AA (remote control) ● Size AAA (headphones) Make sure that the and ends on the batteries match the markings... the battery is removed for any reason other than replacement, close the lid securely. ● If you will not be ejected see your NISSAN dealer for further assistance. 6. Always confirm local regulations for long periods of time, remove the batteries. ● Replacement of the batteries is...
Owner's Manual
Page 270
... Keep the antenna wire more than 8 in (20 cm) away from the CB radio chassis to the body. ● For details, consult a NISSAN dealer. ● Do not ground electrical accessories directly to operate the equipment. Doing so, will bypass the variable voltage control system and the vehicle battery... and (2) this manual. ● Use electrical accessories with Part 15 of the FCC Rules and RSS-210 of the device. otherwise, the new equipment may not charge completely. WARNING ● A cellular telephone should not be used while driving so full attention may cause undesired operation of ...
... Keep the antenna wire more than 8 in (20 cm) away from the CB radio chassis to the body. ● For details, consult a NISSAN dealer. ● Do not ground electrical accessories directly to operate the equipment. Doing so, will bypass the variable voltage control system and the vehicle battery... and (2) this manual. ● Use electrical accessories with Part 15 of the FCC Rules and RSS-210 of the device. otherwise, the new equipment may not charge completely. WARNING ● A cellular telephone should not be used while driving so full attention may cause undesired operation of ...
Owner's Manual
Page 274
... eight hundred six six two sixty two hundred, and - NOT "One eight oh oh six six two sixty two hundred. ● Numbers can say numbers NISSAN Voice Recognition requires a certain way to continue entering digits, if desired. Example: 1-555-1212 *123 - "One five five five one two one two star ...one two three" NOTE: For best results, say "Phonebook, New entry" rather than "Phonebook." Wait for the first 4 digits places only. See "List of voice commands" and "International" later in this section for "#" at any...
... eight hundred six six two sixty two hundred, and - NOT "One eight oh oh six six two sixty two hundred. ● Numbers can say numbers NISSAN Voice Recognition requires a certain way to continue entering digits, if desired. Example: 1-555-1212 *123 - "One five five five one two one two star ...one two three" NOTE: For best results, say "Phonebook, New entry" rather than "Phonebook." Wait for the first 4 digits places only. See "List of voice commands" and "International" later in this section for "#" at any...
Owner's Manual
Page 276
... phone number Main Menu "Call" A Number (speak digits) B "Dial" C 1. Follow the instructions provided by NISSAN and cannot be changed. 5. Press the button on pairing NISSAN recommended cellular phones. Say: "Pair phone" B . The system acknowledges the command and announces the next set of ...A . Say the number you to "Setup" later in the following groups: 3-digit area code, 1. Main Menu "Setup" A "Pair phone" B "New phone" C Initiate from the phone handset D . The pairing procedure of available commands. 4-110 Monitor, climate, audio, phone and voice recognition systems If the...
... phone number Main Menu "Call" A Number (speak digits) B "Dial" C 1. Follow the instructions provided by NISSAN and cannot be changed. 5. Press the button on pairing NISSAN recommended cellular phones. Say: "Pair phone" B . The system acknowledges the command and announces the next set of ...A . Say the number you to "Setup" later in the following groups: 3-digit area code, 1. Main Menu "Setup" A "Pair phone" B "New phone" C Initiate from the phone handset D . The pairing procedure of available commands. 4-110 Monitor, climate, audio, phone and voice recognition systems If the...


