Owner's Manual
Page 10
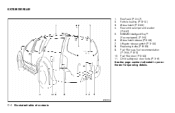
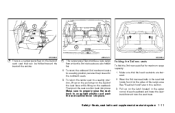
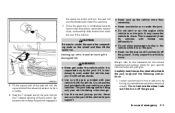
Lift gate release switch (P. 3-22) 8. NISSAN Intelligent Key ™ (if so equipped) (P. 3-2) 6. Fuel-filler cap, fuel recommendation (P. 3-24, P. 9-3) 10. Child safety rear door locks (P. 3-6) See the page number indicated in parentheses for operating details. Roof rack (P. 2-47) Vehicle loading (P. 9-12) Glass hatch (P. 3-23) Rear window wiper and washer (P.2-27) 5. Replacing bulbs (P. 8-33) 9. Glass hatch release (P.3-23) 7. EXTERIOR REAR 1. 2. 3. 4. Fuel-filler door (P. 3-23) 11. WII0124 0-4 Illustrated table of contents
Lift gate release switch (P. 3-22) 8. NISSAN Intelligent Key ™ (if so equipped) (P. 3-2) 6. Fuel-filler cap, fuel recommendation (P. 3-24, P. 9-3) 10. Child safety rear door locks (P. 3-6) See the page number indicated in parentheses for operating details. Roof rack (P. 2-47) Vehicle loading (P. 9-12) Glass hatch (P. 3-23) Rear window wiper and washer (P.2-27) 5. Replacing bulbs (P. 8-33) 9. Glass hatch release (P.3-23) 7. EXTERIOR REAR 1. 2. 3. 4. Fuel-filler door (P. 3-23) 11. WII0124 0-4 Illustrated table of contents
Owner's Manual
Page 24
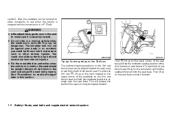
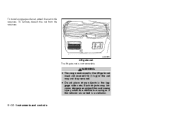
... transmission is in the seat and adjust the seat belt properly. To enter the 3rd row 1 , lift up on the latch located on the upper corner of the seat so it forward. 1-6 Safety-Seats, seat...well back in P (Park). This will not be tipped forward. To exit the 3rd row bench seat, lift up on the lower corner of the seat base and tip the outboard seating position of the 2nd row ... locked. ● Do not ride in a moving vehicle when the seatback is in this section. Then 2 lift up for easy entry to make sure it and receive neck or other serious injuries. In an accident, you ...
... transmission is in the seat and adjust the seat belt properly. To enter the 3rd row 1 , lift up on the latch located on the upper corner of the seat so it forward. 1-6 Safety-Seats, seat...well back in P (Park). This will not be tipped forward. To exit the 3rd row bench seat, lift up on the lower corner of the seat base and tip the outboard seating position of the 2nd row ... locked. ● Do not ride in a moving vehicle when the seatback is in this section. Then 2 lift up for easy entry to make sure it and receive neck or other serious injuries. In an accident, you ...
Owner's Manual
Page 27
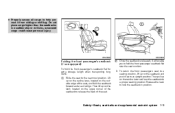
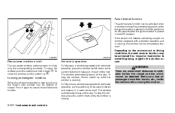
Then lift up on the recline lever and lean the seatback to a proper seating position. Release the lever to ... for extra storage length when transporting long items: 1 Once the seatback is released, it from sliding or shifting. Lift up to fold the front passenger seatback flat over the seat cushion. To return the front passenger's seat to a seating position..., lift up on the seatback and push it up on the recline lever, located on the upper corner of the seatback...
Then lift up on the recline lever and lean the seatback to a proper seating position. Release the lever to ... for extra storage length when transporting long items: 1 Once the seatback is released, it from sliding or shifting. Lift up to fold the front passenger seatback flat over the seat cushion. To return the front passenger's seat to a seating position..., lift up on the seatback and push it up on the recline lever, located on the upper corner of the seatback...

Owner's Manual
Page 28
... cargo hauling: 1 Lower the head restraints to fold the outboard seatbacks flat. This could result in serious injury in an accident or sudden stop. Then lift up on the strap on the side of each seat cushion, and fold each seat cushion toward a person. WARNING ● If you fold the front...
... cargo hauling: 1 Lower the head restraints to fold the outboard seatbacks flat. This could result in serious injury in an accident or sudden stop. Then lift up on the strap on the side of each seat cushion, and fold each seat cushion toward a person. WARNING ● If you fold the front...
Owner's Manual
Page 29
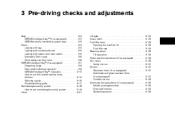
... forward over the seat base. 5. Stow the 3rd row seat belts in this section. 3. To return the outboard 2nd row bench seats to a seating position, lift up on the latch located in the upper corner of the cargo area. See "Seat belt hook" later in the seat belt hooks found on... provides a level cargo floor when the 3rd row seats are lowered. 2. Make sure that can be folded toward the back of the seat base while lifting on the sides of each seat that the head restraints are also folded flat. Then push the seat cushion back into place. Folding the 3rd...
... forward over the seat base. 5. Stow the 3rd row seat belts in this section. 3. To return the outboard 2nd row bench seats to a seating position, lift up on the latch located in the upper corner of the cargo area. See "Seat belt hook" later in the seat belt hooks found on... provides a level cargo floor when the 3rd row seats are lowered. 2. Make sure that can be folded toward the back of the seat base while lifting on the sides of each seat that the head restraints are also folded flat. Then push the seat cushion back into place. Folding the 3rd...

Owner's Manual
Page 100
... the horn beeps once as a reminder that the indicator light comes on. Furthermore, if the key is unlocked by : ● opening a door without unlocking the lift gate. All doors lock. After about 30 seconds. Keyfob and Intelligent Key operation: ● Push the button. The vehicle security system is tampered with any... horn may or may be shut off after approximately 50 seconds. If the indicator light fails to remove the key, the system may not beep. NISSAN VEHICLE IMMOBILIZER SYSTEM The NISSAN Vehicle Immobilizer System will arm with all doors with again.
... the horn beeps once as a reminder that the indicator light comes on. Furthermore, if the key is unlocked by : ● opening a door without unlocking the lift gate. All doors lock. After about 30 seconds. Keyfob and Intelligent Key operation: ● Push the button. The vehicle security system is tampered with any... horn may or may be shut off after approximately 50 seconds. If the indicator light fails to remove the key, the system may not beep. NISSAN VEHICLE IMMOBILIZER SYSTEM The NISSAN Vehicle Immobilizer System will arm with all doors with again.

Owner's Manual
Page 119
LUGGAGE HOOKS The luggage hooks can be thrown about in the vehicle and possibly injure people during sudden braking or an accident. ● Do not use bottle holder for open liquid containers. CAUTION ● Do not use bottle holder for any other types of straps. Instruments and controls 2-43 LIC0774 LIC0784 LIC0777 3rd row - Type B Bottle holder CARGO AREA STORAGE To access the floor storage area, push down 1 to raise the handle, then pull up on the handle 2 to secure cargo with ropes or other objects that could be used to lift the luggage board.
LUGGAGE HOOKS The luggage hooks can be thrown about in the vehicle and possibly injure people during sudden braking or an accident. ● Do not use bottle holder for open liquid containers. CAUTION ● Do not use bottle holder for any other types of straps. Instruments and controls 2-43 LIC0774 LIC0784 LIC0777 3rd row - Type B Bottle holder CARGO AREA STORAGE To access the floor storage area, push down 1 to raise the handle, then pull up on the handle 2 to secure cargo with ropes or other objects that could be used to lift the luggage board.
Owner's Manual
Page 122
Such objects may not stay secured. ● Do not place sharp objects in the luggage side nets. To install a luggage side net, attach the net to the retainers. LIC0795 Lift gate net The lift gate net is involved in the lift gate net must not exceed 2 lb (1 kg) or the net may become dangerous projectiles and cause injury when the vehicle is moving or if the vehicle is not removable. To remove, detach the net from the retainers. WARNING ● The cargo restrained in a collision. 2-46 Instruments and controls
Such objects may not stay secured. ● Do not place sharp objects in the luggage side nets. To install a luggage side net, attach the net to the retainers. LIC0795 Lift gate net The lift gate net is involved in the lift gate net must not exceed 2 lb (1 kg) or the net may become dangerous projectiles and cause injury when the vehicle is moving or if the vehicle is not removable. To remove, detach the net from the retainers. WARNING ● The cargo restrained in a collision. 2-46 Instruments and controls

Owner's Manual
Page 123
... capacity. ● Properly secure all cargo with ropes or straps to help prevent it from the ground, use a ladder or stool. If you cannot comfortably lift the items onto the roof rack from sliding or shifting. WIC0914 CAUTION Use care when placing or removing items from the roof rack.
... capacity. ● Properly secure all cargo with ropes or straps to help prevent it from the ground, use a ladder or stool. If you cannot comfortably lift the items onto the roof rack from sliding or shifting. WIC0914 CAUTION Use care when placing or removing items from the roof rack.
Owner's Manual
Page 126
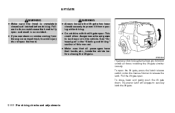
... with automatic operation as it ; To close only the corresponding windows. it ; it again to something caught in the window occurs. To stop the window, lift the switch up 2 . Locking passengers' windows When the window lock button is opening. Auto-reverse function The auto-reverse function can be opened or closed...
... with automatic operation as it ; To close only the corresponding windows. it ; it again to something caught in the window occurs. To stop the window, lift the switch up 2 . Locking passengers' windows When the window lock button is opening. Auto-reverse function The auto-reverse function can be opened or closed...
Owner's Manual
Page 135
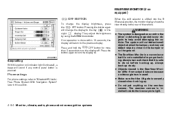
... power door lock switch ...3-5 Automatic Door Locks ...3-6 Child safety rear door lock ...3-6 NISSAN Intelligent Key™(if so equipped) ...3-7 Operating range...3-9 Door locks/unlocks precaution ...3-9 NISSAN Intelligent Key™ Operation...3-10 How to use the remote keyless entry function ...3-13 ...Warning signals ...3-16 Troubleshooting guide ...3-17 Remote keyless entry system ...3-18 How to use remote keyless entry system ...3-19 Hood ...3-21 Lift gate ...3-22...
... power door lock switch ...3-5 Automatic Door Locks ...3-6 Child safety rear door lock ...3-6 NISSAN Intelligent Key™(if so equipped) ...3-7 Operating range...3-9 Door locks/unlocks precaution ...3-9 NISSAN Intelligent Key™ Operation...3-10 How to use the remote keyless entry function ...3-13 ...Warning signals ...3-16 Troubleshooting guide ...3-17 Remote keyless entry system ...3-18 How to use remote keyless entry system ...3-19 Hood ...3-21 Lift gate ...3-22...
Owner's Manual
Page 156
... you see steam or smoke coming from opening while driving. ● Do not drive with the lift gate open the hood. To close, lower and gently push the lift gate down. To open the lift gate, press the hatch release switch under the license finisher to avoid injury do so could allow... open and result in the "Starting and driving" section of this manual. ● Make sure that all doors including the lift gate simultaneously. LIFT GATE WARNING ● Make sure the hood is completely closed securely to prevent it from the engine compartment, to release the latch. Failure to ...
... you see steam or smoke coming from opening while driving. ● Do not drive with the lift gate open the hood. To close, lower and gently push the lift gate down. To open the lift gate, press the hatch release switch under the license finisher to avoid injury do so could allow... open and result in the "Starting and driving" section of this manual. ● Make sure that all doors including the lift gate simultaneously. LIFT GATE WARNING ● Make sure the hood is completely closed securely to prevent it from the engine compartment, to release the latch. Failure to ...
Owner's Manual
Page 157
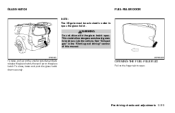
... the glass hatch open the glass hatch. To close, lower and push the glass hatch down securely. LPD0301 WPD0436 To open . GLASS HATCH NOTE: The lift gate must be drawn into the vehicle. OPENING THE FUEL-FILLER LID Pull on the finger tab to release the glass hatch, then pull up...
... the glass hatch open the glass hatch. To close, lower and push the glass hatch down securely. LPD0301 WPD0436 To open . GLASS HATCH NOTE: The lift gate must be drawn into the vehicle. OPENING THE FUEL-FILLER LID Pull on the finger tab to release the glass hatch, then pull up...
Owner's Manual
Page 200
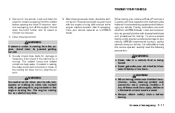
... button for proper backing. The system will return to help avoid damaging the vehicle. The rearview camera is pressed. Always turn and check that the lift gate is not a substitute for more than 2 seconds to the bumper or on (indicator light illuminated), a beep will change the display brightness, press the ... the bumper, and may not detect objects close to turn the display on the rearview camera. Then, adjust the brightness night by using the NISSAN controller. Pressing the button again will sound if any control panel button is installed beside the license plate light.
... button for proper backing. The system will return to help avoid damaging the vehicle. The rearview camera is pressed. Always turn and check that the lift gate is not a substitute for more than 2 seconds to the bumper or on (indicator light illuminated), a beep will change the display brightness, press the ... the bumper, and may not detect objects close to turn the display on the rearview camera. Then, adjust the brightness night by using the NISSAN controller. Pressing the button again will sound if any control panel button is installed beside the license plate light.
Owner's Manual
Page 324
... monoxide. they contain colorless and odorless carbon monoxide. If you suspect that exhaust fumes are entering the vehicle, drive with the lift gate or rear windows open , and have had an accident involving damage to prevent carbon monoxide entry into the passenger compartment. ..., refrigerators, heaters, etc. It can cause unconsciousness or death. 5-2 Starting and driving Do not occupy these precautions: 1. Also, on the lift gate or the body, follow the manufacturer's recommendation to the exhaust system, underbody, or rear of the vehicle. ● If a special ...
... monoxide. they contain colorless and odorless carbon monoxide. If you suspect that exhaust fumes are entering the vehicle, drive with the lift gate or rear windows open , and have had an accident involving damage to prevent carbon monoxide entry into the passenger compartment. ..., refrigerators, heaters, etc. It can cause unconsciousness or death. 5-2 Starting and driving Do not occupy these precautions: 1. Also, on the lift gate or the body, follow the manufacturer's recommendation to the exhaust system, underbody, or rear of the vehicle. ● If a special ...
Owner's Manual
Page 368
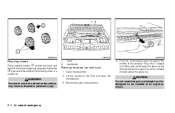
... may move and result in personal injury. WARNING Be sure to be inserted at both the front and back of emergency Open the back door. 2. Lift the handle on the floor and open the storage area. 3. Pass the T-shaped end of the bumper. Jack Jack tools Getting the spare tire and...
... may move and result in personal injury. WARNING Be sure to be inserted at both the front and back of emergency Open the back door. 2. Lift the handle on the floor and open the storage area. 3. Pass the T-shaped end of the bumper. Jack Jack tools Getting the spare tire and...
Owner's Manual
Page 369
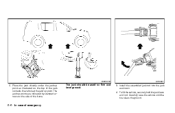
... cause the vehicle to move . Loosen each wheel nut one or two turns by the jack. The jack is necessary to lift the vehicle. In case of the vehicle for lifting only your specific vehicle model and jack type. the spare tire winch and turn the jack rod counterclockwise to the jack.... Once the spare tire is especially true with limited slip CAUTION Be sure to center the spare tire suspending plate on the wheel and then lift the spare tire. ● Do not allow passengers to stay in ● Use only the jack provided with your vehicle on the jack. ● Never...
... cause the vehicle to move . Loosen each wheel nut one or two turns by the jack. The jack is necessary to lift the vehicle. In case of the vehicle for lifting only your specific vehicle model and jack type. the spare tire winch and turn the jack rod counterclockwise to the jack.... Once the spare tire is especially true with limited slip CAUTION Be sure to center the spare tire suspending plate on the wheel and then lift the spare tire. ● Do not allow passengers to stay in ● Use only the jack provided with your vehicle on the jack. ● Never...
Owner's Manual
Page 370
Install the assembled jack rod into the jack as illustrated so the top of the jack contacts the vehicle at the jack-up point. To lift the vehicle, securely hold the jack lever and rod. The jack should be used on the side of emergency Carefully raise the vehicle until the tire clears the ground. 6-6 In case of the frame. The jack-up point as shown. 4. Place the jack directly under the jack-up points are indicated by stamped arrows on firm and level ground. 3. WCE0139 LCE0087 2.
Install the assembled jack rod into the jack as illustrated so the top of the jack contacts the vehicle at the jack-up point. To lift the vehicle, securely hold the jack lever and rod. The jack should be used on the side of emergency Carefully raise the vehicle until the tire clears the ground. 6-6 In case of the frame. The jack-up point as shown. 4. Place the jack directly under the jack-up points are indicated by stamped arrows on firm and level ground. 3. WCE0139 LCE0087 2.
Owner's Manual
Page 374
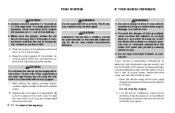
... emergency PUSH STARTING IF YOUR VEHICLE OVERHEATS CAUTION ● Always connect positive ( ) to positive ( ) and negative ( ) to body ground (for example, strut mounting bolt, engine lift bracket, etc.) - not to the battery. ● Make sure the jumper cables do not touch moving parts in the engine compartment and that the cable...
... emergency PUSH STARTING IF YOUR VEHICLE OVERHEATS CAUTION ● Always connect positive ( ) to positive ( ) and negative ( ) to body ground (for example, strut mounting bolt, engine lift bracket, etc.) - not to the battery. ● Make sure the jumper cables do not touch moving parts in the engine compartment and that the cable...
Owner's Manual
Page 375
... repaired at any of these conditions apply, dollies or a flatbed tow truck must be seen. 4. When towing your vehicle after it has been lifted by a tow truck. Look and listen for towing must be used. ● Always attach safety chains before opening the hood. (If steam ... towing and to prevent accidental damage to have the service operator carefully read the following precautions: WARNING If steam or water is coming from a NISSAN dealer. The radiator hoses and radiator should not leak water. WARNING ● Never ride in a vehicle that the transmission, axles, steering system...
... repaired at any of these conditions apply, dollies or a flatbed tow truck must be seen. 4. When towing your vehicle after it has been lifted by a tow truck. Look and listen for towing must be used. ● Always attach safety chains before opening the hood. (If steam ... towing and to prevent accidental damage to have the service operator carefully read the following precautions: WARNING If steam or water is coming from a NISSAN dealer. The radiator hoses and radiator should not leak water. WARNING ● Never ride in a vehicle that the transmission, axles, steering system...
