Owner's Manual
Page 173
... Green Green Red Red - Yellow - Brown - Black Passenger compartment fuse panel The fuse panel is located below and to access the fuses. Remove the panel cover to the left of the steering wheel by the brake pedal. To remove a fuse use the fuse puller tool provided on the fuse panel...
... Green Green Red Red - Yellow - Brown - Black Passenger compartment fuse panel The fuse panel is located below and to access the fuses. Remove the panel cover to the left of the steering wheel by the brake pedal. To remove a fuse use the fuse puller tool provided on the fuse panel...

Owner's Manual
Page 183
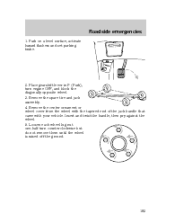
Place gearshift lever in P (Park), turn counterclockwise but do not remove them until the wheel is raised off the ground. 183 FUSES 2. Remove the center ornament or wheel cover from the wheel with the tapered end of the jack handle that came with your vehicle. Park on a level surface, activate hazard flashers and set parking brake. Remove the spare tire and jack assembly. 4. Roadside emergencies 1. Loosen each wheel lug nut one-half turn engine OFF, and block the diagonally opposite wheel. 3. Insert and twist the handle, then pry against the wheel. 5.
Place gearshift lever in P (Park), turn counterclockwise but do not remove them until the wheel is raised off the ground. 183 FUSES 2. Remove the center ornament or wheel cover from the wheel with the tapered end of the jack handle that came with your vehicle. Park on a level surface, activate hazard flashers and set parking brake. Remove the spare tire and jack assembly. 4. Roadside emergencies 1. Loosen each wheel lug nut one-half turn engine OFF, and block the diagonally opposite wheel. 3. Insert and twist the handle, then pry against the wheel. 5.
Owner's Manual
Page 184
... when your body under the vehicle. Reinstall lug nuts until the wheel has been lowered. 10. Locate the jack notch closest to Stowing the spare tire in the order shown. 12. Install wheel cover or center 3 4 ornament on wheel. 13. Roadside emergencies Jacking notches are changing, then place the... jack on the jack. Lower the wheel by turning the jack handle counterclockwise. 11. Refer to the tire you ...
... when your body under the vehicle. Reinstall lug nuts until the wheel has been lowered. 10. Locate the jack notch closest to Stowing the spare tire in the order shown. 12. Install wheel cover or center 3 4 ornament on wheel. 13. Roadside emergencies Jacking notches are changing, then place the... jack on the jack. Lower the wheel by turning the jack handle counterclockwise. 11. Refer to the tire you ...

Owner's Manual
Page 191
...battery and all lit cigarettes, open flames and other lit material away from moving parts. • Do not work on 1. Block the wheels to specifications. Motorcraft parts are sure you have enough ventilation. • Keep all fuel related parts. Working with the engine running ,... the engine is securely latched in the engine compartment for easy location. • We provide a Scheduled Maintenance Guide which parts and services are covered. Maintenance and care SERVICE RECOMMENDATIONS To help you service your vehicle: • We highlight do-it-yourself items in P (Park). 2. If...
...battery and all lit cigarettes, open flames and other lit material away from moving parts. • Do not work on 1. Block the wheels to specifications. Motorcraft parts are sure you have enough ventilation. • Keep all fuel related parts. Working with the engine running ,... the engine is securely latched in the engine compartment for easy location. • We provide a Scheduled Maintenance Guide which parts and services are covered. Maintenance and care SERVICE RECOMMENDATIONS To help you service your vehicle: • We highlight do-it-yourself items in P (Park). 2. If...
Owner's Manual
Page 255
... specifications ...236,237 lubricant specifications ...236,237 parking ...158 shift interlock ...160 Break-in period ...2 Capacities for refilling fluids ...235 Cargo cover ...108 Cargo net ...107,108 CD changer ...76 Child safety restraints ...136 child safety belts ...136 child safety seats ...137 Child safety ... exterior lamps ...233 instrument panel ...233 interior ...233,234 mirrors ...234 plastic parts ...232 safety belts ...234 washing ...230 waxing ...231 wheels ...231 windows ...234 wiper blades ...233 Clock ...47,59,71 Console overhead ...97,98 Controls ...93,94,95,96 power seat ...111...
... specifications ...236,237 lubricant specifications ...236,237 parking ...158 shift interlock ...160 Break-in period ...2 Capacities for refilling fluids ...235 Cargo cover ...108 Cargo net ...107,108 CD changer ...76 Child safety restraints ...136 child safety belts ...136 child safety seats ...137 Child safety ... exterior lamps ...233 instrument panel ...233 interior ...233,234 mirrors ...234 plastic parts ...232 safety belts ...234 washing ...230 waxing ...231 wheels ...231 windows ...234 wiper blades ...233 Clock ...47,59,71 Console overhead ...97,98 Controls ...93,94,95,96 power seat ...111...

Owner's Manual
Page 173
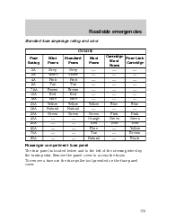
Remove the panel cover to the left of the steering wheel by the brake pedal. Roadside emergencies Standard fuse amperage rating and color COLOR Fuse Rating 2A 3A 4A 5A 7.5A 10A 15A 20A 25A 30A ... panel The fuse panel is located below and to access the fuses. To remove a fuse use the fuse puller tool provided on the fuse panel cover. 173
Remove the panel cover to the left of the steering wheel by the brake pedal. Roadside emergencies Standard fuse amperage rating and color COLOR Fuse Rating 2A 3A 4A 5A 7.5A 10A 15A 20A 25A 30A ... panel The fuse panel is located below and to access the fuses. To remove a fuse use the fuse puller tool provided on the fuse panel cover. 173
Owner's Manual
Page 183
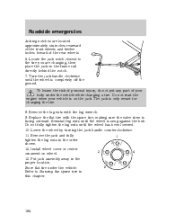
Roadside emergencies 1. Insert and twist the handle, then pry against the wheel. 5. FUSES 2. Remove the spare tire and jack assembly. 4. Remove the center ornament or wheel cover from the wheel with the tapered end of the jack handle that came with your vehicle. Place gearshift lever in P (Park), turn counterclockwise but do not remove them until the wheel is raised off the ground. 183 Loosen each wheel lug nut one-half turn engine OFF, and block the diagonally opposite wheel. 3. Park on a level surface, activate hazard flashers and set parking brake.
Roadside emergencies 1. Insert and twist the handle, then pry against the wheel. 5. FUSES 2. Remove the spare tire and jack assembly. 4. Remove the center ornament or wheel cover from the wheel with the tapered end of the jack handle that came with your vehicle. Place gearshift lever in P (Park), turn counterclockwise but do not remove them until the wheel is raised off the ground. 183 Loosen each wheel lug nut one-half turn engine OFF, and block the diagonally opposite wheel. 3. Park on a level surface, activate hazard flashers and set parking brake.

Owner's Manual
Page 184
... nuts in this chapter. 184 Locate the jack notch closest to Stowing the spare tire in the order shown. 12. Reinstall lug nuts until the wheel is only meant for changing the tire. 8. The jack is snug against the hub. Do not fully tighten the lug nuts until the... your vehicle is completely off the ground. Do not start the engine when your body under the vehicle. Install wheel cover or center 3 4 ornament on wheel. 13. Turn the jack handle clockwise until the wheel has been lowered. 10. To lessen the risk of personal injury, do not put any part of the rear...
... nuts in this chapter. 184 Locate the jack notch closest to Stowing the spare tire in the order shown. 12. Reinstall lug nuts until the wheel is only meant for changing the tire. 8. The jack is snug against the hub. Do not fully tighten the lug nuts until the... your vehicle is completely off the ground. Do not start the engine when your body under the vehicle. Install wheel cover or center 3 4 ornament on wheel. 13. Turn the jack handle clockwise until the wheel has been lowered. 10. To lessen the risk of personal injury, do not put any part of the rear...
Owner's Manual
Page 191
...tracking routine service easy. Set the parking brake and ensure the gearshift is running in an enclosed space, unless you are covered. Block the wheels to prevent the vehicle from moving unexpectedly. 191 PRECAUTIONS WHEN SERVICING YOUR VEHICLE Be especially careful when inspecting or servicing your ... on a vehicle with the engine off the engine and remove the key. 3. Check your dealership can provide necessary parts and service. Block the wheels to prevent the vehicle from moving parts. • Do not work on 1. Turn off 1. Working with the engine on a hot engine. ...
...tracking routine service easy. Set the parking brake and ensure the gearshift is running in an enclosed space, unless you are covered. Block the wheels to prevent the vehicle from moving unexpectedly. 191 PRECAUTIONS WHEN SERVICING YOUR VEHICLE Be especially careful when inspecting or servicing your ... on a vehicle with the engine off the engine and remove the key. 3. Check your dealership can provide necessary parts and service. Block the wheels to prevent the vehicle from moving parts. • Do not work on 1. Turn off 1. Working with the engine on a hot engine. ...

Owner's Manual
Page 255
... specifications ...236,237 lubricant specifications ...236,237 parking ...158 shift interlock ...160 Break-in period ...2 Capacities for refilling fluids ...235 Cargo cover ...108 Cargo net ...107,108 CD changer ...76 Child safety restraints ...136 child safety belts ...136 child safety seats ...137 Child safety ... exterior lamps ...233 instrument panel ...233 interior ...233,234 mirrors ...234 plastic parts ...232 safety belts ...234 washing ...230 waxing ...231 wheels ...231 windows ...234 wiper blades ...233 Clock ...47,59,71 Console overhead ...97,98 Controls ...93,94,95,96 power seat ...111...
... specifications ...236,237 lubricant specifications ...236,237 parking ...158 shift interlock ...160 Break-in period ...2 Capacities for refilling fluids ...235 Cargo cover ...108 Cargo net ...107,108 CD changer ...76 Child safety restraints ...136 child safety belts ...136 child safety seats ...137 Child safety ... exterior lamps ...233 instrument panel ...233 interior ...233,234 mirrors ...234 plastic parts ...232 safety belts ...234 washing ...230 waxing ...231 wheels ...231 windows ...234 wiper blades ...233 Clock ...47,59,71 Console overhead ...97,98 Controls ...93,94,95,96 power seat ...111...
Warranty Guide 5th Printing
Page 13
Time Limits on Coverage • After the first 12 months in service or 12,000 miles, whichever occurs first, wheel alignment and tire balancing are not equipped with the Ford Ambulance Prep Package, see, important information about ambulance conversions (page ...dismantled", "fire", "flood", "junk", "rebuilt", "reconstructed", or "salvaged"; this will void the New Vehicle Limited Warranty • vehicles that are not covered unless required by an insurance company; oil/air filters brake linings/pads tire rotation cleaning/polishing wiper blades clutch linings engine tune-up Other Items...
Time Limits on Coverage • After the first 12 months in service or 12,000 miles, whichever occurs first, wheel alignment and tire balancing are not equipped with the Ford Ambulance Prep Package, see, important information about ambulance conversions (page ...dismantled", "fire", "flood", "junk", "rebuilt", "reconstructed", or "salvaged"; this will void the New Vehicle Limited Warranty • vehicles that are not covered unless required by an insurance company; oil/air filters brake linings/pads tire rotation cleaning/polishing wiper blades clutch linings engine tune-up Other Items...

