Owner Guide 1st Printing
Page 5
... with care, precision, and attention to achieve the best result possible. It is illuminated on your instrument panel? (Refer to Overdrive in the Index) Ⅵ How to engage the childproof safety lock on the sliding door? (Refer to learning what you in the Index) Ⅵ That your automatic transaxle will not shift...
... with care, precision, and attention to achieve the best result possible. It is illuminated on your instrument panel? (Refer to Overdrive in the Index) Ⅵ How to engage the childproof safety lock on the sliding door? (Refer to learning what you in the Index) Ⅵ That your automatic transaxle will not shift...
Owner Guide 1st Printing
Page 87
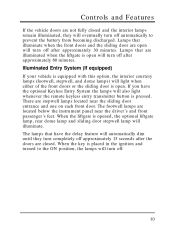
..., stepwell, and dome lamps) will light when either of the front doors or the sliding door is opened, the optional liftgate lamp, rear dome lamp and sliding door stepwell lamp will turn off after the doors are stepwell lamps located near the driver's and front passenger's feet. The... keyless entry transmitter button is open . The lamps that illuminate when the front doors and the sliding door are located below the instrument panel near the sliding door entrance and one on each front door. There are closed and the interior lamps remain illuminated, they turn off approximately ...
..., stepwell, and dome lamps) will light when either of the front doors or the sliding door is opened, the optional liftgate lamp, rear dome lamp and sliding door stepwell lamp will turn off after the doors are stepwell lamps located near the driver's and front passenger's feet. The... keyless entry transmitter button is open . The lamps that illuminate when the front doors and the sliding door are located below the instrument panel near the sliding door entrance and one on each front door. There are closed and the interior lamps remain illuminated, they turn off approximately ...
Owner Guide 1st Printing
Page 101
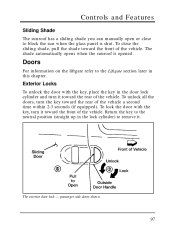
...Liftgate section later in the lock cylinder) to remove it. The exterior door lock - To lock the door with the key, place the key in the door lock cylinder and turn it toward the rear of the vehicle a ...second time within 2-3 seconds (if equipped). passenger side doors shown 97 To close to the neutral position (straight up in this chapter. Controls and...front of the vehicle. Exterior Locks To unlock the door with the key, turn the key toward the front of the vehicle. To unlock all the doors, turn it toward the rear of the vehicle. Return...
...Liftgate section later in the lock cylinder) to remove it. The exterior door lock - To lock the door with the key, place the key in the door lock cylinder and turn it toward the rear of the vehicle a ...second time within 2-3 seconds (if equipped). passenger side doors shown 97 To close to the neutral position (straight up in this chapter. Controls and...front of the vehicle. Exterior Locks To unlock the door with the key, turn the key toward the front of the vehicle. To unlock all the doors, turn it toward the rear of the vehicle. Return...
Owner Guide 1st Printing
Page 105
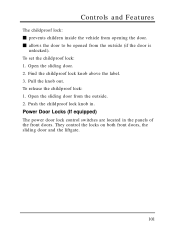
...panels of the front doors. Find the childproof lock knob above the label. 3. To release the childproof lock: 1. Power Door Locks (If equipped) The power door lock control switches are located in . Controls and Features The childproof lock: Ⅵ prevents children inside the vehicle from opening the door. Ⅵ allows the door... to be opened from the outside (if the door is unlocked). Open the sliding door. 2. Pull the knob out. To set the childproof lock: 1. They ...
...panels of the front doors. Find the childproof lock knob above the label. 3. To release the childproof lock: 1. Power Door Locks (If equipped) The power door lock control switches are located in . Controls and Features The childproof lock: Ⅵ prevents children inside the vehicle from opening the door. Ⅵ allows the door... to be opened from the outside (if the door is unlocked). Open the sliding door. 2. Pull the knob out. To set the childproof lock: 1. They ...
Owner Guide 1st Printing
Page 108
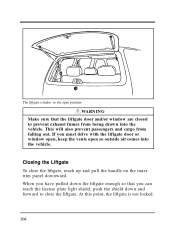
...out. Closing the Liftgate To close the liftgate. The liftgate window in the open position WARNING Make sure that you must drive with the liftgate door or window open, keep the vents open so outside air comes into the vehicle. If you can reach the license plate light shield, push the... shield down the liftgate enough so that the liftgate door and/or window are closed to close the liftgate, reach up and pull the handle on the inner trim panel downward. This will also prevent passengers and cargo from being drawn into the vehicle.
...out. Closing the Liftgate To close the liftgate. The liftgate window in the open position WARNING Make sure that you must drive with the liftgate door or window open, keep the vents open so outside air comes into the vehicle. If you can reach the license plate light shield, push the... shield down the liftgate enough so that the liftgate door and/or window are closed to close the liftgate, reach up and pull the handle on the inner trim panel downward. This will also prevent passengers and cargo from being drawn into the vehicle.
Owner Guide 1st Printing
Page 120
...5. When an unauthorized entry occurs, the system triggers and will flash twice. 3. ID Code Programming Procedure NOTE: All transmitters must be programmed). The instrument panel lights will : Ⅵ flash the headlamps and hazard lamps Ⅵ honk the horn Ⅵ disable the starting circuit to the ACC position. 4. ...Anti-Theft System (If equipped) This system helps protect your vehicle against break-ins or theft by monitoring all doors. 2. If the programming mode is entered. 7. The instrument panel lights will not operate with the system. 1.
...5. When an unauthorized entry occurs, the system triggers and will flash twice. 3. ID Code Programming Procedure NOTE: All transmitters must be programmed). The instrument panel lights will : Ⅵ flash the headlamps and hazard lamps Ⅵ honk the horn Ⅵ disable the starting circuit to the ACC position. 4. ...Anti-Theft System (If equipped) This system helps protect your vehicle against break-ins or theft by monitoring all doors. 2. If the programming mode is entered. 7. The instrument panel lights will not operate with the system. 1.
Owner Guide 1st Printing
Page 263
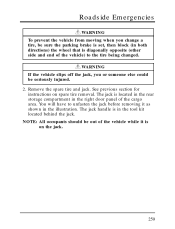
Remove the spare tire and jack. See previous section for instructions on the jack. 259 The jack handle is in the right door panel of the vehicle) to unfasten the jack before removing it is set, then block (in the illustration. Roadside Emergencies WARNING To prevent the vehicle from ...
Remove the spare tire and jack. See previous section for instructions on the jack. 259 The jack handle is in the right door panel of the vehicle) to unfasten the jack before removing it is set, then block (in the illustration. Roadside Emergencies WARNING To prevent the vehicle from ...
Owner Guide 1st Printing
Page 266
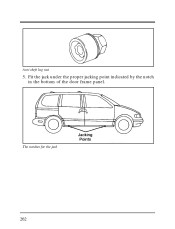
Anti-theft lug nut 5. Fit the jack under the proper jacking point indicated by the notch in the bottom of the door frame panel. The notches for the jack 262
Anti-theft lug nut 5. Fit the jack under the proper jacking point indicated by the notch in the bottom of the door frame panel. The notches for the jack 262
Owner Guide 1st Printing
Page 281
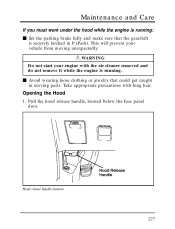
... remove it while the engine is securely latched in moving unexpectedly. Hood release handle location 277 Pull the hood release handle, located below the fuse panel door. WARNING Do not start your vehicle from moving parts. Maintenance and Care If you must work under the hood while the engine is running: Ⅵ...
... remove it while the engine is securely latched in moving unexpectedly. Hood release handle location 277 Pull the hood release handle, located below the fuse panel door. WARNING Do not start your vehicle from moving parts. Maintenance and Care If you must work under the hood while the engine is running: Ⅵ...
Owner Guide 1st Printing
Page 384
......3 Fuel ...306 calculating fuel economy ...311 choosing the right fuel ...308 filling your vehicle with fuel ...306 filter, specifications ...337 fuel filler door release lever ...306, 337 fuel gauge ...18, 24 low fuel warning light ...17 octane rating ...308, 309 quality ...308 running out of... relating to automotive fuels ...310 storing your vehicle ...334 treating emergencies ...310 Fuel cap ...306 removing ...306 replacing ...306, 307 Fuel filler door ...306 remote release ...306 Fuel filter, specifications ...337 Fuel gauge ...18, 24 Fuel pump shut-off switch engine does not start ...242 ...
......3 Fuel ...306 calculating fuel economy ...311 choosing the right fuel ...308 filling your vehicle with fuel ...306 filter, specifications ...337 fuel filler door release lever ...306, 337 fuel gauge ...18, 24 low fuel warning light ...17 octane rating ...308, 309 quality ...308 running out of... relating to automotive fuels ...310 storing your vehicle ...334 treating emergencies ...310 Fuel cap ...306 removing ...306 replacing ...306, 307 Fuel filler door ...306 remote release ...306 Fuel filter, specifications ...337 Fuel gauge ...18, 24 Fuel pump shut-off switch engine does not start ...242 ...


