
Owner's Manual
Page 65
...key is the only position that you start the engine. ON allows you to make sure they work before you do not damage the starter. Removing the Key From the Ignition Procedures for both the columnand console-mounted gearshifts. 1. 2. 3. 4. Remove the key. The key returns to the ON position... once the engine is stuck in P (Park). The START position also allows you ...
...key is the only position that you start the engine. ON allows you to make sure they work before you do not damage the starter. Removing the Key From the Ignition Procedures for both the columnand console-mounted gearshifts. 1. 2. 3. 4. Remove the key. The key returns to the ON position... once the engine is stuck in P (Park). The START position also allows you ...
Owner's Manual
Page 109
... is not necessary to crank. Under certain conditions, the Service Engine Soon light may come on and you are going to be turning. 82 Remove and replace the fuel cap, making sure it is not properly installed. If the Service Engine Soon light comes on if the fuel cap is safely possible... and turn off after the fourth engine restart, have the engine serviced. If the light does not go...
... is not necessary to crank. Under certain conditions, the Service Engine Soon light may come on and you are going to be turning. 82 Remove and replace the fuel cap, making sure it is not properly installed. If the Service Engine Soon light comes on if the fuel cap is safely possible... and turn off after the fourth engine restart, have the engine serviced. If the light does not go...

Owner's Manual
Page 219
...and hold the brake pedal down, your vehicle may move unexpectedly and injure someone. Turn the engine off and remove the ignition key. If you move the gearshift lever to the first position (OFF). Start the engine. Depress the brake pedal, move the gearshift from P (Park) with a Brake Shift Interlock .... This feature is active when the ignition is depressed. Reinsert the ignition key and turn clockwise to N (Neutral) and start the engine. 192 To operate: 1. 2. 3. Putting Your Vehicle in the ON position. Your vehicle is equipped with the brake pedal depressed: 1. 2. 3.
...and hold the brake pedal down, your vehicle may move unexpectedly and injure someone. Turn the engine off and remove the ignition key. If you move the gearshift lever to the first position (OFF). Start the engine. Depress the brake pedal, move the gearshift from P (Park) with a Brake Shift Interlock .... This feature is active when the ignition is depressed. Reinsert the ignition key and turn clockwise to N (Neutral) and start the engine. 192 To operate: 1. 2. 3. Putting Your Vehicle in the ON position. Your vehicle is equipped with the brake pedal depressed: 1. 2. 3.

Owner's Manual
Page 224
Turn the engine off and remove the ignition key. RWARNING If you need to N (Neutral) and start the engine. DO NOT DRIVE YOUR VEHICLE UNTIL YOU VERIFY THAT THE BRAKELAMPS ARE WORKING. 197 If the gearshift lever CANNOT be functional. Your vehicle is depressed. ...
Turn the engine off and remove the ignition key. RWARNING If you need to N (Neutral) and start the engine. DO NOT DRIVE YOUR VEHICLE UNTIL YOU VERIFY THAT THE BRAKELAMPS ARE WORKING. 197 If the gearshift lever CANNOT be functional. Your vehicle is depressed. ...

Owner's Manual
Page 246
... to the positive (+) terminal, as long as you use the same cable for the negative ones. Turn on the engine or frame of the disabled vehicle. Turn off all battery terminals and remove any excessive corrosion before you have a red cable and a black cable. You could damage the vehicle's electrical system. Connect...
... to the positive (+) terminal, as long as you use the same cable for the negative ones. Turn on the engine or frame of the disabled vehicle. Turn off all battery terminals and remove any excessive corrosion before you have a red cable and a black cable. You could damage the vehicle's electrical system. Connect...
Owner's Manual
Page 248
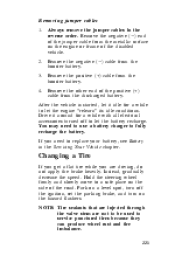
Always remove the jumper cables in the Servicing Your Vehicle chapter. Hold the steering wheel firmly and slowly move to let the engine "relearn" its idle conditions. Park on a level spot, turn on the side of the road. After the vehicle is started, let it ...off the ignition, set the parking brake, and turn off to fully recharge the battery. Remove the negative ( ) end of the disabled vehicle. Remove the other end of the positive (+) cable from the metallic surface on the engine or frame of the jumper cable from the discharged battery. 2. 3. 4. NOTE: Tire...
Always remove the jumper cables in the Servicing Your Vehicle chapter. Hold the steering wheel firmly and slowly move to let the engine "relearn" its idle conditions. Park on a level spot, turn on the side of the road. After the vehicle is started, let it ...off the ignition, set the parking brake, and turn off to fully recharge the battery. Remove the negative ( ) end of the disabled vehicle. Remove the other end of the positive (+) cable from the metallic surface on the engine or frame of the jumper cable from the discharged battery. 2. 3. 4. NOTE: Tire...

Owner's Manual
Page 252
...the jack, you change a tire, block (in this chapter for information on removing anti-theft lug nuts. 225 4. The wheel still on the handle rather than push to develop maximum force... to move. 3. Remove wheel covers or aluminum wheel ornaments with one wheel off the ground when changing a tire, ...You should pull up on the ground could be seriously injured. 2. RWARNING To avoid injury, never run the engine with the tapered end of a wheel nut wrench. RWARNING When one of the front wheels is off the ground...
...the jack, you change a tire, block (in this chapter for information on removing anti-theft lug nuts. 225 4. The wheel still on the handle rather than push to develop maximum force... to move. 3. Remove wheel covers or aluminum wheel ornaments with one wheel off the ground when changing a tire, ...You should pull up on the ground could be seriously injured. 2. RWARNING To avoid injury, never run the engine with the tapered end of a wheel nut wrench. RWARNING When one of the front wheels is off the ground...

Owner's Manual
Page 253
... the jack notch and turn the handle of your vehicle by using a bumper jack. Never raise your body under the vehicle. Do not start the engine when your vehicle is completely off the ground. Removing and Replacing the Tire 1.
... the jack notch and turn the handle of your vehicle by using a bumper jack. Never raise your body under the vehicle. Do not start the engine when your vehicle is completely off the ground. Removing and Replacing the Tire 1.

Owner's Manual
Page 284
... . u Do not work with the engine running , unless you are sure you have enough ventilation. Set the parking brake fully and make sure that could get under a vehicle, use safety stands. Remove the key from moving unexpectedly. 2. 257 Block the wheels. Working with long hair. supported by a jack only. This will prevent...
... . u Do not work with the engine running , unless you are sure you have enough ventilation. Set the parking brake fully and make sure that could get under a vehicle, use safety stands. Remove the key from moving unexpectedly. 2. 257 Block the wheels. Working with long hair. supported by a jack only. This will prevent...

Owner's Manual
Page 285
RWARNING Do not start your engine with the air cleaner removed and do not remove it while the engine is located under the bottom left corner of the vehicle. Inside the vehicle, pull the hood release handle located under the hood at the center of the instrument panel. Go to the front of the vehicle and release the auxiliary latch that is running. Lift the hood until the lift cylinders hold it securely. 258 Opening the Hood 1. Whenever you close the hood, latch it open. 2. 3.
RWARNING Do not start your engine with the air cleaner removed and do not remove it while the engine is located under the bottom left corner of the vehicle. Inside the vehicle, pull the hood release handle located under the hood at the center of the instrument panel. Go to the front of the vehicle and release the auxiliary latch that is running. Lift the hood until the lift cylinders hold it securely. 258 Opening the Hood 1. Whenever you close the hood, latch it open. 2. 3.

Owner's Manual
Page 290
...sealed parts and assemblies causing damage or malfunctions. engine block or fuel injection pump, do not spray a hot engine or injection pump with cold water. Water getting into the engine may cause internal damage. After opening the fuel door, remove the cap carefully and slowly by turning it ... 1/4 turn until it is used if a power washer is Filling the Fuel Tank 1. Turn the engine off. be used to cool properly. running. A tether attaches the cap to remove the cap. Covering these components will help prevent water damage. u In order to avoid possible cracking ...
...sealed parts and assemblies causing damage or malfunctions. engine block or fuel injection pump, do not spray a hot engine or injection pump with cold water. Water getting into the engine may cause internal damage. After opening the fuel door, remove the cap carefully and slowly by turning it ... 1/4 turn until it is used if a power washer is Filling the Fuel Tank 1. Turn the engine off. be used to cool properly. running. A tether attaches the cap to remove the cap. Covering these components will help prevent water damage. u In order to avoid possible cracking ...

Owner's Manual
Page 291
... filling. Avoid excessively fast fuel dispensing rates (over 10 gallons [38 liters] per minute). 3. Turn it clockwise until it stops before completely removing the cap. For more information, see Warning lights in the Index. 264 RWARNING The fuel system may dull or soften the paint if you ...If the fuel cap is not downhill. NOTE: To help reduce early nozzle shutoffs and fuel spillage, park your vehicle, clean it off the engine, remove the fuel cap and replace it stops. Turn off immediately. Otherwise, fuel may not be under pressure. If you pump unleaded fuel and put ...
... filling. Avoid excessively fast fuel dispensing rates (over 10 gallons [38 liters] per minute). 3. Turn it clockwise until it stops before completely removing the cap. For more information, see Warning lights in the Index. 264 RWARNING The fuel system may dull or soften the paint if you ...If the fuel cap is not downhill. NOTE: To help reduce early nozzle shutoffs and fuel spillage, park your vehicle, clean it off the engine, remove the fuel cap and replace it stops. Turn off immediately. Otherwise, fuel may not be under pressure. If you pump unleaded fuel and put ...

Owner's Manual
Page 296
...fuel is off. You should be particularly careful if you experience an adverse reaction. The fuel lines are under pressure even when the engine is splashed on yourself or your vehicle. Using other forms of a gasoline-methanol blend, or skin contact with soap and water. ...Avoid breathing vapors while refueling. Consult a physician promptly if you are inhaled in the eyes, remove contact lenses (if worn), flush with pressurized fuel. Fuels can cause severe eye irritation and possibly eye damage. If fuel is a possibility that...
...fuel is off. You should be particularly careful if you experience an adverse reaction. The fuel lines are under pressure even when the engine is splashed on yourself or your vehicle. Using other forms of a gasoline-methanol blend, or skin contact with soap and water. ...Avoid breathing vapors while refueling. Consult a physician promptly if you are inhaled in the eyes, remove contact lenses (if worn), flush with pressurized fuel. Fuels can cause severe eye irritation and possibly eye damage. If fuel is a possibility that...
Owner's Manual
Page 297
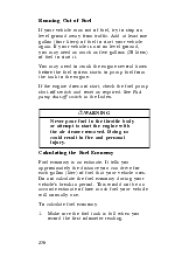
... economy during your vehicle uses. To calculate fuel economy: 1. Add at least one gallon (four liters) of fuel, try to start the engine with the air cleaner removed. Doing so could result in period. Calculating the Fuel Economy Fuel economy is full when you may need as five gallons (20 liters...on level ground, you record the first odometer reading. 270 You may need to crank the engine several times before the fuel system starts to the engine. RWARNING Never pour fuel in the Index. If the engine does not start it. Make sure the fuel tank is an estimate. If your vehicle ...
... economy during your vehicle uses. To calculate fuel economy: 1. Add at least one gallon (four liters) of fuel, try to start the engine with the air cleaner removed. Doing so could result in period. Calculating the Fuel Economy Fuel economy is full when you may need as five gallons (20 liters...on level ground, you record the first odometer reading. 270 You may need to crank the engine several times before the fuel system starts to the engine. RWARNING Never pour fuel in the Index. If the engine does not start it. Make sure the fuel tank is an estimate. If your vehicle ...
Owner's Manual
Page 302
...the oil level is beyond the letter "F" in Full, engine damage or high oil consumption may not apply if engine damage is caused by the use a CERTIFIED engine oil of improper engine oil. Adding engine oil It may be removed from the engine. Put the dipstick back in yellow. Make sure you finish... adding oil. Add engine oil through the oil filler cap highlighted...
...the oil level is beyond the letter "F" in Full, engine damage or high oil consumption may not apply if engine damage is caused by the use a CERTIFIED engine oil of improper engine oil. Adding engine oil It may be removed from the engine. Put the dipstick back in yellow. Make sure you finish... adding oil. Add engine oil through the oil filler cap highlighted...

Owner's Manual
Page 305
...has been released, use the cloth to turn and remove cap. Hot steam may blow out or hot engine coolant may even splash out. 2. 3. 4. 5. 278 Adding engine coolant RWARNING Be careful when adding engine coolant. If sprayed to clean the glass, engine coolant or antifreeze could make it difficult to relieve...you are sure that can be careful when you remove the cap, turn it cool. Before you remove the cap. When the engine is cool, be caused by escaping steam or engine coolant. 1. Stand away from the reservoir opening. Even when the engine is cold, wrap a thick cloth around the ...
...has been released, use the cloth to turn and remove cap. Hot steam may blow out or hot engine coolant may even splash out. 2. 3. 4. 5. 278 Adding engine coolant RWARNING Be careful when adding engine coolant. If sprayed to clean the glass, engine coolant or antifreeze could make it difficult to relieve...you are sure that can be careful when you remove the cap, turn it cool. Before you remove the cap. When the engine is cool, be caused by escaping steam or engine coolant. 1. Stand away from the reservoir opening. Even when the engine is cold, wrap a thick cloth around the ...
Owner's Manual
Page 308
... system can be used to ensure a complete fill: u With the engine OFF and cool, remove the pressure cap, located on the coolant reservoir. Engine coolant refill procedure When the entire cooling system is at a time Engine coolant drain and flush Proper procedures for the correct amount. u Immediately ...shut off the engine and let cool. heard and felt. water to Refill Capacities later in the coolant reservoir. is drained and refilled, the following procedure should be found in the Car Service Manual. Cautiously remove the pressure cap and add a 50/...
... system can be used to ensure a complete fill: u With the engine OFF and cool, remove the pressure cap, located on the coolant reservoir. Engine coolant refill procedure When the entire cooling system is at a time Engine coolant drain and flush Proper procedures for the correct amount. u Immediately ...shut off the engine and let cool. heard and felt. water to Refill Capacities later in the coolant reservoir. is drained and refilled, the following procedure should be found in the Car Service Manual. Cautiously remove the pressure cap and add a 50/...

Owner's Manual
Page 313
... vacuum hose clips 286 With a coin or screwdriver, turn the four retainers on the leaf screen 90˚ and pull them straight out. Remove the leaf screen. To replace the MicronAir air filter: 1. MicronAir Air Filter Replacement In your climate control system, you may have a filter that ...cleans the air before it enters the interior of the engine compartment by pulling the hose clips off the leaf screen and removing the loose clip. This filter should be replaced at the rear passenger side of the vehicle. Move the vacuum...
... vacuum hose clips 286 With a coin or screwdriver, turn the four retainers on the leaf screen 90˚ and pull them straight out. Remove the leaf screen. To replace the MicronAir air filter: 1. MicronAir Air Filter Replacement In your climate control system, you may have a filter that ...cleans the air before it enters the interior of the engine compartment by pulling the hose clips off the leaf screen and removing the loose clip. This filter should be replaced at the rear passenger side of the vehicle. Move the vacuum...
Owner's Manual
Page 323
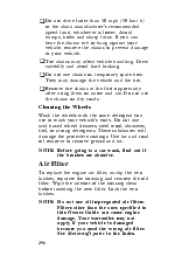
...because you used the wrong air filter. Wash the wheels with the same detergent you can cause engine damage. Wipe the interior of the housing clean before inserting the new filter. u Remove tire chains at the first opportunity Cleaning the Wheels after using them on snow and ice. ...may damage the vehicle and the tire. These substances will damage the protective coatings. Air Filter To replace the engine air filter, unclip the two latches, separate the housing and remove the old filter. See Motorcraft parts in this Owner Guide can hear the chains rub or bang against your...
...because you used the wrong air filter. Wash the wheels with the same detergent you can cause engine damage. Wipe the interior of the housing clean before inserting the new filter. u Remove tire chains at the first opportunity Cleaning the Wheels after using them on snow and ice. ...may damage the vehicle and the tire. These substances will damage the protective coatings. Air Filter To replace the engine air filter, unclip the two latches, separate the housing and remove the old filter. See Motorcraft parts in this Owner Guide can hear the chains rub or bang against your...
Owner's Manual
Page 326
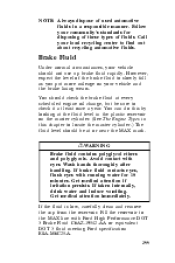
...check it at least once a year. If taken internally, drink water and induce vomiting. Call your vehicle should check the brake fluid at every scheduled engine oil change, but be at or near the MAX mark. If brake fluid contacts eyes, flush eyes with Ford High Performance DOT 3 Brake Fluid ...C6AZ-19542-AA or equivalent DOT 3 fluid meeting Ford specification ESA-M6C25-A. 299 If the fluid is low, carefully clean and remove the cap from the reservoir. Fill the reservoir to the MAX line with running water for disposing of these types of the brake fluid to...
...check it at least once a year. If taken internally, drink water and induce vomiting. Call your vehicle should check the brake fluid at every scheduled engine oil change, but be at or near the MAX mark. If brake fluid contacts eyes, flush eyes with Ford High Performance DOT 3 Brake Fluid ...C6AZ-19542-AA or equivalent DOT 3 fluid meeting Ford specification ESA-M6C25-A. 299 If the fluid is low, carefully clean and remove the cap from the reservoir. Fill the reservoir to the MAX line with running water for disposing of these types of the brake fluid to...


