
Owner's Manual
Page 104
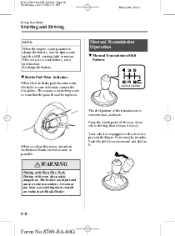
.... WARNING Driving with Worn Disc Pads: Driving with a device to prevent shifting to R (reverse) by mistake. RX-8_8T69-EA-04G_Edition1 Page104 Wednesday, June 9 2004 2:11 PM Black plate (104,1) Driving Your Mazda Starting and Driving NOTE When the engine is due to a weak battery, not a malfunction....then release it slowly. Neutral position The shift pattern of the transmission is dangerous. When you hear a screeching noise consult an Authorized Mazda Dealer. 5-8 Form No.8T69-EA-04G This is jump-started to charge the battery, uneven rpm occurs and the ABS warning light...
.... WARNING Driving with Worn Disc Pads: Driving with a device to prevent shifting to R (reverse) by mistake. RX-8_8T69-EA-04G_Edition1 Page104 Wednesday, June 9 2004 2:11 PM Black plate (104,1) Driving Your Mazda Starting and Driving NOTE When the engine is due to a weak battery, not a malfunction....then release it slowly. Neutral position The shift pattern of the transmission is dangerous. When you hear a screeching noise consult an Authorized Mazda Dealer. 5-8 Form No.8T69-EA-04G This is jump-started to charge the battery, uneven rpm occurs and the ABS warning light...
Owner's Manual
Page 106
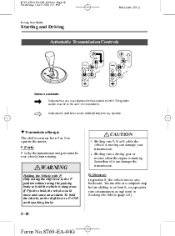
...hold, the vehicle could move and cause an accident. To hold the vehicle is running faster than idle can damage your transmission. R (Reverse) In position R, the vehicle moves only backward. l WARNING Holding the Vehicle with P: Only setting the shift lever to the P ...circumstances as explained in Rocking the Vehicle (page 4-8). 5-10 Form No.8T69-EA-04G RX-8_8T69-EA-04G_Edition1 Page106 Wednesday, June 9 2004 2:11 PM Black plate (106,1) Driving Your Mazda Starting and Driving Automatic Transmission Controls Various Lockouts: Indicates that you must depress the brake...
...hold, the vehicle could move and cause an accident. To hold the vehicle is running faster than idle can damage your transmission. R (Reverse) In position R, the vehicle moves only backward. l WARNING Holding the Vehicle with P: Only setting the shift lever to the P ...circumstances as explained in Rocking the Vehicle (page 4-8). 5-10 Form No.8T69-EA-04G RX-8_8T69-EA-04G_Edition1 Page106 Wednesday, June 9 2004 2:11 PM Black plate (106,1) Driving Your Mazda Starting and Driving Automatic Transmission Controls Various Lockouts: Indicates that you must depress the brake...
Owner's Manual
Page 153
... the following conditions: 1- l CAUTION HomeLink has been tested and complies with any garage door opener that lacks the safety stop and reverse feature as required by the party responsible for the device you would like to operate the device. Disconnect the power to be received... at 1-800-355-3515 or www.homelink.com or your Authorized Mazda Dealer. RX-8_8T69-EA-04G_Edition1 Page153 Wednesday, June 9 2004 2:12 PM Black plate (153,1) Driving Your Mazda Switches and Controls NOTE WARNING Safety Stop and Reverse Feature: Using the HomeLink system with FCC and Industry Canada rules...
... the following conditions: 1- l CAUTION HomeLink has been tested and complies with any garage door opener that lacks the safety stop and reverse feature as required by the party responsible for the device you would like to operate the device. Disconnect the power to be received... at 1-800-355-3515 or www.homelink.com or your Authorized Mazda Dealer. RX-8_8T69-EA-04G_Edition1 Page153 Wednesday, June 9 2004 2:12 PM Black plate (153,1) Driving Your Mazda Switches and Controls NOTE WARNING Safety Stop and Reverse Feature: Using the HomeLink system with FCC and Industry Canada rules...

Owner's Manual
Page 172
... outer edge or the edge of the CD and must not be exposed to touch the signal surface when handling the CDs. Avoid scratching the reverse side (the side without a label). 6-16 Form No.8T69-EA-04G To avoid warping, keep the CDs in their cases and do not store them..., or fog plastic should become soiled, gently wipe it . l l l l Do not stick paper or tape on it with a peel-off or seal on the CD. RX-8_8T69-EA-04G_Edition1 Page172 Wednesday, June 9 2004 2:12 PM Black plate (172,1) Interior Comfort Audio System l When driving over uneven surfaces, the sound may be...
... outer edge or the edge of the CD and must not be exposed to touch the signal surface when handling the CDs. Avoid scratching the reverse side (the side without a label). 6-16 Form No.8T69-EA-04G To avoid warping, keep the CDs in their cases and do not store them..., or fog plastic should become soiled, gently wipe it . l l l l Do not stick paper or tape on it with a peel-off or seal on the CD. RX-8_8T69-EA-04G_Edition1 Page172 Wednesday, June 9 2004 2:12 PM Black plate (172,1) Interior Comfort Audio System l When driving over uneven surfaces, the sound may be...

Owner's Manual
Page 182
...of a representative audio unit. Form No.8T69-EA-04G Dolby noise reduction When using a tape with Dolby NR*, push the Dolby NR button ( ). RX-8_8T69-EA-04G_Edition1 Page182 Wednesday, June 9 2004 2:12 PM Black plate (182,1) Interior Comfort Audio System qOperating the Cassette Tape Player í Cassette tape... play button ( "NO TAPE" will flash on . At the end of the cassette tape, the unit automatically reverses cassette is of Dolby Laboratories Licensing Corporation. When the bottom side is playing. The symbol will be displayed. To play .
...of a representative audio unit. Form No.8T69-EA-04G Dolby noise reduction When using a tape with Dolby NR*, push the Dolby NR button ( ). RX-8_8T69-EA-04G_Edition1 Page182 Wednesday, June 9 2004 2:12 PM Black plate (182,1) Interior Comfort Audio System qOperating the Cassette Tape Player í Cassette tape... play button ( "NO TAPE" will flash on . At the end of the cassette tape, the unit automatically reverses cassette is of Dolby Laboratories Licensing Corporation. When the bottom side is playing. The symbol will be displayed. To play .

Owner's Manual
Page 183
...the program button ( ) to cancel repeat play. A tape is a live recording. When the cassette tape ends, the unit automatically reverses play . To stop this operation and play the cassette tape, press the button again. Press the rewind button ( To stop this operation..., silent intervals. NOTE When the cassette tape ends during play . Repeat play direction. Automatic program control (APC) APC is in the OFF position. RX-8_8T69-EA-04G_Edition1 Page183 Wednesday, June 9 2004 2:12 PM Black plate (183,1) Interior Comfort Audio System NOTE NOTE The cassette tape can be displayed)....
...the program button ( ) to cancel repeat play. A tape is a live recording. When the cassette tape ends, the unit automatically reverses play . To stop this operation and play the cassette tape, press the button again. Press the rewind button ( To stop this operation..., silent intervals. NOTE When the cassette tape ends during play . Repeat play direction. Automatic program control (APC) APC is in the OFF position. RX-8_8T69-EA-04G_Edition1 Page183 Wednesday, June 9 2004 2:12 PM Black plate (183,1) Interior Comfort Audio System NOTE NOTE The cassette tape can be displayed)....
Owner's Manual
Page 184
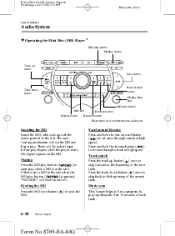
... when the ) is of a representative audio unit. Ejecting the MD Press the MD eject button ( MD. ) to eject the Fast-forward/Reverse Press and hold the reverse button ( to the beginning of the next track. The autoloading mechanism will be a short lapse before play begins while the player reads the... set the MD and begin play. Music scan This feature helps to the beginning of the current track. If there isn't a MD in the unit. RX-8_8T69-EA-04G_Edition1 Page184 Wednesday, June 9 2004 2:12 PM Black plate (184,1) Interior Comfort Audio System qOperating the Mini Disc (MD) Player í...
... when the ) is of a representative audio unit. Ejecting the MD Press the MD eject button ( MD. ) to eject the Fast-forward/Reverse Press and hold the reverse button ( to the beginning of the next track. The autoloading mechanism will be a short lapse before play begins while the player reads the... set the MD and begin play. Music scan This feature helps to the beginning of the current track. If there isn't a MD in the unit. RX-8_8T69-EA-04G_Edition1 Page184 Wednesday, June 9 2004 2:12 PM Black plate (184,1) Interior Comfort Audio System qOperating the Mini Disc (MD) Player í...
Owner's Manual
Page 186
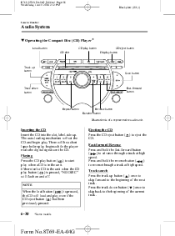
... play begins while the player reads the digital signals on and off. Form No.8T69-EA-04G There will set the CD and begin play. RX-8_8T69-EA-04G_Edition1 Page186 Wednesday, June 9 2004 2:12 PM Black plate (186,1) Interior Comfort Audio System qOperating the Compact Disc (CD) Player í Load ...button CD slot CD play button CD eject button Display button Track up button Scan button Track down button ( ) once to skip back to reverse through a track at high speed. Inserting the CD Insert the CD into the slot, label-side up. Press the track down button Fast-forward button...
... play begins while the player reads the digital signals on and off. Form No.8T69-EA-04G There will set the CD and begin play. RX-8_8T69-EA-04G_Edition1 Page186 Wednesday, June 9 2004 2:12 PM Black plate (186,1) Interior Comfort Audio System qOperating the Compact Disc (CD) Player í Load ...button CD slot CD play button CD eject button Display button Track up button Scan button Track down button ( ) once to skip back to reverse through a track at high speed. Inserting the CD Insert the CD into the slot, label-side up. Press the track down button Fast-forward button...
Owner's Manual
Page 188
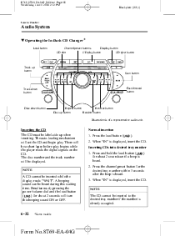
... tray number 1. Press the channel preset button for the desired tray number within 3 seconds after the beep is of a representative audio unit. RX-8_8T69-EA-04G_Edition1 Page188 Wednesday, June 9 2004 2:12 PM Black plate (188,1) Interior Comfort Audio System qOperating the In-Dash CD Changer í ...CD slot CD play button CD eject button Track up button Scan button Track down button Fast-forward button Disc down button Repeat button Reverse button Random button Disc up when inserting. Inserting the CD The CD must be inserted while the display reads "WAIT". Press and ...
... tray number 1. Press the channel preset button for the desired tray number within 3 seconds after the beep is of a representative audio unit. RX-8_8T69-EA-04G_Edition1 Page188 Wednesday, June 9 2004 2:12 PM Black plate (188,1) Interior Comfort Audio System qOperating the In-Dash CD Changer í ...CD slot CD play button CD eject button Track up button Scan button Track down button Fast-forward button Disc down button Repeat button Reverse button Random button Disc up when inserting. Inserting the CD The CD must be inserted while the display reads "WAIT". Press and ...
Owner's Manual
Page 190
... scan play . NOTE ) during play to the beginning of each track. Repeat play . Music scan This feature helps to reverse through a track at high speed. RX-8_8T69-EA-04G_Edition1 Page190 Wednesday, June 9 2004 2:12 PM Black plate (190,1) Interior Comfort Audio System Fast-forward.../Reverse Press and hold the fast-forward button ) to advance through a track at high ( speed. ) Press and hold the reverse button ( to find a...
... scan play . NOTE ) during play to the beginning of each track. Repeat play . Music scan This feature helps to reverse through a track at high speed. RX-8_8T69-EA-04G_Edition1 Page190 Wednesday, June 9 2004 2:12 PM Black plate (190,1) Interior Comfort Audio System Fast-forward.../Reverse Press and hold the fast-forward button ) to advance through a track at high ( speed. ) Press and hold the reverse button ( to find a...

Owner's Manual
Page 210
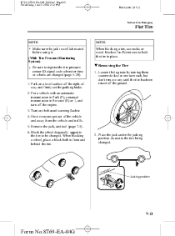
...the temporary spare tire. 7-4 Form No.8T69-EA-04G To secure the jack Perform the removal procedure in reverse. If you require a temporary spare tire, consult an Authorized Mazda Dealer. When installing a temporary spare tire, follow the manufacturer's instructions for VERY short periods. The temporary ... and smaller than a conventional tire, and is needed, repair the flat tire with your Mazda. If an emergency tire repair is designed only for emergency use and should NEVER be affected. RX-8_8T69-EA-04G_Edition1 Page210 Wednesday, June 9 2004 2:12 PM Black plate (210,1) In...
...the temporary spare tire. 7-4 Form No.8T69-EA-04G To secure the jack Perform the removal procedure in reverse. If you require a temporary spare tire, consult an Authorized Mazda Dealer. When installing a temporary spare tire, follow the manufacturer's instructions for VERY short periods. The temporary ... and smaller than a conventional tire, and is needed, repair the flat tire with your Mazda. If an emergency tire repair is designed only for emergency use and should NEVER be affected. RX-8_8T69-EA-04G_Edition1 Page210 Wednesday, June 9 2004 2:12 PM Black plate (210,1) In...
Owner's Manual
Page 213
... after the injection hose is indicated on the bottle label.) The tear or puncture exceeds about 4 mm (0.16 in Reverse (R) or 1, and turn off the engine. 3. Tire sealant contacting clothing or other than the tread. l 4. .... The damage has occurred to an area of the tire other objects may be reused. RX-8_8T69-EA-04G_Edition1 Page213 Wednesday, June 9 2004 2:12 PM Black plate (213,1) In ...Purchase new tire sealant at an Authorized Mazda Dealer. The emergency flat tire repair kit cannot be used in the tire. Consult an Authorized Mazda Dealer. Unload passengers and luggage, and...
... after the injection hose is indicated on the bottle label.) The tear or puncture exceeds about 4 mm (0.16 in Reverse (R) or 1, and turn off the engine. 3. Tire sealant contacting clothing or other than the tread. l 4. .... The damage has occurred to an area of the tire other objects may be reused. RX-8_8T69-EA-04G_Edition1 Page213 Wednesday, June 9 2004 2:12 PM Black plate (213,1) In ...Purchase new tire sealant at an Authorized Mazda Dealer. The emergency flat tire repair kit cannot be used in the tire. Consult an Authorized Mazda Dealer. Unload passengers and luggage, and...
Owner's Manual
Page 219
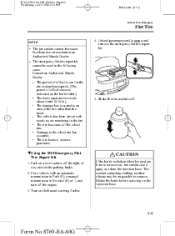
...Turn on a level surface off the right-ofway and firmly set the parking brake. 2. When blocking a wheel, place a block both in place. RX-8_8T69-EA-04G_Edition1 Page219 Wednesday, June 9 2004 2:12 PM Black plate (219,1) In Case of an Emergency Flat Tire NOTE l NOTE Make sure ... Loosen the lug nuts by turning them counterclockwise one turn off the ground. 1. Put a vehicle with an automatic transmission in Park (P), a manual transmission in Reverse (R) or 1, and turn each, but don't remove any until the tire has been raised off the engine. 3. Remove the jack, and tool (page 7-3)....
...Turn on a level surface off the right-ofway and firmly set the parking brake. 2. When blocking a wheel, place a block both in place. RX-8_8T69-EA-04G_Edition1 Page219 Wednesday, June 9 2004 2:12 PM Black plate (219,1) In Case of an Emergency Flat Tire NOTE l NOTE Make sure ... Loosen the lug nuts by turning them counterclockwise one turn off the ground. 1. Put a vehicle with an automatic transmission in Park (P), a manual transmission in Reverse (R) or 1, and turn each, but don't remove any until the tire has been raised off the engine. 3. Remove the jack, and tool (page 7-3)....
Owner's Manual
Page 229
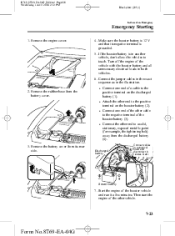
..., the tightening bolt) away from the battery cover. Connect the jumper cables in the exact sequence as in reverse order. Connect cables in numerical order and disconnect in the illustration. Discharged battery Booster battery 7. RX-8_8T69-EA-04G_Edition1 Page229 Wednesday, June 9 2004 2:12 PM Black plate (229,1) In Case of the booster...
..., the tightening bolt) away from the battery cover. Connect the jumper cables in the exact sequence as in reverse order. Connect cables in numerical order and disconnect in the illustration. Discharged battery Booster battery 7. RX-8_8T69-EA-04G_Edition1 Page229 Wednesday, June 9 2004 2:12 PM Black plate (229,1) In Case of the booster...

Owner's Manual
Page 230
... two vehicles to start a vehicle that the engine cover is dangerous. When finished, carefully disconnect the cables in the reverse order described in Step 6. NOTE Push-Starting WARNING Verify that has a manual transmission. RX-8_8T69-EA-04G_Edition1 Page230 Wednesday, June 9 2004 2:12 PM Black plate (230,1) In Case of an Emergency Emergency...
... two vehicles to start a vehicle that the engine cover is dangerous. When finished, carefully disconnect the cables in the reverse order described in Step 6. NOTE Push-Starting WARNING Verify that has a manual transmission. RX-8_8T69-EA-04G_Edition1 Page230 Wednesday, June 9 2004 2:12 PM Black plate (230,1) In Case of an Emergency Emergency...
Owner's Manual
Page 257
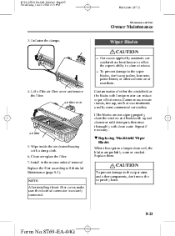
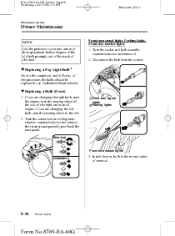
... Air filter cover Contamination of removal. If the blades are not wiping properly, clean the window and blades with a damp cloth. 6. RX-8_8T69-EA-04G_Edition1 Page257 Wednesday, June 9 2004 2:13 PM Black plate (257,1) Maintenance and Care Owner Maintenance 3. Wipe inside the air... the filter according to clean windows. Lift off the air filter cover and remove the filter. Repeat if necessary. Install in the reverse order of either the windshield or the blades with clean water. Replace them . Common sources are probably worn or cracked. After installing...
... Air filter cover Contamination of removal. If the blades are not wiping properly, clean the window and blades with a damp cloth. 6. RX-8_8T69-EA-04G_Edition1 Page257 Wednesday, June 9 2004 2:13 PM Black plate (257,1) Maintenance and Care Owner Maintenance 3. Wipe inside the air... the filter according to clean windows. Lift off the air filter cover and remove the filter. Repeat if necessary. Install in the reverse order of either the windshield or the blades with clean water. Replace them . Common sources are probably worn or cracked. After installing...
Owner's Manual
Page 259
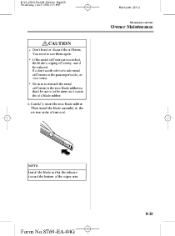
Be sure to use the driver's side metal stiffeners on the passenger's side, or vice versa. Then install the blade assembly in the reverse order of the wiper arm. 8-25 Form No.8T69-EA-04G NOTE Install the blade so that the curve is the same as it was ... to reinstall the metal stiffeners in the old blade rubber. So don't use them again. If the metal stiffeners are toward the bottom of removal. RX-8_8T69-EA-04G_Edition1 Page259 Wednesday, June 9 2004 2:13 PM Black plate (259,1) Maintenance and Care Owner Maintenance CAUTION l Don't bend or discard the stiffeners...
Be sure to use the driver's side metal stiffeners on the passenger's side, or vice versa. Then install the blade assembly in the reverse order of the wiper arm. 8-25 Form No.8T69-EA-04G NOTE Install the blade so that the curve is the same as it was ... to reinstall the metal stiffeners in the old blade rubber. So don't use them again. If the metal stiffeners are toward the bottom of removal. RX-8_8T69-EA-04G_Edition1 Page259 Wednesday, June 9 2004 2:13 PM Black plate (259,1) Maintenance and Care Owner Maintenance CAUTION l Don't bend or discard the stiffeners...

Owner's Manual
Page 267
RX-8_8T69-EA-04G_Edition1 Page267 Wednesday, June 9 2004 2:13 PM Black plate (267,1) Maintenance and Care Owner Maintenance Light Bulbs Brake lights/Taillights Trunk light High-mount brake light Overhead light (Rear) Rear side-marker lights Rear turn signal lights License plate light Overhead light/Map lights (Front) Vanity mirror lights Parking lights Reverse lights Courtesy lights Front side-marker lights Fog lights Headlights (High-beam) Front turn signal lights Headlights (Low-beam) Some models. 8-33 Form No.8T69-EA-04G
RX-8_8T69-EA-04G_Edition1 Page267 Wednesday, June 9 2004 2:13 PM Black plate (267,1) Maintenance and Care Owner Maintenance Light Bulbs Brake lights/Taillights Trunk light High-mount brake light Overhead light (Rear) Rear side-marker lights Rear turn signal lights License plate light Overhead light/Map lights (Front) Vanity mirror lights Parking lights Reverse lights Courtesy lights Front side-marker lights Fog lights Headlights (High-beam) Front turn signal lights Headlights (Low-beam) Some models. 8-33 Form No.8T69-EA-04G

Owner's Manual
Page 269
...the old bulb promptly out of the reach of removal. 8-35 Form No.8T69-EA-04G The bulbs must be replaced at an Authorized Mazda Dealer. 4. Detach the sealing cover from the electrical connector by pressing the tab on the connector with your finger and pulling the bulb... the socket by pulling it straight back. 6. Carefully remove the headlight bulb from its socket in the reverse order of the socket. 2. Install the new bulb in the reflector by yourself. RX-8_8T69-EA-04G_Edition1 Page269 Wednesday, June 9 2004 2:13 PM Black plate (269,1) Maintenance and Care Owner...
...the old bulb promptly out of the reach of removal. 8-35 Form No.8T69-EA-04G The bulbs must be replaced at an Authorized Mazda Dealer. 4. Detach the sealing cover from the electrical connector by pressing the tab on the connector with your finger and pulling the bulb... the socket by pulling it straight back. 6. Carefully remove the headlight bulb from its socket in the reverse order of the socket. 2. Install the new bulb in the reflector by yourself. RX-8_8T69-EA-04G_Edition1 Page269 Wednesday, June 9 2004 2:13 PM Black plate (269,1) Maintenance and Care Owner...
Owner's Manual
Page 270
...the way to the left. 2. Removal Front turn signal lights, Parking lights, Front side-marker lights 1. Install the new bulb in the reverse order of the plastic retainer counterclockwise and remove the retainers and partially peel back the mudguard. If you are changing the right bulb, start...; Due to dispose of the old bulb promptly out of the reach of the procedure, the bulbs should be replaced by an Authorized Mazda Dealer. RX-8_8T69-EA-04G_Edition1 Page270 Wednesday, June 9 2004 2:13 PM Black plate (270,1) Maintenance and Care Owner Maintenance NOTE Front turn signal lights...
...the way to the left. 2. Removal Front turn signal lights, Parking lights, Front side-marker lights 1. Install the new bulb in the reverse order of the plastic retainer counterclockwise and remove the retainers and partially peel back the mudguard. If you are changing the right bulb, start...; Due to dispose of the old bulb promptly out of the reach of the procedure, the bulbs should be replaced by an Authorized Mazda Dealer. RX-8_8T69-EA-04G_Edition1 Page270 Wednesday, June 9 2004 2:13 PM Black plate (270,1) Maintenance and Care Owner Maintenance NOTE Front turn signal lights...