
Owner Manual
Page 44
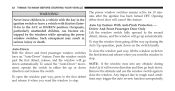
...window from going all the way up or down automatically. Remove the obstacle and use the window switch again to close the window part way, lift the window switch to the first detent and release when you want the window to the second detent, release, and the window will go ... the auto reverse function unexpectedly and release it will cancel this feature. Auto Up Feature With Anti-Pinch Protection - Driver And Front Passenger Door Only Lift the window switch fully upward to stop . Any impact due to rough road condiTo open the window part way, press to stop . Auto-Down ...
...window from going all the way up or down automatically. Remove the obstacle and use the window switch again to close the window part way, lift the window switch to the first detent and release when you want the window to the second detent, release, and the window will go ... the auto reverse function unexpectedly and release it will cancel this feature. Auto Up Feature With Anti-Pinch Protection - Driver And Front Passenger Door Only Lift the window switch fully upward to stop . Any impact due to rough road condiTo open the window part way, press to stop . Auto-Down ...

Owner Manual
Page 46
... buffeting. 44 THINGS TO KNOW BEFORE STARTING YOUR VEHICLE Wind Buffeting Wind buffeting can be described as the perception of pressure on the handle and lift. This is a normal occurrence and can be injured by these fumes.
... buffeting. 44 THINGS TO KNOW BEFORE STARTING YOUR VEHICLE Wind Buffeting Wind buffeting can be described as the perception of pressure on the handle and lift. This is a normal occurrence and can be injured by these fumes.
Owner Manual
Page 113
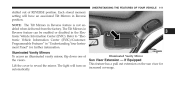
... vanity mirror, flip down one of REVERSE position. The Tilt Mirrors in Reverse feature can be enabled or disabled in "Understanding Your Instrument Panel" for Lift the cover to reveal the mirror.
... vanity mirror, flip down one of REVERSE position. The Tilt Mirrors in Reverse feature can be enabled or disabled in "Understanding Your Instrument Panel" for Lift the cover to reveal the mirror.
Owner Manual
Page 163
... while driving may be adjusted before fastening the seat belts and while the vehicle is parked. Moving a seat while driving could result in the seat, lift up on the seat to be adjusted forward or rearward by the front of control which could result from a poorly adjusted seat belt. Then, using...
... while driving may be adjusted before fastening the seat belts and while the vehicle is parked. Moving a seat while driving could result in the seat, lift up on the seat to be adjusted forward or rearward by the front of control which could result from a poorly adjusted seat belt. Then, using...
Owner Manual
Page 164
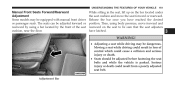
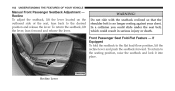
...desired position and release the lever. Recline Lever 162 UNDERSTANDING THE FEATURES OF YOUR VEHICLE Manual Front Passenger Seatback Adjustment - To return the seatback, lift the lever, lean forward and release the lever. Do not ride with the seatback reclined so that the shoulder belt is no longer resting ...against your chest. WARNING! Recline To adjust the seatback, lift the lever located on the outboard side of the seat, lean back to the seating position, raise the seatback and lock it into place. ...
...desired position and release the lever. Recline Lever 162 UNDERSTANDING THE FEATURES OF YOUR VEHICLE Manual Front Passenger Seatback Adjustment - To return the seatback, lift the lever, lean forward and release the lever. Do not ride with the seatback reclined so that the shoulder belt is no longer resting ...against your chest. WARNING! Recline To adjust the seatback, lift the lever located on the outboard side of the seat, lean back to the seating position, raise the seatback and lock it into place. ...
Owner Manual
Page 172
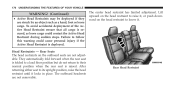
..., foot or loose cargo. Rear Head Restraint The center head restraint has limited adjustment. Failure to its upright position, raise the head restraint until it . Lift upward on the head restraint to their normal position when the rear seat is raised. Head Restraints - To avoid accidental deployment of the Active Head...
..., foot or loose cargo. Rear Head Restraint The center head restraint has limited adjustment. Failure to its upright position, raise the head restraint until it . Lift upward on the head restraint to their normal position when the rear seat is raised. Head Restraints - To avoid accidental deployment of the Active Head...

Owner Manual
Page 175
... cargo area in the rear of the seat, lean back and release the lever at the desired position. Reclining Rear Seat To recline the seatback, lift the lever located on the outboard side of the vehicle (with the seatback reclined so that the shoulder belt is in the locked-up or... by children when the vehicle is no longer resting against your chest. Do not ride with the rear seatbacks in motion. To return the seatback, lift the lever, lean forward and release the lever. 3 Rear Seat Release WARNING! Children should not be seriously injured in serious injury or death. They could...
... cargo area in the rear of the seat, lean back and release the lever at the desired position. Reclining Rear Seat To recline the seatback, lift the lever located on the outboard side of the vehicle (with the seatback reclined so that the shoulder belt is in the locked-up or... by children when the vehicle is no longer resting against your chest. Do not ride with the rear seatbacks in motion. To return the seatback, lift the lever, lean forward and release the lever. 3 Rear Seat Release WARNING! Children should not be seriously injured in serious injury or death. They could...
Owner Manual
Page 181
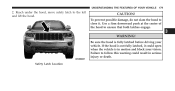
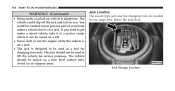
UNDERSTANDING THE FEATURES OF YOUR VEHICLE 179 2. Be sure the hood is in serious injury or death. If the hood is not fully latched, it . Reach under the hood, move safety latch to ensure that both latches engage. 3 WARNING! Use a firm downward push at the center of the hood to the left and lift the hood. CAUTION! To prevent possible damage, do not slam the hood to follow this warning could open when the vehicle is fully latched before driving your vision. Failure to close it could result in motion and block your vehicle. Safety Latch Location
UNDERSTANDING THE FEATURES OF YOUR VEHICLE 179 2. Be sure the hood is in serious injury or death. If the hood is not fully latched, it . Reach under the hood, move safety latch to ensure that both latches engage. 3 WARNING! Use a firm downward push at the center of the hood to the left and lift the hood. CAUTION! To prevent possible damage, do not slam the hood to follow this warning could open when the vehicle is fully latched before driving your vision. Failure to close it could result in motion and block your vehicle. Safety Latch Location
Owner Manual
Page 270
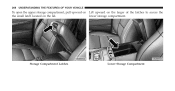
268 UNDERSTANDING THE FEATURES OF YOUR VEHICLE To open the upper storage compartment, pull upward on Lift upward on the larger of the latches to access the the small latch located on the lid. Storage Compartment Latches Lower Storage Compartment lower storage compartment.
268 UNDERSTANDING THE FEATURES OF YOUR VEHICLE To open the upper storage compartment, pull upward on Lift upward on the larger of the latches to access the the small latch located on the lid. Storage Compartment Latches Lower Storage Compartment lower storage compartment.

Owner Manual
Page 280
..., particularly at reduced speeds and turn corners carefully when carrying large or heavy loads on the roof rack. Improperly secured loads can add sudden upward lift to the roof rack and vehicle, do not carry any loads on the roof rack without the crossbars installed. If it is especially true on...
..., particularly at reduced speeds and turn corners carefully when carrying large or heavy loads on the roof rack. Improperly secured loads can add sudden upward lift to the roof rack and vehicle, do not carry any loads on the roof rack without the crossbars installed. If it is especially true on...
Owner Manual
Page 412
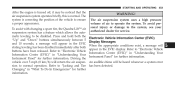
...; - If Equipped ...448 ▫ Description ...448 ▫ Electronic Vehicle Information Center (EVIC) Display Messages ...449 Ⅵ Quadra-Lift™ - If Equipped ...442 ▫ Electronic Vehicle Information Center (EVIC) Display Messages ...453 ▫ Operation ...454 ...455 ...456 ...456 ...456 ▫ Quadra-Trac II ...
...; - If Equipped ...448 ▫ Description ...448 ▫ Electronic Vehicle Information Center (EVIC) Display Messages ...449 Ⅵ Quadra-Lift™ - If Equipped ...442 ▫ Electronic Vehicle Information Center (EVIC) Display Messages ...453 ▫ Operation ...454 ...455 ...456 ...456 ...456 ▫ Quadra-Trac II ...
Owner Manual
Page 452
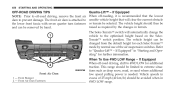
IF EQUIPPED Description The Quadra-Lift™ air suspension system provides full time load leveling capability along with the benefit of being able to adjust vehicle height by the push of a button. 450 STARTING AND OPERATING QUADRA-LIFT™ - Selec-Terrain™ Switch 1 2 3 4 5 6 Up Button Down Button Park Mode Indicator Lamp Normal Ride Height Indicator Lamp Off-Road 1 Indicator Lamp Off-Road 2 Indicator Lamp
IF EQUIPPED Description The Quadra-Lift™ air suspension system provides full time load leveling capability along with the benefit of being able to adjust vehicle height by the push of a button. 450 STARTING AND OPERATING QUADRA-LIFT™ - Selec-Terrain™ Switch 1 2 3 4 5 6 Up Button Down Button Park Mode Indicator Lamp Normal Ride Height Indicator Lamp Off-Road 1 Indicator Lamp Off-Road 2 Indicator Lamp
Owner Manual
Page 454
... below 25 mph (40 km/h). If the vehicle not be cancelled. speed remains between 15 mph (24 km/h) and 25 mph The Quadra-Lift™ air suspension system uses a lifting (40 km/h) for all of the vehicle for further information. 452 STARTING AND OPERATING Selec-Terrain™ knob is turned to "Selec...
... below 25 mph (40 km/h). If the vehicle not be cancelled. speed remains between 15 mph (24 km/h) and 25 mph The Quadra-Lift™ air suspension system uses a lifting (40 km/h) for all of the vehicle for further information. 452 STARTING AND OPERATING Selec-Terrain™ knob is turned to "Selec...
Owner Manual
Page 455
To assist with changing a spare tire, the Quadra-Lift™ air suspension system has a feature which allows the automatic leveling to be disabled. Press and hold both buttons have been released. WARNING! Refer to "...
To assist with changing a spare tire, the Quadra-Lift™ air suspension system has a feature which allows the automatic leveling to be disabled. Press and hold both buttons have been released. WARNING! Refer to "...
Owner Manual
Page 458
If Equipped When off-road driving, shift to the optimized height based on the SelecTerrain™ switch position. Vehicle speeds in terrain. Quadra-Lift™ - Front Air Dam 1 - If Equipped When off-roading, it is needed. The vehicle height can be removed by hand. When To Use 4WD LOW... Refer to prevent damage. 456 STARTING AND OPERATING OFF-ROAD DRIVING TIPS NOTE: Prior to off-road driving, remove the front air dam to "Quadra-Lift™ - The front air dam is attached to extreme situations such as required by normal use of 25 mph (40 km/h) should then be avoided...
If Equipped When off-road driving, shift to the optimized height based on the SelecTerrain™ switch position. Vehicle speeds in terrain. Quadra-Lift™ - Front Air Dam 1 - If Equipped When off-roading, it is needed. The vehicle height can be removed by hand. When To Use 4WD LOW... Refer to prevent damage. 456 STARTING AND OPERATING OFF-ROAD DRIVING TIPS NOTE: Prior to off-road driving, remove the front air dam to "Quadra-Lift™ - The front air dam is attached to extreme situations such as required by normal use of 25 mph (40 km/h) should then be avoided...
Owner Manual
Page 471
... wheel angle and vehicle speed are sufficient to potentially cause wheel lift, it then applies the brake of wheel lift occurring during very severe or evasive driving maneuvers. When ERM determines that wheel lift will only intervene during severe or evasive driving maneuvers. ERM cannot... prevent all wheel lift or rollovers, especially those that wheel lift or rollover may also reduce engine power to other factors such as...
... wheel angle and vehicle speed are sufficient to potentially cause wheel lift, it then applies the brake of wheel lift occurring during very severe or evasive driving maneuvers. When ERM determines that wheel lift will only intervene during severe or evasive driving maneuvers. ERM cannot... prevent all wheel lift or rollovers, especially those that wheel lift or rollover may also reduce engine power to other factors such as...
Owner Manual
Page 543
...), tie-downs must be lowered to the "Park" (lowest) level, and have automatic leveling disabled, before tying them down tension. 5 NOTE: Vehicles equipped with Quadra-Lift™ must be set and/or loss of proper tie-down (from the body) on a trailer or flatbed truck. If Equipped" in forward direction NOT...
...), tie-downs must be lowered to the "Park" (lowest) level, and have automatic leveling disabled, before tying them down tension. 5 NOTE: Vehicles equipped with Quadra-Lift™ must be set and/or loss of proper tie-down (from the body) on a trailer or flatbed truck. If Equipped" in forward direction NOT...
Owner Manual
Page 545
... into NEUTRAL (N)" to be certain that the transfer case is used . Otherwise, internal damage will occur if a front or rear wheel lift is fully in PARK for recreational towing. • Before recreational towing, perform the procedure outlined under the New Vehicle Limited Warranty. Damage ... towing is adjacent to the transmission or transfer case will result. (Continued) 5 Recreational Towing - CAUTION! • Front or rear wheel lifts should not be placed in NEUTRAL (N). Quadra-Trac IIா /Quadra-Driveா II Four-Wheel Drive Models The transfer case must be...
... into NEUTRAL (N)" to be certain that the transfer case is used . Otherwise, internal damage will occur if a front or rear wheel lift is fully in PARK for recreational towing. • Before recreational towing, perform the procedure outlined under the New Vehicle Limited Warranty. Damage ... towing is adjacent to the transmission or transfer case will result. (Continued) 5 Recreational Towing - CAUTION! • Front or rear wheel lifts should not be placed in NEUTRAL (N). Quadra-Trac IIா /Quadra-Driveா II Four-Wheel Drive Models The transfer case must be...
Owner Manual
Page 556
..., below the load floor. Never put any part of your body under a raised vehicle, take it to a service center where it can be raised on a lift. • Never start or run the engine while the vehicle is dangerous. Jack Storage Location You could slip off the jack and fall on a jack... on you need to get under a vehicle that is designed to be used as a tool for service purposes. The vehicle should not be used to lift the vehicle for changing tires only. Avoid ice or slippery areas. The jack should be crushed. If you . The vehicle could be jacked on a jack...
..., below the load floor. Never put any part of your body under a raised vehicle, take it to a service center where it can be raised on a lift. • Never start or run the engine while the vehicle is dangerous. Jack Storage Location You could slip off the jack and fall on a jack... on you need to get under a vehicle that is designed to be used as a tool for service purposes. The vehicle should not be used to lift the vehicle for changing tires only. Avoid ice or slippery areas. The jack should be crushed. If you . The vehicle could be jacked on a jack...
Owner Manual
Page 557
... Operating" for further information on the side of the vehicle closest to moving traffic, pull far enough off the road to the body with Quadra-Lift refer to change a tire on disabling automatic leveling. 6 Spare Tire Stowage The spare tire is secured to avoid being jacked. 7. NOTE: Passengers should not... ignition OFF. ing position. For example, if changing the right front tire, block the left rear Preparations For Jacking wheel. 1. Do not attempt to "Quadra-Lift -
... Operating" for further information on the side of the vehicle closest to moving traffic, pull far enough off the road to the body with Quadra-Lift refer to change a tire on disabling automatic leveling. 6 Spare Tire Stowage The spare tire is secured to avoid being jacked. 7. NOTE: Passengers should not... ignition OFF. ing position. For example, if changing the right front tire, block the left rear Preparations For Jacking wheel. 1. Do not attempt to "Quadra-Lift -


