

Owner's Manual
Page 1
... read this manual, you can refer to your dealer's staff is to answer any time. In it at any questions and concerns. It will give you understand the coverages and are aware of your new vehicle is specially trained in this owner's manual in your new vehicle. Read the warranty booklet thoroughly so you years of a 2010 Honda Odyssey was...
... read this manual, you can refer to your dealer's staff is to answer any time. In it at any questions and concerns. It will give you understand the coverages and are aware of your new vehicle is specially trained in this owner's manual in your new vehicle. Read the warranty booklet thoroughly so you years of a 2010 Honda Odyssey was...

Owner's Manual
Page 4
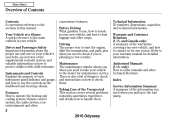
... capacities and tire pressures) 1 00X31-SHJ-6500 © 2009 American Honda Motor Co., Inc. - 2010 Odyssey Online Reference Owner's Manual Contents Owner's Identification Form Your Vehicle at a Glance (main controls) ...3 Driver and Passenger Safety (seat belts, SRS, and child protection) ...5 Instruments and Controls (indicators, gauges, dashboard, and steering column) ...63 Features (climate control, audio, steering wheel, rear entertainment, security, cruise control, and HomeLink ) ...209 Before Driving (fuel, vehicle break-in, and cargo loading) ...367 Driving (engine and transmission...
... capacities and tire pressures) 1 00X31-SHJ-6500 © 2009 American Honda Motor Co., Inc. - 2010 Odyssey Online Reference Owner's Manual Contents Owner's Identification Form Your Vehicle at a Glance (main controls) ...3 Driver and Passenger Safety (seat belts, SRS, and child protection) ...5 Instruments and Controls (indicators, gauges, dashboard, and steering column) ...63 Features (climate control, audio, steering wheel, rear entertainment, security, cruise control, and HomeLink ) ...209 Before Driving (fuel, vehicle break-in, and cargo loading) ...367 Driving (engine and transmission...
Owner's Manual
Page 5
... breakin your vehicle's seat belts, an overview of your new vehicle, and how to use the controls on how to contact us for detailed information. Technical Information ID numbers, dimensions, capacities, and technical information. Instruments and Controls Explains the purpose of the warranties covering your warranty manual for any reason. Driving The proper way to tow a trailer. and Canada only) A summary of each instrument panel indicator and gauge, and...
... breakin your vehicle's seat belts, an overview of your new vehicle, and how to use the controls on how to contact us for detailed information. Technical Information ID numbers, dimensions, capacities, and technical information. Instruments and Controls Explains the purpose of the warranties covering your warranty manual for any reason. Driving The proper way to tow a trailer. and Canada only) A summary of each instrument panel indicator and gauge, and...
Owner's Manual
Page 6
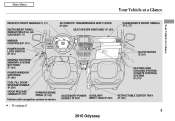
... PANEL INDICATORS (P.65, 66) GAUGES(P.77) MIRROR CONTROLS (P.191) POWER DOOR LOCK SWITCH (P.151) DRIVING POSITION MEMORY SYSTEM BUTTONS (P.184) POWER WINDOW SWITCHES (P.186) FUEL FILL DOOR RELEASE HANDLE (P.369) HOOD RELEASE HANDLE (P.370) PARKING BRAKE PEDAL (P.192) ACCESSORY POWER SOCKET (P.203) AUXILIARY INPUT JACK (P.283) RETRACTABLE CENTER TRAY (P.195) AUTOMATIC TRANSMISSION SHIFT LEVER (P.386) SEAT HEATER SWITCHES (P.183) PASSENGER'S FRONT AIRBAG (P.9, 27) Your Vehicle at a Glance GLOVE BOXES (P.201) HEATING AND COOLING SYSTEM/ CLIMATE CONTROL SYSTEM (P.210) Vehicle with navigation...
... PANEL INDICATORS (P.65, 66) GAUGES(P.77) MIRROR CONTROLS (P.191) POWER DOOR LOCK SWITCH (P.151) DRIVING POSITION MEMORY SYSTEM BUTTONS (P.184) POWER WINDOW SWITCHES (P.186) FUEL FILL DOOR RELEASE HANDLE (P.369) HOOD RELEASE HANDLE (P.370) PARKING BRAKE PEDAL (P.192) ACCESSORY POWER SOCKET (P.203) AUXILIARY INPUT JACK (P.283) RETRACTABLE CENTER TRAY (P.195) AUTOMATIC TRANSMISSION SHIFT LEVER (P.386) SEAT HEATER SWITCHES (P.183) PASSENGER'S FRONT AIRBAG (P.9, 27) Your Vehicle at a Glance GLOVE BOXES (P.201) HEATING AND COOLING SYSTEM/ CLIMATE CONTROL SYSTEM (P.210) Vehicle with navigation...
Owner's Manual
Page 7
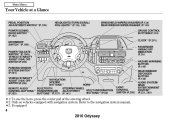
...OFF SWITCH (P.395) REMOTE AUDIO CONTROL BUTTONS (P.282) 3 HEADLIGHTS/TURN SIGNAL/ FOG LIGHTS 3 (P.135, 138) WINDSHIELD WIPERS/WASHERS (P.134) REAR WINDOW WIPER/WASHER (P.135) CRUISE CONTROL BUTTONS (P.319) CLOCK 3 (P.281) PASSENGER AIRBAG OFF INDICATOR (P.35) HAZARD WARNING BUTTON (P.140) REAR WINDOW DEFOGGER BUTTON (P.140) LIGHT CONTROL SWITCH (P.205) AUDIO SYSTEM/ REAR ENTERTAINMENT SYSTEM 3 (P.221, 285) NAVIGATION SYSTEM BUTTONS 2 HORN 1 BLUETOOTH STEERING WHEEL MULTI-INFORMATION HANDSFREELINK ADJUSTMENT 3 BUTTONS 3 (P.82) BUTTONS (P.327) (P.141) 1: To use the horn, press the center pad...
...OFF SWITCH (P.395) REMOTE AUDIO CONTROL BUTTONS (P.282) 3 HEADLIGHTS/TURN SIGNAL/ FOG LIGHTS 3 (P.135, 138) WINDSHIELD WIPERS/WASHERS (P.134) REAR WINDOW WIPER/WASHER (P.135) CRUISE CONTROL BUTTONS (P.319) CLOCK 3 (P.281) PASSENGER AIRBAG OFF INDICATOR (P.35) HAZARD WARNING BUTTON (P.140) REAR WINDOW DEFOGGER BUTTON (P.140) LIGHT CONTROL SWITCH (P.205) AUDIO SYSTEM/ REAR ENTERTAINMENT SYSTEM 3 (P.221, 285) NAVIGATION SYSTEM BUTTONS 2 HORN 1 BLUETOOTH STEERING WHEEL MULTI-INFORMATION HANDSFREELINK ADJUSTMENT 3 BUTTONS 3 (P.82) BUTTONS (P.327) (P.141) 1: To use the horn, press the center pad...

Owner's Manual
Page 18
... and relatch the seat belt. Except U.S. The center seating position of the third row has a detachable seat belt that the belt is securely latched. LX and Canadian DX models This spreads the forces of a crash over your hips, then pull up on the belt to remove any slack, then check that can be folded down. Driver and Passenger Safety Improperly positioning the seat belts can cause...
... and relatch the seat belt. Except U.S. The center seating position of the third row has a detachable seat belt that the belt is securely latched. LX and Canadian DX models This spreads the forces of a crash over your hips, then pull up on the belt to remove any slack, then check that can be folded down. Driver and Passenger Safety Improperly positioning the seat belts can cause...

Owner's Manual
Page 66
... the controls and displays that contribute to the daily operation of your vehicle. Windshield Wipers and Washers ...134 Rear Window Wiper and Washer ...135 Turn Signal and Headlights...135 Instrument Panel Brightness ...139 Hazard Warning Button ...140 Rear Window Defogger ...140 Steering Wheel Adjustment ...141 Keys and Locks...142 Immobilizer System...143 Ignition Switch ...144 Remote Transmitter ...145 Opening or Closing the Power Sliding Doors ...148 Opening or Closing the Power Tailgate ...148 Door Locks ...151 Power Door Locks ...151 Auto Door Locking...
... the controls and displays that contribute to the daily operation of your vehicle. Windshield Wipers and Washers ...134 Rear Window Wiper and Washer ...135 Turn Signal and Headlights...135 Instrument Panel Brightness ...139 Hazard Warning Button ...140 Rear Window Defogger ...140 Steering Wheel Adjustment ...141 Keys and Locks...142 Immobilizer System...143 Ignition Switch ...144 Remote Transmitter ...145 Opening or Closing the Power Sliding Doors ...148 Opening or Closing the Power Tailgate ...148 Door Locks ...151 Power Door Locks ...151 Auto Door Locking...
Owner's Manual
Page 140
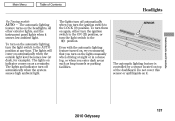
... ambient light. Headlights On Touring models AUTO The automatic lighting feature turns on the headlights, all other exterior lights, and the instrument panel lights when it . 137 2010 Odyssey The lights on indicator comes on top of the dashboard. The lights and indicator turn the light switch to the AUTO position at dusk, for example). SENSOR Instruments and Controls The automatic lighting feature is controlled by a sensor located on as long tunnels or parking facilities. To turn on again, either turn the ignition switch to the LOCK...
... ambient light. Headlights On Touring models AUTO The automatic lighting feature turns on the headlights, all other exterior lights, and the instrument panel lights when it . 137 2010 Odyssey The lights on indicator comes on top of the dashboard. The lights and indicator turn the light switch to the AUTO position at dusk, for example). SENSOR Instruments and Controls The automatic lighting feature is controlled by a sensor located on as long tunnels or parking facilities. To turn on again, either turn the ignition switch to the LOCK...
Owner's Manual
Page 155
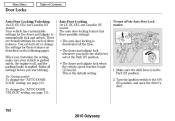
... time. On Touring models The auto door locking feature has three possible settings: The auto door locking is the default setting. 1. The doors and tailgate lock whenever you start driving. To change the ''AUTO DOOR LOCK'' setting, see page 125 . 152 2010 Odyssey You can turn off the Auto Door Lock modes: Your vehicle has customizable settings for the doors and tailgate to the ON (II) position, and open the driver's door. The doors and tailgate lock when the vehicle speed...
... time. On Touring models The auto door locking feature has three possible settings: The auto door locking is the default setting. 1. The doors and tailgate lock whenever you start driving. To change the ''AUTO DOOR LOCK'' setting, see page 125 . 152 2010 Odyssey You can turn off the Auto Door Lock modes: Your vehicle has customizable settings for the doors and tailgate to the ON (II) position, and open the driver's door. The doors and tailgate lock when the vehicle speed...

Owner's Manual
Page 165
... to the sliding doors. 162 2010 Odyssey To open or close the power sliding doors. If you release the brake pedal or the parking brake. If you will hear a beep until the door closes. Sliding Doors When the shift lever is in the ON (II) position: To open the door with the outside door handle, pull the door handle. The dashboard switches to the left of the steering column allow...
... to the sliding doors. 162 2010 Odyssey To open or close the power sliding doors. If you release the brake pedal or the parking brake. If you will hear a beep until the door closes. Sliding Doors When the shift lever is in the ON (II) position: To open the door with the outside door handle, pull the door handle. The dashboard switches to the left of the steering column allow...
Owner's Manual
Page 219
See the navigation system manual for complete details. The rear passengers can also adjust the fan speed, temperature, and airflow of the rear A/C unit with the REAR button and the rear temperature control switch on the front control panel. Using the Rear A/C Unit On LX and Canadian DX models You can also be operated by a second row passenger to adjust the rear fan speed, airflow, and temperature. 216 2010 Odyssey The rear passengers can...
See the navigation system manual for complete details. The rear passengers can also adjust the fan speed, temperature, and airflow of the rear A/C unit with the REAR button and the rear temperature control switch on the front control panel. Using the Rear A/C Unit On LX and Canadian DX models You can also be operated by a second row passenger to adjust the rear fan speed, airflow, and temperature. 216 2010 Odyssey The rear passengers can...

Owner's Manual
Page 222
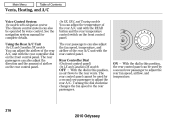
... models The rear control panel can only be used when the indicator in the display. Each time you adjust is shown in the REAR LOCK button on the front control panel is divided between the rear floor vents and rear ceiling vents. Vents, Heating, and A/C EX, EX-L and Touring models Press the top ( ) of the rear passenger compartment. Press the bottom ( ) of the fan speed is shown in automatic...
... models The rear control panel can only be used when the indicator in the display. Each time you adjust is shown in the REAR LOCK button on the front control panel is divided between the rear floor vents and rear ceiling vents. Vents, Heating, and A/C EX, EX-L and Touring models Press the top ( ) of the rear passenger compartment. Press the bottom ( ) of the fan speed is shown in automatic...
Owner's Manual
Page 289
... upper display. NOTE: The rear speakers are automatically turned off if the rear system selects a different entertainment source than the front seat occupants. The rear control panel can enjoy a different entertainment source (AM/FM radio, XM Radio, CD changer, DVD player or AUX) than the front system. Press the RR CTRL knob again to a disc on the rear controls (ceiling panel/remote control), press the RR CTRL knob...
... upper display. NOTE: The rear speakers are automatically turned off if the rear system selects a different entertainment source than the front seat occupants. The rear control panel can enjoy a different entertainment source (AM/FM radio, XM Radio, CD changer, DVD player or AUX) than the front system. Press the RR CTRL knob again to a disc on the rear controls (ceiling panel/remote control), press the RR CTRL knob...

Owner's Manual
Page 412
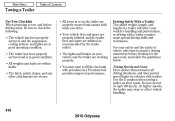
... Period Driving Avoid towing a trailer during your vehicle's first 600 miles (1,000 km) (see behind you use the compact spare tire that you should install special mirrors if you cannot clearly see page 368 ). 409 2010 Odyssey Improper equipment or installation can cause damage to store a full size wheel and tire, and page 463 for information on changing a flat tire. Spare Tires Additional Towing Equipment When towing a trailer...
... Period Driving Avoid towing a trailer during your vehicle's first 600 miles (1,000 km) (see behind you use the compact spare tire that you should install special mirrors if you cannot clearly see page 368 ). 409 2010 Odyssey Improper equipment or installation can cause damage to store a full size wheel and tire, and page 463 for information on changing a flat tire. Spare Tires Additional Towing Equipment When towing a trailer...
Owner's Manual
Page 413
... speed limits for the open road, and follow the guidelines below. Premium fuel provides improved performance. Driving Safely With a Trailer The added weight, length, and height of others, take time to practice driving maneuvers before driving away, be sure to check the following: The vehicle has been properly serviced, and the suspension, cooling system, and lights are properly secured and cannot shift while you drive. At higher speeds, the trailer...
... speed limits for the open road, and follow the guidelines below. Premium fuel provides improved performance. Driving Safely With a Trailer The added weight, length, and height of others, take time to practice driving maneuvers before driving away, be sure to check the following: The vehicle has been properly serviced, and the suspension, cooling system, and lights are properly secured and cannot shift while you drive. At higher speeds, the trailer...
Owner's Manual
Page 427
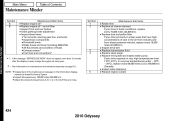
... 2010 Odyssey Replace dust and pollen filter If you drive in dusty conditions, replace every 15,000 miles (24,000 km). Inspect idle speed every 160,000 miles (256,000 km). Maintenance Minder Symbol A B Maintenance Main Items Replace engine oil 1 Replace engine oil 1 and oil filter Inspect front and rear brakes Check parking brake adjustment Inspect these items: Tie rod ends, steering gear box, and boots Suspension components Driveshaft boots Brake hoses and lines (including ABS/VSA) All fluid levels and condition of fluids Exhaust...
... 2010 Odyssey Replace dust and pollen filter If you drive in dusty conditions, replace every 15,000 miles (24,000 km). Inspect idle speed every 160,000 miles (256,000 km). Maintenance Minder Symbol A B Maintenance Main Items Replace engine oil 1 Replace engine oil 1 and oil filter Inspect front and rear brakes Check parking brake adjustment Inspect these items: Tie rod ends, steering gear box, and boots Suspension components Driveshaft boots Brake hoses and lines (including ABS/VSA) All fluid levels and condition of fluids Exhaust...

Owner's Manual
Page 518
......136 Replacing Halogen Bulbs ...437 Turning on ...136 Headphones...315 Head Restraints ...171 Heated Mirror ...192 Heater, Seat ...183 Heating and Cooling ...210 High Altitude, Starting at ...385 High-Low Beam Switch ...135 HomeLink Universal Transceiver...322 Hood, Opening the ...370 Horn ...4, 133 I H Halogen Headlight Bulbs...437 HandsFreeLink ...325 Hazard Warning Flashers...140 Headlights ...136 Aiming ...437 Identification Number, Vehicle...490 Ignition Keys...142 Switch ...144 Timing Control System ...502 Immobilizer System...143 G Gas Mileage...
......136 Replacing Halogen Bulbs ...437 Turning on ...136 Headphones...315 Head Restraints ...171 Heated Mirror ...192 Heater, Seat ...183 Heating and Cooling ...210 High Altitude, Starting at ...385 High-Low Beam Switch ...135 HomeLink Universal Transceiver...322 Hood, Opening the ...370 Horn ...4, 133 I H Halogen Headlight Bulbs...437 HandsFreeLink ...325 Hazard Warning Flashers...140 Headlights ...136 Aiming ...437 Identification Number, Vehicle...490 Ignition Keys...142 Switch ...144 Timing Control System ...502 Immobilizer System...143 G Gas Mileage...

Owner's Manual
Page 521
..., 66 Remote Audio Controls...282 Remote Control (RES) ...312 Remote Transmitter ...145 Removing the Second Row Seats ...177 Replacement Information Engine Oil and Filter ...428 Fuses ...480 Light Bulbs ...437 Timing Belt ...436 Tires ...454 Wiper Blades ...445 Replacing Seat Belts After a Crash ...24 Reporting Safety Defects...510 Reserve Tank, Engine Coolant ...372, 430 Retractable Center Tray ...195 Reverse Gear Position...387 Roof Rack ...381 Rotation, Tire ...453 S Safety Belts...8, 21 Safety Defects, Reporting...510 Safety Features ...7 Airbags ...9 Seat Belts ...8 Safety Labels, Location...
..., 66 Remote Audio Controls...282 Remote Control (RES) ...312 Remote Transmitter ...145 Removing the Second Row Seats ...177 Replacement Information Engine Oil and Filter ...428 Fuses ...480 Light Bulbs ...437 Timing Belt ...436 Tires ...454 Wiper Blades ...445 Replacing Seat Belts After a Crash ...24 Reporting Safety Defects...510 Reserve Tank, Engine Coolant ...372, 430 Retractable Center Tray ...195 Reverse Gear Position...387 Roof Rack ...381 Rotation, Tire ...453 S Safety Belts...8, 21 Safety Defects, Reporting...510 Safety Features ...7 Airbags ...9 Seat Belts ...8 Safety Labels, Location...

Owner's Manual
Page 522
... Seat Access ...174 Security System ...318 Sensors Front Passenger's Weight Sensors...30 Driver's Seat Position Sensor ...30 Serial Number ...490 Service Intervals ...415 Service Manual ...511 Service Station Procedure ...369 Setting the Clock ...281 Shift Lever Position Indicators ...386 Shift Lock Release ...389 Side Airbags ...9, 31 Off Indicator ...35, 68 Side Marker Lights, Bulb Replacement ...439 Signaling Turns ...136 Sliding Doors ...161 Snow Tires ...455 Sound System ...221 Spare Tire Inflating ...462 Specifications ...493 Specifications Charts...492 Speed Control...
... Seat Access ...174 Security System ...318 Sensors Front Passenger's Weight Sensors...30 Driver's Seat Position Sensor ...30 Serial Number ...490 Service Intervals ...415 Service Manual ...511 Service Station Procedure ...369 Setting the Clock ...281 Shift Lever Position Indicators ...386 Shift Lock Release ...389 Side Airbags ...9, 31 Off Indicator ...35, 68 Side Marker Lights, Bulb Replacement ...439 Signaling Turns ...136 Sliding Doors ...161 Snow Tires ...455 Sound System ...221 Spare Tire Inflating ...462 Specifications ...493 Specifications Charts...492 Speed Control...
Owner's Manual
Page 523
... ...452 Labeling ...496 Replacing ...454 Rotating...453 Service Life ...453 Snow ...455 Specifications ...493 Tire Chains ...456 Tire Pressure Monitoring System (TPMS) ...396, 399 Tools, Tire Changing ...463 Towing A Trailer ...404 Emergency Wrecker ...486 Equipment and Accessories ...406 Weight Limit ...404 Trailer Loading ...404 Trailer Towing Tips...410 Transmission Checking Fluid Level ...433 Fluid Selection...434 Identification Number...491 Shifting the Automatic ...386 Treadwear ...494 Trip Meter ...78, 86 Turn Signals ...135 U Unexpected...
... ...452 Labeling ...496 Replacing ...454 Rotating...453 Service Life ...453 Snow ...455 Specifications ...493 Tire Chains ...456 Tire Pressure Monitoring System (TPMS) ...396, 399 Tools, Tire Changing ...463 Towing A Trailer ...404 Emergency Wrecker ...486 Equipment and Accessories ...406 Weight Limit ...404 Trailer Loading ...404 Trailer Towing Tips...410 Transmission Checking Fluid Level ...433 Fluid Selection...434 Identification Number...491 Shifting the Automatic ...386 Treadwear ...494 Trip Meter ...78, 86 Turn Signals ...135 U Unexpected...


