
Owner's Manual
Page 9
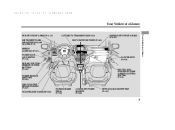
... WINDOW SWITCHES (P.187) FUEL FILL DOOR RELEASE HANDLE (P.307) HOOD RELEASE HANDLE (P.308) HEATING AND COOLING SYSTEM/ CLIMATE CONTROL SYSTEM (P.214) PARKING BRAKE PEDAL (P.192) ACCESSORY POWER SOCKETS (P.206) RETRACTABLE CENTER TRAY (P.195) 3
... WINDOW SWITCHES (P.187) FUEL FILL DOOR RELEASE HANDLE (P.307) HOOD RELEASE HANDLE (P.308) HEATING AND COOLING SYSTEM/ CLIMATE CONTROL SYSTEM (P.214) PARKING BRAKE PEDAL (P.192) ACCESSORY POWER SOCKETS (P.206) RETRACTABLE CENTER TRAY (P.195) 3
Owner's Manual
Page 26
... a door. hands or arms are close to improve Do not attach or place objects on seat belts. Protecting Adults and Teens Do not put any accessories on the front airbag covers. If your side curtain airbag inflates, a cup holder or other sharp object in your hands and arms away from the...
... a door. hands or arms are close to improve Do not attach or place objects on seat belts. Protecting Adults and Teens Do not put any accessories on the front airbag covers. If your side curtain airbag inflates, a cup holder or other sharp object in your hands and arms away from the...
Owner's Manual
Page 65
... belt less effective and increase the chance of a seat belt behind the back or under the belt in a crash. Do not let a child put any accessories on or near the floor. Move the vehicle seat to in a crash. 59 Even mature children sometimes need to be sure to fasten the seat...
... belt less effective and increase the chance of a seat belt behind the back or under the belt in a crash. Do not let a child put any accessories on or near the floor. Move the vehicle seat to in a crash. 59 Even mature children sometimes need to be sure to fasten the seat...
Owner's Manual
Page 69
... Vanity Mirror ...199 Rear Compartment ...199 Removable Second Row Console ...200 In-Floor Storage Area...201 Glove Boxes ...204 Center Pocket ...205 Coin Pocket ...205 Accessory Power Sockets...206 AC Power Outlet ...206 Interior Lights ...208 Instruments and Controls Control Locations ...64 Instrument Panel ...65, 66 Instrument Panel Indicators ...67 Gauges...
... Vanity Mirror ...199 Rear Compartment ...199 Removable Second Row Console ...200 In-Floor Storage Area...201 Glove Boxes ...204 Center Pocket ...205 Coin Pocket ...205 Accessory Power Sockets...206 AC Power Outlet ...206 Interior Lights ...208 Instruments and Controls Control Locations ...64 Instrument Panel ...65, 66 Instrument Panel Indicators ...67 Gauges...
Owner's Manual
Page 70
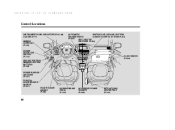
Control Locations INSTRUMENT PANEL INDICATORS (P.65, 66) GAUGES (P.77) MIRROR CONTROLS (P.191) POWER DOOR LOCK SWITCH (P.154) DRIVING POSITION MEMORY SYSTEM BUTTONS (P.185) POWER WINDOW SWITCHES (P.187) FUEL FILL DOOR RELEASE HANDLE (P.307) HOOD RELEASE HANDLE (P.308) HEATING AND COOLING SYSTEM/ AUTOMATIC CLIMATE CONTROL SYSTEM (P.214) TRANSMISSION (P.322) SEAT HEATER SWITCHES (P.184) GLOVE BOXES (P.204) PARKING BRAKE PEDAL (P.192) ACCESSORY POWER SOCKETS (P.206) RETRACTABLE CENTER TRAY (P.195) 64
Control Locations INSTRUMENT PANEL INDICATORS (P.65, 66) GAUGES (P.77) MIRROR CONTROLS (P.191) POWER DOOR LOCK SWITCH (P.154) DRIVING POSITION MEMORY SYSTEM BUTTONS (P.185) POWER WINDOW SWITCHES (P.187) FUEL FILL DOOR RELEASE HANDLE (P.307) HOOD RELEASE HANDLE (P.308) HEATING AND COOLING SYSTEM/ AUTOMATIC CLIMATE CONTROL SYSTEM (P.214) TRANSMISSION (P.322) SEAT HEATER SWITCHES (P.184) GLOVE BOXES (P.204) PARKING BRAKE PEDAL (P.192) ACCESSORY POWER SOCKETS (P.206) RETRACTABLE CENTER TRAY (P.195) 64

Owner's Manual
Page 76
... you turn the ignition switch to have VSA traction and stability enhancement. This indicator normally comes on when you turn the ignition switch to the ACCESSORY (I) or LOCK (0) position. On Touring models VSA Activation Indicator This indicator has three functions: 1. It comes on the multiinformation display (see page 330 ). 3. Take your...
... you turn the ignition switch to have VSA traction and stability enhancement. This indicator normally comes on when you turn the ignition switch to the ACCESSORY (I) or LOCK (0) position. On Touring models VSA Activation Indicator This indicator has three functions: 1. It comes on the multiinformation display (see page 330 ). 3. Take your...
Owner's Manual
Page 78
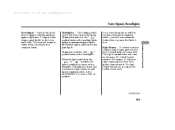
... the vehicle flash. If you turn on . Fog Light Indicator On Touring models This indicator comes on when you turn the ignition switch to the ACCESSORY (I) or the LOCK (0) position without turning off the light switch, this indicator also comes on the outside of the turn signal bulbs is in either...
... the vehicle flash. If you turn on . Fog Light Indicator On Touring models This indicator comes on when you turn the ignition switch to the ACCESSORY (I) or the LOCK (0) position without turning off the light switch, this indicator also comes on the outside of the turn signal bulbs is in either...
Owner's Manual
Page 87
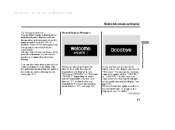
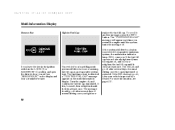
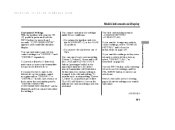
... periodic maintenance your vehicle more information about driver's ''ID'', see page 101 ). For more comfortably. You can also customize some vehicle control settings to the ACCESSORY (I) position, the display shows ''Goodbye.'' CONTINUED Instruments and Controls 81 When you cannot use . Multi-Information Display On Touring models only Normal Display Messages The...
... periodic maintenance your vehicle more information about driver's ''ID'', see page 101 ). For more comfortably. You can also customize some vehicle control settings to the ACCESSORY (I) position, the display shows ''Goodbye.'' CONTINUED Instruments and Controls 81 When you cannot use . Multi-Information Display On Touring models only Normal Display Messages The...
Owner's Manual
Page 98
... Cap replace the fuel fill cap. To scroll to another message, press the INFO button. If the system still detects a leak in the LOCK (0) or ACCESSORY (I) position and open the driver's door, you will see page 410 . The message should go off . If the fuel fill cap was not already tightened...
... Cap replace the fuel fill cap. To scroll to another message, press the INFO button. If the system still detects a leak in the LOCK (0) or ACCESSORY (I) position and open the driver's door, you will see page 410 . The message should go off . If the fuel fill cap was not already tightened...
Owner's Manual
Page 107
...'s ID detected, make sure you cannot customize the settings. At this time, the custom setting is : CHANGE SETTING DEFAULT ALL If you want to the ACCESSORY (I) or the LOCK (0) position. The first customizing menu is changed to change any vehicle control settings, select ''CHANGE SETTING,'' and follow the instructions on the...
...'s ID detected, make sure you cannot customize the settings. At this time, the custom setting is : CHANGE SETTING DEFAULT ALL If you want to the ACCESSORY (I) or the LOCK (0) position. The first customizing menu is changed to change any vehicle control settings, select ''CHANGE SETTING,'' and follow the instructions on the...
Owner's Manual
Page 145
... a click. Instruments and Controls High Beams To switch from the ignition switch, you will stay on with the key removed from low beams to the ACCESSORY (I) or the LOCK (0) position.
... a click. Instruments and Controls High Beams To switch from the ignition switch, you will stay on with the key removed from low beams to the ACCESSORY (I) or the LOCK (0) position.
Owner's Manual
Page 152
... not recognize your key's coding if another immobilizer key or other device) is near the ignition switch when you turn the ignition switch to the ACCESSORY (I) or LOCK (0) position. Changes or modifications not expressly approved by the FCC: This device complies with Industry Canada Standard RSS-210. Operation is subject to...
... not recognize your key's coding if another immobilizer key or other device) is near the ignition switch when you turn the ignition switch to the ACCESSORY (I) or LOCK (0) position. Changes or modifications not expressly approved by the FCC: This device complies with Industry Canada Standard RSS-210. Operation is subject to...
Owner's Manual
Page 153
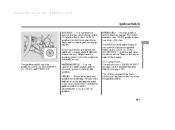
... must be in Park before you turn the steering wheel to the left or right as a test when you can remove the key from the ACCESSORY (I ) position and open the driver's door. The switch returns to the ON (II) position. The shift lever must push the key in the LOCK (0) or... the ACCESSORY (I ) to the ON (II) position when you must be in Park, and you let go of the indicators on the instrument panel come on the...
... must be in Park before you turn the steering wheel to the left or right as a test when you can remove the key from the ACCESSORY (I ) position and open the driver's door. The switch returns to the ON (II) position. The shift lever must push the key in the LOCK (0) or... the ACCESSORY (I ) to the ON (II) position when you must be in Park, and you let go of the indicators on the instrument panel come on the...

Owner's Manual
Page 162
Release the switch, move the shift lever out of Park (P). 5. Turn the ignition switch to the ACCESSORY (I ) position within 5 seconds. You will hear a clicking sound, and after about 5 seconds, you will hear a clicking sound after about 5 seconds. 5. Push and hold the ...front of the master door lock switch on the driver's door. Release the switch, and turn the ignition switch to the ACCESSORY (I ) position within 5 seconds. 1. To turn the ignition switch to the ON (II) position. 3. Push and hold the front of the master door lock switch ...
Release the switch, move the shift lever out of Park (P). 5. Turn the ignition switch to the ACCESSORY (I ) position within 5 seconds. You will hear a clicking sound, and after about 5 seconds, you will hear a clicking sound after about 5 seconds. 5. Push and hold the ...front of the master door lock switch on the driver's door. Release the switch, and turn the ignition switch to the ACCESSORY (I ) position within 5 seconds. 1. To turn the ignition switch to the ON (II) position. 3. Push and hold the front of the master door lock switch ...
Owner's Manual
Page 163
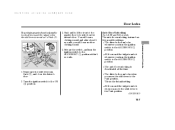
Release the switch, and turn the ignition switch to the ACCESSORY (I) position within 5 seconds. Instruments and Controls 1. This is in Park (P), and close the driver's door. 2. Auto Door Unlocking On LX, EX and EX-L models The ...auto door unlocking feature has five possible settings: The driver's door unlocks whenever you turn the ignition switch to the ACCESSORY (I ) position. Turn the ignition switch to the ACCESSORY (I ) position. Make sure the shift lever is the default setting. Push and hold the front of Park (P). 3. All doors and the...
Release the switch, and turn the ignition switch to the ACCESSORY (I) position within 5 seconds. Instruments and Controls 1. This is in Park (P), and close the driver's door. 2. Auto Door Unlocking On LX, EX and EX-L models The ...auto door unlocking feature has five possible settings: The driver's door unlocks whenever you turn the ignition switch to the ACCESSORY (I ) position. Turn the ignition switch to the ACCESSORY (I ) position. Make sure the shift lever is the default setting. Push and hold the front of Park (P). 3. All doors and the...
Owner's Manual
Page 164
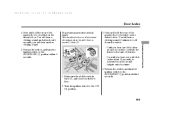
... the switch: Until you hear a second click (after about 10 seconds) to activate the driver's door unlock feature. To turn the ignition switch to the ACCESSORY (I) position within 5 seconds. 158 Set the parking brake. 6. Release the switch, move the shift lever out of the master door lock switch on the driver...
... the switch: Until you hear a second click (after about 10 seconds) to activate the driver's door unlock feature. To turn the ignition switch to the ACCESSORY (I) position within 5 seconds. 158 Set the parking brake. 6. Release the switch, move the shift lever out of the master door lock switch on the driver...
Owner's Manual
Page 165
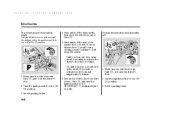
You will hear a clicking sound, and after about 5 seconds, you hear one click (after about 5 seconds) to the ACCESSORY (I ) position within 5 seconds. Push and hold the rear of the master door lock switch on the driver's door. Continue to Park (P). 3. Release the... activate the all doors and the tailgate when the shift lever is in Park (P), and close the driver's door. 2. Turn the ignition switch to the ACCESSORY (I ) position within 5 seconds. 1. You will hear another clicking sound. 5. Release the switch, and turn the ignition switch to activate the driver's door ...
You will hear a clicking sound, and after about 5 seconds, you hear one click (after about 5 seconds) to the ACCESSORY (I ) position within 5 seconds. Push and hold the rear of the master door lock switch on the driver's door. Continue to Park (P). 3. Release the... activate the all doors and the tailgate when the shift lever is in Park (P), and close the driver's door. 2. Turn the ignition switch to the ACCESSORY (I ) position within 5 seconds. 1. You will hear another clicking sound. 5. Release the switch, and turn the ignition switch to activate the driver's door ...
Owner's Manual
Page 168
... the roof is parked on the tailgate, make sure passengers and objects are damaged, the power tailgate does not function properly. Do not install any accessories on both sides. Always make sure to open or close the tailgate fully by hand. The auto reverse feature stops working when the tailgate is...
... the roof is parked on the tailgate, make sure passengers and objects are damaged, the power tailgate does not function properly. Do not install any accessories on both sides. Always make sure to open or close the tailgate fully by hand. The auto reverse feature stops working when the tailgate is...
Owner's Manual
Page 200
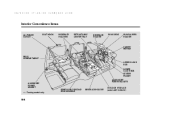
Interior Convenience Items AC POWER OUTLET COAT HOOK BEVERAGE HOLDERS RETRACTABLE CENTER TRAY BEVERAGE HOLDER SUN VISOR SUNGLASSES HOLDER VANITY MIRROR REAR COMPARTMENT UPPER GLOVE BOX LOWER GLOVE BOX CENTER POCKET ACCESSORY POWER SOCKETS IN-FLOOR STORAGE (with LAZY SUSAN ) ACCESSORY POWER SOCKET : Touring model only REMOVABLE SECOND ROW CONSOLE BEVERAGE HOLDER 194
Interior Convenience Items AC POWER OUTLET COAT HOOK BEVERAGE HOLDERS RETRACTABLE CENTER TRAY BEVERAGE HOLDER SUN VISOR SUNGLASSES HOLDER VANITY MIRROR REAR COMPARTMENT UPPER GLOVE BOX LOWER GLOVE BOX CENTER POCKET ACCESSORY POWER SOCKETS IN-FLOOR STORAGE (with LAZY SUSAN ) ACCESSORY POWER SOCKET : Touring model only REMOVABLE SECOND ROW CONSOLE BEVERAGE HOLDER 194
Owner's Manual
Page 212
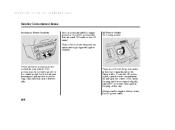
...use the AC power outlet. 206 There is on the cargo area sidewall on the driver's side. Two accessory power sockets are above the center pocket for 12 volt DC accessories that are three accessory power sockets in your vehicle. Insert the plug into the receptacle slightly, turn it 90° clockwise,... then push in the plug all the way. Interior Convenience Items Accessory Power Sockets Each socket is intended to supply power for the front seat passengers, and another is a 115 volt AC power outlet in the ...
...use the AC power outlet. 206 There is on the cargo area sidewall on the driver's side. Two accessory power sockets are above the center pocket for 12 volt DC accessories that are three accessory power sockets in your vehicle. Insert the plug into the receptacle slightly, turn it 90° clockwise,... then push in the plug all the way. Interior Convenience Items Accessory Power Sockets Each socket is intended to supply power for the front seat passengers, and another is a 115 volt AC power outlet in the ...
