Owner's Manual
Page 1
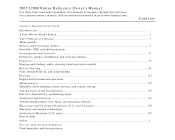
Instruments and Controls ...37 Indicators, gauges, dashboard, and steering column. Driving ...111 Engine and transmission operation. and Canada) ...193 Warranty and contact information. 2005 S2000 Online Reference Owner's Manual Use these links (and links throughout this manual) to order. Maintenance ...121 Schedules, fluid checking, minor services, and vehicle storage. Authorized Manuals (U.S. Features ...73 Heating and Cooling, audio, steering wheel and cruise control Before Driving...99 Fuel, vehicle break-in, and cargo loading. only)...197 How to navigate through this ...
Instruments and Controls ...37 Indicators, gauges, dashboard, and steering column. Driving ...111 Engine and transmission operation. and Canada) ...193 Warranty and contact information. 2005 S2000 Online Reference Owner's Manual Use these links (and links throughout this manual) to order. Maintenance ...121 Schedules, fluid checking, minor services, and vehicle storage. Authorized Manuals (U.S. Features ...73 Heating and Cooling, audio, steering wheel and cruise control Before Driving...99 Fuel, vehicle break-in, and cargo loading. only)...197 How to navigate through this ...
Owner's Manual
Page 2
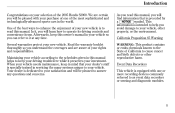
... the State of your vehicle, other reproductive harm. California Proposition 65 Warning WARNING: This product contains or emits chemicals known to cause cancer and birth defects or other property, or the environment. i We are aware of the 2005 Honda S2000. Maintaining your vehicle according to the schedules given in this manual helps to keep this manual, you avoid damage to...
... the State of your vehicle, other reproductive harm. California Proposition 65 Warning WARNING: This product contains or emits chemicals known to cause cancer and birth defects or other property, or the environment. i We are aware of the 2005 Honda S2000. Maintaining your vehicle according to the schedules given in this manual helps to keep this manual, you avoid damage to...

Owner's Manual
Page 4
Your Vehicle at a Glance HEADLIGHTS/TURN SIGNALS (P.48) DRIVER'S FRONT AIRBAG (P.9, 19) REAR WINDOW DEFOGGER BUTTON (P.50) WINDSHIELD WIPERS/ WASHERS (P.47) PASSENGER'S FRONT AIRBAG (P.9, 19) HEATING AND AIR CONDITIONING (P.74) Your Vehicle at a Glance HOOD RELEASE HANDLE (P.102) DOOR LOCK SWITCH (P.54) POWER WINDOW SWITCHES (P.59) AUDIO SYSTEM (P.78) MIRROR CONTROLS (P.66) ROOF SWITCH (P.62) HAZARD WARNING BUTTON (P.49) 3
Your Vehicle at a Glance HEADLIGHTS/TURN SIGNALS (P.48) DRIVER'S FRONT AIRBAG (P.9, 19) REAR WINDOW DEFOGGER BUTTON (P.50) WINDSHIELD WIPERS/ WASHERS (P.47) PASSENGER'S FRONT AIRBAG (P.9, 19) HEATING AND AIR CONDITIONING (P.74) Your Vehicle at a Glance HOOD RELEASE HANDLE (P.102) DOOR LOCK SWITCH (P.54) POWER WINDOW SWITCHES (P.59) AUDIO SYSTEM (P.78) MIRROR CONTROLS (P.66) ROOF SWITCH (P.62) HAZARD WARNING BUTTON (P.49) 3

Owner's Manual
Page 38
...44 Fuel Gauge ...45 Temperature Gauge ...45 Clock ...45 Controls Near the Steering Wheel ...46 Windshield Wipers and Washers ...47 Turn Signal and Headlights...48 Instrument Panel Brightness ...49 Hazard Warning Button ...49 Rear Window Defogger ...50 Keys and Locks ...51 Immobilizer System...52 Ignition Switch ...53 Power Door Locks ...54 Trunk...54 Emergency Trunk Opener ...55 Remote Transmitter ...56 Seats ...58 Power Windows ...59 Convertible Top ...61 Mirrors ...66 Parking Brake ...67 Interior Convenience Items ...68 Beverage Holder ...69 Accessory Power Socket ...69 Console Compartments...
...44 Fuel Gauge ...45 Temperature Gauge ...45 Clock ...45 Controls Near the Steering Wheel ...46 Windshield Wipers and Washers ...47 Turn Signal and Headlights...48 Instrument Panel Brightness ...49 Hazard Warning Button ...49 Rear Window Defogger ...50 Keys and Locks ...51 Immobilizer System...52 Ignition Switch ...53 Power Door Locks ...54 Trunk...54 Emergency Trunk Opener ...55 Remote Transmitter ...56 Seats ...58 Power Windows ...59 Convertible Top ...61 Mirrors ...66 Parking Brake ...67 Interior Convenience Items ...68 Beverage Holder ...69 Accessory Power Socket ...69 Console Compartments...

Owner's Manual
Page 43
... flash. Replace the bulb as soon as a reminder that you turn on with the high beam headlights. When you have inserted a properly-coded ignition key. It will not start (see that you turn the ignition switch from ON (II) to ACCESSORY (I) or LOCK (0). Low Fuel Indicator This indicator comes on the outside of the turn signal bulbs is burned out (see page 48 . ''Daytime Running Lights'' Indicator Canadian models only...
... flash. Replace the bulb as soon as a reminder that you turn on with the high beam headlights. When you have inserted a properly-coded ignition key. It will not start (see that you turn the ignition switch from ON (II) to ACCESSORY (I) or LOCK (0). Low Fuel Indicator This indicator comes on the outside of the turn signal bulbs is burned out (see page 48 . ''Daytime Running Lights'' Indicator Canadian models only...

Owner's Manual
Page 57
... ignition switch. You cannot open either door is not fully closed or the key is in the ignition switch. LED LOCK BUTTON TRUNK RELEASE BUTTON UNLOCK BUTTON PANIC BUTTON LOCK Press this button for about 1 second to ON (II). Push it twice to lock both doors. Remote Transmitter switch is in the center position) will come on the remote transmitter, or turn the ignition switch to attract attention; Some exterior lights...
... ignition switch. You cannot open either door is not fully closed or the key is in the ignition switch. LED LOCK BUTTON TRUNK RELEASE BUTTON UNLOCK BUTTON PANIC BUTTON LOCK Press this button for about 1 second to ON (II). Push it twice to lock both doors. Remote Transmitter switch is in the center position) will come on the remote transmitter, or turn the ignition switch to attract attention; Some exterior lights...

Owner's Manual
Page 60
... it . PASSENGER'S WINDOW SWITCH The driver's armrest has a master power window control panel. Pull back on the switch and hold it . Instruments and Controls MAIN SWITCH Make sure your passenger is away from the window before closing it to close the window, pull back on someone's hands or fingers can cause serious injury. To close the window. Power Windows Turn the ignition switch to ON (II) to stop. Release the switch when you...
... it . PASSENGER'S WINDOW SWITCH The driver's armrest has a master power window control panel. Pull back on the switch and hold it . Instruments and Controls MAIN SWITCH Make sure your passenger is away from the window before closing it to close the window, pull back on someone's hands or fingers can cause serious injury. To close the window. Power Windows Turn the ignition switch to ON (II) to stop. Release the switch when you...

Owner's Manual
Page 61
... the window unintentionally. 60 The AUTO function only works to the second detent, and release it . Keep the MAIN switch off when you release the switch. The window automatically goes all the way down. To raise the window, you must pull back on the window switch briefly. Power Windows The master control panel also contains these extra features: AUTO To open the driver's window only partially, push the window switch down lightly and...
... the window unintentionally. 60 The AUTO function only works to the second detent, and release it . Keep the MAIN switch off when you release the switch. The window automatically goes all the way down. To raise the window, you must pull back on the window switch briefly. Power Windows The master control panel also contains these extra features: AUTO To open the driver's window only partially, push the window switch down lightly and...

Owner's Manual
Page 62
.... Extended exposure to sunlight can damage the material and the mechanism. Lowering the Convertible Top Before operating the convertible top, make sure the vehicle is parked on your vehicle lowers and raises electrically. Push in f reezing weather. CONTINUED 61 Apply the parking brake. LOCKING LEVER LATCH TAB Instruments and Controls Do not operate the convertible top in the tabs, and pull the locking levers down. Turn the ignition switch to...
.... Extended exposure to sunlight can damage the material and the mechanism. Lowering the Convertible Top Before operating the convertible top, make sure the vehicle is parked on your vehicle lowers and raises electrically. Push in f reezing weather. CONTINUED 61 Apply the parking brake. LOCKING LEVER LATCH TAB Instruments and Controls Do not operate the convertible top in the tabs, and pull the locking levers down. Turn the ignition switch to...

Owner's Manual
Page 76
... floor vents. Set the fan to the desired speed. Make sure the temperature is dry, select Fresh Air mode. 5. Vents, Heating, and A/C Air flows from the center vents in the dashboard above the audio system, the vents on both sides of the instrument panel. and Fresh Air mode. 3. Using the Heater The heater uses engine coolant to maximum cool. . 3. Adjust the warmth of the instrument panel. Watch the engine coolant temperature gauge...
... floor vents. Set the fan to the desired speed. Make sure the temperature is dry, select Fresh Air mode. 5. Vents, Heating, and A/C Air flows from the center vents in the dashboard above the audio system, the vents on both sides of the instrument panel. and Fresh Air mode. 3. Using the Heater The heater uses engine coolant to maximum cool. . 3. Adjust the warmth of the instrument panel. Watch the engine coolant temperature gauge...

Owner's Manual
Page 118
.... Maintenance Safety ...122 Maintenance Schedule ...123 Maintenance Record ...127 Fluid Locations...130 Adding Engine Oil ...131 Changing the Oil and Filter ...132 Engine Coolant ...134 Windshield Washers ...136 Manual Transmission Fluid ...137 Differential Fluid ...138 Brake and Clutch Fluid ...139 Lights ...140 Cleaning the Seat Belts ...145 Floor Mats ...146 Dust and Pollen Filter ...146 Wiper Blades ...147 Tires ...148 Checking the Battery ...154 Vehicle Storage ...155 Maintenance 121 This section also includes Maintenance Schedules for normal driving and severe driving conditions...
.... Maintenance Safety ...122 Maintenance Schedule ...123 Maintenance Record ...127 Fluid Locations...130 Adding Engine Oil ...131 Changing the Oil and Filter ...132 Engine Coolant ...134 Windshield Washers ...136 Manual Transmission Fluid ...137 Differential Fluid ...138 Brake and Clutch Fluid ...139 Lights ...140 Cleaning the Seat Belts ...145 Floor Mats ...146 Dust and Pollen Filter ...146 Wiper Blades ...147 Tires ...148 Checking the Battery ...154 Vehicle Storage ...155 Maintenance 121 This section also includes Maintenance Schedules for normal driving and severe driving conditions...

Owner's Manual
Page 120
... recommendations: Avoid exceeding your vehicle regularly over 90°F (32°C)] conditions. The load limit is shown on the tire information label on the driver's doorjamb. Driving less than 5 miles (8 km) per trip or, in mountainous conditions. Canadian Owners Follow the Maintenance Schedule for Severe Conditions if you should also follow the Maintenance Schedule for your vehicle on the engine, brakes, and many other vehicle parts. Maintenance 123
... recommendations: Avoid exceeding your vehicle regularly over 90°F (32°C)] conditions. The load limit is shown on the tire information label on the driver's doorjamb. Driving less than 5 miles (8 km) per trip or, in mountainous conditions. Canadian Owners Follow the Maintenance Schedule for Severe Conditions if you should also follow the Maintenance Schedule for your vehicle on the engine, brakes, and many other vehicle parts. Maintenance 123

Owner's Manual
Page 121
.... Vehicles: Maintenance, replacement, or repair of emissions control devices and systems may be performed at the specified intervals. According to state and federal regulations, failure to keep your warranties in effect. Owner's Maintenance Checks You should be done by any check, turn to EPA standards. Engine coolant level Check the radiator reserve tank every time you fill the fuel tank. Tires Check the tire pressure monthly. Lights Check the operation of Honda parts...
.... Vehicles: Maintenance, replacement, or repair of emissions control devices and systems may be performed at the specified intervals. According to state and federal regulations, failure to keep your warranties in effect. Owner's Maintenance Checks You should be done by any check, turn to EPA standards. Engine coolant level Check the radiator reserve tank every time you fill the fuel tank. Tires Check the tire pressure monthly. Lights Check the operation of Honda parts...
Owner's Manual
Page 122
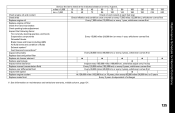
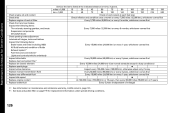
...tires Replace engine oil Replace engine oil filter Check front and rear brakes Check parking brake adjustment Inspect the following items: Tie-rod ends, steering gearbox, and boots Suspension components Driveshaft boots Brake hoses and lines (including ABS) All fluid levels and condition of fluids Exhaust system Fuel lines and connections Inspect drive belts Replace dust and pollen filter Replace air cleaner element Replace spark plugs Inspect valve clearance Replace manual transmission fluid Replace rear differential fluid Inspect idle speed Replace engine coolant Replace brake fluid Service...
...tires Replace engine oil Replace engine oil filter Check front and rear brakes Check parking brake adjustment Inspect the following items: Tie-rod ends, steering gearbox, and boots Suspension components Driveshaft boots Brake hoses and lines (including ABS) All fluid levels and condition of fluids Exhaust system Fuel lines and connections Inspect drive belts Replace dust and pollen filter Replace air cleaner element Replace spark plugs Inspect valve clearance Replace manual transmission fluid Replace rear differential fluid Inspect idle speed Replace engine coolant Replace brake fluid Service...
Owner's Manual
Page 123
...parking brake adjustment Lubricate all hinges, locks and latches Inspect the following items: Brake hoses and lines (including ABS) All fluid levels and condition of fluids Exhaust system Fuel lines and connections Lights and controls/vehicle underbody Inspect drive belts Replace dust and pollen filter Replace air cleaner element Replace spark plugs Inspect valve clearance Replace manual transmission fluid Replace rear differential fluid Inspect idle speed Replace engine coolant Replace brake fluid Service the items listed at the indicated distance (or time, if given). 105 60 90 120 150 miles...
...parking brake adjustment Lubricate all hinges, locks and latches Inspect the following items: Brake hoses and lines (including ABS) All fluid levels and condition of fluids Exhaust system Fuel lines and connections Lights and controls/vehicle underbody Inspect drive belts Replace dust and pollen filter Replace air cleaner element Replace spark plugs Inspect valve clearance Replace manual transmission fluid Replace rear differential fluid Inspect idle speed Replace engine coolant Replace brake fluid Service the items listed at the indicated distance (or time, if given). 105 60 90 120 150 miles...
Owner's Manual
Page 148
...-and rear-engine sports cars, and it is worn unevenly, have the installer perform a dynamic balance. If you can expect them to -rear. When you have a unidirectional tread pattern, so they are the driving wheels, you drive moderately, the rear tires could last more rapidly than 10,000 miles (16,000 km). Maintenance Improper wheel weights can expect from the wheel. The originalequipment tires on ordinary passenger vehicles. Tire...
...-and rear-engine sports cars, and it is worn unevenly, have the installer perform a dynamic balance. If you can expect them to -rear. When you have a unidirectional tread pattern, so they are the driving wheels, you drive moderately, the rear tires could last more rapidly than 10,000 miles (16,000 km). Maintenance Improper wheel weights can expect from the wheel. The originalequipment tires on ordinary passenger vehicles. Tire...
Owner's Manual
Page 152
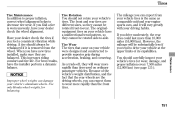
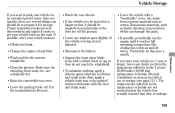
... full operating temperature (the cooling fan cycles on the road. Wash and dry the exterior completely. Put the transmission in the 2 years/ 30,000 miles (48,000 km) maintenance schedule (Normal Conditions) as soon as plastic sheeting, trap moisture, which can damage the paint. Disconnect the battery. Maintenance If you store your vehicle for storage. Clean the interior. Block the rear wheels. Cover the vehicle with a folded towel...
... full operating temperature (the cooling fan cycles on the road. Wash and dry the exterior completely. Put the transmission in the 2 years/ 30,000 miles (48,000 km) maintenance schedule (Normal Conditions) as soon as plastic sheeting, trap moisture, which can damage the paint. Disconnect the battery. Maintenance If you store your vehicle for storage. Clean the interior. Block the rear wheels. Cover the vehicle with a folded towel...

Owner's Manual
Page 196
... Daytime Running Lights...48 Daytime Running Lights Indicator ...42 Dead Battery ...166 Defects, Reporting Safety...196 Defogger, Rear Window ...50 Defrosting the Windows ...77 Differential Fluid ...138 Dimensions ...184 Dimming the Headlights ...48 Dipstick Engine Oil ...103 Directional Signals ...48 Disc Brake Wear Indicators ...118 Disposal of Used Oil ...134 Do Not Tow a Trailer ...119 Doors Locking and Unlocking ...54 Monitor Indicator ...41 Power Door Locks ...54 DOT Tire Quality Grading ...186 Downshifting, Manual Transmission ...115 Driver and Passenger Safety ...5 Driving ...111...
... Daytime Running Lights...48 Daytime Running Lights Indicator ...42 Dead Battery ...166 Defects, Reporting Safety...196 Defogger, Rear Window ...50 Defrosting the Windows ...77 Differential Fluid ...138 Dimensions ...184 Dimming the Headlights ...48 Dipstick Engine Oil ...103 Directional Signals ...48 Disc Brake Wear Indicators ...118 Disposal of Used Oil ...134 Do Not Tow a Trailer ...119 Doors Locking and Unlocking ...54 Monitor Indicator ...41 Power Door Locks ...54 DOT Tire Quality Grading ...186 Downshifting, Manual Transmission ...115 Driver and Passenger Safety ...5 Driving ...111...
Owner's Manual
Page 197
... Controls ...189 Exhaust Fumes ...35 Expectant Mothers, Use of Seat Belts by ...14 Tank, Refueling ...101 Fuel Economy ...104 Fuel Station Procedures ...101 Fuses, Checking the ...174 F Fan, Interior...75 Features ...73 Filling the Fuel Tank ...101 Filters Dust and Pollen ...146 Oil ...132 Flashers, Hazard Warning...49 Flat Tire, Changing a ...159 Fluids Brake ...139 Clutch ...139 Manual Transmission ...137 Windshield Washer ...136 FM Stereo Radio Reception ...81 Four-way Flashers ...49 Fuel ...100 Fill Door and Cap...101 Gauge...
... Controls ...189 Exhaust Fumes ...35 Expectant Mothers, Use of Seat Belts by ...14 Tank, Refueling ...101 Fuel Economy ...104 Fuel Station Procedures ...101 Fuses, Checking the ...174 F Fan, Interior...75 Features ...73 Filling the Fuel Tank ...101 Filters Dust and Pollen ...146 Oil ...132 Flashers, Hazard Warning...49 Flat Tire, Changing a ...159 Fluids Brake ...139 Clutch ...139 Manual Transmission ...137 Windshield Washer ...136 FM Stereo Radio Reception ...81 Four-way Flashers ...49 Fuel ...100 Fill Door and Cap...101 Gauge...

Owner's Manual
Page 198
...Oil Pressure ...40, 170 Maintenance Required...43 Malfunction Indicator Lamp ...41, 171 Seat Belt ...40 SRS ...41 Trunk-open ...41 Turn Signal and Hazard Warning ...42 Indicators, Instrument Panel ...40 Inflation, Proper Tire ...149 Recommended Pressures ...150 Inside Mirror ...66 Inspection, Tire ...150 Installing a Child Seat ...28 Instrument Panel ...39 Instrument Panel Brightness ...49 Interiors ...40 Introduction ...i J Jacking Up the Vehicle ...160 Jack, Tire ...159 Jump Starting ...166 K Keys ...51 I Identification Number, Vehicle ...182 Ignition Keys...51 Switch ...53 Timing Control...
...Oil Pressure ...40, 170 Maintenance Required...43 Malfunction Indicator Lamp ...41, 171 Seat Belt ...40 SRS ...41 Trunk-open ...41 Turn Signal and Hazard Warning ...42 Indicators, Instrument Panel ...40 Inflation, Proper Tire ...149 Recommended Pressures ...150 Inside Mirror ...66 Inspection, Tire ...150 Installing a Child Seat ...28 Instrument Panel ...39 Instrument Panel Brightness ...49 Interiors ...40 Introduction ...i J Jacking Up the Vehicle ...160 Jack, Tire ...159 Jump Starting ...166 K Keys ...51 I Identification Number, Vehicle ...182 Ignition Keys...51 Switch ...53 Timing Control...


