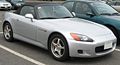
2003 Honda S2000 Support Question
2003 Honda S2000 Support Question
Find answers below for this question about 2003 Honda S2000.Need a 2003 Honda S2000 manual? We have 1 online manual for this item!
Question posted by frlax on September 6th, 2012
Maintenance Light
what does the maintenance light look like?
Current Answers
Related Manual Pages
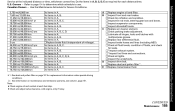
Owner's Manual - Page 7
... Seat Belt System Components ...33 Lap/Shoulder Belt ...33 Automatic Seat Belt Tensioners ...34 Seat Belt Maintenance ...34 Additional Information About Your SRS ...36 SRS Components ...36 How Your Airbags Work ...36 How the SRS Indicator Light Works ...38 SRS Service...39 Additional Safety Precautions ...39 Carbon Monoxide Hazard ...40 Safety Labels...
Owner's Manual - Page 41
...Driver and Passenger Safety
39 Tampering could cause
the airbags to remove or replace the airbags yourself. The SRS indicator light alerts you need them. Take your car to an
Additional Safety Precautions
Do not attempt to a problem. See... About Your SRS
SRS Service Your Supplemental Restraint System is virtually maintenance-free, and there are no parts you must have your airbags.
Owner's Manual - Page 44
... ...50 Odometer ...50 Trip Meter ...51 Maintenance Required Indicator ...51 Controls Near the Steering Wheel ...52 Headlights ...53 Daytime Running Lights...54 Instrument Panel Brightness ...54 Turn Signals ... the Convertible Top ...72 Raising the Convertible Top ...75 Convertible Top Cover ...77 Maintenance ...78 Hazard Warning ...80 Mirrors ...80 Adjusting the Power Mirrors ...80 Parking Brake...
Owner's Manual - Page 46
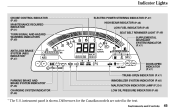
... CONTROL INDICATOR (P.48) MAINTENANCE REQUIRED INDICATOR (P.51) TURN SIGNAL AND HAZARD WARNING INDICATORS (P.48)
ELECTRIC POWER STEERING INDICATOR (P.47) HIGH BEAM INDICATOR (P.48) LOW FUEL INDICATOR (P.48) SEAT BELT REMINDER LIGHT (P.46) SUPPLEMENTAL RESTRAINT SYSTEM INDICATOR (P.47)
ANTI-LOCK BRAKE SYSTEM (ABS) INDICATOR (P.47) DOOR-OPEN INDICATOR (P.47) TRUNK-OPEN INDICATOR (P.47...
Owner's Manual - Page 52
... 154 .
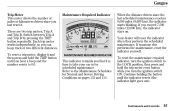
This indicator reminds you turn the ignition switch ON. Your dealer will reset the indicator when they perform the scheduled maintenance. Gauges
Trip Meter This meter shows the number of two different distances. To reset a trip meter, display it and then ... B. Refer to the LOCK position, then press and hold the TRIP button until the indicator resets (the indicator light goes out).
Owner's Manual - Page 144
......192 Replacing Tires and Wheels ...193 Wheels and Tires ...194 Winter Driving ...194 Snow Tires ...195 Tire Chains ...195 Lights ...196 Headlight Aiming ...198 Replacing Bulbs ...198 Storing Your Car ...206
Maintenance
147 Maintenance
This section explains why it is important to keep your Honda dealer. If you have the skills and tools...
Owner's Manual - Page 151
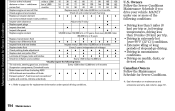
... and coolant at the indicated miles x 1,000 distance or time whichever km x 1,000 comes first. Maintenance Schedule for Severe Conditions.
: See information on muddy, dusty, or de-iced roads. months Replace engine...fluid levels and condition of fluids Exhaust system , Fuel lines and connections Lights and controls, Vehicle underbody 1 : Refer to page 187 for replacement information under one or more ...
Owner's Manual - Page 152
... in A. Do items in A, B, C, D, E. Replace dust and pollen filter 1. Do items in A. Do items in A. A B Replace engine oil and filter. Lubricate all lights. Check parking brake adjustment. CONTINUED Maintenance 155 U.S. Do items in A. Inspect the underbody. Replace transmission fluid. Do items in A, B, C. Replace air cleaner element. Inspect brake hoses and lines...
Owner's Manual - Page 156

... reservoir each time you are unsure of the headlights, parking lights, taillights, high-mount brake light, turn to the page given. See page 174 . Lights Check the operation of how to perform any check, turn signals, brake lights, and license plate lights monthly. Maintenance
159 Owner Maintenance Checks
You should check the following items at the specified...
Owner's Manual - Page 161

...necessary, add oil to bring the level to the environment. Tighten it on the ground.
164
Maintenance Let the engine run for several minutes, then check the drain bolt and oil filter for several... engine with the recommended oil. Engine oil change your work. 8. The oil pressure indicator light should go out within five seconds. Put a new washer on the dipstick. Start the engine. If...
Owner's Manual - Page 183
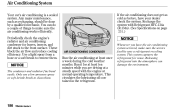
...make sure the air conditioning works efficiently. You can damage the environment.
186
Maintenance Periodically check the engine's radiator and air conditioning condenser for at least ten ... Releasing ref rigerant into the atmosphere can do a couple of things to the front surface. Use a light spray from a hose or a soft brush to clean them . Air Conditioning System
Your car's air ...
Owner's Manual - Page 193
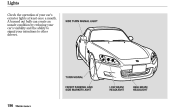
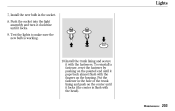
A burned out bulb can create an unsafe condition by reducing your car's visibility and the ability to other drivers.
Lights
Check the operation of your intentions to signal your car's exterior lights at least once a month. SIDE TURN SIGNAL LIGHT
TURN SIGNAL
FRONT PARKING AND SIDE MARKER LIGHT
LOW BEAM HEADLIGHT
HIGH BEAM HEADLIGHT
196
Maintenance
Owner's Manual - Page 194
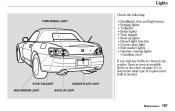
...-up lights Hazard light function License plate light Side marker lights Daytime running lights (Canadian cars) If you find any bulbs are burned out, replace them as soon as possible. Refer to the chart on page 251 to determine what type of replacement bulb is needed. STOP/TAILLIGHT SIDE MARKER LIGHT
LICENSE PLATE LIGHT BACK-UP LIGHT
Maintenance
197...
Owner's Manual - Page 195

...should be required. Adjustment of the headlights should not attempt to overheat and shatter.
198
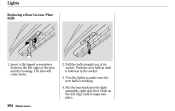
Maintenance Because of high voltage discharge tube. Oil, perspiration, or a scratch on the glass can...its base and protect the glass from contact with denatured alcohol and a clean cloth. Lights
Headlight Aiming The headlights were properly aimed when your dealer to have it replaced. Replacing...
Owner's Manual - Page 196
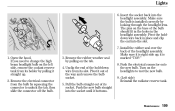
... the headlight assembly. Insert the socket back into the socket until it is marked ''TOP.'' 8. Make sure it bottoms.
Maintenance
199 Unclip the end of the hold-down wire from its slot. Open the hood. Remove the electrical connector from the bulb.... 7. The pins on the left side, remove the coolant reserve tank from its holder by looking through the headlight lens. Lights
6.
Owner's Manual - Page 197
.... Pull the bulb straight out of its socket.
6. Lock each clip in place. 8. Test the lights to lock it in place by turning it clockwise to make sure the new bulb is working. 9. ...Install the three holding clips from the headlight assembly by pushing on the center.
200
Maintenance If you are changing the bulb on the passenger's side, turn off the engine. Use a flat-...
Owner's Manual - Page 198
... socket until it snaps into its socket. Maintenance
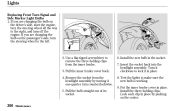
201 Turn the bulb holder one-quarter turn signal assembly until it locks. 5. Put the side turn it clockwise until it from the lens. Use a small flat blade screwdriver to make sure the new bulb is working. 6. Lights
Replacing a Side Turn Signal Bulb 3. Pull...
Owner's Manual - Page 199
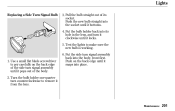
... turn signal light bulb, push it in . Remove the burned out bulb. Open the trunk. 2. Lights
Replacing Rear Bulbs
1. To remove the stop/taillight, back-up or side marker light bulb, pull the bulb straight out of the four bulbs is burned out: stop/taillight, backup light, turn it counterclockwise until it unlocks.
202
Maintenance
Owner's Manual - Page 200
Test the lights to make sure the new bulb is flush with the head).
To reinstall a fastener, reset the fastener by pushing...the center is working.
10.Install the trunk lining and secure it pops back almost flush with the fasteners. Maintenance
203 Put the fastener in the socket. 8. Lights
7. Install the new bulb in the hole of the trunk lining and push on the housing. Push the ...
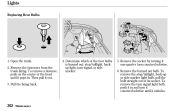
Owner's Manual - Page 201
Insert a flat-tipped screwdriver between the left edge until it snaps into the light assembly, right side first. Push on the left edge of its socket. Put the lens back into place.
204
Maintenance The lens will come down.
2. Push the new bulb in until it bottoms in the socket. 3. Pull the bulb...
Similar Questions

What Does The Flashing Red Light On My Dash Mean?
what does the flashing red light on my dash mean?
what does the flashing red light on my dash mean?
(Posted by Anonymous-159886 7 years ago)

Low Fuel Light
I own a honda accord 2000 v6 ex 3.0 but the low fuel light light wont turn on even if the tank is al...
I own a honda accord 2000 v6 ex 3.0 but the low fuel light light wont turn on even if the tank is al...
(Posted by Wilsong160 8 years ago)

Fast Flashing Signal Light One Side
I need to know witch relay is for the signal lights I don't have a manual.
I need to know witch relay is for the signal lights I don't have a manual.
(Posted by edwheaton59 9 years ago)

Why Would The Abs Light Randomly Came On A 200 Honda S2000
(Posted by miminepe 9 years ago)

What Is A No Key Maintenance Light On A 2008 Honda Crv
(Posted by johnsu 10 years ago)