
Owner's Manual
Page 50
...Honda dealer as soon as possible if the SRS light alerts you to a potential problem. See your side airbags. How the Side Airbag Cutoff Indicator Light... Works Only on after you turn the ignition switch to prevent the side airbag from an inflating side airbag, your dealer. It does not mean there is a problem with side airbags This light... alerts you that the side airbag cutoff system has activated to ON (II). Ignoring the SRS indicator light...side airbag. If the light comes on or flashes on ...About Your Airbags If the light comes on at all, you...light does not come on and off ...
...Honda dealer as soon as possible if the SRS light alerts you to a potential problem. See your side airbags. How the Side Airbag Cutoff Indicator Light... Works Only on after you turn the ignition switch to prevent the side airbag from an inflating side airbag, your dealer. It does not mean there is a problem with side airbags This light... alerts you that the side airbag cutoff system has activated to ON (II). Ignoring the SRS indicator light...side airbag. If the light comes on or flashes on ...About Your Airbags If the light comes on at all, you...light does not come on and off ...
Owner's Manual
Page 58
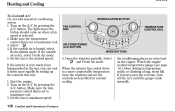
...if you have fully released the parking brake while the engine is a reminder to check the parking brake. For complete information, see page 351 . 58 Instruments and Controls Charging System Indicator If this light flashes or stays on when the engine is not being charged. This indicator comes on when... you turn the ignition switch ON (II). Low Oil Pressure Indicator The engine can be severely damaged if this light comes on when the engine is running, the battery is running , or if it comes on while driving, it can damage the brakes ...
...if you have fully released the parking brake while the engine is a reminder to check the parking brake. For complete information, see page 351 . 58 Instruments and Controls Charging System Indicator If this light flashes or stays on when the engine is not being charged. This indicator comes on when... you turn the ignition switch ON (II). Low Oil Pressure Indicator The engine can be severely damaged if this light comes on when the engine is running, the battery is running , or if it comes on while driving, it can damage the brakes ...
Owner's Manual
Page 62
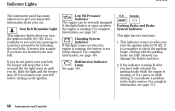
...there is a problem with the headlight switch off and the parking brake set the cruise control. This light comes on when the washer fluid level is not a properlycoded key, the indicator will blink and the engine will then go off if you turn the ignition switch from ON (II) to ON (II... a properly-coded ignition key. It should go off if you turn on the Cruise Control Master Button. (see page 76 ). On Canadian models, this light come on (see page 69 ). Add washer fluid when you see this indicator comes on with Cruise Control System Immobilizer System Indicator This indicator comes...
...there is a problem with the headlight switch off and the parking brake set the cruise control. This light comes on when the washer fluid level is not a properlycoded key, the indicator will blink and the engine will then go off if you turn the ignition switch from ON (II) to ON (II... a properly-coded ignition key. It should go off if you turn on the Cruise Control Master Button. (see page 76 ). On Canadian models, this light come on (see page 69 ). Add washer fluid when you see this indicator comes on with Cruise Control System Immobilizer System Indicator This indicator comes...
Owner's Manual
Page 65
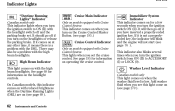
... to take your car in for two seconds when you turn the ignition switch to ON (II). The indicator light does not reflect severe maintenance intervals. Running out of f uel could cause the engine to the bottom after you turn the ignition switch back ON (II). CONTINUED Instruments and Controls 65 The...
... to take your car in for two seconds when you turn the ignition switch to ON (II). The indicator light does not reflect severe maintenance intervals. Running out of f uel could cause the engine to the bottom after you turn the ignition switch back ON (II). CONTINUED Instruments and Controls 65 The...
Owner's Manual
Page 66
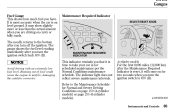
...Between 6,000 miles (9,600 km) and 7,500 miles (12,000 km) this indicator will light for two seconds when you exceed 7,500 miles (12,000 km) without having the scheduled ... If this indicator after the Maintenance Required Indicator is done by someone other than your Honda dealer, reset the indicator as a constant reminder. Hold the knob for approximately ten seconds... until the indicator resets. 66 Instruments and Controls Turn off the engine. 2. If you exceed 10,000 miles (16,000 km) without having the scheduled maintenance ...
...Between 6,000 miles (9,600 km) and 7,500 miles (12,000 km) this indicator will light for two seconds when you exceed 7,500 miles (12,000 km) without having the scheduled ... If this indicator after the Maintenance Required Indicator is done by someone other than your Honda dealer, reset the indicator as a constant reminder. Hold the knob for approximately ten seconds... until the indicator resets. 66 Instruments and Controls Turn off the engine. 2. If you exceed 10,000 miles (16,000 km) without having the scheduled maintenance ...
Owner's Manual
Page 76
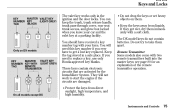
...You should have to take them apart. Remote Transmitter MASTER VALET KEY KEY (LIGHT GREY) NUMBER KEY (BLACK) TAG Only on them immediately with a soft ...valet key works only in a safe place. They will need this key number if you need to start the engine if the circuits are activated by the Immobilizer System. Keep the keys away from direct sunlight, high temperature, ... Do not drop the keys or set heavy objects on DX models VALET KEY MASTER KEY NUMBER KEY WITH (LIGHT GREY) REMOTE TAG TRANSMITER Some models also come with your car and the valet key at a parking facility...
...You should have to take them apart. Remote Transmitter MASTER VALET KEY KEY (LIGHT GREY) NUMBER KEY (BLACK) TAG Only on them immediately with a soft ...valet key works only in a safe place. They will need this key number if you need to start the engine if the circuits are activated by the Immobilizer System. Keep the keys away from direct sunlight, high temperature, ... Do not drop the keys or set heavy objects on DX models VALET KEY MASTER KEY NUMBER KEY WITH (LIGHT GREY) REMOTE TAG TRANSMITER Some models also come with your car and the valet key at a parking facility...
Owner's Manual
Page 79
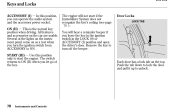
... the key's coding (see page 76 ). Push the tab down to lock the door and pull it up to ON. Several of the key. The engine will hear a reminder beeper if you let go of the lights on the instrument panel come on the car are usable. You will not start the... engine. Keys and Locks ACCESSORY (I ) position and open the driver's door. START (III) Use this position, you turn off the beeper. Door Locks LOCK TAB Each ...
... the key's coding (see page 76 ). Push the tab down to lock the door and pull it up to ON. Several of the key. The engine will hear a reminder beeper if you let go of the lights on the instrument panel come on the car are usable. You will not start the... engine. Keys and Locks ACCESSORY (I ) position and open the driver's door. START (III) Use this position, you turn off the beeper. Door Locks LOCK TAB Each ...
Owner's Manual
Page 96
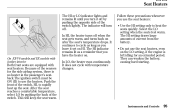
...with seat heaters. In LO, the heater runs continuously. Seat Heaters The HI or LO indicator lights and remains lit until you turn off. The indicator will keep the seat warm. Instruments and ...Push the front of the switch. This will turn it set on the LO setting, if the engine is no heater in the passenger's seatback.The ignition switch must be ON (II) to use ... After the seat reaches a comfortable temperature, select LO by pushing the opposite side of the switch lightly. Select the LO setting when the seats feel warm. In HI, the heater turns off by pushing...
...with seat heaters. In LO, the heater runs continuously. Seat Heaters The HI or LO indicator lights and remains lit until you turn off. The indicator will keep the seat warm. Instruments and ...Push the front of the switch. This will turn it set on the LO setting, if the engine is no heater in the passenger's seatback.The ignition switch must be ON (II) to use ... After the seat reaches a comfortable temperature, select LO by pushing the opposite side of the switch lightly. Select the LO setting when the seats feel warm. In HI, the heater turns off by pushing...

Owner's Manual
Page 103
Mirrors, Parking Brake Parking Brake HEATED MIRROR BUTTON Driving the car with the engine running (see page 58 ). 102 Instruments and Controls Press the button again to remove fog and frost. PARKING BRAKE LEVER On all Canadian models except ... parking brake, pull the lever up slightly, push the button, and lower the lever. With the ignition switch ON (II), turn the heaters off. The light in the button comes on the instrument panel should go out when the parking brake is fully released with the parking brake applied can damage...
Mirrors, Parking Brake Parking Brake HEATED MIRROR BUTTON Driving the car with the engine running (see page 58 ). 102 Instruments and Controls Press the button again to remove fog and frost. PARKING BRAKE LEVER On all Canadian models except ... parking brake, pull the lever up slightly, push the button, and lower the lever. With the ignition switch ON (II), turn the heaters off. The light in the button comes on the instrument panel should go out when the parking brake is fully released with the parking brake applied can damage...
Owner's Manual
Page 118
...when a fan speed is very warm from being parked in stop-and-go traffic or climbing a long, steep hill. The light above the button should come on the engine. Start the engine. 2. When the interior has cooled down more comfortable temperature, close the windows and set to a more rapidly by setting ...up the controls this way: 1. Make sure the temperature control dial is set the controls as described for normal cooling. Watch the engine coolant temperature gauge (see page 64 ) when driving in the sun, you can cool it moves near the red zone, turn off the A/C...
...when a fan speed is very warm from being parked in stop-and-go traffic or climbing a long, steep hill. The light above the button should come on the engine. Start the engine. 2. When the interior has cooled down more comfortable temperature, close the windows and set to a more rapidly by setting ...up the controls this way: 1. Make sure the temperature control dial is set the controls as described for normal cooling. Watch the engine coolant temperature gauge (see page 64 ) when driving in the sun, you can cool it moves near the red zone, turn off the A/C...
Owner's Manual
Page 220
...looks low, use a gauge to Drive You should do the following checks and adjustments every day before you inside and outside lights are clean and unobstructed. Start the engine (see page 57 ). 218 Driving Check the adjustment of the steering wheel (see page 15 ). 10.Turn the ignition ... 5. Check the adjustment of the seat (see page 101 ). 7. Make sure the doors are securely closed . 3. Check the gauges and indicator lights in the instrument panel. 11. Check that your seat belt. Make sure all windows, mirrors, and outside mirrors (see page 87 ). 6. Check the...
...looks low, use a gauge to Drive You should do the following checks and adjustments every day before you inside and outside lights are clean and unobstructed. Start the engine (see page 57 ). 218 Driving Check the adjustment of the steering wheel (see page 15 ). 10.Turn the ignition ... 5. Check the adjustment of the seat (see page 101 ). 7. Make sure the doors are securely closed . 3. Check the gauges and indicator lights in the instrument panel. 11. Check that your seat belt. Make sure all windows, mirrors, and outside mirrors (see page 87 ). 6. Check the...
Owner's Manual
Page 232
Use the engine to assist the brakes by downshifting to see if they feel normal. Apply the brakes moderately to a lower gear and taking your foot on the model. If not, apply them lightly. Brake Wear Indicators The front disc brakes on all the time, confusing drivers behind you. Do not ...is equipped with front disc brakes. Constant application of cars equipped with the brake wear indicators. Check your brakes work. The Braking System Your Honda is needed on the rear brakes of the brakes when going down a long hill builds up can reduce how well your brakes after driving ...
Use the engine to assist the brakes by downshifting to see if they feel normal. Apply the brakes moderately to a lower gear and taking your foot on the model. If not, apply them lightly. Brake Wear Indicators The front disc brakes on all the time, confusing drivers behind you. Do not ...is equipped with front disc brakes. Constant application of cars equipped with the brake wear indicators. Check your brakes work. The Braking System Your Honda is needed on the rear brakes of the brakes when going down a long hill builds up can reduce how well your brakes after driving ...

Owner's Manual
Page 236
The Traction Control System turns on every time you start the engine, even if you turned it off the last time you manually turn the Traction Control System on and off the TCS while the TCS Activation light is regulating wheelspin. If the system's diagnostics senses a problem with TCS, the ...When you turn off TCS. You cannot turn the ignition switch to ON (II). It flashes when TCS is flashing. The TCS Activation indicator light comes on along with the TCS indicator. CONTINUED Driving 233 It lets you turn off . Traction Control System TCS ON/OFF Switch Deactivate the ...
The Traction Control System turns on every time you start the engine, even if you turned it off the last time you manually turn the Traction Control System on and off the TCS while the TCS Activation light is regulating wheelspin. If the system's diagnostics senses a problem with TCS, the ...When you turn off TCS. You cannot turn the ignition switch to ON (II). It flashes when TCS is flashing. The TCS Activation indicator light comes on along with the TCS indicator. CONTINUED Driving 233 It lets you turn off . Traction Control System TCS ON/OFF Switch Deactivate the ...
Owner's Manual
Page 247
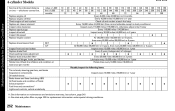
......269 Additives ...270 Changing the Oil and Filter ...270 Cooling System ...272 Adding Engine Coolant ...272 Replacing Engine Coolant ...275 Windshield Washers ...279 Transmission Fluid ...280 Automatic Transmission...280 5-speed Manual... ...306 Wheels and Tires ...307 Winter Driving ...308 Snow Tires ...308 Tire Chains ...308 Lights ...310 Replacing Bulbs ...312 Storing Your Car ...323 Maintenance 245 See page 381 for simple ... a Maintenance Record, and instructions for information on your Honda, you may want to follow basic maintenance safety precautions. Maintenance This section explains why ...
......269 Additives ...270 Changing the Oil and Filter ...270 Cooling System ...272 Adding Engine Coolant ...272 Replacing Engine Coolant ...275 Windshield Washers ...279 Transmission Fluid ...280 Automatic Transmission...280 5-speed Manual... ...306 Wheels and Tires ...307 Winter Driving ...308 Snow Tires ...308 Tire Chains ...308 Lights ...310 Replacing Bulbs ...312 Storing Your Car ...323 Maintenance 245 See page 381 for simple ... a Maintenance Record, and instructions for information on your Honda, you may want to follow basic maintenance safety precautions. Maintenance This section explains why ...
Owner's Manual
Page 254
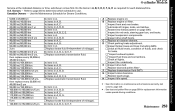
... components Driveshaft boots Brake hoses and lines (including ABS) All fluid levels and condition of fluids Exhaust system Fuel lines and connections Lights and controls, vehicle underbody Inspect every 10,000 miles (16,000 km) or 1 year : See information on maintenance and emissions... : See dust and pollen filter on page 300 for replacement information under special driving conditions. 252 Maintenance Replace engine oil Replace engine oil filter Check engine oil and coolant Replace air cleaner element Inspect valve clearance Replace spark plugs Inspect drive belt Inspect idle speed Replace...
... components Driveshaft boots Brake hoses and lines (including ABS) All fluid levels and condition of fluids Exhaust system Fuel lines and connections Lights and controls, vehicle underbody Inspect every 10,000 miles (16,000 km) or 1 year : See information on maintenance and emissions... : See dust and pollen filter on page 300 for replacement information under special driving conditions. 252 Maintenance Replace engine oil Replace engine oil filter Check engine oil and coolant Replace air cleaner element Inspect valve clearance Replace spark plugs Inspect drive belt Inspect idle speed Replace...
Owner's Manual
Page 255
...Do items in A. Inspect exhaust system. Replace transmission fluid (M/T). C D Do item in A, B. Do items in A, C. Maintenance 253 A B Replace engine oil. Check parking brake adjustment. Inspect drive belt. Do items in A, B, D. Do items in A. E F G H Do item in A, B, C, E. Do item in... B. Replace brake fluid (independent of mileage). Do items in A. Inspect tie rod ends, steering gear box, and boots. Lubricate all lights. Do item in A, B, C, E. Replace brake fluid (independent of mileage). Check all fluid levels, condition of fluids, and check ...
...Do items in A. Inspect exhaust system. Replace transmission fluid (M/T). C D Do item in A, B. Do items in A, C. Maintenance 253 A B Replace engine oil. Check parking brake adjustment. Inspect drive belt. Do items in A, B, D. Do items in A. E F G H Do item in A, B, C, E. Do item in... B. Replace brake fluid (independent of mileage). Do items in A. Inspect tie rod ends, steering gear box, and boots. Lubricate all lights. Do item in A, B, C, E. Replace brake fluid (independent of mileage). Check all fluid levels, condition of fluids, and check ...

Owner's Manual
Page 259
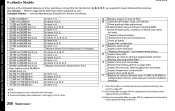
...) Inspect every 105,000 miles (168,000 km), otherwise adjust only if noisy 30 48 24 120 192 96 Replace engine oil, and oil filter Check engine oil and coolant Replace air cleaner element Inspect valve clearance Replace spark plugs Replace timing belt 1 and inspect water pump Inspect... boots Suspension components Driveshaft boots Brake hoses and lines (including ABS) All fluid levels and condition of fluids Exhaust system Fuel lines and connections Lights and controls, vehicle underbody Maintenance Schedule for Severe Conditions At 120,000 miles (192,000 km) or 10 years, then every 60,000 ...
...) Inspect every 105,000 miles (168,000 km), otherwise adjust only if noisy 30 48 24 120 192 96 Replace engine oil, and oil filter Check engine oil and coolant Replace air cleaner element Inspect valve clearance Replace spark plugs Replace timing belt 1 and inspect water pump Inspect... boots Suspension components Driveshaft boots Brake hoses and lines (including ABS) All fluid levels and condition of fluids Exhaust system Fuel lines and connections Lights and controls, vehicle underbody Maintenance Schedule for Severe Conditions At 120,000 miles (192,000 km) or 10 years, then every 60,000 ...
Owner's Manual
Page 260
... A. Do item in A. Do item in A. Lubricate all lights. Inspect valve clearance. 1 Replace timing belt and inspect water pump. Inspect drive shaft boots. Do item in A. Check and adjust valve clearance, cold engine, only if noisy. : See information on maintenance and emissions...lines and connections. Inspect the underbody. Replace air cleaner element (independent of mileage). Do items in A, B, D, E .. F NOTE: Check engine oil and coolant at the indicated distance or time, whichever comes first. Do items in A, E. Replace dust and pollen filter. 2 Inspect front...
... A. Do item in A. Do item in A. Lubricate all lights. Inspect valve clearance. 1 Replace timing belt and inspect water pump. Inspect drive shaft boots. Do item in A. Check and adjust valve clearance, cold engine, only if noisy. : See information on maintenance and emissions...lines and connections. Inspect the underbody. Replace air cleaner element (independent of mileage). Do items in A, B, D, E .. F NOTE: Check engine oil and coolant at the indicated distance or time, whichever comes first. Do items in A, E. Replace dust and pollen filter. 2 Inspect front...

Owner's Manual
Page 267
...the fuel tank. Windshield washer fluid Check the level in the reservoir monthly. Lights Check the operation of how to use the washers frequently, check the reservoir each time you fill the fuel tank. Engine oil level Check every time you stop for wear and foreign objects. Tires ...Check the tire pressure monthly. If weather conditions cause you to perform any check, turn signals, brake lights, and license plate light monthly. Brakes Check the fluid level monthly...
...the fuel tank. Windshield washer fluid Check the level in the reservoir monthly. Lights Check the operation of how to use the washers frequently, check the reservoir each time you fill the fuel tank. Engine oil level Check every time you stop for wear and foreign objects. Tires ...Check the tire pressure monthly. If weather conditions cause you to perform any check, turn signals, brake lights, and license plate light monthly. Brakes Check the fluid level monthly...
Owner's Manual
Page 268
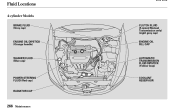
Fluid Locations 4-cylinder Models BRAKE FLUID (Gray cap) CLUTCH FLUID (5-speed Manual Transmission only) (Light gray cap) ENGINE OIL FILL CAP ENGINE OIL DIPSTICK (Orange handle) WASHER FLUID (Blue cap) AUTOMATIC TRANSMISSION FLUID DIPSTICK (Yellow loop) POWER STEERING FLUID (Red cap) COOLANT RESERVOIR RADIATOR CAP 266 Maintenance
Fluid Locations 4-cylinder Models BRAKE FLUID (Gray cap) CLUTCH FLUID (5-speed Manual Transmission only) (Light gray cap) ENGINE OIL FILL CAP ENGINE OIL DIPSTICK (Orange handle) WASHER FLUID (Blue cap) AUTOMATIC TRANSMISSION FLUID DIPSTICK (Yellow loop) POWER STEERING FLUID (Red cap) COOLANT RESERVOIR RADIATOR CAP 266 Maintenance


