Owner's Manual
Page 1
.... Authorized Manuals (U.S. Before Driving ...161 What gasoline to the dealer. Maintenance ...195 The Maintenance Schedule shows you when you need when you need to take your new Honda, and how to the fuel pump. Technical Information ...291 ID numbers, dimensions, capacities, and technical information. Things to start the engine, shift the transmission, and park, plus towing a trailer. Taking Care of the warranties covering your car to use dashboard and steering column controls. Comfort...
.... Authorized Manuals (U.S. Before Driving ...161 What gasoline to the dealer. Maintenance ...195 The Maintenance Schedule shows you when you need when you need to take your new Honda, and how to the fuel pump. Technical Information ...291 ID numbers, dimensions, capacities, and technical information. Things to start the engine, shift the transmission, and park, plus towing a trailer. Taking Care of the warranties covering your car to use dashboard and steering column controls. Comfort...
Owner's Manual
Page 2
.... Maintaining your car according to the schedules given in this owner's manual in your car needs maintenance, keep in servicing the many systems unique to keep this manual helps to your new Honda is to cause cancer and birth defects or other property, or the environment. When your car so you understand the coverages and are aware of a 2002 Honda Civic was a wise...
.... Maintaining your car according to the schedules given in this owner's manual in your car needs maintenance, keep in servicing the many systems unique to keep this manual helps to your new Honda is to cause cancer and birth defects or other property, or the environment. When your car so you understand the coverages and are aware of a 2002 Honda Civic was a wise...
Owner's Manual
Page 16
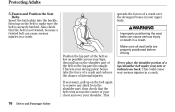
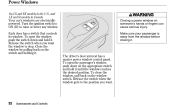
... fits snugly. Also check that the belt rests across your hips, then pull up on the belt again to make sure the belt is not twisted, because a twisted belt can cause serious injury or death in a crash. 16 Driver and Passenger Safety Improperly positioning the seat belts can cause serious injuries in your upper body. This lets your back. If necessary...
... fits snugly. Also check that the belt rests across your hips, then pull up on the belt again to make sure the belt is not twisted, because a twisted belt can cause serious injury or death in a crash. 16 Driver and Passenger Safety Improperly positioning the seat belts can cause serious injuries in your upper body. This lets your back. If necessary...
Owner's Manual
Page 28
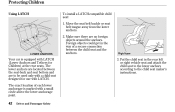
... instructions provided in your car. Properly secure a rear-facing child seat (see page 35 ). 28 Driver and Passenger Safety Small children: Not recommended, due to the front airbag hazard. Protecting Children Placing a Child Seat Front Passenger's Seat Infants: Never in the front seat, due This page briefly summarizes Honda's recommendations on where to place rear-facing and forwardfacing child seats in this section. Properly...
... instructions provided in your car. Properly secure a rear-facing child seat (see page 35 ). 28 Driver and Passenger Safety Small children: Not recommended, due to the front airbag hazard. Protecting Children Placing a Child Seat Front Passenger's Seat Infants: Never in the front seat, due This page briefly summarizes Honda's recommendations on where to place rear-facing and forwardfacing child seats in this section. Properly...
Owner's Manual
Page 42
... type Your car is marked with LATCH (Lower Anchors and Tethers for use with LATCH. The exact location of a secure connection between the seat-back and seat bottom and are to the child seat maker's instructions. 42 Driver and Passenger Safety Protecting Children Using LATCH To install a LATCH-compatible child seat: 1. Foreign objects could get in the rear left or right vehicle seat and attach the...
... type Your car is marked with LATCH (Lower Anchors and Tethers for use with LATCH. The exact location of a secure connection between the seat-back and seat bottom and are to the child seat maker's instructions. 42 Driver and Passenger Safety Protecting Children Using LATCH To install a LATCH-compatible child seat: 1. Foreign objects could get in the rear left or right vehicle seat and attach the...

Owner's Manual
Page 57
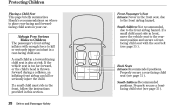
... ...67 Fuel Gauge ...67 Temperature Gauge ...68 Controls Near the Steering Wheel ...69 Headlights ...70 Daytime Running Lights...71 Instrument Panel Brightness ...71 Turn Signals ...72 Windshield Wipers ...72 Windshield Washers ...73 Hazard Warning...74 Rear Window Defogger ...74 Steering Wheel Adjustment ...75 Keys and Locks ...76 Keys...76 Immobilizer System...77 Ignition Switch ...78 Door Locks ...80 Power Door Locks ...81 Remote Transmitter ...81 Trunk ...84 Emergency Trunk Opener ...85 Seat Adjustments ...86 Front Seat Adjustments ...86 Driver's Seat Height Adjustment ...87 Driver's Seat...
... ...67 Fuel Gauge ...67 Temperature Gauge ...68 Controls Near the Steering Wheel ...69 Headlights ...70 Daytime Running Lights...71 Instrument Panel Brightness ...71 Turn Signals ...72 Windshield Wipers ...72 Windshield Washers ...73 Hazard Warning...74 Rear Window Defogger ...74 Steering Wheel Adjustment ...75 Keys and Locks ...76 Keys...76 Immobilizer System...77 Ignition Switch ...78 Door Locks ...80 Power Door Locks ...81 Remote Transmitter ...81 Trunk ...84 Emergency Trunk Opener ...85 Seat Adjustments ...86 Front Seat Adjustments ...86 Driver's Seat Height Adjustment ...87 Driver's Seat...
Owner's Manual
Page 62
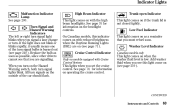
..., since other drivers cannot see that you must refuel soon. Washer Level Indicator Canadian models only This lights when you signal a lane change or turn signal bulbs is not closed tightly. If the light does not blink or blinks rapidly, it usually means one of the car should flash. See page 70 for information on if the trunk lid is burned...
..., since other drivers cannot see that you must refuel soon. Washer Level Indicator Canadian models only This lights when you signal a lane change or turn signal bulbs is not closed tightly. If the light does not blink or blinks rapidly, it usually means one of the car should flash. See page 70 for information on if the trunk lid is burned...
Owner's Manual
Page 74
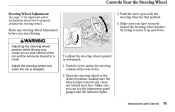
... the steering wheel upward or downward: 1. Push the lever under the steering column all the way down . Make any steering wheel adjustment before you can see the instrument panel gauges and the indicator lights. Move the steering wheel to properly position the steering wheel. 3. Adjust the steering wheel only when the car is stopped. Make sure you start driving. Controls Near the Steering Wheel Steering Wheel Adjustment See page 17 for important safety information...
... the steering wheel upward or downward: 1. Push the lever under the steering column all the way down . Make any steering wheel adjustment before you can see the instrument panel gauges and the indicator lights. Move the steering wheel to properly position the steering wheel. 3. Adjust the steering wheel only when the car is stopped. Make sure you start driving. Controls Near the Steering Wheel Steering Wheel Adjustment See page 17 for important safety information...
Owner's Manual
Page 91
.... Power Windows On LX and EX models in the U.S., and LX and Si models in Canada Your car's windows are electricallypowered. The driver's door armrest has a master power window control panel. Closing a power window on the window switch. Release the switch when you want the window to raise or lower any window. Turn the ignition switch to ON (II) to stop. Release the switch when the window gets to the position you want . Make sure your passenger is...
.... Power Windows On LX and EX models in the U.S., and LX and Si models in Canada Your car's windows are electricallypowered. The driver's door armrest has a master power window control panel. Closing a power window on the window switch. Release the switch when you want the window to raise or lower any window. Turn the ignition switch to ON (II) to stop. Release the switch when the window gets to the position you want . Make sure your passenger is...
Owner's Manual
Page 193
... Oil ...210 Additives ...210 Changing the Oil and Filter ...211 Cooling System ...213 Adding Engine Coolant ...213 Replacing Engine Coolant ...215 Windshield Washers ...219 Transmission Fluid ...220 Automatic Transmission...220 5-speed Manual Transmission...222 Brake and Clutch Fluid ...223 Brake System ...223 Clutch System ...223 Power Steering ...224 Air Cleaner Element ...225 Hood Latch ...226 Spark Plugs ...227 Replacement ...227 Specifications ...229 Battery ...230 Wiper Blades ...232 Air Conditioning System ...234 Dust and Pollen Filter ...235 Drive Belts ...237 Timing Belt ...237 Tires...
... Oil ...210 Additives ...210 Changing the Oil and Filter ...211 Cooling System ...213 Adding Engine Coolant ...213 Replacing Engine Coolant ...215 Windshield Washers ...219 Transmission Fluid ...220 Automatic Transmission...220 5-speed Manual Transmission...222 Brake and Clutch Fluid ...223 Brake System ...223 Clutch System ...223 Power Steering ...224 Air Cleaner Element ...225 Hood Latch ...226 Spark Plugs ...227 Replacement ...227 Specifications ...229 Battery ...230 Wiper Blades ...232 Air Conditioning System ...234 Dust and Pollen Filter ...235 Drive Belts ...237 Timing Belt ...237 Tires...

Owner's Manual
Page 198
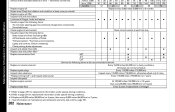
..., steering gear box and boots, Suspension components Driveshaft boots, Brake hoses and lines (including ABS) All fluid levels and condition of fluids Exhaust system, Fuel lines and connections Replace air cleaner element Inspect and adjust drive belts Replace dust and pollen filter Replace transmission fluid Check oil and coolant at each fuel stop Every 30,000 miles (48,000 km) M/T A/T CVT Service the following items at the recommended intervals. 1 2 Replace spark plugs Inspect valve clearance Replace timing belt, and inspect water pump Inspect idle speed Replace engine coolant Replace...
..., steering gear box and boots, Suspension components Driveshaft boots, Brake hoses and lines (including ABS) All fluid levels and condition of fluids Exhaust system, Fuel lines and connections Replace air cleaner element Inspect and adjust drive belts Replace dust and pollen filter Replace transmission fluid Check oil and coolant at each fuel stop Every 30,000 miles (48,000 km) M/T A/T CVT Service the following items at the recommended intervals. 1 2 Replace spark plugs Inspect valve clearance Replace timing belt, and inspect water pump Inspect idle speed Replace engine coolant Replace...
Owner's Manual
Page 199
.... Inspect brake hoses and lines (including ABS). Inspect exhaust system. NOTE: Check engine oil and coolant at the indicated distance or time, whichever comes first. Do items in A, C, D. Inspect tie rod ends, steering gear box and boots. Inspect suspension components. Replace dust and pollen filter. Service at each fuel stop. Do items in A, B, C, D, Replace transmission fluid (CVT) 2. Do items in A, B. Do items in A, B. Replace transmission fluid (CVT) 2. Replace spark plugs. Replace timing belt, inspect water pump. Replace engine coolant. Inspect idle speed...
.... Inspect brake hoses and lines (including ABS). Inspect exhaust system. NOTE: Check engine oil and coolant at the indicated distance or time, whichever comes first. Do items in A, C, D. Inspect tie rod ends, steering gear box and boots. Inspect suspension components. Replace dust and pollen filter. Service at each fuel stop. Do items in A, B, C, D, Replace transmission fluid (CVT) 2. Do items in A, B. Do items in A, B. Replace transmission fluid (CVT) 2. Replace spark plugs. Replace timing belt, inspect water pump. Replace engine coolant. Inspect idle speed...
Owner's Manual
Page 200
...items: Brake hoses and lines (including ABS) All fluid levels and condition of fluids Exhaust system, Fuel lines and connections Lights and controls, Vehicle underbody Check parking brake adjustment Inspect and adjust drive belts Replace dust and pollen filter 1 Replace transmission fluid 24 36 48 60 Replace every 5,000 miles (8,000 km) or 6 months Check oil and coolant at each fuel stop Replace air cleaner element Replace spark plugs Inspect valve clearance Replace timing belt 2, and inspect water pump Inspect idle speed Replace engine coolant Replace brake fluid M/T A/T 3 CVT Service the...
...items: Brake hoses and lines (including ABS) All fluid levels and condition of fluids Exhaust system, Fuel lines and connections Lights and controls, Vehicle underbody Check parking brake adjustment Inspect and adjust drive belts Replace dust and pollen filter 1 Replace transmission fluid 24 36 48 60 Replace every 5,000 miles (8,000 km) or 6 months Check oil and coolant at each fuel stop Replace air cleaner element Replace spark plugs Inspect valve clearance Replace timing belt 2, and inspect water pump Inspect idle speed Replace engine coolant Replace brake fluid M/T A/T 3 CVT Service the...
Owner's Manual
Page 206
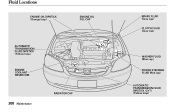
Fluid Locations ENGINE OIL DIPSTICK (Orange loop) ENGINE OIL FILL CAP BRAKE FLUID (Gray cap) CLUTCH FLUID (Gray cap) AUTOMATIC TRANSMISSION FLUID DIPSTICK (Yellow loop) WASHER FLUID (Blue cap) ENGINE COOLANT RESERVOIR POWER STEERING FLUID (Red cap) RADIATOR CAP AUTOMATIC TRANSMISSION FLUID DIPSTICK (CVT) (Yellow loop) 208 Maintenance
Fluid Locations ENGINE OIL DIPSTICK (Orange loop) ENGINE OIL FILL CAP BRAKE FLUID (Gray cap) CLUTCH FLUID (Gray cap) AUTOMATIC TRANSMISSION FLUID DIPSTICK (Yellow loop) WASHER FLUID (Blue cap) ENGINE COOLANT RESERVOIR POWER STEERING FLUID (Red cap) RADIATOR CAP AUTOMATIC TRANSMISSION FLUID DIPSTICK (CVT) (Yellow loop) 208 Maintenance
Owner's Manual
Page 251
..., it for storage. Nonporous materials, such as cotton. Clean the interior. If the car is being stored indoors). Storing Your Car If you need to park your car for an extended period (more than one month), there are completely dry. Leave the parking brake off the ground. Block the rear wheels. Change the engine oil and filter (see page 200 ). Make sure the carpeting, floor mats, etc.
..., it for storage. Nonporous materials, such as cotton. Clean the interior. If the car is being stored indoors). Storing Your Car If you need to park your car for an extended period (more than one month), there are completely dry. Leave the parking brake off the ground. Block the rear wheels. Change the engine oil and filter (see page 200 ). Make sure the carpeting, floor mats, etc.
Owner's Manual
Page 310
... ...306 D DANGER, Explanation of ...ii Dashboard ...2, 58 Daytime Running Lights...71 Defects, Reporting Safety...308 Defog and Defrost ...109 Defogger, Rear Window ...74 Defrosting the Windows ...109 Dimensions ...294 Dimming the Headlights ...71 Dipstick Automatic Transmission...220 Engine Oil ...166 Directional Signals ...72 Disc Brake Wear Indicators ...189 Disposal of Used Oil ...212 Doors Locking and Unlocking ...80 Power Door Locks ...81 DOT Tire Quality Grading ...296 Downshifting, 5-speed Manual Transmission ...178 Drive Belts ...237 Driver and Passenger Safety ...5 II
... ...306 D DANGER, Explanation of ...ii Dashboard ...2, 58 Daytime Running Lights...71 Defects, Reporting Safety...308 Defog and Defrost ...109 Defogger, Rear Window ...74 Defrosting the Windows ...109 Dimensions ...294 Dimming the Headlights ...71 Dipstick Automatic Transmission...220 Engine Oil ...166 Directional Signals ...72 Disc Brake Wear Indicators ...189 Disposal of Used Oil ...212 Doors Locking and Unlocking ...80 Power Door Locks ...81 DOT Tire Quality Grading ...296 Downshifting, 5-speed Manual Transmission ...178 Drive Belts ...237 Driver and Passenger Safety ...5 II
Owner's Manual
Page 311
... Oil, What Kind to Use ...209 Overheating...275 Specifications ...294 Starting...177 Engine Speed Limiter ...179, 183 Ethanol in Gasoline ...298 Evaporative Emissions Controls .. 300 Exhaust Fumes ...54 Expectant Mothers, Use of Seat Belts by ...19 Exterior, Cleaning the ...256 5-speed Manual Transmission Checking Fluid Level ...222 Shifting the ...178 Flashers, Hazard Warning...74 Flat Tire, Changing a ...265 Fluids Automatic Transmission...220 Brake ...223 Clutch ...223 Manual Transmission ...222 Power Steering...224 Windshield Washer ...219 FM Stereo Radio Reception ...143 Folding Rear Seat...
... Oil, What Kind to Use ...209 Overheating...275 Specifications ...294 Starting...177 Engine Speed Limiter ...179, 183 Ethanol in Gasoline ...298 Evaporative Emissions Controls .. 300 Exhaust Fumes ...54 Expectant Mothers, Use of Seat Belts by ...19 Exterior, Cleaning the ...256 5-speed Manual Transmission Checking Fluid Level ...222 Shifting the ...178 Flashers, Hazard Warning...74 Flat Tire, Changing a ...265 Fluids Automatic Transmission...220 Brake ...223 Clutch ...223 Manual Transmission ...222 Power Steering...224 Windshield Washer ...219 FM Stereo Radio Reception ...143 Folding Rear Seat...
Owner's Manual
Page 312
Index Fuses, Checking the ...284 H Halogen Headlight Bulbs...247 Hazard Warning Flashers...74 Headlights Daytime Running Lights...71 High Beam Indicator ...63 Reminder Beeper ...70 Replacing Halogen Bulbs ...250 Turning on ...70 Head Restraints ...88 Heating and Cooling ...104 High Altitude, Starting at ...177 High-Low Beam Switch ...70 High-mount Brake Light...247 Hood Latch ...226 Hood, Opening the ...164 Horn...69 Hydraulic Clutch ...223 Hydroplaning...194 G Gas Mileage, Improving...168 Gasohol ...298 Gasoline...
Index Fuses, Checking the ...284 H Halogen Headlight Bulbs...247 Hazard Warning Flashers...74 Headlights Daytime Running Lights...71 High Beam Indicator ...63 Reminder Beeper ...70 Replacing Halogen Bulbs ...250 Turning on ...70 Head Restraints ...88 Heating and Cooling ...104 High Altitude, Starting at ...177 High-Low Beam Switch ...70 High-mount Brake Light...247 Hood Latch ...226 Hood, Opening the ...164 Horn...69 Hydraulic Clutch ...223 Hydroplaning...194 G Gas Mileage, Improving...168 Gasohol ...298 Gasoline...
Owner's Manual
Page 315
... Tire Inflating ...264 Specifications ...295 Spark Plugs, Replacing ...227 Specifications Charts...294 Speed Control ...156 Speedometer ...66 Spotlights ...102 SRS, Additional Information...48 Additional Safety Precautions ...53 Airbag Service ...53 How the Side Airbag Indicator Light Works ...52 How the SRS Indicator Works ...51 How Your Airbags Work ...48 How Your Side Airbags Work...50 SRS Components ...48 SRS Indicator...51, 61 START (Ignition Key Position) ...80 Testing of Readiness Codes ...303 Starting the Engine...
... Tire Inflating ...264 Specifications ...295 Spark Plugs, Replacing ...227 Specifications Charts...294 Speed Control ...156 Speedometer ...66 Spotlights ...102 SRS, Additional Information...48 Additional Safety Precautions ...53 Airbag Service ...53 How the Side Airbag Indicator Light Works ...52 How the SRS Indicator Works ...51 How Your Airbags Work ...48 How Your Side Airbags Work...50 SRS Components ...48 SRS Indicator...51, 61 START (Ignition Key Position) ...80 Testing of Readiness Codes ...303 Starting the Engine...
Owner's Manual
Page 316
..., Tire Changing ...265 Towing A Trailer ...194 Emergency Wrecker ...289 Traction Devices ...244 Transmission Checking Fluid Level, Automatic ...220 Checking Fluid Level, Manual ...222 Fluid Selection ...220, 222 Identification Number...293 Shifting the Automatic ...181 Shifting the Manual ...178 Treadwear ...296 Trip Meter ...67 Trunk...84 Opening...84 Open Monitor Light ...63 Turn Signals ...72 Vehicle Dimensions...294 Vehicle Identification Number...292 Vehicle Storage ...254 Ventilation ...106 VIN ...292 Vinyl Cleaning ...259 Viscosity, Oil...210 W WARNING...
..., Tire Changing ...265 Towing A Trailer ...194 Emergency Wrecker ...289 Traction Devices ...244 Transmission Checking Fluid Level, Automatic ...220 Checking Fluid Level, Manual ...222 Fluid Selection ...220, 222 Identification Number...293 Shifting the Automatic ...181 Shifting the Manual ...178 Treadwear ...296 Trip Meter ...67 Trunk...84 Opening...84 Open Monitor Light ...63 Turn Signals ...72 Vehicle Dimensions...294 Vehicle Identification Number...292 Vehicle Storage ...254 Ventilation ...106 VIN ...292 Vinyl Cleaning ...259 Viscosity, Oil...210 W WARNING...


