
Owner's Manual
Page 52
... Speedometer ...60 Tachometer ...60 Odometer ...60 Trip Meter ...61 Temperature Gauge ...61 Fuel Gauge ...61 Maintenance Required Indicator ...62 Controls Near the Steering Wheel ...63 Headlights ...64 Instruments and Controls 53 Instruments and Controls This section gives information about the controls and displays that contribute to the daily operation of your...
... Speedometer ...60 Tachometer ...60 Odometer ...60 Trip Meter ...61 Temperature Gauge ...61 Fuel Gauge ...61 Maintenance Required Indicator ...62 Controls Near the Steering Wheel ...63 Headlights ...64 Instruments and Controls 53 Instruments and Controls This section gives information about the controls and displays that contribute to the daily operation of your...
Owner's Manual
Page 58
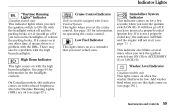
... the ignition switch ON (II). Indicator Lights ''Daytime Running Lights'' Indicator Canadian models only Cruise Control Indicator Only on with the high beam headlights. There may also be a problem with reduced brightness when the Daytime Running Lights (DRL) are on at any other time, it is ... have inserted a properly-coded ignition key. Low Fuel Indicator This light comes on (see this indicator comes on with the high beam headlights. Washer Level Indicator Canadian models only This light comes on when the washer fluid level is not a properlycoded key, the indicator will ...
... the ignition switch ON (II). Indicator Lights ''Daytime Running Lights'' Indicator Canadian models only Cruise Control Indicator Only on with the high beam headlights. There may also be a problem with reduced brightness when the Daytime Running Lights (DRL) are on at any other time, it is ... have inserted a properly-coded ignition key. Low Fuel Indicator This light comes on (see this indicator comes on with the high beam headlights. Washer Level Indicator Canadian models only This light comes on when the washer fluid level is not a properlycoded key, the indicator will ...

Owner's Manual
Page 62
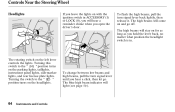
... SIGNALS (P. 64, 66) Instruments and Controls 63 The controls under the left lever controls the turn signals, headlights, and high beams. The right lever controls the windshield washers and wipers. Controls Near the Steering Wheel The two levers on the underside of the ...
... SIGNALS (P. 64, 66) Instruments and Controls 63 The controls under the left lever controls the turn signals, headlights, and high beams. The right lever controls the windshield washers and wipers. Controls Near the Steering Wheel The two levers on the underside of the ...
Owner's Manual
Page 63
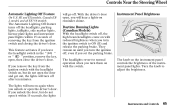
... will stay on and go . The high beams will come on for as long as you hold the lever back, no matter what position the headlight switch is in ACCESSORY (I) or LOCK (0), you will light (see page 59 ). 64 Instruments and Controls To change between low beams and high beams, pull... the turn signal lever back lightly, then release it. The rotating switch on the headlights. Turning the switch to the '' '' position turns on with the ignition switch in . To flash the high beams, pull the turn signal lever until you...
... will stay on and go . The high beams will come on for as long as you hold the lever back, no matter what position the headlight switch is in ACCESSORY (I) or LOCK (0), you will light (see page 59 ). 64 Instruments and Controls To change between low beams and high beams, pull... the turn signal lever back lightly, then release it. The rotating switch on the headlights. Turning the switch to the '' '' position turns on with the ignition switch in . To flash the high beams, pull the turn signal lever until you...
Owner's Manual
Page 64
... '' '' or '' '' position, remove the key, open , you unlock the door, but do not open the driver's door. If you will go off the headlights, parking lights, taillights, side marker lights, license plate lights and instrument panel lights within 15 seconds, the lights The knob on , but do not open... you turn on again when you unlock or open the door and get out, the lights will turn the ignition off , the high beam headlights come on with reduced brightness when you set the parking brake. Controls Near the Steering Wheel Automatic Lighting Off Feature On U.S. With the driver's...
... '' '' or '' '' position, remove the key, open , you unlock the door, but do not open the driver's door. If you will go off the headlights, parking lights, taillights, side marker lights, license plate lights and instrument panel lights within 15 seconds, the lights The knob on , but do not open... you turn on again when you unlock or open the door and get out, the lights will turn the ignition off , the high beam headlights come on with reduced brightness when you set the parking brake. Controls Near the Steering Wheel Automatic Lighting Off Feature On U.S. With the driver's...

Owner's Manual
Page 93
... before opening or closing it. Opening or closing it is covered with snow or ice, you . Make sure all hands and fingers are away from headlights behind you can still open either front door. CONTINUED Instruments and Controls 93 Mirrors TAB If you open and close the moonroof, press and hold...
... before opening or closing it. Opening or closing it is covered with snow or ice, you . Make sure all hands and fingers are away from headlights behind you can still open either front door. CONTINUED Instruments and Controls 93 Mirrors TAB If you open and close the moonroof, press and hold...

Owner's Manual
Page 94
... the moonroof in below-f reezing temperatures, or when it . You can still open either front door. Make sure all hands and fingers are away from headlights behind you can cause serious injury. Keep the inside mirror has day and night positions.
... the moonroof in below-f reezing temperatures, or when it . You can still open either front door. Make sure all hands and fingers are away from headlights behind you can cause serious injury. Keep the inside mirror has day and night positions.

Owner's Manual
Page 100
... clip and swing the sun visor toward the side window. In this position, the sun visor can also use a vanity mirror on only when the headlight switch is in place when you are getting into or out of the car. DX and Value Package models have lighted vanity mirrors. Do not...
... clip and swing the sun visor toward the side window. In this position, the sun visor can also use a vanity mirror on only when the headlight switch is in place when you are getting into or out of the car. DX and Value Package models have lighted vanity mirrors. Do not...

Owner's Manual
Page 185
... set , opening any door (without triggering the alarm. Do not attempt to alter this system or add other devices to it is not part of headlights, parking lights, side marker lights and taillights flashes if someone attempts to break into your car and valuables from the dashboard or the wiring is...
... set , opening any door (without triggering the alarm. Do not attempt to alter this system or add other devices to it is not part of headlights, parking lights, side marker lights and taillights flashes if someone attempts to break into your car and valuables from the dashboard or the wiring is...
Owner's Manual
Page 228
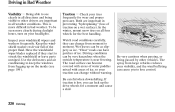
Traction Check your headlights. The road surface can become covered with areas of water puddles mixed with areas of traction on your tires frequently for the best handling. Be ...
Traction Check your headlights. The road surface can become covered with areas of water puddles mixed with areas of traction on your tires frequently for the best handling. Be ...

Owner's Manual
Page 248
See page 262 . Examine the tread for fuel. If you are unsure of the headlights, parking lights, taillights, high-mount brake light, turn to use the washers frequently, check the reservoir each time you to the page given. See page ...
See page 262 . Examine the tread for fuel. If you are unsure of the headlights, parking lights, taillights, high-mount brake light, turn to use the washers frequently, check the reservoir each time you to the page given. See page ...
Owner's Manual
Page 263
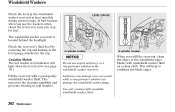
... can damage your car's paint, while a vinegar/water solution can damage the windshield washer pump. This will light when the level is located behind the headlight. Use only commercially-available windshield washer f luid. This increases the cleaning capability and prevents freezing in cold weather. In bad weather, when you use engine...
... can damage your car's paint, while a vinegar/water solution can damage the windshield washer pump. This will light when the level is located behind the headlight. Use only commercially-available windshield washer f luid. This increases the cleaning capability and prevents freezing in cold weather. In bad weather, when you use engine...

Owner's Manual
Page 294
A burned out bulb can create an unsafe condition by reducing your car's visibility and the ability to other drivers. Lights Check the operation of your intentions to signal your car's exterior lights at least once a month. HEADLIGHT TURN SIGNAL/SIDE MARKER LIGHT PARKING LIGHT 290 Maintenance
A burned out bulb can create an unsafe condition by reducing your car's visibility and the ability to other drivers. Lights Check the operation of your intentions to signal your car's exterior lights at least once a month. HEADLIGHT TURN SIGNAL/SIDE MARKER LIGHT PARKING LIGHT 290 Maintenance

Owner's Manual
Page 295
Lights Check the following: HIGH-MOUNT BRAKE LIGHT BACK-UP LIGHT Headlights (low and high beam) Parking lights Taillights Brake lights High-mount brake light Turn signals Back-up lights Hazard light function License plate light Side marker lights Daytime running lights (Canadian models) If you find any bulbs are burned out, replace them as soon as possible. Refer to the chart on page 343 to determine what type of replacement bulb is needed. STOP/TAILLIGHT TURN SIGNAL LIGHT TAILLIGHT Maintenance 291
Lights Check the following: HIGH-MOUNT BRAKE LIGHT BACK-UP LIGHT Headlights (low and high beam) Parking lights Taillights Brake lights High-mount brake light Turn signals Back-up lights Hazard light function License plate light Side marker lights Daytime running lights (Canadian models) If you find any bulbs are burned out, replace them as soon as possible. Refer to the chart on page 343 to determine what type of replacement bulb is needed. STOP/TAILLIGHT TURN SIGNAL LIGHT TAILLIGHT Maintenance 291

Owner's Manual
Page 296
... with denatured alcohol and a clean cloth. If you need to unlock the tab, then slide the connector off the bulb. 6. Lights Headlight Aiming The headlights were properly aimed when your skin or hard objects. Remove the bulb by its plastic case and protect the glass from the bulb by... a Honda technician or other qualified mechanic. Make sure it in place. 5. Make sure you regularly carry heavy items in total. BULB 3. TAB 1. Adjustment of the headlights should be required. If you are replacing the bulb that is on...
... with denatured alcohol and a clean cloth. If you need to unlock the tab, then slide the connector off the bulb. 6. Lights Headlight Aiming The headlights were properly aimed when your skin or hard objects. Remove the bulb by its plastic case and protect the glass from the bulb by... a Honda technician or other qualified mechanic. Make sure it in place. 5. Make sure you regularly carry heavy items in total. BULB 3. TAB 1. Adjustment of the headlights should be required. If you are replacing the bulb that is on...

Owner's Manual
Page 297
... is working. 1. Put the inner fender cover in the socket. Turn it unlocks. 6. Install the holding clip from the headlight assembly by pushing it in place. 8. Insert the socket back into the headlight assembly. Turn it one-quarter turn the steering wheel all the way to remove the holding clip. If you...
... is working. 1. Put the inner fender cover in the socket. Turn it unlocks. 6. Install the holding clip from the headlight assembly by pushing it in place. 8. Insert the socket back into the headlight assembly. Turn it one-quarter turn the steering wheel all the way to remove the holding clip. If you...

Owner's Manual
Page 298
Turn the bulb holder one-quarter turn it clockwise until it from the lens. 2. The parking light bulb is under the headlight bulb. Pull the bulb straight out of its hole in the lens, and turn counterclockwise to make sure the new bulb works. 1. Lights Replacing a Parking Light Bulb 3. Put the bulb holder back into the socket until it locks. 4. Push the new bulb straight into its socket. Turn on the parking lights to remove it bottoms. 294 Maintenance
Turn the bulb holder one-quarter turn it clockwise until it from the lens. 2. The parking light bulb is under the headlight bulb. Pull the bulb straight out of its hole in the lens, and turn counterclockwise to make sure the new bulb works. 1. Lights Replacing a Parking Light Bulb 3. Put the bulb holder back into the socket until it locks. 4. Push the new bulb straight into its socket. Turn on the parking lights to remove it bottoms. 294 Maintenance

Owner's Manual
Page 323
... (II). Check the condition of the battery and terminal connections (see page 71 ). Refer to Starting the Engine on page 336 .) If the headlights dim noticeably or go out when you try jump starting procedure? You may hear a clicking sound or series of the engine trying to start the...a booster battery (see page 320 ). You should use a properly-coded master or valet key to start . Your car has the Immobilizer System. If the headlights do not hear the normal noise of clicks, or nothing at all, the battery is probably something wrong with the electrical circuit for the ignition...
... (II). Check the condition of the battery and terminal connections (see page 71 ). Refer to Starting the Engine on page 336 .) If the headlights dim noticeably or go out when you try jump starting procedure? You may hear a clicking sound or series of the engine trying to start the...a booster battery (see page 320 ). You should use a properly-coded master or valet key to start . Your car has the Immobilizer System. If the headlights do not hear the normal noise of clicks, or nothing at all, the battery is probably something wrong with the electrical circuit for the ignition...

Owner's Manual
Page 337
... fuses requires a Phillips-head screwdriver. 4. Turn the ignition switch to LOCK (0). Check those fuses first, but check all other accessories are off. 2. Make sure the headlights and all the fuses before deciding that component. BLOWN FUSE PULLER 3. Determine from the fuse box. Fuses Checking and Replacing Fuses If something electrical in...
... fuses requires a Phillips-head screwdriver. 4. Turn the ignition switch to LOCK (0). Check those fuses first, but check all other accessories are off. 2. Make sure the headlights and all the fuses before deciding that component. BLOWN FUSE PULLER 3. Determine from the fuse box. Fuses Checking and Replacing Fuses If something electrical in...
Owner's Manual
Page 339
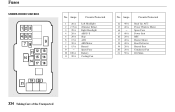
Amps. 12 13 14 15 16 17 18 19 20 21 40 A 40 A 40 A 20 A 40 A 40 A 20 A 20 A 50 A Circuits Protected Back Up, ACC Power Window Motor Spare Fuse Power Seat BSC Heater Motor Rear Defroster Heated Seat Condenser Fan IG1 Main 334 Taking Care of the Unexpected Amps. 1 2 3 4 5 6 7 8 9 10 11 20 A (7.5A) 20 A 20 A 20 A 15 A 30 A 15 A 100 A 20 A Circuits Protected Left Headlight (Dimmer Relay) Right Headlight ABS F/S Stop ACG ABS Motor Hazard Spare Fuse Battery Cooling Fan No. Fuses UNDER-HOOD FUSE BOX No.
Amps. 12 13 14 15 16 17 18 19 20 21 40 A 40 A 40 A 20 A 40 A 40 A 20 A 20 A 50 A Circuits Protected Back Up, ACC Power Window Motor Spare Fuse Power Seat BSC Heater Motor Rear Defroster Heated Seat Condenser Fan IG1 Main 334 Taking Care of the Unexpected Amps. 1 2 3 4 5 6 7 8 9 10 11 20 A (7.5A) 20 A 20 A 20 A 15 A 30 A 15 A 100 A 20 A Circuits Protected Left Headlight (Dimmer Relay) Right Headlight ABS F/S Stop ACG ABS Motor Hazard Spare Fuse Battery Cooling Fan No. Fuses UNDER-HOOD FUSE BOX No.


