
Owner's Manual
Page 19
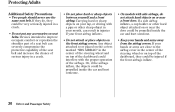
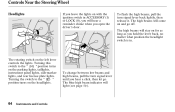
... the protective capability of the seat belt and increase the chance of the steering wheel and on the front airbag covers. Do not put any accessories on or near a front door. Any object inflates, a cup holder or other sharp object in injuries if your lap, or driving with the proper operation...
... the protective capability of the seat belt and increase the chance of the steering wheel and on the front airbag covers. Do not put any accessories on or near a front door. Any object inflates, a cup holder or other sharp object in injuries if your lap, or driving with the proper operation...
Owner's Manual
Page 36
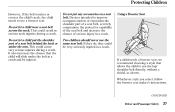
... and Passenger Safety 37 It also increases the chance that allows the child to use the same seat belt. Do not let a child put any accessories on a seat belt. If they do, they could cause occupant comfort or reposition the shoulder part of a seat belt, severely compromise the protective capability of...
... and Passenger Safety 37 It also increases the chance that allows the child to use the same seat belt. Do not let a child put any accessories on a seat belt. If they do, they could cause occupant comfort or reposition the shoulder part of a seat belt, severely compromise the protective capability of...
Owner's Manual
Page 52
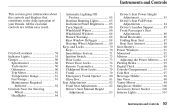
... ...94 Parking Brake ...95 Digital Clock ...96 Console Compartment ...97 Coin Box ...97 Beverage Holder ...98 Sun Visor...99 Vanity Mirror ...99 Sunglasses Holder ...100 Accessory Power Socket ...100 Interior Lights ...101 Control Locations ...54 Indicator Lights...55 Gauges ...60 Speedometer ...60 Tachometer ...60 Odometer ...60 Trip Meter ...61 Temperature Gauge... controls are within easy reach. Instruments and Controls This section gives information about the controls and displays that contribute to the daily operation of your Honda.
... ...94 Parking Brake ...95 Digital Clock ...96 Console Compartment ...97 Coin Box ...97 Beverage Holder ...98 Sun Visor...99 Vanity Mirror ...99 Sunglasses Holder ...100 Accessory Power Socket ...100 Interior Lights ...101 Control Locations ...54 Indicator Lights...55 Gauges ...60 Speedometer ...60 Tachometer ...60 Odometer ...60 Trip Meter ...61 Temperature Gauge... controls are within easy reach. Instruments and Controls This section gives information about the controls and displays that contribute to the daily operation of your Honda.
Owner's Manual
Page 58
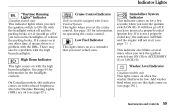
...'' Indicator Canadian models only Cruise Control Indicator Only on models equipped with Cruise Control System This indicator lights when you turn the ignition switch to ACCESSORY (I) or LOCK (0). High Beam Indicator This light comes on the headlight controls. This indicator also blinks several times when you must refuel soon...
...'' Indicator Canadian models only Cruise Control Indicator Only on models equipped with Cruise Control System This indicator lights when you turn the ignition switch to ACCESSORY (I) or LOCK (0). High Beam Indicator This light comes on the headlight controls. This indicator also blinks several times when you must refuel soon...
Owner's Manual
Page 63
... in . The high beams will stay on for as long as you hold the lever back, no matter what position the headlight switch is in ACCESSORY (I) or LOCK (0), you will hear a reminder chime when you hear a click, then let go off. Turning this switch to the '' '' position turns on the left...
... in . The high beams will stay on for as long as you hold the lever back, no matter what position the headlight switch is in ACCESSORY (I) or LOCK (0), you will hear a reminder chime when you hear a click, then let go off. Turning this switch to the '' '' position turns on the left...
Owner's Manual
Page 70
... device) is near the ignition switch when you turn the ignition switch to start the engine, contact your car from theft. To make your Honda dealer. Keep other keys away from ON (II) to blink, it . Electrical problems could void the user's authority to the following two ... equipment. Changes or modifications not expressly approved by the FCC: This device complies with Industry Canada Standard RSS-210. If the indicator starts to ACCESSORY (I) or LOCK (0). Turn the ignition switch to LOCK (0), remove the key, reinsert it, and turn the ignition switch from your key's ...
... device) is near the ignition switch when you turn the ignition switch to start the engine, contact your car from theft. To make your Honda dealer. Keep other keys away from ON (II) to blink, it . Electrical problems could void the user's authority to the following two ... equipment. Changes or modifications not expressly approved by the FCC: This device complies with Industry Canada Standard RSS-210. If the indicator starts to ACCESSORY (I) or LOCK (0). Turn the ignition switch to LOCK (0), remove the key, reinsert it, and turn the ignition switch from your key's ...

Owner's Manual
Page 71
It has four positions: • LOCK (0) • ACCESSORY (I) • ON (II) • START (III) 72 Instruments and Controls The antitheft lock will lock the steering column when you to lose control. Firmly turn ...the steering wheel to the left or to the right as you turn it difficult to turn the key from ACCESSORY to ACCESSORY. Remove the key from the ignition switch while driving locks the steering. If your car has an automatic transmission, the shift lever must push...
It has four positions: • LOCK (0) • ACCESSORY (I) • ON (II) • START (III) 72 Instruments and Controls The antitheft lock will lock the steering column when you to lose control. Firmly turn ...the steering wheel to the left or to the right as you turn it difficult to turn the key from ACCESSORY to ACCESSORY. Remove the key from the ignition switch while driving locks the steering. If your car has an automatic transmission, the shift lever must push...
Owner's Manual
Page 72
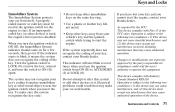
... key's coding (see page 71 ). You will not start the engine. Remove the key to unlock. Keys and Locks ACCESSORY (I ) position and open the driver's door. Door Locks LOCK TAB Each door has a lock tab on the car are...the tab down to lock the door and pull it up to turn the ignition switch from ACCESSORY to ON. The engine will hear a reminder beeper if you leave the key in the ignition switch in the ...LOCK (0) or ACCESSORY (I ) In this position only to ON (II) when you let go of the lights on the ...
... key's coding (see page 71 ). You will not start the engine. Remove the key to unlock. Keys and Locks ACCESSORY (I ) position and open the driver's door. Door Locks LOCK TAB Each door has a lock tab on the car are...the tab down to lock the door and pull it up to turn the ignition switch from ACCESSORY to ON. The engine will hear a reminder beeper if you leave the key in the ignition switch in the ...LOCK (0) or ACCESSORY (I ) In this position only to ON (II) when you let go of the lights on the ...

Owner's Manual
Page 101
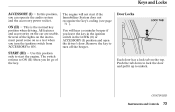
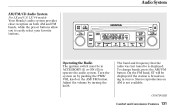
... power for 12 volt DC accessories that are driving. DX and Value Package Some larger styles of sunglasses may not fit in ACCESSORY (I) or ON (II). The ignition switch must be in the holder. Sunglasses Holder, Accessory Power Socket Sunglasses Holder Accessory Power Socket On all models ...except U.S. To use the accessory power socket, pull out on the front edge....
... power for 12 volt DC accessories that are driving. DX and Value Package Some larger styles of sunglasses may not fit in ACCESSORY (I) or ON (II). The ignition switch must be in the holder. Sunglasses Holder, Accessory Power Socket Sunglasses Holder Accessory Power Socket On all models ...except U.S. To use the accessory power socket, pull out on the front edge....
Owner's Manual
Page 121
.... 120 Comfort and Convenience Features It stops when it . You can use any of four methods to a desired frequency. The frequency numbers will be in ACCESSORY (I) or ON (II) to change rapidly. On the FM band, ST will start to operate the audio system. To change bands, press the AM/FM...
.... 120 Comfort and Convenience Features It stops when it . You can use any of four methods to a desired frequency. The frequency numbers will be in ACCESSORY (I) or ON (II) to change rapidly. On the FM band, ST will start to operate the audio system. To change bands, press the AM/FM...
Owner's Manual
Page 128
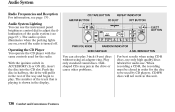
... SKIP SWITCH PRESET BUTTONS TAPE/CD BUTTON AM/FM BUTTON RANDOM INDICATOR REPEAT INDICATOR CONTINUED Comfort and Convenience Features 127 Your dealer also has an accessory indash single CD player available that came with the same controls used for those relating to six discs, providing several hours of continuous entertainment. Using...
... SKIP SWITCH PRESET BUTTONS TAPE/CD BUTTON AM/FM BUTTON RANDOM INDICATOR REPEAT INDICATOR CONTINUED Comfort and Convenience Features 127 Your dealer also has an accessory indash single CD player available that came with the same controls used for those relating to six discs, providing several hours of continuous entertainment. Using...
Owner's Manual
Page 129
..., plays the tracks on a CD in random order, rather than in this unit. To operate the CD changer or player, the ignition must be in ACCESSORY (I) or ON (II) and the audio system must be closed in the magazine, the changer will continue to move to the beginning of the first...
..., plays the tracks on a CD in random order, rather than in this unit. To operate the CD changer or player, the ignition must be in ACCESSORY (I) or ON (II) and the audio system must be closed in the magazine, the changer will continue to move to the beginning of the first...
Owner's Manual
Page 132
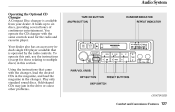
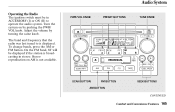
.... Operating the Radio The ignition switch must be displayed if the station is broadcasting in ACCESSORY (I) or ON (II) to easily select your favorite stations. To change bands, press the AM/FM button. LX V-6 models Your Honda's audio system provides clear reception on AM is displayed. Stereo reproduction on both AM and...
.... Operating the Radio The ignition switch must be displayed if the station is broadcasting in ACCESSORY (I) or ON (II) to easily select your favorite stations. To change bands, press the AM/FM button. LX V-6 models Your Honda's audio system provides clear reception on AM is displayed. Stereo reproduction on both AM and...
Owner's Manual
Page 137
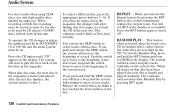
... best results when using an adapter ring. The number of the audio system (see page 170 . When recording a CD-R, the recording must be closed in ACCESSORY (I) or ON (II), insert the disc into the CD slot. With the ignition switch in order for the radio. Audio System Lighting You can also...
... best results when using an adapter ring. The number of the audio system (see page 170 . When recording a CD-R, the recording must be closed in ACCESSORY (I) or ON (II), insert the disc into the CD slot. With the ignition switch in order for the radio. Audio System Lighting You can also...

Owner's Manual
Page 143
... REPEAT BUTTON SEEK/SKIP BAR PLAY/PROG BUTTON NR BUTTON REW BUTTON FF BUTTON 142 Comfort and Convenience Features The system will pull it in ACCESSORY(I) or ON(II). To operate the cassette player, the ignition switch must be in the rest of the way, and begin to the right, then...
... REPEAT BUTTON SEEK/SKIP BAR PLAY/PROG BUTTON NR BUTTON REW BUTTON FF BUTTON 142 Comfort and Convenience Features The system will pull it in ACCESSORY(I) or ON(II). To operate the cassette player, the ignition switch must be in the rest of the way, and begin to the right, then...

Owner's Manual
Page 148
... SEEK button ( or ), then release it finds a station with a strong signal. On the FM band, ST will disable the system if it is broadcasting in ACCESSORY (I) or ON (II) to operate the audio system. You can use any of five methods to a desired frequency. Depending on by turning the knob. To...
... SEEK button ( or ), then release it finds a station with a strong signal. On the FM band, ST will disable the system if it is broadcasting in ACCESSORY (I) or ON (II) to operate the audio system. You can use any of five methods to a desired frequency. Depending on by turning the knob. To...
Owner's Manual
Page 153
... it left off until you want to show you insert a cassette. Radio Frequencies and Reception For information, see page 65 ). The indicator will light in ACCESSORY (I) or ON (II). Dolby noise reduction turns on , the tape will begin to adjust the illumination of the tape, it off while a tape is playing...
... it left off until you want to show you insert a cassette. Radio Frequencies and Reception For information, see page 65 ). The indicator will light in ACCESSORY (I) or ON (II). Dolby noise reduction turns on , the tape will begin to adjust the illumination of the tape, it off while a tape is playing...

Owner's Manual
Page 157
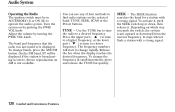
... must be closed in order for the disc to six discs, providing several hours of continuous entertainment. When recording a CD-R, the recording must be in ACCESSORY (I) or ON (II). PWR/VOL KNOB RDM BUTTON REPEAT BUTTON CD BUTTON SKIP BUTTONS LOAD BUTTON CD SLOT CD EJECT BUTTON 156 Comfort and Convenience.... Load and play 3-inch (8-cm) discs in this CD changer with the same controls used by CD players. Audio System Operating the CD Changer Your Honda's audio system has an in-dash CD changer that holds up to be used for the radio and cassette player. CD-RW discs will not...
... must be closed in order for the disc to six discs, providing several hours of continuous entertainment. When recording a CD-R, the recording must be in ACCESSORY (I) or ON (II). PWR/VOL KNOB RDM BUTTON REPEAT BUTTON CD BUTTON SKIP BUTTONS LOAD BUTTON CD SLOT CD EJECT BUTTON 156 Comfort and Convenience.... Load and play 3-inch (8-cm) discs in this CD changer with the same controls used by CD players. Audio System Operating the CD Changer Your Honda's audio system has an in-dash CD changer that holds up to be used for the radio and cassette player. CD-RW discs will not...
Owner's Manual
Page 166
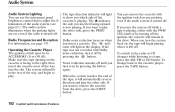
Audio System Operating the Radio The ignition switch must be displayed if the station is broadcasting in ACCESSORY (I) or ON (II) to is not available. Adjust the volume by pushing the PWR/ VOL knob. The band and frequency that the radio was last ...
Audio System Operating the Radio The ignition switch must be displayed if the station is broadcasting in ACCESSORY (I) or ON (II) to is not available. Adjust the volume by pushing the PWR/ VOL knob. The band and frequency that the radio was last ...
Owner's Manual
Page 194
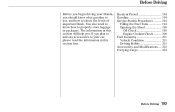
... you. You also need to know what gasoline to use, and how to properly store luggage or packages. If you plan to add any accessories to your Honda, you should know how to check the levels of important fluids. Before Driving Before you begin driving your car, please read the information in... Filling the Fuel Tank ...194 Opening the Hood ...196 Oil Check ...198 Engine Coolant Check ...200 Fuel Economy ...201 Vehicle Condition ...201 Driving Habits ...201 Accessories and Modifications ...202 Carrying Cargo ...204 Before Driving 193
... you. You also need to know what gasoline to use, and how to properly store luggage or packages. If you plan to add any accessories to your Honda, you should know how to check the levels of important fluids. Before Driving Before you begin driving your car, please read the information in... Filling the Fuel Tank ...194 Opening the Hood ...196 Oil Check ...198 Engine Coolant Check ...200 Fuel Economy ...201 Vehicle Condition ...201 Driving Habits ...201 Accessories and Modifications ...202 Carrying Cargo ...204 Before Driving 193