Owner's Manual
Page 1
... owner's manual, click on authorized manuals or go to change gears, etc. Emergency Service ...111 Changing a flat, jump starting, towing. Index ...133 Gas Station Information Maintenance ...76 The Required Maintenance Schedule and some items you should know before driving your car. Contents Owner's Identification Form Features & Safety ...2 What you can service. 1990 Accord Sedan Online Reference Owner's Manual Use these links (and links throughout this manual) to navigate through this reference. Consumer Information ...124 Reporting Safety Detects, warranty service, vehicle...
... owner's manual, click on authorized manuals or go to change gears, etc. Emergency Service ...111 Changing a flat, jump starting, towing. Index ...133 Gas Station Information Maintenance ...76 The Required Maintenance Schedule and some items you should know before driving your car. Contents Owner's Identification Form Features & Safety ...2 What you can service. 1990 Accord Sedan Online Reference Owner's Manual Use these links (and links throughout this manual) to navigate through this reference. Consumer Information ...124 Reporting Safety Detects, warranty service, vehicle...
Owner's Manual
Page 19
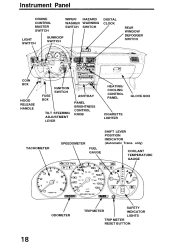
only) COOLANT TEMPERATURE GAUGE TRIP METER ODOMETER SAFETY INDICATOR LIGHTS TRIP METER RESET BUTTON Instrument Panel CRUISE CONTROL MASTER SWITCH LIGHT SWITCH SUNROOF SWITCH WIPER/ HAZARD WASHER WARNING SWITCH SWITCH DIGITAL CLOCK REAR WINDOW DEFOGGER SWITCH COIN BOX IGNITION SWITCH HOOD RELEASE HANDLE FUSE BOX ASHTRAY PANEL BRIGHTNESS CONTROL KNOB HEATING/ COOLING CONTROL PANEL GLOVE BOX TILT STEERING ADJUSTMENT LEVER CIGARETTE LIGHTER SPEEDOMETER TACHOMETER FUEL GAUGE SHIFT LEVER POSITION INDICATOR (Automatic Trans.
only) COOLANT TEMPERATURE GAUGE TRIP METER ODOMETER SAFETY INDICATOR LIGHTS TRIP METER RESET BUTTON Instrument Panel CRUISE CONTROL MASTER SWITCH LIGHT SWITCH SUNROOF SWITCH WIPER/ HAZARD WASHER WARNING SWITCH SWITCH DIGITAL CLOCK REAR WINDOW DEFOGGER SWITCH COIN BOX IGNITION SWITCH HOOD RELEASE HANDLE FUSE BOX ASHTRAY PANEL BRIGHTNESS CONTROL KNOB HEATING/ COOLING CONTROL PANEL GLOVE BOX TILT STEERING ADJUSTMENT LEVER CIGARETTE LIGHTER SPEEDOMETER TACHOMETER FUEL GAUGE SHIFT LEVER POSITION INDICATOR (Automatic Trans.

Owner's Manual
Page 24
... brake electrical or hydraulic systems; Safety Indicator Lights: Door and Trunk Lid Warning Lights If a door or the trunk lid is open when the ignition is switched on, the appropriate indicator will light, and stay lit, until you have the lamp repaired or replaced. have the system checked by a Honda dealer. Checking the Safety Indicator Lights The door, trunk lid and brake lamp warning lights should come on ; If they don't, have your car...
... brake electrical or hydraulic systems; Safety Indicator Lights: Door and Trunk Lid Warning Lights If a door or the trunk lid is open when the ignition is switched on, the appropriate indicator will light, and stay lit, until you have the lamp repaired or replaced. have the system checked by a Honda dealer. Checking the Safety Indicator Lights The door, trunk lid and brake lamp warning lights should come on ; If they don't, have your car...
Owner's Manual
Page 29
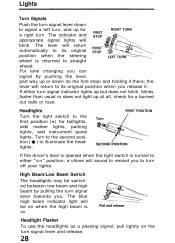
... POSITION If the driver's door is opened when the light switch is turned to either turn . The indicator and STOP appropriate signal lights will sound to remind you release it there; The lever will return to its original STOP position when the steering LEFT TURN wheel is on the turn signal lever towards you can signal by pulling the turn signal lever and release. For lane changing you . the...
... POSITION If the driver's door is opened when the light switch is turned to either turn . The indicator and STOP appropriate signal lights will sound to remind you release it there; The lever will return to its original STOP position when the steering LEFT TURN wheel is on the turn signal lever towards you can signal by pulling the turn signal lever and release. For lane changing you . the...
Owner's Manual
Page 35
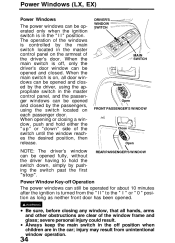
... either the " u p " or " d o w n " side of the windows is controlled by the driver, using the switch located on each passenger door. The operation of the switch until the window reaches the desired position, then release. When the main switch is on the armrest of the window frame and glass; DRIVER'S WINDOW SWITCH MAIN SWITCH Close Open FRONT PASSENGER'S WINDOW Close Open REAR PASSENGER'S WINDOW Power Window Key-off position when children are clear of...
... either the " u p " or " d o w n " side of the windows is controlled by the driver, using the switch located on each passenger door. The operation of the switch until the window reaches the desired position, then release. When the main switch is on the armrest of the window frame and glass; DRIVER'S WINDOW SWITCH MAIN SWITCH Close Open FRONT PASSENGER'S WINDOW Close Open REAR PASSENGER'S WINDOW Power Window Key-off position when children are clear of...
Owner's Manual
Page 51
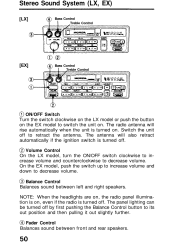
... speakers. The panel lighting can be turned off to retract the antenna. The antenna will rise automatically when the unit is turned off . Volume Control On the LX model, turn the ON/OFF switch clockwise to increase volume and counterclockwise to decrease volume. Balance Control Balances sound between front and rear speakers. Stereo Sound System (LX, EX) [LX] Bass Control Treble Control [EX] Bass Control Treble Control ON/OFF Switch Turn the switch...
... speakers. The panel lighting can be turned off to retract the antenna. The antenna will rise automatically when the unit is turned off . Volume Control On the LX model, turn the ON/OFF switch clockwise to increase volume and counterclockwise to decrease volume. Balance Control Balances sound between front and rear speakers. Stereo Sound System (LX, EX) [LX] Bass Control Treble Control [EX] Bass Control Treble Control ON/OFF Switch Turn the switch...

Owner's Manual
Page 57
... is not covered under the emission controls warranty. Never use gasoline containing more than 5% methanol, even if it simply means your Honda dealer. If the spark knock persists, consult your engine is running at its octane rating is an average of 86 or higher. Use gasoline from pumps labeled unleaded, with a pump octane number of the Research (R) octane and Motor (M) octane numbers...
... is not covered under the emission controls warranty. Never use gasoline containing more than 5% methanol, even if it simply means your Honda dealer. If the spark knock persists, consult your engine is running at its octane rating is an average of 86 or higher. Use gasoline from pumps labeled unleaded, with a pump octane number of the Research (R) octane and Motor (M) octane numbers...
Owner's Manual
Page 60
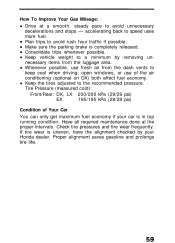
How To Improve Your Gas Mileage: Drive at the proper intervals. open windows, or use fresh air from the luggage area. Make sure the parking brake is uneven, have the alignment checked by removing unnecessary items from the dash vents to a minimum by your car is in top running condition. Keep vehicle weight to keep cool when driving; Tire Pressure (measured cold): Front/Rear: DX, LX 200/200 kPa (29...
How To Improve Your Gas Mileage: Drive at the proper intervals. open windows, or use fresh air from the luggage area. Make sure the parking brake is uneven, have the alignment checked by removing unnecessary items from the dash vents to a minimum by your car is in top running condition. Keep vehicle weight to keep cool when driving; Tire Pressure (measured cold): Front/Rear: DX, LX 200/200 kPa (29...
Owner's Manual
Page 62
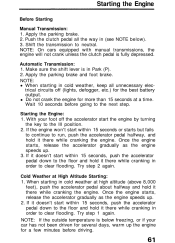
... fails to continue to clear flooding. Shift the transmission to the next step. Apply the parking brake and foot brake. Cold Weather at a time. Once the engine starts, release the accelerator gradually as the engine speeds up. 3. Push the clutch pedal all unnecessary electrical circuits off the accelerator start within 15 seconds, push the accelerator pedal down to the floor and hold it there while cranking...
... fails to continue to clear flooding. Shift the transmission to the next step. Apply the parking brake and foot brake. Cold Weather at a time. Once the engine starts, release the accelerator gradually as the engine speeds up. 3. Push the clutch pedal all unnecessary electrical circuits off the accelerator start within 15 seconds, push the accelerator pedal down to the floor and hold it there while cranking...
Owner's Manual
Page 67
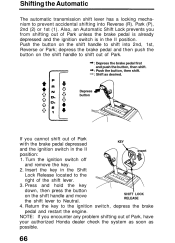
... shift handle to shift out of Park KEY with the brake pedal depressed and the ignition switch in the Shift Lock Release located to the ignition switch, depress the brake pedal and restart the engine. Insert the key in the II Insert position: 1. Push the button on the shift handle and move RELEASE the shift lever to prevent accidental shifting into 2nd, 1st, Reverse or Park; Shifting the Automatic The automatic transmission shift lever has a locking mechanism to Neutral. 4. Park...
... shift handle to shift out of Park KEY with the brake pedal depressed and the ignition switch in the Shift Lock Release located to the ignition switch, depress the brake pedal and restart the engine. Insert the key in the II Insert position: 1. Push the button on the shift handle and move RELEASE the shift lever to prevent accidental shifting into 2nd, 1st, Reverse or Park; Shifting the Automatic The automatic transmission shift lever has a locking mechanism to Neutral. 4. Park...
Owner's Manual
Page 68
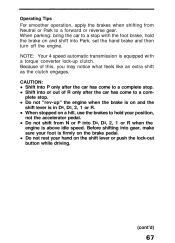
... the brake on and shift into Park, set the hand brake and then turn off the engine. Do not rest your position, not the accelerator pedal. CAUTION: Shift into P only after the car has come to a forward or reverse gear. Do not shift from Neutral or Park to a complete stop . Before shifting into gear, make sure your foot is above idle speed. Do not "rev-up clutch...
... the brake on and shift into Park, set the hand brake and then turn off the engine. Do not rest your position, not the accelerator pedal. CAUTION: Shift into P only after the car has come to a forward or reverse gear. Do not shift from Neutral or Park to a complete stop . Before shifting into gear, make sure your foot is above idle speed. Do not "rev-up clutch...
Owner's Manual
Page 72
... the ground. Trailer Lights Trailer lights must always be of the proper size, load rating and inflated to the pressure recommended by a qualified technician. A safety chain must comply with electric brakes, a trailer brake controller that attaches only to the bumper. The chain should be used between the car and the trailer. The wiring color codes are properly inflated. Hitches Use only a hitch recommended by your car's tires are described on the label attached to the driver's door jamb. A trailer lighting...
... the ground. Trailer Lights Trailer lights must always be of the proper size, load rating and inflated to the pressure recommended by a qualified technician. A safety chain must comply with electric brakes, a trailer brake controller that attaches only to the bumper. The chain should be used between the car and the trailer. The wiring color codes are properly inflated. Hitches Use only a hitch recommended by your car's tires are described on the label attached to the driver's door jamb. A trailer lighting...
Owner's Manual
Page 74
... technique. Avoid rapid lane changing and sharp turns. Remember, the total length of control. Steer straight ahead. Avoid sudden maneuvers: slow down before driving. Check also for excessive cargo weight, worn suspension or other vehicles. Avoid jerky starts and sudden acceleration. If your rearview mirrors conform to warn you of speed, allow at moderate engine rpm. The trailer could hit your car in an area away...
... technique. Avoid rapid lane changing and sharp turns. Remember, the total length of control. Steer straight ahead. Avoid sudden maneuvers: slow down before driving. Check also for excessive cargo weight, worn suspension or other vehicles. Avoid jerky starts and sudden acceleration. If your rearview mirrors conform to warn you of speed, allow at moderate engine rpm. The trailer could hit your car in an area away...
Owner's Manual
Page 78
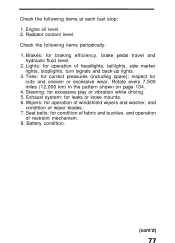
... driving. 5. Battery condition. (cont'd) Steering: for leaks or loose mounts. 6. Check the following items at each fuel stop: 1. Tires: for operation of headlights, taillights, side marker lights, stoplights, turn signals and back-up lights. 3. Rotate every 7,500 miles (12,000 km) in the pattern shown on page 104. 4. Check the following items periodically: 1. Seat belts: for operation of windshield wipers and washer, and condition of restraint mechanism. 8. Lights: for correct pressures...
... driving. 5. Battery condition. (cont'd) Steering: for leaks or loose mounts. 6. Check the following items at each fuel stop: 1. Tires: for operation of headlights, taillights, side marker lights, stoplights, turn signals and back-up lights. 3. Rotate every 7,500 miles (12,000 km) in the pattern shown on page 104. 4. Check the following items periodically: 1. Seat belts: for operation of windshield wipers and washer, and condition of restraint mechanism. 8. Lights: for correct pressures...
Owner's Manual
Page 87
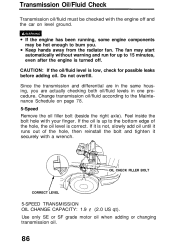
... 5-SPEED TRANSMISSION OIL CHANGE CAPACITY: 1.9 (2.0 US qt). Use only SE or SF grade motor oil when adding or changing transmission oil. Feel inside the bolt hole with your finger. Change transmission oil/fluid according to 15 minutes, even after the engine is low, check for up to bum you are actually checking both oil/fluid levels in the same housing, you . CAUTION: If the oil/fluid level is turned off and the car...
... 5-SPEED TRANSMISSION OIL CHANGE CAPACITY: 1.9 (2.0 US qt). Use only SE or SF grade motor oil when adding or changing transmission oil. Feel inside the bolt hole with your finger. Change transmission oil/fluid according to 15 minutes, even after the engine is low, check for up to bum you are actually checking both oil/fluid levels in the same housing, you . CAUTION: If the oil/fluid level is turned off and the car...
Owner's Manual
Page 93
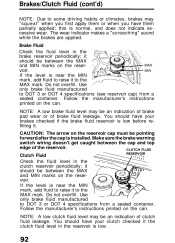
... container. CAUTION: The arrow on the reservoir. Make sure the brake warning switch wiring doesn't get caught between the MAX MAX and MIN marks on the reservoir cap must be an indication of brake fluid leakage. You should have them partially applied; Do not overfill. NOTE: A low brake fluid level may be an indication of brake pad wear or of clutch fluid leakage.
... container. CAUTION: The arrow on the reservoir. Make sure the brake warning switch wiring doesn't get caught between the MAX MAX and MIN marks on the reservoir cap must be an indication of brake fluid leakage. You should have them partially applied; Do not overfill. NOTE: A low brake fluid level may be an indication of brake pad wear or of clutch fluid leakage.
Owner's Manual
Page 119
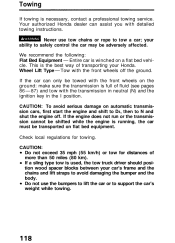
... ground. your car's frame and the chains and lift straps to support the car's weight while towing. If the car can assist you with detailed towing instructions. Tow with the transmission in neutral (N) and the ignition key in the I position. If the engine does not run or the transmission cannot be shifted while the engine is used, the tow truck driver should position wood spacer blocks between your ability to safely control the car...
... ground. your car's frame and the chains and lift straps to support the car's weight while towing. If the car can assist you with detailed towing instructions. Tow with the transmission in neutral (N) and the ignition key in the I position. If the engine does not run or the transmission cannot be shifted while the engine is used, the tow truck driver should position wood spacer blocks between your ability to safely control the car...
Owner's Manual
Page 134
... Air Filter ...94 Air Pressure, Tires ...102 Aluminum Alloy Wheels ...108 Antenna ...50 Antifreeze ...See "Radiator Coolant" Anti-theft Steering Column Lock System ...60 Appearance Care ...107 Ashtrays ...37 Audio System ...50 Automatic Seat Belt ...9 Automatic Transmission Driving Technique ...68 Fluid ...87 Operation ...67 Shift Lever Position Indicator ...20 Bulb Replacement ...100 Specification ...123 Buzzer ...See "Beeper System" Battery Charging System Warning Light ...22 Jump Starting ...116 Maintenance ...97 Specification ...123 Beeper System Fasten Seat Belt Beeper ...14 Key Reminder...
... Air Filter ...94 Air Pressure, Tires ...102 Aluminum Alloy Wheels ...108 Antenna ...50 Antifreeze ...See "Radiator Coolant" Anti-theft Steering Column Lock System ...60 Appearance Care ...107 Ashtrays ...37 Audio System ...50 Automatic Seat Belt ...9 Automatic Transmission Driving Technique ...68 Fluid ...87 Operation ...67 Shift Lever Position Indicator ...20 Bulb Replacement ...100 Specification ...123 Buzzer ...See "Beeper System" Battery Charging System Warning Light ...22 Jump Starting ...116 Maintenance ...97 Specification ...123 Beeper System Fasten Seat Belt Beeper ...14 Key Reminder...
Owner's Manual
Page 135
...Switch ...Hood Latch ... 29 28 20 28 28 28 20 7 44 20 28 33 Filters Air ...94 Engine Oil ...84 Fuel ...94 Fluid ...See " O i l " Foreign Countries, Operation in ...57 Front Seat Adjustment ...6 Fuel Filler Door and Cap ...58 Filter ...94 Gasohol ...56 Gasoline ...56 Gauge ...19 Requirement ...56 Reserve Warning Light ...20 Fuse Checking and Replacing ...98 Specification ...123 Identification Numbers ...Ignition Keys ...Switch ...Ignition Switch Light ...Indicator Lights ...Inflation Pressures, Tire ...Instrument Panel ...Instrument Panel Brightness Control ...Interior Light ...Interior Trim...
...Switch ...Hood Latch ... 29 28 20 28 28 28 20 7 44 20 28 33 Filters Air ...94 Engine Oil ...84 Fuel ...94 Fluid ...See " O i l " Foreign Countries, Operation in ...57 Front Seat Adjustment ...6 Fuel Filler Door and Cap ...58 Filter ...94 Gasohol ...56 Gasoline ...56 Gauge ...19 Requirement ...56 Reserve Warning Light ...20 Fuse Checking and Replacing ...98 Specification ...123 Identification Numbers ...Ignition Keys ...Switch ...Ignition Switch Light ...Indicator Lights ...Inflation Pressures, Tire ...Instrument Panel ...Instrument Panel Brightness Control ...Interior Light ...Interior Trim...
Owner's Manual
Page 136
...Speeds ...65 Shifting ...64 Meters, Gauges ...See "Gauges" Mirrors Power Mirrors ...27 Rearview Mirrors ...27 Panel Brightness Control ...29 Parking Brake ...33 Passive Belt ...9 PGM-FI Check Engine Warning Light ...22 System ...128 Power Door Locks ...4 Mirrors ...27 Steering ...93 Windows ...34 Pregnant Women ...16 Pressures, Tire Inflation ...102 Preventive Service ...109 Radiator Coolant ...88 Radio ...50 Rearview Mirrors ...27 Rear Window Defogger ...26 Reminder Lights .. See "Warning Lights" (cont'd) Keys Door Locks ...Glove Box ...Ignition ...Key Reminder Beeper ...Keys ...Trunk Lock...
...Speeds ...65 Shifting ...64 Meters, Gauges ...See "Gauges" Mirrors Power Mirrors ...27 Rearview Mirrors ...27 Panel Brightness Control ...29 Parking Brake ...33 Passive Belt ...9 PGM-FI Check Engine Warning Light ...22 System ...128 Power Door Locks ...4 Mirrors ...27 Steering ...93 Windows ...34 Pregnant Women ...16 Pressures, Tire Inflation ...102 Preventive Service ...109 Radiator Coolant ...88 Radio ...50 Rearview Mirrors ...27 Rear Window Defogger ...26 Reminder Lights .. See "Warning Lights" (cont'd) Keys Door Locks ...Glove Box ...Ignition ...Key Reminder Beeper ...Keys ...Trunk Lock...


