Owner's Manual
Page 4
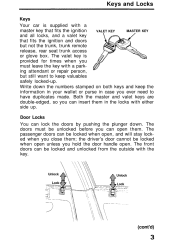
... keep valuables safely locked-up . The doors must leave the key with a parking attendant or repair person, but not the trunk, trunk remote release, rear seat trunk access or glove box.
... keep valuables safely locked-up . The doors must leave the key with a parking attendant or repair person, but not the trunk, trunk remote release, rear seat trunk access or glove box.
Owner's Manual
Page 6
Pull up the lever at the left side of the driver's seat. prolonged exposure can only be opened from outside . To activate the locks, push down the lock tabs located on each door, then close the doors. ...
Pull up the lever at the left side of the driver's seat. prolonged exposure can only be opened from outside . To activate the locks, push down the lock tabs located on each door, then close the doors. ...
Owner's Manual
Page 7
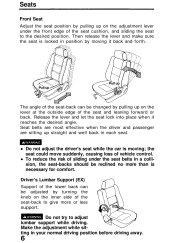
... of vehicle control. Driver's Lumbar Support (EX) Support of the lower back can be changed by pulling up straight and well back in each seat. Make the adjustment while sitting in position by moving ; To reduce the risk of sliding under the front edge of the... to give more than is necessary for comfort. the seat could move suddenly, causing loss of the seat-back to adjust lumbar support while driving. Seats Front Seat Adjust the seat position by pulling up on the adjustment lever under the seat belts in a collision, the seat-backs should be reclined no more or less support....
... of vehicle control. Driver's Lumbar Support (EX) Support of the lower back can be changed by pulling up straight and well back in each seat. Make the adjustment while sitting in position by moving ; To reduce the risk of sliding under the front edge of the... to give more than is necessary for comfort. the seat could move suddenly, causing loss of the seat-back to adjust lumbar support while driving. Seats Front Seat Adjust the seat position by pulling up on the adjustment lever under the seat belts in a collision, the seat-backs should be reclined no more or less support....
Owner's Manual
Page 8
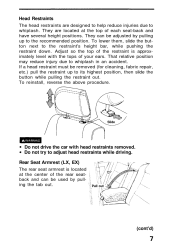
... restraint's height bar, while pushing the restraint down. Pull out (cont'd) Adjust so the top of the restraint is located at the top of each seat-back and have several height positions. If a head restraint must be adjusted by pulling the tab out. To reinstall, reverse the above procedure. They can... at the center of the rear seatback and can be removed (for cleaning, fabric repair, etc.) pull the restraint up to the recommended position. Rear Seat Armrest (LX, EX) The rear seat armrest is approximately level with head restraints removed.
... restraint's height bar, while pushing the restraint down. Pull out (cont'd) Adjust so the top of the restraint is located at the top of each seat-back and have several height positions. If a head restraint must be adjusted by pulling the tab out. To reinstall, reverse the above procedure. They can... at the center of the rear seatback and can be removed (for cleaning, fabric repair, etc.) pull the restraint up to the recommended position. Rear Seat Armrest (LX, EX) The rear seat armrest is approximately level with head restraints removed.
Owner's Manual
Page 9
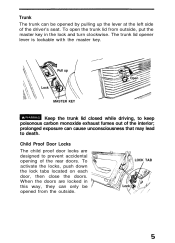
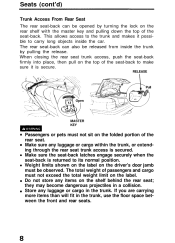
... label. If you are carrying more items than will fit in a collision. Store any luggage or cargo within the trunk, or extending through the rear seat trunk access is secured. Make sure any luggage or cargo in the trunk. they may become dangerous projectiles in the trunk, use the floor space... trunk by turning the lock on the rear shelf with the master key and pulling down the top of the rear seat. When closing the rear seat trunk access, push the seat-back firmly into place, then pull on the top of passengers and cargo must be released from inside the car. Do...
... label. If you are carrying more items than will fit in a collision. Store any luggage or cargo within the trunk, or extending through the rear seat trunk access is secured. Make sure any luggage or cargo in the trunk. they may become dangerous projectiles in the trunk, use the floor space... trunk by turning the lock on the rear shelf with the master key and pulling down the top of the rear seat. When closing the rear seat trunk access, push the seat-back firmly into place, then pull on the top of passengers and cargo must be released from inside the car. Do...
Owner's Manual
Page 10
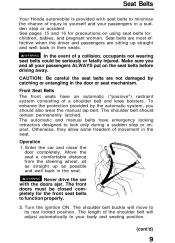
... are most effective when the driver and passengers are not damaged by the automatic system, you and all your passengers in their seats. Move the seat a comfortable distance from the steering wheel, sit as straight up straight and well back in a sudden stop or impact. The ... should remain permanently latched. Otherwise, they allow some freedom of a shoulder belt and knee bolsters. Seat Belts Your Honda automobile is provided with the doors ajar. Never drive the car with seat belts to minimize the chance of injury to lock only during a sudden stop or accident. See pages...
... are most effective when the driver and passengers are not damaged by the automatic system, you and all your passengers in their seats. Move the seat a comfortable distance from the steering wheel, sit as straight up straight and well back in a sudden stop or impact. The ... should remain permanently latched. Otherwise, they allow some freedom of a shoulder belt and knee bolsters. Seat Belts Your Honda automobile is provided with the doors ajar. Never drive the car with seat belts to minimize the chance of injury to lock only during a sudden stop or accident. See pages...
Owner's Manual
Page 11
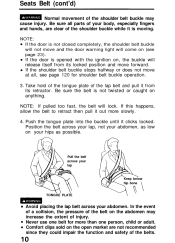
... across your lap, not your hips as low on the open market are clear of the belts. Comfort clips sold on your abdomen, as possible. Seats Belt (cont'd) Normal movement of injury. If the door is not closed completely, the shoulder belt buckle will not move forward. NOTE: If pulled too...
... across your lap, not your hips as low on the open market are clear of the belts. Comfort clips sold on your abdomen, as possible. Seats Belt (cont'd) Normal movement of injury. If the door is not closed completely, the shoulder belt buckle will not move forward. NOTE: If pulled too...
Owner's Manual
Page 12
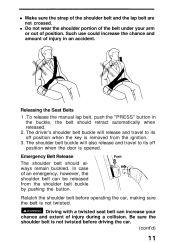
Releasing the Seat Belts 1 .To release the manual lap belt, push the "PRESS" button in an accident. Emergency Belt Release The shoulder belt should retract automatically when released. 2. ... opened. Push Relatch the shoulder belt before operating the car, making sure the belt is not twisted before driving the car. (cont'd) Driving with a twisted seat belt can increase your arm or out of an emergency, however, the shoulder belt can be released from the ignition. 3. Such use could increase the...
Releasing the Seat Belts 1 .To release the manual lap belt, push the "PRESS" button in an accident. Emergency Belt Release The shoulder belt should retract automatically when released. 2. ... opened. Push Relatch the shoulder belt before operating the car, making sure the belt is not twisted before driving the car. (cont'd) Driving with a twisted seat belt can increase your arm or out of an emergency, however, the shoulder belt can be released from the ignition. 3. Such use could increase the...
Owner's Manual
Page 13
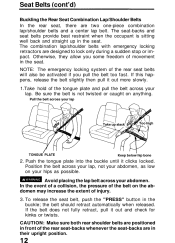
... the buckle; Push the tongue plate into the buckle until it out and check for kinks or twists. Seat Belts (cont'd) Buckling the Rear Seat Combination Lap/Shoulder Belts In the rear seat, there are designed to lock only during a sudden stop or impact. If this happens, release the belt...Make sure both rear shoulder belts are positioned in front of movement in their upright position. To release the seat belt, push the "PRESS" button in the seat. The seat-backs and seat belts provide best restraint when the occupant is not twisted or caught on the abdomen may increase the extent ...
... the buckle; Push the tongue plate into the buckle until it out and check for kinks or twists. Seat Belts (cont'd) Buckling the Rear Seat Combination Lap/Shoulder Belts In the rear seat, there are designed to lock only during a sudden stop or impact. If this happens, release the belt...Make sure both rear shoulder belts are positioned in front of movement in their upright position. To release the seat belt, push the "PRESS" button in the seat. The seat-backs and seat belts provide best restraint when the occupant is not twisted or caught on the abdomen may increase the extent ...
Owner's Manual
Page 14
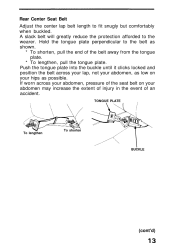
.... * To shorten, pull the end of an accident. A slack belt will greatly reduce the protection afforded to fit snugly but comfortably when buckled. Rear Center Seat Belt Adjust the center lap belt length to the wearer. Push the tongue plate into the buckle until it clicks locked and position the belt... across your abdomen, pressure of the seat belt on your abdomen may increase the extent of injury in the event of the belt away from the tongue plate. * To lengthen, pull the...
.... * To shorten, pull the end of an accident. A slack belt will greatly reduce the protection afforded to fit snugly but comfortably when buckled. Rear Center Seat Belt Adjust the center lap belt length to the wearer. Push the tongue plate into the buckle until it clicks locked and position the belt... across your abdomen, pressure of the seat belt on your abdomen may increase the extent of injury in the event of the belt away from the tongue plate. * To lengthen, pull the...
Owner's Manual
Page 15
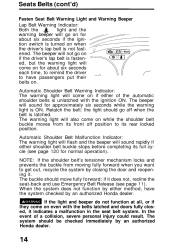
...will not go on if the driver's lap belt is unlatched with the belts latched and doors fully closed, it indicates a malfunction in the seat belt system. The system should move fully forward; The beeper will sound rapidly if either method, have passengers put their belts on while the shoulder... belt buckle moves from moving fully forward when you want to get out, recycle the system by an authorized Honda dealer. The warning light will go off position to have the system checked by either shoulder belt buckle stops before completing its rear locked ...
...will not go on if the driver's lap belt is unlatched with the belts latched and doors fully closed, it indicates a malfunction in the seat belt system. The system should move fully forward; The beeper will sound rapidly if either method, have passengers put their belts on while the shoulder... belt buckle moves from moving fully forward when you want to get out, recycle the system by an authorized Honda dealer. The warning light will go off position to have the system checked by either shoulder belt buckle stops before completing its rear locked ...
Owner's Manual
Page 16
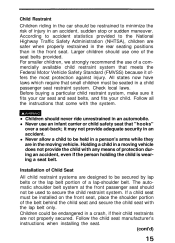
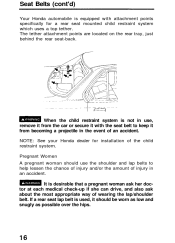
... lap-shoulder belt. Check local laws. For smaller children, we strongly recommend the use an infant carrier or child safety seat that meets the Federal Motor Vehicle Safety Standard (FMVSS) because it offers the most protection against injury. Larger children should... never ride unrestrained in a child passenger seat restraint system. Follow the child seat manufacturer's instructions when installing the seat. (cont'd) Children should use one of the seat belts provided. According to accident statistics provided to the National Highway Traffic Safety Administration...
... lap-shoulder belt. Check local laws. For smaller children, we strongly recommend the use an infant carrier or child safety seat that meets the Federal Motor Vehicle Safety Standard (FMVSS) because it offers the most protection against injury. Larger children should... never ride unrestrained in a child passenger seat restraint system. Follow the child seat manufacturer's instructions when installing the seat. (cont'd) Children should use one of the seat belts provided. According to accident statistics provided to the National Highway Traffic Safety Administration...
Owner's Manual
Page 17
... which uses a top tether. It is used, it with attachment points specifically for installation of wearing the lap/shoulder belt. Seat Belts (cont'd) Your Honda automobile is equipped with the seat belt to help lessen the chance of injury and/or the amount of injury in the event of an accident. The... tether attachment points are located on the rear tray, just behind the rear seat-back. When the child restraint system is ...
... which uses a top tether. It is used, it with attachment points specifically for installation of wearing the lap/shoulder belt. Seat Belts (cont'd) Your Honda automobile is equipped with the seat belt to help lessen the chance of injury and/or the amount of injury in the event of an accident. The... tether attachment points are located on the rear tray, just behind the rear seat-back. When the child restraint system is ...
Owner's Manual
Page 18
... the belts, pull them all work properly. 3. then let them . Don't let anything get inside the buckle or the retractor; Replacement Replace the seat belt if: 1.The belting is questionable. It was being injured in the shade, with chemical solvents; Do not remove the...retractor does not work properly. Its condition is cut, punctured, burned, etc. 2. Inspection All parts of the seat belts, including the belt fabric, should always be regularly inspected for damage at the seat belt anchor points). 4. Never bleach, dye or clean the belts with the car windows open. it will ...
... the belts, pull them all work properly. 3. then let them . Don't let anything get inside the buckle or the retractor; Replacement Replace the seat belt if: 1.The belting is questionable. It was being injured in the shade, with chemical solvents; Do not remove the...retractor does not work properly. Its condition is cut, punctured, burned, etc. 2. Inspection All parts of the seat belts, including the belt fabric, should always be regularly inspected for damage at the seat belt anchor points). 4. Never bleach, dye or clean the belts with the car windows open. it will ...
Owner's Manual
Page 22
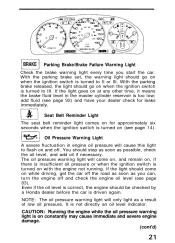
...the parking brake released, the light should stop as soon as possible, check the oil level, and add oil if necessary. Seat Belt Reminder Light The seat belt reminder light comes on for leaks immediately. BRAKE Parking Brake/Brake Failure Warning Light Check the brake warning light every time ...ignition switch is turned on when the ignition switch is driven again. With the parking brake set, the warning light should be checked by a Honda dealer before the car is turned to flash on constantly may cause immediate and severe engine damage. (cont'd) Oil Pressure Warning Light A severe...
...the parking brake released, the light should stop as soon as possible, check the oil level, and add oil if necessary. Seat Belt Reminder Light The seat belt reminder light comes on for leaks immediately. BRAKE Parking Brake/Brake Failure Warning Light Check the brake warning light every time ...ignition switch is turned on when the ignition switch is driven again. With the parking brake set, the warning light should be checked by a Honda dealer before the car is turned to flash on constantly may cause immediate and severe engine damage. (cont'd) Oil Pressure Warning Light A severe...
Owner's Manual
Page 50
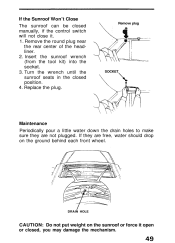
... tool kit) into the socket. 3. DRAIN HOLE CAUTION: Do not put weight on the ground behind each front wheel. Turn the wrench until the sunroof seats in the closed , you may damage the mechanism. Replace the plug. If the Sunroof Won't Close The sunroof can be closed manually, if the control...
... tool kit) into the socket. 3. DRAIN HOLE CAUTION: Do not put weight on the ground behind each front wheel. Turn the wrench until the sunroof seats in the closed , you may damage the mechanism. Replace the plug. If the Sunroof Won't Close The sunroof can be closed manually, if the control...
Owner's Manual
Page 59
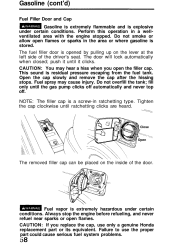
... refuel near sparks or open flames or sparks in the area or where gasoline is opened by pulling up on the inside of the driver's seat. Fuel spray may hear a hiss when you replace the cap, use the proper part could cause serious fuel system problems. Tighten the cap ...clockwise until the gas pump clicks off automatically and never top off. fill only until ratchetting clicks are heard. Failure to use only a genuine Honda replacement part or its equivalent. push it until it clicks. Do not overfill the tank; NOTE: The filler cap is explosive under certain conditions. ...
... refuel near sparks or open flames or sparks in the area or where gasoline is opened by pulling up on the inside of the driver's seat. Fuel spray may hear a hiss when you replace the cap, use the proper part could cause serious fuel system problems. Tighten the cap ...clockwise until the gas pump clicks off automatically and never top off. fill only until ratchetting clicks are heard. Failure to use only a genuine Honda replacement part or its equivalent. push it until it clicks. Do not overfill the tank; NOTE: The filler cap is explosive under certain conditions. ...
Owner's Manual
Page 63
.... Nothing is secured. stop and take a rest. When stopping for repairs: Park the car well off the highway when you are properly adjusted. The front seat head restraints are tired; The brake pedal feels normal. While driving remember to warn other warning devices to : Always drive defensively; Turn on a hill: 1. Turn...
.... Nothing is secured. stop and take a rest. When stopping for repairs: Park the car well off the highway when you are properly adjusted. The front seat head restraints are tired; The brake pedal feels normal. While driving remember to warn other warning devices to : Always drive defensively; Turn on a hill: 1. Turn...

Owner's Manual
Page 76
... in addition to point towards a curb if facing downhill, away from a curb if facing uphill. CAUTION: Parking on an incline with a trailer attached, place and seat chocks at each wheel of firmly applying the parking brake and placing the transmission in first or reverse (manual transmission) or P (automatic transmission). When leaving...
... in addition to point towards a curb if facing downhill, away from a curb if facing uphill. CAUTION: Parking on an incline with a trailer attached, place and seat chocks at each wheel of firmly applying the parking brake and placing the transmission in first or reverse (manual transmission) or P (automatic transmission). When leaving...
Owner's Manual
Page 78
...); Tires: for braking efficiency, brake pedal travel and hydraulic fluid level. 2. Rotate every 7,500 miles (12,000 km) in the pattern shown on page 104. 4. Seat belts: for cuts and uneven or excessive wear. Radiator coolant level. inspect for condition of fabric and buckles, and operation of restraint mechanism. 8. Steering: for...
...); Tires: for braking efficiency, brake pedal travel and hydraulic fluid level. 2. Rotate every 7,500 miles (12,000 km) in the pattern shown on page 104. 4. Seat belts: for cuts and uneven or excessive wear. Radiator coolant level. inspect for condition of fabric and buckles, and operation of restraint mechanism. 8. Steering: for...


