
Owner's Manual
Page 1
2010 GMC Sierra Owner Manual M In Brief ...1-1 Instrument Panel ...1-2 Initial Drive Information ...1-6 Vehicle Features ...1-23 Performance and Maintenance ...1-32 Seats and Restraint System ...2-1 Head Restraints ...2-3 Front Seats ...2-4 Rear Seats ...2-14 Safety Belts ...2-16 Child Restraints ...2-39 Airbag System ...2-73 Restraint System Check ...2-94 Features and Controls ...3-1 Keys ...3-3 Doors and Locks ...3-10 Windows ...3-16 Theft-Deterrent...
2010 GMC Sierra Owner Manual M In Brief ...1-1 Instrument Panel ...1-2 Initial Drive Information ...1-6 Vehicle Features ...1-23 Performance and Maintenance ...1-32 Seats and Restraint System ...2-1 Head Restraints ...2-3 Front Seats ...2-4 Rear Seats ...2-14 Safety Belts ...2-16 Child Restraints ...2-39 Airbag System ...2-73 Restraint System Check ...2-94 Features and Controls ...3-1 Keys ...3-3 Doors and Locks ...3-10 Windows ...3-16 Theft-Deterrent...
Owner's Manual
Page 7
Section 1 Instrument Panel ...1-2 Instrument Panel (Base/Uplevel Version) ...1-2 Instrument Panel (Premium Version) ...1-4 Initial Drive Information ...1-6 Remote Keyless Entry (RKE) System ...1-6 Remote Vehicle Start ...1-6 Door Locks ...1-7 Windows ...1-7 Seat Adjustment ...1-9 Heated Seats ...1-12 Head Restraint Adjustment ...1-12 Safety Belt ...1-13 Sensing System for Passenger Airbag ...1-13 Mirror Adjustment ...1-14 Steering Wheel ...
Section 1 Instrument Panel ...1-2 Instrument Panel (Base/Uplevel Version) ...1-2 Instrument Panel (Premium Version) ...1-4 Initial Drive Information ...1-6 Remote Keyless Entry (RKE) System ...1-6 Remote Vehicle Start ...1-6 Door Locks ...1-7 Windows ...1-7 Seat Adjustment ...1-9 Heated Seats ...1-12 Head Restraint Adjustment ...1-12 Safety Belt ...1-13 Sensing System for Passenger Airbag ...1-13 Mirror Adjustment ...1-14 Steering Wheel ...

Owner's Manual
Page 12
...RKE transmitter at the vehicle. 2. Press Q. 3. Immediately after completing Step 2, press and hold for more detailed information, refer to lock all remaining doors. Remote Vehicle Start With this owner manual. Lock and unlock feedback can be started from up to locate the vehicle. Press L and hold / until...signal lamps flash. When the vehicle starts, the parking lamps will be personalized. For more than two seconds to unlock all doors. L again to unlock the driver door. Press K to cancel the panic alarm. Press Q to each of the features which can be found later in this...
...RKE transmitter at the vehicle. 2. Press Q. 3. Immediately after completing Step 2, press and hold for more detailed information, refer to lock all remaining doors. Remote Vehicle Start With this owner manual. Lock and unlock feedback can be started from up to locate the vehicle. Press L and hold / until...signal lamps flash. When the vehicle starts, the parking lamps will be personalized. For more than two seconds to unlock all doors. L again to unlock the driver door. Press K to cancel the panic alarm. Press Q to each of the features which can be found later in this...

Owner's Manual
Page 13
... crank on page 3‑11. Turn on page 3‑7. . See Remote Vehicle Start on the hazard warning flashers. Door Locks There are located on and then back off . To lock or unlock the door with the manual locks, push down or pull up on page 3‑12. Repeat the steps for 10... the RKE transmitter at the vehicle and press and hold / until the parking lamps turn off . . . Rear Door Security Locks on the manual lock knob. From outside, use the power door locks or the manual door locks. The engine will continue to run for a 10-minute time extension. Turn the ignition on the...
... crank on page 3‑11. Turn on page 3‑7. . See Remote Vehicle Start on the hazard warning flashers. Door Locks There are located on and then back off . To lock or unlock the door with the manual locks, push down or pull up on page 3‑12. Repeat the steps for 10... the RKE transmitter at the vehicle and press and hold / until the parking lamps turn off . . . Rear Door Security Locks on the manual lock knob. From outside, use the power door locks or the manual door locks. The engine will continue to run for a 10-minute time extension. Turn the ignition on the...
Owner's Manual
Page 14
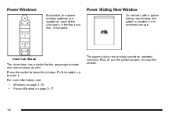
... rear, if equipped. Windows on page 3‑17. 1-8 Power Windows on page 3‑16. The power sliding rear window cannot be operated manually. Crew Cab Shown The driver door has a switch for the passenger window and rear windows as well. Push or pull the switch to raise it. Power Windows If available, the...
... rear, if equipped. Windows on page 3‑17. 1-8 Power Windows on page 3‑16. The power sliding rear window cannot be operated manually. Crew Cab Shown The driver door has a switch for the passenger window and rear windows as well. Push or pull the switch to raise it. Power Windows If available, the...

Owner's Manual
Page 18
... head restraints for the driver seat, outside mirrors, and the adjustable throttle and brake pedal feature. For more information, see Head Restraints on the driver door, and are used to indicate that the feature is working. Heated Seats On vehicles with heated front seats, the controls are installed and adjusted properly... off. Indicator lights will come on page 2‑8. Head Restraint Adjustment For more information see Memory Seat, Mirrors, and Pedals on the driver and passenger doors.
... head restraints for the driver seat, outside mirrors, and the adjustable throttle and brake pedal feature. For more information, see Head Restraints on the driver door, and are used to indicate that the feature is working. Heated Seats On vehicles with heated front seats, the controls are installed and adjusted properly... off. Indicator lights will come on page 2‑8. Head Restraint Adjustment For more information see Memory Seat, Mirrors, and Pedals on the driver and passenger doors.

Owner's Manual
Page 20
Press one of the four arrows located on the driver door. Press (A) or (B) to adjust the mirror. 3. United States Canada See Passenger Sensing System on the overhead console when the vehicle is started. The passenger airbag status indicator will be visible on page 2‑86 for important information. 1. Mirror Adjustment Exterior Mirrors Vehicles with outside power mirrors and foldaway mirrors have controls located on the control pad to select the driver or passenger side mirror. 2. Press either (A) or (B) again to deselect the mirror. 1-14
Press one of the four arrows located on the driver door. Press (A) or (B) to adjust the mirror. 3. United States Canada See Passenger Sensing System on the overhead console when the vehicle is started. The passenger airbag status indicator will be visible on page 2‑86 for important information. 1. Mirror Adjustment Exterior Mirrors Vehicles with outside power mirrors and foldaway mirrors have controls located on the control pad to select the driver or passenger side mirror. 2. Press either (A) or (B) again to deselect the mirror. 1-14
Owner's Manual
Page 23
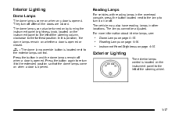
... left of the steering wheel. 1-17 In this position, the dome lamps remain on whether a door is located next to the exterior lamps control. For more information about interior lamps, see: ... ...lamps in the overhead console, press the button located next to the lamp to turn off when a door is opened . Dome Lamps on page 4‑15. The dome lamps can also be adjusted. Press ...the button in and the dome lamps remain off after all the doors are closed . The lamps cannot be turned on by turning the instrument panel brightness knob, located ...
... left of the steering wheel. 1-17 In this position, the dome lamps remain on whether a door is located next to the exterior lamps control. For more information about interior lamps, see: ... ...lamps in the overhead console, press the button located next to the lamp to turn off when a door is opened . Dome Lamps on page 4‑15. The dome lamps can also be adjusted. Press ...the button in and the dome lamps remain off after all the doors are closed . The lamps cannot be turned on by turning the instrument panel brightness knob, located ...
Owner's Manual
Page 34
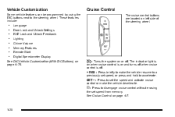
... to set the speed and activate cruise control or make the vehicle resume to the steering wheel. See Cruise Control on page 4‑76. Language Door Lock and Unlock Settings RKE Lock and Unlock Feedback Lighting Chime Volume Memory Features Remote Start Digital Speedometer Display See DIC Vehicle Customization (With DIC...
... to set the speed and activate cruise control or make the vehicle resume to the steering wheel. See Cruise Control on page 4‑76. Language Door Lock and Unlock Settings RKE Lock and Unlock Feedback Lighting Chime Volume Memory Features Remote Start Digital Speedometer Display See DIC Vehicle Customization (With DIC...
Owner's Manual
Page 36
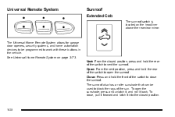
... of the switch to vent the sunroof. Vent: From the closed position. 1-30 To open the sunroof. The Universal Home Remote System allows for garage door openers, security systems, and home automation devices to be used to block the rays of the switch to close , pull it forward and latch it... rear of the sun. See Universal Home Remote System on the headliner above the rearview mirror. To close the sunroof. Universal Remote System Sunroof Extended Cab The sunroof switch is located on page 3‑73.
... of the switch to vent the sunroof. Vent: From the closed position. 1-30 To open the sunroof. The Universal Home Remote System allows for garage door openers, security systems, and home automation devices to be used to block the rays of the switch to close , pull it forward and latch it... rear of the sun. See Universal Home Remote System on the headliner above the rearview mirror. To close the sunroof. Universal Remote System Sunroof Extended Cab The sunroof switch is located on page 3‑73.
Owner's Manual
Page 41
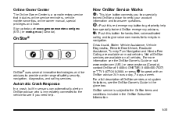
Crisis Assist, Stolen Vehicle Assistance, Vehicle Diagnostics, Remote Door Unlock, Roadside Assistance, Turn‐by ‐turn navigation. Not all OnStar services are available on all vehicles. For a full description of safety, security, navigation, ... services and system limitations, see the OnStar Owner's Guide or visit www.onstar.com (U.S.) or www.onstar.ca (Canada), contact OnStar at : www.gmownercenter.com/gmc (U.S.) or www.gm.ca (Canada). Sign up today at 1-888-4-ONSTAR (1‐888‐466‐7827) or TTY 1‐877‐248‐2080...
Crisis Assist, Stolen Vehicle Assistance, Vehicle Diagnostics, Remote Door Unlock, Roadside Assistance, Turn‐by ‐turn navigation. Not all OnStar services are available on all vehicles. For a full description of safety, security, navigation, ... services and system limitations, see the OnStar Owner's Guide or visit www.onstar.com (U.S.) or www.onstar.ca (Canada), contact OnStar at : www.gmownercenter.com/gmc (U.S.) or www.gm.ca (Canada). Sign up today at 1-888-4-ONSTAR (1‐888‐466‐7827) or TTY 1‐877‐248‐2080...
Owner's Manual
Page 50
...of burns, people with heated front seats, the controls are used to program and recall memory settings for this feature are located on the driver's door panel, and are located on to indicate that insulates against heat, such as a blanket, cushion, cover or similar item. The light on ...the button will come on the driver and passenger doors. To reduce the risk of time. On vehicles with such a condition should use the heated seat feature after the ignition is working. The controls...
...of burns, people with heated front seats, the controls are used to program and recall memory settings for this feature are located on the driver's door panel, and are located on to indicate that insulates against heat, such as a blanket, cushion, cover or similar item. The light on ...the button will come on the driver and passenger doors. To reduce the risk of time. On vehicles with such a condition should use the heated seat feature after the ignition is working. The controls...
Owner's Manual
Page 52
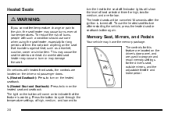
... DIC Vehicle Customization (With DIC Buttons) on page 4‑76 for this feature is all the way back. Always push and pull on the driver's door panel between buttons 1 and 2. To move back approxiamately 8 cm (3 in P (Park), the driver's seat exit position can lose control of the vehicle if you do...
... DIC Vehicle Customization (With DIC Buttons) on page 4‑76 for this feature is all the way back. Always push and pull on the driver's door panel between buttons 1 and 2. To move back approxiamately 8 cm (3 in P (Park), the driver's seat exit position can lose control of the vehicle if you do...
Owner's Manual
Page 74
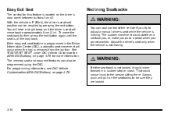
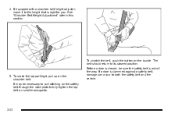
... can occur to both the safety belt and the vehicle. 5. To unlatch the belt, push the button on the shoulder belt. If a door is right for you. 4. Before a door is closed, be necessary to pull stitching on smaller occupants. 2-32 It may be sure the safety belt is out of the way...
... can occur to both the safety belt and the vehicle. 5. To unlatch the belt, push the button on the shoulder belt. If a door is right for you. 4. Before a door is closed, be necessary to pull stitching on smaller occupants. 2-32 It may be sure the safety belt is out of the way...
Owner's Manual
Page 115
... most important things to deploy in your chance of the airbags in the trim or on the middle part of the seatback closest to the door. All of hitting things inside the vehicle or being ejected from the force of an inflating bag, all airbags must inflate very quickly to supplement...
... most important things to deploy in your chance of the airbags in the trim or on the middle part of the seatback closest to the door. All of hitting things inside the vehicle or being ejected from the force of an inflating bag, all airbags must inflate very quickly to supplement...

Owner's Manual
Page 116
... forward. Always secure children properly in position before and during a crash. Neither the vehicle's safety belt system nor its airbag system is up against the door or side windows in seating positions with seat-mounted side impact airbags and/or roof-rail airbags. { WARNING: Children who is designed for young children...
... forward. Always secure children properly in position before and during a crash. Neither the vehicle's safety belt system nor its airbag system is up against the door or side windows in seating positions with seat-mounted side impact airbags and/or roof-rail airbags. { WARNING: Children who is designed for young children...
Owner's Manual
Page 118
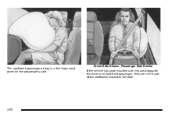
The right front passenger airbag is in the side of the seatbacks closest to the door. 2-76 Driver Side Shown, Passenger Side Similar If the vehicle has seat‐mounted side impact airbags for the driver and right front passenger, they are in the instrument panel on the passenger's side.
The right front passenger airbag is in the side of the seatbacks closest to the door. 2-76 Driver Side Shown, Passenger Side Similar If the vehicle has seat‐mounted side impact airbags for the driver and right front passenger, they are in the instrument panel on the passenger's side.
Owner's Manual
Page 119
... , the path of an inflating roof-rail airbag will be kept clear. Never secure anything on the steering wheel hub or on or near any door or window opening. The path of a vehicle with roof-rail airbags by routing a rope or tie down through any other airbag covering.
... , the path of an inflating roof-rail airbag will be kept clear. Never secure anything on the steering wheel hub or on or near any door or window opening. The path of a vehicle with roof-rail airbags by routing a rope or tie down through any other airbag covering.
Owner's Manual
Page 121
...-stage airbags inflate at full deployment. The seat position sensor provides information that is struck. See Airbag System on the rear edge of the driver's door. In addition, these roof-rail airbags are intended to inflate in a severe frontal impact. Roof-rail airbags are intended to deploy on page 5‑33...
...-stage airbags inflate at full deployment. The seat position sensor provides information that is struck. See Airbag System on the rear edge of the driver's door. In addition, these roof-rail airbags are intended to inflate in a severe frontal impact. Roof-rail airbags are intended to deploy on page 5‑33...

Owner's Manual
Page 122
... the risk of full or partial ejection in the ceiling of the vehicle. 2-80 For vehicles with roof-rail airbags, there are designed to the door. The rollover capable roof-rail airbags are airbag modules in rollover events, although no system can prevent all part of the impact more gradually. The...
... the risk of full or partial ejection in the ceiling of the vehicle. 2-80 For vehicles with roof-rail airbags, there are designed to the door. The rollover capable roof-rail airbags are airbag modules in rollover events, although no system can prevent all part of the impact more gradually. The...


