

Owner's Manual
Page 1
2008 GMC Savana Owner Manual Seats and Restraint Systems ...1-1 Front Seats ...1-2 Rear Seats ...1-6 Safety Belts ...1-10 Child Restraints ...1-29 Airbag System ...1-57 Restraint System Check ...1-75 Features and Controls ...2-1 Keys ...2-2 Doors and Locks ...2-6 Windows ...2-13 Theft-Deterrent Systems ...2-16 Starting and Operating Your Vehicle ...2-18 Mirrors ...2-32 Storage Areas ...2-34 Instrument Panel ...3-1 Instrument Panel Overview ...3-4 Climate Controls ...3-19 Warning Lights, Gages, and Indicators ...3-24 Driver Information Center (DIC) ...3-42 Audio System(s) ...3-63 Driving Your ...
2008 GMC Savana Owner Manual Seats and Restraint Systems ...1-1 Front Seats ...1-2 Rear Seats ...1-6 Safety Belts ...1-10 Child Restraints ...1-29 Airbag System ...1-57 Restraint System Check ...1-75 Features and Controls ...2-1 Keys ...2-2 Doors and Locks ...2-6 Windows ...2-13 Theft-Deterrent Systems ...2-16 Starting and Operating Your Vehicle ...2-18 Mirrors ...2-32 Storage Areas ...2-34 Instrument Panel ...3-1 Instrument Panel Overview ...3-4 Climate Controls ...3-19 Warning Lights, Gages, and Indicators ...3-24 Driver Information Center (DIC) ...3-42 Audio System(s) ...3-63 Driving Your ...

Owner's Manual
Page 81
...20 Starting the Engine ...2-20 Fuel Regulator ...2-21 Engine Coolant Heater ...2-21 Automatic Transmission Operation ...2-22 Tow/Haul Mode ...2-25 Parking Brake ...2-26 Shifting Into PARK (P) ...2-27 Shifting Out of PARK (P) ...2-29 Parking Over Things That Burn ...2-29 Engine Exhaust ...2-30 Running the Engine While Parked ...2-31 Mirrors ...2-32 Manual Rearview Mirror ...2-32 Outside Manual Mirror ...2-32 Outside Camper-Type Mirrors ...2-32 Outside Power Mirrors ...2-33 Outside Convex Mirror ...2-33 Outside Heated Mirrors ...2-34 Storage Areas ...2-34 Keys ...2-2 Remote Keyless Entry (RKE...
...20 Starting the Engine ...2-20 Fuel Regulator ...2-21 Engine Coolant Heater ...2-21 Automatic Transmission Operation ...2-22 Tow/Haul Mode ...2-25 Parking Brake ...2-26 Shifting Into PARK (P) ...2-27 Shifting Out of PARK (P) ...2-29 Parking Over Things That Burn ...2-29 Engine Exhaust ...2-30 Running the Engine While Parked ...2-31 Mirrors ...2-32 Manual Rearview Mirror ...2-32 Outside Manual Mirror ...2-32 Outside Camper-Type Mirrors ...2-32 Outside Power Mirrors ...2-33 Outside Convex Mirror ...2-33 Outside Heated Mirrors ...2-34 Storage Areas ...2-34 Keys ...2-2 Remote Keyless Entry (RKE...
Owner's Manual
Page 84
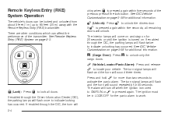
... L (Vehicle Locator/Panic Alarm): Press and release L to unlock the drivers door. The turn signal lamps will flash and the horn will turn signal lamps will flash and the horn will unlock. The alarm will sound three times. chirp when Q is moved to work. The interior lamps will flash twice to indicate unlocking has occurred. If enabled through the DIC, the parking lamps...
... L (Vehicle Locator/Panic Alarm): Press and release L to unlock the drivers door. The turn signal lamps will flash and the horn will turn signal lamps will flash and the horn will unlock. The alarm will sound three times. chirp when Q is moved to work. The interior lamps will flash twice to indicate unlocking has occurred. If enabled through the DIC, the parking lamps...

Owner's Manual
Page 87
... key is on the door or the remote keyless entry transmitter, all the doors will lock. Pressing the power lock switch twice or the lock button on page 3-58. 2-7 The Cargo door will only lock when they are closed or when the delayed locking feature functions. The doors will remain unlocked from inside the vehicle. These prompts allow you stop the vehicle and move the shift lever back into PARK...
... key is on the door or the remote keyless entry transmitter, all the doors will lock. Pressing the power lock switch twice or the lock button on page 3-58. 2-7 The Cargo door will only lock when they are closed or when the delayed locking feature functions. The doors will remain unlocked from inside the vehicle. These prompts allow you stop the vehicle and move the shift lever back into PARK...

Owner's Manual
Page 88
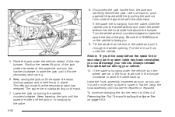
... PARK (P). The automatic unlock feature can be disabled. Rear Door Security Locks Security locks are located on page 3-58 for more information. Driver's Side Shown, Passenger's Side Similar Move the button to the left for the passenger's side door to return the door locks to engage the security feature. The automatic door locking feature cannot be disabled or programmed in different ways if the vehicle has an automatic transmission. Automatic Door Unlock The vehicle doors...
... PARK (P). The automatic unlock feature can be disabled. Rear Door Security Locks Security locks are located on page 3-58 for more information. Driver's Side Shown, Passenger's Side Similar Move the button to the left for the passenger's side door to return the door locks to engage the security feature. The automatic door locking feature cannot be disabled or programmed in different ways if the vehicle has an automatic transmission. Automatic Door Unlock The vehicle doors...

Owner's Manual
Page 94
Express-Down The driver and front passenger window switches also has an express-down mode. To open the window part way, lightly tap the switch until the window is dangerous. Leaving children in a vehicle with the ignition key is active. The windows will work when the ignition has been turned to ON/RUN or ACC/ACCESSORY, or when Retained Accessory Power (RAP) is dangerous for the passenger window also. They can be...
Express-Down The driver and front passenger window switches also has an express-down mode. To open the window part way, lightly tap the switch until the window is dangerous. Leaving children in a vehicle with the ignition key is active. The windows will work when the ignition has been turned to ON/RUN or ACC/ACCESSORY, or when Retained Accessory Power (RAP) is dangerous for the passenger window also. They can be...
Owner's Manual
Page 97
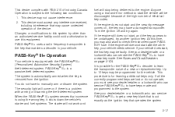
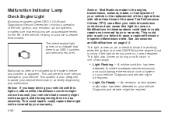
... automatically armed when the key is using a trial-and-error method to the following two conditions: 1. PASS-Key® III+ Operation Your vehicle is subject to start , the first key may not cause interference. 2. Turn the ignition off and try another ignition key. If your dealer/retailer or a locksmith who can service PASS-Key® III+ to learn the transponder value of electrical key codes. The security light...
... automatically armed when the key is using a trial-and-error method to the following two conditions: 1. PASS-Key® III+ Operation Your vehicle is subject to start , the first key may not cause interference. 2. Turn the ignition off and try another ignition key. If your dealer/retailer or a locksmith who can service PASS-Key® III+ to learn the transponder value of electrical key codes. The security light...
Owner's Manual
Page 101
...® Diesel manual for easier starting it. Plug in the coolant heater at least 15 seconds between each try , to allow the cranking motor to cool down . 2. If the vehicle starts briefly but then stops again, do not, your dealer/retailer. Do not race the engine immediately after cranking has ended, can be covered by turning the ignition switch to the ACC/ACCESSORY or LOCK/OFF...
...® Diesel manual for easier starting it. Plug in the coolant heater at least 15 seconds between each try , to allow the cranking motor to cool down . 2. If the vehicle starts briefly but then stops again, do not, your dealer/retailer. Do not race the engine immediately after cranking has ended, can be covered by turning the ignition switch to the ACC/ACCESSORY or LOCK/OFF...

Owner's Manual
Page 115
... Warning Devices ...3-6 Horn ...3-6 Tilt Wheel ...3-7 Turn Signal/Multifunction Lever ...3-7 Turn and Lane-Change Signals ...3-8 Headlamp High/Low-Beam Changer ...3-9 Flash-to-Pass ...3-9 Windshield Wipers ...3-9 Windshield Washer ...3-10 Cruise Control ...3-10 Exterior Lamps ...3-13 Headlamps on Reminder ...3-14 Daytime Running Lamps (DRL) ...3-15 Automatic Headlamp System ...3-15 Instrument Panel Brightness ...3-16 Dome Lamps ...3-16 Dome Lamp Override ...3-16 Entry/Exit Lighting ...3-17 Reading Lamps ...3-17 Electric Power Management ...3-17 Battery Run-Down Protection ...3-17 Accessory...
... Warning Devices ...3-6 Horn ...3-6 Tilt Wheel ...3-7 Turn Signal/Multifunction Lever ...3-7 Turn and Lane-Change Signals ...3-8 Headlamp High/Low-Beam Changer ...3-9 Flash-to-Pass ...3-9 Windshield Wipers ...3-9 Windshield Washer ...3-10 Cruise Control ...3-10 Exterior Lamps ...3-13 Headlamps on Reminder ...3-14 Daytime Running Lamps (DRL) ...3-15 Automatic Headlamp System ...3-15 Instrument Panel Brightness ...3-16 Dome Lamps ...3-16 Dome Lamp Override ...3-16 Entry/Exit Lighting ...3-17 Reading Lamps ...3-17 Electric Power Management ...3-17 Battery Run-Down Protection ...3-17 Accessory...

Owner's Manual
Page 130
... feature is located next to the farthest position. If the vehicle is started in a dark garage, the automatic headlamp system will come on page 3-16. Make sure the instrument panel brightness control is located next to brighten or dim the instrument panel lights and the radio display. D (Instrument Panel Lights): Turn the knob clockwise or counterclockwise to the exterior lamps control. This only works if the headlamps or parking...
... feature is located next to the farthest position. If the vehicle is started in a dark garage, the automatic headlamp system will come on page 3-16. Make sure the instrument panel brightness control is located next to brighten or dim the instrument panel lights and the radio display. D (Instrument Panel Lights): Turn the knob clockwise or counterclockwise to the exterior lamps control. This only works if the headlamps or parking...
Owner's Manual
Page 137
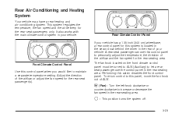
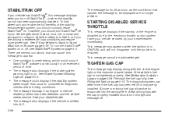
Rear Air Conditioning and Heating System Your vehicle may have a rear heating and air-conditioning system. Adjust the direction of the airflow and the fan speed for this panel, move the fan knob out of your vehicle. This position turns the system off. 9: 3-23 Front Climate Control Panel Use this action disables the front control panel. A rear seat passenger can use the control panel in your vehicle. Performing this control panel when you would like to maintain a separate...
Rear Air Conditioning and Heating System Your vehicle may have a rear heating and air-conditioning system. Adjust the direction of the airflow and the fan speed for this panel, move the fan knob out of your vehicle. This position turns the system off. 9: 3-23 Front Climate Control Panel Use this action disables the front control panel. A rear seat passenger can use the control panel in your vehicle. Performing this control panel when you would like to maintain a separate...
Owner's Manual
Page 138
... engine just to let you should not be alarmed when this happens. To change the direction of the airflow in the rear-seating area. When one of the warning lights comes on and stays on to direct cooled air to do repairs can circulate effectively. Temperature Control: Turn the right knob clockwise or counterclockwise to the floor outlets. Mode Control: Turn the center...
... engine just to let you should not be alarmed when this happens. To change the direction of the airflow in the rear-seating area. When one of the warning lights comes on and stays on to direct cooled air to do repairs can circulate effectively. Temperature Control: Turn the right knob clockwise or counterclockwise to the floor outlets. Mode Control: Turn the center...
Owner's Manual
Page 150
... engine, transmission, exhaust, intake, or fuel system of your vehicle or the replacement of the original tires with this light to come on your service technician in a failure to costly repairs that might not be as good, and the engine might be required. This could lead to pass a required Emission Inspection/Maintenance test. This could also result in correctly diagnosing any problem is not running...
... engine, transmission, exhaust, intake, or fuel system of your vehicle or the replacement of the original tires with this light to come on your service technician in a failure to costly repairs that might not be as good, and the engine might be required. This could lead to pass a required Emission Inspection/Maintenance test. This could also result in correctly diagnosing any problem is not running...
Owner's Manual
Page 163
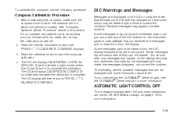
...; Diesel manual for a few seconds when the calibration is located. AUTOMATIC LIGHT CONTROL OFF This message displays when the automatic headlamps are more information. 3-49 Press the set to start the compass calibration. 4. The following procedure: DIC Warnings and Messages Messages are displayed on the DIC to notify the driver that the status of the DIC buttons on the instrument panel...
...; Diesel manual for a few seconds when the calibration is located. AUTOMATIC LIGHT CONTROL OFF This message displays when the automatic headlamps are more information. 3-49 Press the set to start the compass calibration. 4. The following procedure: DIC Warnings and Messages Messages are displayed on the DIC to notify the driver that the status of the DIC buttons on the instrument panel...
Owner's Manual
Page 170
... fuel cap allows fuel to evaporate into 4LO. 3-56 ® The message turns off as soon as the conditions that can determine if the fuel cap has been left off or improperly installed. To limit wheel spin and realize the full benefits of time. • The message also displays if the brake system warning light is on the instrument panel cluster if the vehicle's fuel cap...
... fuel cap allows fuel to evaporate into 4LO. 3-56 ® The message turns off as soon as the conditions that can determine if the fuel cap has been left off or improperly installed. To limit wheel spin and realize the full benefits of time. • The message also displays if the brake system warning light is on the instrument panel cluster if the vehicle's fuel cap...

Owner's Manual
Page 297
...). Accessory Weight: This means the combined weight of fuel, oil, and coolant, but without passengers and cargo. Bead: The tire bead contains steel wires wrapped by steel cords that the tire is expressed in which can range from A to 279. The DOT code includes the Tire Identification Number (TIN), an alphanumeric designator which the plies are , automatic transmission, power steering, power brakes, power windows, power seats, and air conditioning. See Loading Your Vehicle...
...). Accessory Weight: This means the combined weight of fuel, oil, and coolant, but without passengers and cargo. Bead: The tire bead contains steel wires wrapped by steel cords that the tire is expressed in which can range from A to 279. The DOT code includes the Tire Identification Number (TIN), an alphanumeric designator which the plies are , automatic transmission, power steering, power brakes, power windows, power seats, and air conditioning. See Loading Your Vehicle...
Owner's Manual
Page 306
... the tire's air pressure. Set the parking brake. 2. Turn the ignition switch to the tire/wheel positions in the following order: driver side front tire, passenger side front tire, passenger side rear tire, and driver side rear tire using a TPMS diagnostic tool. The TPMS sensors can use the pointed end of the TPMS sensors, the identification codes will need to start over. The sensors are matched to ON/RUN with the engine off. 3. TPMS Sensor Matching...
... the tire's air pressure. Set the parking brake. 2. Turn the ignition switch to the tire/wheel positions in the following order: driver side front tire, passenger side front tire, passenger side rear tire, and driver side rear tire using a TPMS diagnostic tool. The TPMS sensors can use the pointed end of the TPMS sensors, the identification codes will need to start over. The sensors are matched to ON/RUN with the engine off. 3. TPMS Sensor Matching...
Owner's Manual
Page 332
... latch has released. Position the center lift point of the jack under the center of the spare tire and turn the wheel wrench in the hoist shaft hole in place. Keep lowering the jack until it has been repaired or replaced. To continue changing the flat tire, return to lower the spare the rest of the cable and pull it lifts the secondary latch spring. 6. Keep raising the jack...
... latch has released. Position the center lift point of the jack under the center of the spare tire and turn the wheel wrench in the hoist shaft hole in place. Keep lowering the jack until it has been repaired or replaced. To continue changing the flat tire, return to lower the spare the rest of the cable and pull it lifts the secondary latch spring. 6. Keep raising the jack...

Owner's Manual
Page 349
...65 66 67 77 Usage Transmission Even Ignition Injectors (Gas) Glow Plug Module (Diesel) Engine Control Module Battery Odd Ignition Injectors (Gas) Oxygen Sensor 2 (Gas) Air Conditioning Compressor Fan Clutch (Diesel) V6 Fuel Injectors (Gas) Antilock Brake System Module (J-Case) Antilock Brake System Motor (J-Case) Trailer Wiring (J-Case) Empty Starter Solenoid (J-Case) Engine Control Module (ECM), Powertrain (Diesel) (J-Case) Front Blower (J-Case) Empty Body BEC (Mega Fuse) Relays 68 69 70 71 72 73 74 75 76 Usage Empty Run, Crank (High Current Micro) Windshield Wiper High (High Current Micro...
...65 66 67 77 Usage Transmission Even Ignition Injectors (Gas) Glow Plug Module (Diesel) Engine Control Module Battery Odd Ignition Injectors (Gas) Oxygen Sensor 2 (Gas) Air Conditioning Compressor Fan Clutch (Diesel) V6 Fuel Injectors (Gas) Antilock Brake System Module (J-Case) Antilock Brake System Motor (J-Case) Trailer Wiring (J-Case) Empty Starter Solenoid (J-Case) Engine Control Module (ECM), Powertrain (Diesel) (J-Case) Front Blower (J-Case) Empty Body BEC (Mega Fuse) Relays 68 69 70 71 72 73 74 75 76 Usage Empty Run, Crank (High Current Micro) Windshield Wiper High (High Current Micro...
Owner's Manual
Page 400
...Scheduling Appointments ...7-9 Servicing Your Airbag-Equipped Vehicle ...1-73 Sheet Metal Damage ...5-101 Shifting Into Park (P) ...2-27 Shifting Out of Park (P) ...2-29 Signals, Turn and Lane-Change ...3-8 Sliding Side Door ...2-9 Spare Tire ...5-94 Installing ...5-82 Removing ...5-79 Storing ...5-93 Specifications, Capacities ...5-110 10 Speedometer ...3-26 StabiliTrak® System ...4-5 StabiliTrak® Indicator Light ...3-34 Starting the Engine ...2-20 Steering ...4-7 Steering Wheel Controls, Audio ...3-82 Steering Wheel, Tilt Wheel ...3-7 Storage Areas ...2-34 Stuck in Sand, Mud...
...Scheduling Appointments ...7-9 Servicing Your Airbag-Equipped Vehicle ...1-73 Sheet Metal Damage ...5-101 Shifting Into Park (P) ...2-27 Shifting Out of Park (P) ...2-29 Signals, Turn and Lane-Change ...3-8 Sliding Side Door ...2-9 Spare Tire ...5-94 Installing ...5-82 Removing ...5-79 Storing ...5-93 Specifications, Capacities ...5-110 10 Speedometer ...3-26 StabiliTrak® System ...4-5 StabiliTrak® Indicator Light ...3-34 Starting the Engine ...2-20 Steering ...4-7 Steering Wheel Controls, Audio ...3-82 Steering Wheel, Tilt Wheel ...3-7 Storage Areas ...2-34 Stuck in Sand, Mud...


