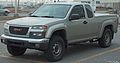
Owner's Manual
Page 1
2004 GMC Canyon Owner Manual Seats and Restraint Systems ...1-1 Front Seats ...1-3 Rear Seats ...1-9 Safety Belts ...1-11 Child Restraints ...1-31 Air Bag Systems ...1-60 Restraint System Check ...1-73 ... ...4-2 Towing ...4-47 Service and Appearance Care ...5-1 Service ...5-3 Fuel ...5-5 Checking Things Under the Hood ...5-10 Rear Axle ...5-47 Four-Wheel Drive ...5-48 Front Axle ...5-49 Bulb Replacement ...5-50 Windshield Wiper Blade Replacement ...5-55 Tires ...5-57 Appearance Care ...5-94 Vehicle Identification ...5-103 Electrical System ...5-103 Capacities and Specifications...
2004 GMC Canyon Owner Manual Seats and Restraint Systems ...1-1 Front Seats ...1-3 Rear Seats ...1-9 Safety Belts ...1-11 Child Restraints ...1-31 Air Bag Systems ...1-60 Restraint System Check ...1-73 ... ...4-2 Towing ...4-47 Service and Appearance Care ...5-1 Service ...5-3 Fuel ...5-5 Checking Things Under the Hood ...5-10 Rear Axle ...5-47 Four-Wheel Drive ...5-48 Front Axle ...5-49 Bulb Replacement ...5-50 Windshield Wiper Blade Replacement ...5-55 Tires ...5-57 Appearance Care ...5-94 Vehicle Identification ...5-103 Electrical System ...5-103 Capacities and Specifications...
Owner's Manual
Page 130
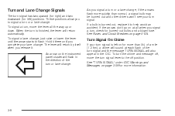
... will return automatically. When the turn is finished, the lever will return by itself when you signal a turn, check for more than normal, a signal bulb may be burned out and other drivers won't see your turn signal is burned out, replace it there until the arrow starts to help avoid... Chime If your lane change , just raise or lower the lever until you to the off , move the lever all when you release it. If a bulb is left ) positions. These positions allow you complete your turn signal. See Fuses and Circuit Breakers on for burned-out...
... will return automatically. When the turn is finished, the lever will return by itself when you signal a turn, check for more than normal, a signal bulb may be burned out and other drivers won't see your turn signal is burned out, replace it there until the arrow starts to help avoid... Chime If your lane change , just raise or lower the lever until you to the off , move the lever all when you release it. If a bulb is left ) positions. These positions allow you complete your turn signal. See Fuses and Circuit Breakers on for burned-out...
Owner's Manual
Page 262
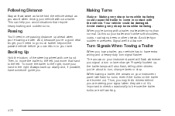
... right, move the trailer to turn, change . When towing a trailer, the arrows on your instrument panel will flash for turns even if the bulbs on your instrument panel will also flash, telling other objects. Backing Up Hold the bottom of the steering wheel with a trailer, make wider turns... hand to the right. This can return to come in advance. Making Turns Notice: Making very sharp turns while trailering could be sure the trailer bulbs are burned out. When you 're towing a trailer. Do this so your hand to the left , just move the trailer to be damaged. ...
... right, move the trailer to turn, change . When towing a trailer, the arrows on your instrument panel will flash for turns even if the bulbs on your instrument panel will also flash, telling other objects. Backing Up Hold the bottom of the steering wheel with a trailer, make wider turns... hand to the right. This can return to come in advance. Making Turns Notice: Making very sharp turns while trailering could be sure the trailer bulbs are burned out. When you 're towing a trailer. Do this so your hand to the left , just move the trailer to be damaged. ...
Owner's Manual
Page 265
......5-37 Brakes ...5-38 Battery ...5-41 Jump Starting ...5-42 Rear Axle ...5-47 Four-Wheel Drive ...5-48 Front Axle ...5-49 Bulb Replacement ...5-50 Halogen Bulbs ...5-50 Headlamps ...5-50 Front Turn Signal, Sidemarker and Daytime Running Lamps ...5-52 Center High-Mounted Stoplamp (CHMSL) ...5-53... Taillamps, Turn Signal, Stoplamps and Back-up Lamps ...5-53 Replacement Bulbs ...5-54 Windshield Wiper Blade Replacement ...5-55 Service ...5-3 Doing Your Own Service Work ...5-4 Adding Equipment to the Outside of Your Vehicle ...
......5-37 Brakes ...5-38 Battery ...5-41 Jump Starting ...5-42 Rear Axle ...5-47 Four-Wheel Drive ...5-48 Front Axle ...5-49 Bulb Replacement ...5-50 Halogen Bulbs ...5-50 Headlamps ...5-50 Front Turn Signal, Sidemarker and Daytime Running Lamps ...5-52 Center High-Mounted Stoplamp (CHMSL) ...5-53... Taillamps, Turn Signal, Stoplamps and Back-up Lamps ...5-53 Replacement Bulbs ...5-54 Windshield Wiper Blade Replacement ...5-55 Service ...5-3 Doing Your Own Service Work ...5-4 Adding Equipment to the Outside of Your Vehicle ...
Owner's Manual
Page 314
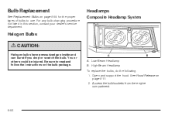
... others could be injured. Be sure to use. Low-Beam Headlamp B. A. See Hood Release on the bulb package. Open and support the hood. Access the bulb/sockets from the engine compartment. 5-50 Headlamps Composite Headlamp System Halogen Bulbs {CAUTION: Halogen bulbs have pressurized gas inside and can burst if you drop or scratch the...
... others could be injured. Be sure to use. Low-Beam Headlamp B. A. See Hood Release on the bulb package. Open and support the hood. Access the bulb/sockets from the engine compartment. 5-50 Headlamps Composite Headlamp System Halogen Bulbs {CAUTION: Halogen bulbs have pressurized gas inside and can burst if you drop or scratch the...
Owner's Manual
Page 315
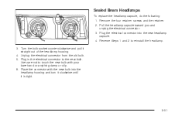
Pull the headlamp capsule toward you and unplug the electrical connector. 3. Reverse Steps 1 and 2 to the new bulb. Turn the bulb socket counterclockwise and pull it is tight. 5-51 Place the connector with your bare hand or anything damp or oily. 6. Sealed Beam Headlamps ...the headlamp capsule, do the following: 1. Plug in the electrical connector to reinstall the headlamp. 3. Use care not to touch the new bulb with the new bulb into the new headlamp capsule. 4. Plug the electrical connector into the headlamp housing and turn it clockwise until it straight out of the ...
Pull the headlamp capsule toward you and unplug the electrical connector. 3. Reverse Steps 1 and 2 to the new bulb. Turn the bulb socket counterclockwise and pull it is tight. 5-51 Place the connector with your bare hand or anything damp or oily. 6. Sealed Beam Headlamps ...the headlamp capsule, do the following: 1. Plug in the electrical connector to reinstall the headlamp. 3. Use care not to touch the new bulb with the new bulb into the new headlamp capsule. 4. Plug the electrical connector into the headlamp housing and turn it clockwise until it straight out of the ...
Owner's Manual
Page 316
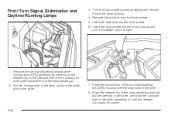
... 4. Pull the inboard side of the lamp assembly in the grille. 7. Insert the bulb socket into the bulb socket. 6. Remove the turn it clockwise until the release clip snaps into place. 5-52...the outboard side of the lamp out from the small post in , until it from the bulb socket. 5. Place the inboard end of the lamp toward you. 2. Front Turn Signal, Sidemarker and Daytime Running ...Lamps 3. Insert the new bulb into the lamp housing and turn signal/parking lamp/daytime running lamp (DRL) assembly by pressing on...
... 4. Pull the inboard side of the lamp assembly in the grille. 7. Insert the bulb socket into the bulb socket. 6. Remove the turn it clockwise until the release clip snaps into place. 5-52...the outboard side of the lamp out from the small post in , until it from the bulb socket. 5. Place the inboard end of the lamp toward you. 2. Front Turn Signal, Sidemarker and Daytime Running ...Lamps 3. Insert the new bulb into the lamp housing and turn signal/parking lamp/daytime running lamp (DRL) assembly by pressing on...
Owner's Manual
Page 317
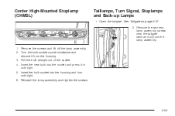
... out of the socket. 4. See Tailgate on page 2-10. 2. Insert the new bulb into the housing and turn until tight. 5. Turn the bulb socket counterclockwise and remove it in until tight. 6. Remove the screws and lift off the lamp assembly. 2. Reinstall the lamp assembly and tighten ...the screws. 5-53 Remove the two rear lamp assembly screws near the tailgate latch and pull out the lamp assembly. 1. Insert the bulb socket into the socket and press it from the housing. 3. Open the tailgate. Center High-Mounted Stoplamp (CHMSL) Taillamps, Turn Signal, Stoplamps and...
... out of the socket. 4. See Tailgate on page 2-10. 2. Insert the new bulb into the housing and turn until tight. 5. Turn the bulb socket counterclockwise and remove it in until tight. 6. Remove the screws and lift off the lamp assembly. 2. Reinstall the lamp assembly and tighten ...the screws. 5-53 Remove the two rear lamp assembly screws near the tailgate latch and pull out the lamp assembly. 1. Insert the bulb socket into the socket and press it from the housing. 3. Open the tailgate. Center High-Mounted Stoplamp (CHMSL) Taillamps, Turn Signal, Stoplamps and...
Owner's Manual
Page 318
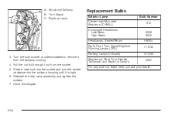
...Beam Park/ Front Turn Signal/Daytime Running Lamps (DRL) Parking Lamps (Inboard) Bulb Number 912 9006 9005 H6054 7157A 3157A 3057 3. Reinstall the rear lamp assembly and tighten the screws. 7. A. Pull the old bulb straight out from the taillamp housing. 4. Close the tailgate. Turn Signal C.... Stoplamps, Rear Turn Signals, Taillamps, and Back-Up Lamps For any bulb not listed here, contact your dealer. 5-54 Stoplamp/Taillamp B. Press a new bulb into the socket and turn the socket clockwise into the taillamp housing until it from the socket. 5....
...Beam Park/ Front Turn Signal/Daytime Running Lamps (DRL) Parking Lamps (Inboard) Bulb Number 912 9006 9005 H6054 7157A 3157A 3057 3. Reinstall the rear lamp assembly and tighten the screws. 7. A. Pull the old bulb straight out from the taillamp housing. 4. Close the tailgate. Turn Signal C.... Stoplamps, Rear Turn Signals, Taillamps, and Back-Up Lamps For any bulb not listed here, contact your dealer. 5-54 Stoplamp/Taillamp B. Press a new bulb into the socket and turn the socket clockwise into the taillamp housing until it from the socket. 5....
Owner's Manual
Page 406
... ...5-50 Center High-Mounted Stoplamp (CHMSL) ...5-53 Front Turn Signal, Sidemarker and Daytime Running Lamps ...5-52 Halogen Bulbs ...5-50 Headlamps ...5-50 Replacement Bulbs ...5-54 Taillamps, Turn Signal, Stoplamps and Back-up Lamps ...5-53 Buying New Tires ...5-68 C California Fuel ...5-6 Canada ...7-4 Canadian Owners ...ii Canadian Roadside Assistance ...7-7 Capacities and ...
... ...5-50 Center High-Mounted Stoplamp (CHMSL) ...5-53 Front Turn Signal, Sidemarker and Daytime Running Lamps ...5-52 Halogen Bulbs ...5-50 Headlamps ...5-50 Replacement Bulbs ...5-54 Taillamps, Turn Signal, Stoplamps and Back-up Lamps ...5-53 Buying New Tires ...5-68 C California Fuel ...5-6 Canada ...7-4 Canadian Owners ...ii Canadian Roadside Assistance ...7-7 Capacities and ...
Owner's Manual
Page 411
... Disabilities ...7-5 GM Oil Life System™ ...3-38 H Hazard Warning Flashers ...3-4 Head Restraints ...1-7 Headlamp High/Low-Beam Changer ...3-7 Headlamps ...5-50 Bulb Replacement ...5-50 Front Turn Signal, Sidemarker and Daytime Running Lamps ...5-52 Halogen Bulbs ...5-50 Heated Seats ...1-5 Highbeam On Light ...3-35 Highway Hypnosis ...4-37 Hill and Mountain Roads ...4-38 Hitches ...4-68 Hood Checking...
... Disabilities ...7-5 GM Oil Life System™ ...3-38 H Hazard Warning Flashers ...3-4 Head Restraints ...1-7 Headlamp High/Low-Beam Changer ...3-7 Headlamps ...5-50 Bulb Replacement ...5-50 Front Turn Signal, Sidemarker and Daytime Running Lamps ...5-52 Halogen Bulbs ...5-50 Heated Seats ...1-5 Highbeam On Light ...3-35 Highway Hypnosis ...4-37 Hill and Mountain Roads ...4-38 Hitches ...4-68 Hood Checking...
Owner's Manual
Page 415
... Entry System ...2-4 Remote Keyless Entry System, Operation ...2-5 Removing the Flat Tire and Installing the Spare Tire ...5-78 Removing the Spare Tire and Tools ...5-75 Replacement Bulbs ...5-54 Replacing Brake System Parts ...5-41 Replacing Restraint System Parts After a Crash ...1-74 11
... Entry System ...2-4 Remote Keyless Entry System, Operation ...2-5 Removing the Flat Tire and Installing the Spare Tire ...5-78 Removing the Spare Tire and Tools ...5-75 Replacement Bulbs ...5-54 Replacing Brake System Parts ...5-41 Replacing Restraint System Parts After a Crash ...1-74 11