
Owner's Manual
Page 31
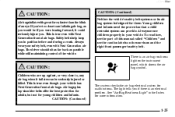
... shows the air bag symbol. There is true even with Next Generation frontal air bags. CAUTION: (Continued) The system checks the air bag electrical system for them. Always secure children properly in position before and during a crash. CAUTION: Children who are up against, or very close to... an eye. CAUTION: (Continued) Neither the vehicle's safety belt system nor its air bag system is designed for malfunctions. This is an electrical problem. Air bags plus lap-shoulder belts offer the best protection for adults, but not for more information. 1-25 yellowblue CAUTION: Air bags...
... shows the air bag symbol. There is true even with Next Generation frontal air bags. CAUTION: (Continued) The system checks the air bag electrical system for them. Always secure children properly in position before and during a crash. CAUTION: Children who are up against, or very close to... an eye. CAUTION: (Continued) Neither the vehicle's safety belt system nor its air bag system is designed for malfunctions. This is an electrical problem. Air bags plus lap-shoulder belts offer the best protection for adults, but not for more information. 1-25 yellowblue CAUTION: Air bags...

Owner's Manual
Page 73
... are shut. If your vehicle. It can 't see or smell CO. D If you must drive with the rear window, endgate or liftgate open or if electrical wiring or other cable connections must pass through the seal between the body and the rear window, endgate or liftgate: D Make sure all the way...
... are shut. If your vehicle. It can 't see or smell CO. D If you must drive with the rear window, endgate or liftgate open or if electrical wiring or other cable connections must pass through the seal between the body and the rear window, endgate or liftgate: D Make sure all the way...

Owner's Manual
Page 84
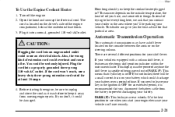
... in 10 seconds, push the accelerator pedal all the way down for longer than 15 seconds at a time will cause your starter motor. Before adding electrical equipment, check with the electronics in START for five more seconds, unless it starts sooner. 3. Engine Coolant Heater (If Equipped) In very cold weather, 0_F... a minimum of the key and the accelerator pedal. When the engine starts, let go of four hours prior to have your vehicle. If you add electrical parts or accessories, you don't, your vehicle. 2-20
... in 10 seconds, push the accelerator pedal all the way down for longer than 15 seconds at a time will cause your starter motor. Before adding electrical equipment, check with the electronics in START for five more seconds, unless it starts sooner. 3. Engine Coolant Heater (If Equipped) In very cold weather, 0_F... a minimum of the key and the accelerator pedal. When the engine starts, let go of four hours prior to have your vehicle. If you add electrical parts or accessories, you don't, your vehicle. 2-20
Owner's Manual
Page 85
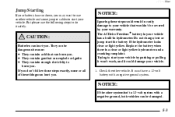
Open the hood and unwrap the electrical cord. The dealer can 't move easily. 2-21 If you don't, it could be powered anytime the shift lever is located on the outside temperature, the ... could be a small current drain on the steering column. Plug it was before to leave your battery over a period of extension cord could cause an electrical shock. Plug the cord into a normal, grounded 110-volt AC outlet. Also, the wrong kind of time. Before starting the engine, be parking your vehicle...
Open the hood and unwrap the electrical cord. The dealer can 't move easily. 2-21 If you don't, it could be powered anytime the shift lever is located on the outside temperature, the ... could be a small current drain on the steering column. Plug it was before to leave your battery over a period of extension cord could cause an electrical shock. Plug the cord into a normal, grounded 110-volt AC outlet. Also, the wrong kind of time. Before starting the engine, be parking your vehicle...
Owner's Manual
Page 131
...will drain your sunroof, the ignition or RAP needs to be equipped with a power sliding sunroof. Once the sunroof is also equipped with any electrical equipment when not in the Index. Just remove the plug from the outlet and follow the proper installation instructions that are included with a sunshade ...can plug in the mini console to open the sunroof to open the sunroof. To open or close the sunroof. Always turn off any electrical equipment you can press the forward side of the instrument panel. The sunroof is closed, press the forward side of the button in auxiliary...
...will drain your sunroof, the ignition or RAP needs to be equipped with a power sliding sunroof. Once the sunroof is also equipped with any electrical equipment when not in the Index. Just remove the plug from the outlet and follow the proper installation instructions that are included with a sunshade ...can plug in the mini console to open the sunroof to open the sunroof. To open or close the sunroof. Always turn off any electrical equipment you can press the forward side of the instrument panel. The sunroof is closed, press the forward side of the button in auxiliary...
Owner's Manual
Page 141
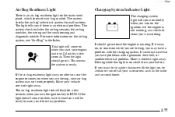
...drive a short distance with the light on while you are driving, your battery. The system checks the air bag's electrical system for a few seconds when you if there is an electrical problem. The system check includes the air bag sensors, the air bag modules, the wiring and the crash sensing and... come on when you if there is a problem. It could drain your air bag system may have a problem with a generator drive belt, or another electrical problem. Driving while this light is on the ignition, but the engine is not running . If the air bag readiness light stays on after you...
...drive a short distance with the light on while you are driving, your battery. The system checks the air bag's electrical system for a few seconds when you if there is an electrical problem. The system check includes the air bag sensors, the air bag modules, the wiring and the crash sensing and... come on when you if there is a problem. It could drain your air bag system may have a problem with a generator drive belt, or another electrical problem. Driving while this light is on the ignition, but the engine is not running . If the air bag readiness light stays on after you...
Owner's Manual
Page 142
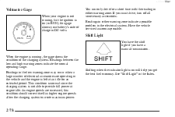
...indicator light is running , but the ignition is not able to create maximum power. yellowblue Voltmeter Gage When your battery's state of charge in the electrical system. This condition is normal since the charging system is on will help you get the best fuel economy. As engine speeds are operating in... the shift light if you must drive, turn off all unnecessary accessories. Readings in the low warning zone may occur when a large number of electrical accessories are increased, this gage shows your engine is not running , the gage shows the condition of the charging system.
...indicator light is running , but the ignition is not able to create maximum power. yellowblue Voltmeter Gage When your battery's state of charge in the electrical system. This condition is normal since the charging system is on will help you get the best fuel economy. As engine speeds are operating in... the shift light if you must drive, turn off all unnecessary accessories. Readings in the low warning zone may occur when a large number of electrical accessories are increased, this gage shows your engine is not running , the gage shows the condition of the charging system.

Owner's Manual
Page 146
Find a safe place to correct the emission system malfunction by considering the following may be corrected when the electrical system dries out. See "Filling Your Tank" in one of two ways: If the light stops flashing and remains on steady, see "If the Light ... you it is working, when the ignition is on and the engine is not running. If so, reinstall the fuel cap, making sure to your electrical system may prevent more serious damage to fully install the cap. A few driving trips should turn the light off . The condition will usually be wet...
Find a safe place to correct the emission system malfunction by considering the following may be corrected when the electrical system dries out. See "Filling Your Tank" in one of two ways: If the light stops flashing and remains on steady, see "If the Light ... you it is working, when the ignition is on and the engine is not running. If so, reinstall the fuel cap, making sure to your electrical system may prevent more serious damage to fully install the cap. A few driving trips should turn the light off . The condition will usually be wet...

Owner's Manual
Page 147
... fuel brand you do, your engine not to turn the light off , have developed. You or others could be sure to fix any mechanical or electrical problems that it catches fire. It will cause your engine can become so hot that may notice this as possible and have your vehicle with...
... fuel brand you do, your engine not to turn the light off , have developed. You or others could be sure to fix any mechanical or electrical problems that it catches fire. It will cause your engine can become so hot that may notice this as possible and have your vehicle with...
Owner's Manual
Page 248
... brake controller by itself. This can return to go much farther beyond the passed vehicle before you can help you would when driving your electrical connection at the same time. And, because you're a good deal longer, you 're towing a trailer. Always back up ahead ...brakes are still working . During your trip, check occasionally to be damaged. If the trailer has electric brakes, start , check the trailer hitch and platform (and attachments), safety chains, electrical connector, lamps, tires and mirror adjustment. Acquaint yourself with the feel of handling and braking with ...
... brake controller by itself. This can return to go much farther beyond the passed vehicle before you can help you would when driving your electrical connection at the same time. And, because you're a good deal longer, you 're towing a trailer. Always back up ahead ...brakes are still working . During your trip, check occasionally to be damaged. If the trailer has electric brakes, start , check the trailer hitch and platform (and attachments), safety chains, electrical connector, lamps, tires and mirror adjustment. Acquaint yourself with the feel of handling and braking with ...
Owner's Manual
Page 252
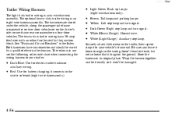
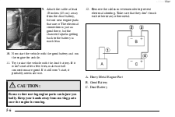
The heavy-duty trailer wiring has a 30-amp feed wire with an inline fuse located by a qualified electrical technician. The technician can use the following color code chart when connecting the wiring harness to your vehicle's frame rail. D Dark Green: Right stoplamp ...D White (Light Gauge): Auxiliary stoplamp. Securely attach the harness to the trailer, then tape or strap it drags on four-door vehicles. D Red: Use for electric trailer brakes or auxiliary wiring. The harnesses are stored under the vehicle, along the passenger-side frame crossmember on two-door vehicles or on the...
The heavy-duty trailer wiring has a 30-amp feed wire with an inline fuse located by a qualified electrical technician. The technician can use the following color code chart when connecting the wiring harness to your vehicle's frame rail. D Dark Green: Right stoplamp ...D White (Light Gauge): Auxiliary stoplamp. Securely attach the harness to the trailer, then tape or strap it drags on four-door vehicles. D Red: Use for electric trailer brakes or auxiliary wiring. The harnesses are stored under the vehicle, along the passenger-side frame crossmember on two-door vehicles or on the...
Owner's Manual
Page 255
... run down, you may want to use the following steps to start the battery if the hydrometer looks clear or light yellow. D They contain enough electricity to burn you . D They contain gas that can explode or ignite.
... run down, you may want to use the following steps to start the battery if the hydrometer looks clear or light yellow. D They contain enough electricity to burn you . D They contain gas that can explode or ignite.
Owner's Manual
Page 256
... need to add water to start your vehicle, and the bad grounding could be badly damaged. NOTICE: If you don't, explosive gas could damage the electrical systems. To avoid the possibility of the vehicles rolling, set the parking brake firmly on your warranty. 5-4 Be sure the battery has enough water. If...
... need to add water to start your vehicle, and the bad grounding could be badly damaged. NOTICE: If you don't, explosive gas could damage the electrical systems. To avoid the possibility of the vehicles rolling, set the parking brake firmly on your warranty. 5-4 Be sure the battery has enough water. If...
Owner's Manual
Page 258
.... Dead Battery CAUTION: Fans or other metal. 10. Keep your hands away from the dead battery, but the chance of sparks getting back to prevent electrical shorting. Now start after a few tries, make sure all connections are good. Good Battery C. A. Attach the cable at least 18 inches (45 cm) ...away from moving engine parts can injure you badly. The electrical connection is just as good there, but not near engine parts that they don't touch each other or any other moving parts once the engine...
.... Dead Battery CAUTION: Fans or other metal. 10. Keep your hands away from the dead battery, but the chance of sparks getting back to prevent electrical shorting. Now start after a few tries, make sure all connections are good. Good Battery C. A. Attach the cable at least 18 inches (45 cm) ...away from moving engine parts can injure you badly. The electrical connection is just as good there, but not near engine parts that they don't touch each other or any other moving parts once the engine...

Owner's Manual
Page 287
There is also technical information about the care of Your Vehicle GM Vehicle Care/Appearance Materials Vehicle Identification Number (VIN) Service Parts Identification Label Electrical System Replacement Bulbs Capacities and Specifications Air Conditioning Refrigerants Normal Maintenance Replacement Parts 6-1 yellowblue Section 6 Service and Appearance Care Here you will find information about ...
There is also technical information about the care of Your Vehicle GM Vehicle Care/Appearance Materials Vehicle Identification Number (VIN) Service Parts Identification Label Electrical System Replacement Bulbs Capacities and Specifications Air Conditioning Refrigerants Normal Maintenance Replacement Parts 6-1 yellowblue Section 6 Service and Appearance Care Here you will find information about ...
Owner's Manual
Page 293
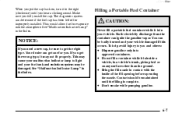
yellowblue When you put the cap back on any surface other than the ground. See "Malfunction Indicator Lamp" in the Index. 6-7 Static electricity discharge from the container can get the wrong type, it may not fit properly. Your dealer can ignite the gasoline vapor. This may be maintained ...
yellowblue When you put the cap back on any surface other than the ground. See "Malfunction Indicator Lamp" in the Index. 6-7 Static electricity discharge from the container can get the wrong type, it may not fit properly. Your dealer can ignite the gasoline vapor. This may be maintained ...
Owner's Manual
Page 320
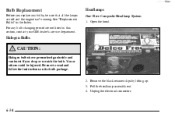
Headlamps One-Piece Composite Headlamp System 1. You or others could be sure that all the lamps are off and the engine isn't running. Unplug the electrical connector. 6-34 For any bulbs, be injured. Open the hood. yellowblue Bulb Replacement Before you drop or scratch the bulb. Remove the black retainer clips ...
Headlamps One-Piece Composite Headlamp System 1. You or others could be sure that all the lamps are off and the engine isn't running. Unplug the electrical connector. 6-34 For any bulbs, be injured. Open the hood. yellowblue Bulb Replacement Before you drop or scratch the bulb. Remove the black retainer clips ...
Owner's Manual
Page 321
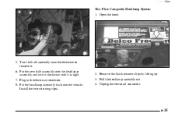
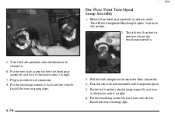
Unplug the electrical connector. 6-35 yellowblue Two-Piece Composite Headlamp System 1. Remove the black retainer clips by lifting up. 3. Plug in the electrical connector. 8. Put the headlamp assembly back into the headlamp assembly and turn it clockwise until it . 6. Open the hood. 5. Pull the headlamp assembly out. 4. Turn the bulb assembly counterclockwise to remove it is tight. 7. Install the two retaining clips. 2. Put the new bulb assembly into the vehicle.
Unplug the electrical connector. 6-35 yellowblue Two-Piece Composite Headlamp System 1. Remove the black retainer clips by lifting up. 3. Plug in the electrical connector. 8. Put the headlamp assembly back into the headlamp assembly and turn it clockwise until it . 6. Open the hood. 5. Pull the headlamp assembly out. 4. Turn the bulb assembly counterclockwise to remove it is tight. 7. Install the two retaining clips. 2. Put the new bulb assembly into the vehicle.
Owner's Manual
Page 322
... it . 6. Plug in this section. 2. Install the two retaining clips. 3. Remove the headlamp assembly as shown under "One-Piece Composite Headlamp System" earlier in the electrical connector. 8. Install the two retaining clips. 6-36 Push the new bulb into place. 5. Twist the bulb socket to remove it from the headlamp assembly. 5. Put...
... it . 6. Plug in this section. 2. Install the two retaining clips. 3. Remove the headlamp assembly as shown under "One-Piece Composite Headlamp System" earlier in the electrical connector. 8. Install the two retaining clips. 6-36 Push the new bulb into place. 5. Twist the bulb socket to remove it from the headlamp assembly. 5. Put...
Owner's Manual
Page 323
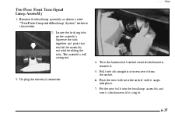
Push the new bulb into the socket until it from the socket. 3. The assembly will swing out. 4. Unplug the electrical connector. 6. Turn the harness bulb socket counterclockwise to remove it is tight. 6-37 Squeeze the tabs together and push that end of the assembly out ...
Push the new bulb into the socket until it from the socket. 3. The assembly will swing out. 4. Unplug the electrical connector. 6. Turn the harness bulb socket counterclockwise to remove it is tight. 6-37 Squeeze the tabs together and push that end of the assembly out ...


