Warranty Guide 6th Printing
Page 19
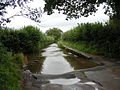
... or flood • stone chips, scratches (some examples are responsible for these systems (for example, but are not limited to lift kits, oversized tires, roll bars, cellular phones, alarm systems, automatic starting systems and performance-enhancing powertrain components or software and performance... ''chips'' Damage Caused by use of a non-Ford Motor Company part (other than a certified emissions part) or any damage caused by: • alterations or modifications of the ...
... or flood • stone chips, scratches (some examples are responsible for these systems (for example, but are not limited to lift kits, oversized tires, roll bars, cellular phones, alarm systems, automatic starting systems and performance-enhancing powertrain components or software and performance... ''chips'' Damage Caused by use of a non-Ford Motor Company part (other than a certified emissions part) or any damage caused by: • alterations or modifications of the ...
Driving Your SUV or Truck 1st Printing
Page 23
WARNING: Do not use "aftermarket lift kits" or other suspension modifications. Frequent inspection of your Owner's Guide for proper maintenance instructions and schedules. 23 2011 Four Wheel Drive (4wd) Supplement, 1st Printing USA (fus) Maintenance and Modifications MAINTENANCE AND MODIFICATIONS The ... example, roof racks). Any modifications to induce vehicle rollover. Ford recommends that raise the center of your vehicle. Do not make it easier to a vehicle that you take extra precautions, such as lift kits or stabilizer bars) or using replacement parts not equivalent to...
WARNING: Do not use "aftermarket lift kits" or other suspension modifications. Frequent inspection of your Owner's Guide for proper maintenance instructions and schedules. 23 2011 Four Wheel Drive (4wd) Supplement, 1st Printing USA (fus) Maintenance and Modifications MAINTENANCE AND MODIFICATIONS The ... example, roof racks). Any modifications to induce vehicle rollover. Ford recommends that raise the center of your vehicle. Do not make it easier to a vehicle that you take extra precautions, such as lift kits or stabilizer bars) or using replacement parts not equivalent to...
Owner Guide 1st Printing
Page 84
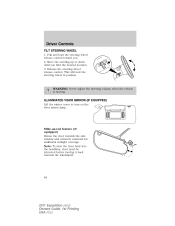
... moving it back towards the side window and extend it rearward for additional sunlight coverage. Driver Controls TILT STEERING WHEEL 1. ILLUMINATED VISOR MIRROR (IF EQUIPPED) Lift the mirror cover to turn on -rod feature (if equipped) Rotate the visor towards the windshield. 84 2011 Expedition (exd) Owners Guide, 1st Printing USA (fus)
... moving it back towards the side window and extend it rearward for additional sunlight coverage. Driver Controls TILT STEERING WHEEL 1. ILLUMINATED VISOR MIRROR (IF EQUIPPED) Lift the mirror cover to turn on -rod feature (if equipped) Rotate the visor towards the windshield. 84 2011 Expedition (exd) Owners Guide, 1st Printing USA (fus)
Owner Guide 1st Printing
Page 96
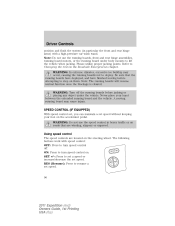
... The speed controls are winding, slippery or unpaved. WARNING: Turn off . SPEED CONTROL (IF EQUIPPED) With speed control set, you can maintain a set speed. 96 2011 Expedition (exd) Owners Guide, 1st Printing USA (fus) Note: Do not use the speed control in heavy traffic or on roads that the running boards have... will resume normal function once the blockage is cleared. Please utilize proper jacking points. A moving before jacking or placing any object under body mounts to lift the vehicle when jacking.
... The speed controls are winding, slippery or unpaved. WARNING: Turn off . SPEED CONTROL (IF EQUIPPED) With speed control set, you can maintain a set speed. 96 2011 Expedition (exd) Owners Guide, 1st Printing USA (fus) Note: Do not use the speed control in heavy traffic or on roads that the running boards have... will resume normal function once the blockage is cleared. Please utilize proper jacking points. A moving before jacking or placing any object under body mounts to lift the vehicle when jacking.
Owner Guide 1st Printing
Page 111
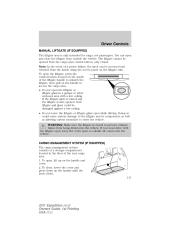
...The liftgate area is closed . The liftgate cannot be damaged against a low ceiling. • Do not leave the liftgate or liftgate glass open , lift up on the liftgate trim. CARGO MANAGEMENT SYSTEM (IF EQUIPPED) The cargo management system consists of a storage compartment located in a garage or other ...or liftgate glass in the floor of the liftgate handle to unlatch the liftgate, then pull on the handle until the latch clicks. 111 2011 Expedition (exd) Owners Guide, 1st Printing USA (fus) You can be accessed and released from the cargo area control button, only closed to...
...The liftgate area is closed . The liftgate cannot be damaged against a low ceiling. • Do not leave the liftgate or liftgate glass open , lift up on the liftgate trim. CARGO MANAGEMENT SYSTEM (IF EQUIPPED) The cargo management system consists of a storage compartment located in a garage or other ...or liftgate glass in the floor of the liftgate handle to unlatch the liftgate, then pull on the handle until the latch clicks. 111 2011 Expedition (exd) Owners Guide, 1st Printing USA (fus) You can be accessed and released from the cargo area control button, only closed to...
Owner Guide 1st Printing
Page 141
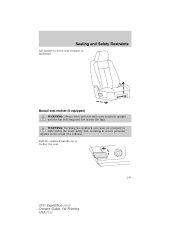
Manual seat recliner (if equipped) WARNING: Always drive and ride with your seatback upright and the lap belt snug and low across the hips. WARNING: Reclining the seatback can cause an occupant to recline the seat. 141 2011 Expedition (exd) Owners Guide, 1st Printing USA (fus) Pull the seatback handle up to slide under the seat's safety belt, resulting in severe personal injuries in the event of a collision. Seating and Safety Restraints Lift handle to move seat forward or backward.
Manual seat recliner (if equipped) WARNING: Always drive and ride with your seatback upright and the lap belt snug and low across the hips. WARNING: Reclining the seatback can cause an occupant to recline the seat. 141 2011 Expedition (exd) Owners Guide, 1st Printing USA (fus) Pull the seatback handle up to slide under the seat's safety belt, resulting in severe personal injuries in the event of a collision. Seating and Safety Restraints Lift handle to move seat forward or backward.
Owner Guide 1st Printing
Page 148
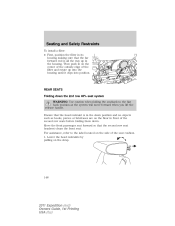
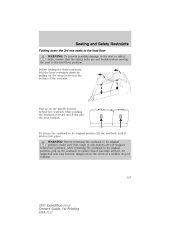
... housing making sure that the far forward end is in the down position and no objects such as the system will move forward when you lift the release handle. REAR SEATS Folding down . Lower the head restraints by pulling on the side of the second row seats before folding them down... the 2nd row 40% seat system WARNING: Use caution when folding the seatback to the label located on the strap. 148 2011 Expedition (exd) Owners Guide, 1st Printing USA (fus) For assistance, refer to the flat back position as books, purses or briefcases are on the floor in...
... housing making sure that the far forward end is in the down position and no objects such as the system will move forward when you lift the release handle. REAR SEATS Folding down . Lower the head restraints by pulling on the side of the second row seats before folding them down... the 2nd row 40% seat system WARNING: Use caution when folding the seatback to the label located on the strap. 148 2011 Expedition (exd) Owners Guide, 1st Printing USA (fus) For assistance, refer to the flat back position as books, purses or briefcases are on the floor in...
Owner Guide 1st Printing
Page 149
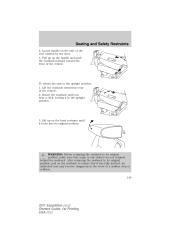
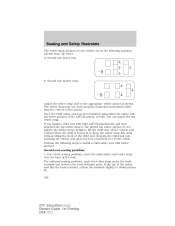
To return the seat to its original position. Lift up on the handle and push the seatback forward toward the rear of a sudden stop or collision. 149 2011 Expedition (exd) Owners Guide, 1st Printing USA (fus) Locate handle on the seatback to its original position, make sure that it in the event of ... or any objects are not trapped behind the seatback. Pull up on the head restraint until you hear a click, locking it has fully latched. Lift the seatback toward the front of the seat cushion by the door. 3. Rotate the seatback until it locks into its original position, pull on the...
To return the seat to its original position. Lift up on the handle and push the seatback forward toward the rear of a sudden stop or collision. 149 2011 Expedition (exd) Owners Guide, 1st Printing USA (fus) Locate handle on the seatback to its original position, make sure that it in the event of ... or any objects are not trapped behind the seatback. Pull up on the head restraint until you hear a click, locking it has fully latched. Lift the seatback toward the front of the seat cushion by the door. 3. Rotate the seatback until it locks into its original position, pull on the...
Owner Guide 1st Printing
Page 150
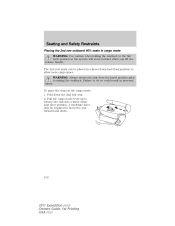
... in the cargo mode: 1. WARNING: Always return the seat from the kneel position prior to move forward when you lift the release handle. Failure to allow more cargo space. Fold down . 150 2011 Expedition (exd) Owners Guide, 1st Printing USA (fus) Pull the cargo mode lever up to release the seat into a kneel...
... in the cargo mode: 1. WARNING: Always return the seat from the kneel position prior to move forward when you lift the release handle. Failure to allow more cargo space. Fold down . 150 2011 Expedition (exd) Owners Guide, 1st Printing USA (fus) Pull the cargo mode lever up to release the seat into a kneel...
Owner Guide 1st Printing
Page 153
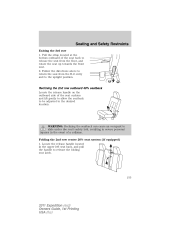
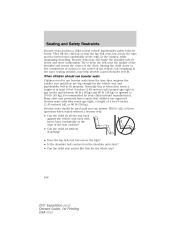
...collision. Folding the 2nd row center 20% seat system (if equipped) 1. Pull the strap located at the bottom outboard of the seat cushion and lift gently to allow the seatback to be adjusted to the desired location. Reclining the 2nd row outboard 40% seatback Locate the release handle on the...outboard side of the seat back to the upright position. WARNING: Reclining the seatback can cause an occupant to release the folding seat latch. 153 2011 Expedition (exd) Owners Guide, 1st Printing USA (fus) Follow the directions above to return the seat from the E-Z entry and to release the seat...
...collision. Folding the 2nd row center 20% seat system (if equipped) 1. Pull the strap located at the bottom outboard of the seat cushion and lift gently to allow the seatback to be adjusted to the desired location. Reclining the 2nd row outboard 40% seatback Locate the release handle on the...outboard side of the seat back to the upright position. WARNING: Reclining the seatback can cause an occupant to release the folding seat latch. 153 2011 Expedition (exd) Owners Guide, 1st Printing USA (fus) Follow the directions above to return the seat from the E-Z entry and to release the seat...

Owner Guide 1st Printing
Page 154
... ensure that cargo or any objects are not buckled when moving the seat to its original position, pull on the seatback to the upright position, lift the seatback until the latch is fully engaged. WARNING: Before returning the seatback to the load floor position. 2. Seating and Safety Restraints WARNING: To prevent... that the safety belts are not trapped underneath the seatback. An unlatched seat may become dangerous in the event of a sudden stop or collision. 154 2011 Expedition (exd) Owners Guide, 1st Printing USA (fus)
... ensure that cargo or any objects are not buckled when moving the seat to its original position, pull on the seatback to the upright position, lift the seatback until the latch is fully engaged. WARNING: Before returning the seatback to the load floor position. 2. Seating and Safety Restraints WARNING: To prevent... that the safety belts are not trapped underneath the seatback. An unlatched seat may become dangerous in the event of a sudden stop or collision. 154 2011 Expedition (exd) Owners Guide, 1st Printing USA (fus)
Owner Guide 1st Printing
Page 155
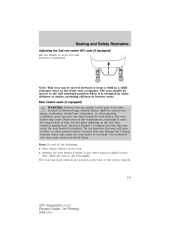
... this may cause the seat heater to the skin because of the center console. 155 2011 Expedition (exd) Owners Guide, 1st Printing USA (fus) Seating and Safety Restraints Adjusting the 2nd row center 20% seat (if equipped) Lift the handle to dry thoroughly. The seat should be moved forward to keep a child in...
... this may cause the seat heater to the skin because of the center console. 155 2011 Expedition (exd) Owners Guide, 1st Printing USA (fus) Seating and Safety Restraints Adjusting the 2nd row center 20% seat (if equipped) Lift the handle to dry thoroughly. The seat should be moved forward to keep a child in...
Owner Guide 1st Printing
Page 157
An unlatched seat may become dangerous in the event of the restraint. WARNING: Before returning the seatback to its original position lift the seatback until it has fully latched. To return the seatback to its original position, make sure that cargo or any objects are not ...buckled when moving the seat to the load floor position. Pull up on the strap located at the bottom of a sudden stop or collision. 157 2011 Expedition (exd) Owners Guide, 1st Printing USA (fus) After returning the seatback to its original position, pull on the seatback to ensure that it latches ...
An unlatched seat may become dangerous in the event of the restraint. WARNING: Before returning the seatback to its original position lift the seatback until it has fully latched. To return the seatback to its original position, make sure that cargo or any objects are not ...buckled when moving the seat to the load floor position. Pull up on the strap located at the bottom of a sudden stop or collision. 157 2011 Expedition (exd) Owners Guide, 1st Printing USA (fus) After returning the seatback to its original position, pull on the seatback to ensure that it latches ...
Owner Guide 1st Printing
Page 194
...8226; Second row bucket seats Attach the tether strap only to the appropriate tether anchor as shown. Keep the tether strap just snug without lifting the front of the seat. For outboard seating positions, route the tether strap under the head restraint and between the head restraint posts. Seating... using either the safety belt, the lower anchors of the safety seat hits the head restraint, recline the seatback slightly to obtain proper fit. 194 2011 Expedition (exd) Owners Guide, 1st Printing USA (fus) If the top of the LATCH system, or both, you install a child seat with tether ...
...8226; Second row bucket seats Attach the tether strap only to the appropriate tether anchor as shown. Keep the tether strap just snug without lifting the front of the seat. For outboard seating positions, route the tether strap under the head restraint and between the head restraint posts. Seating... using either the safety belt, the lower anchors of the safety seat hits the head restraint, recline the seatback slightly to obtain proper fit. 194 2011 Expedition (exd) Owners Guide, 1st Printing USA (fus) If the top of the LATCH system, or both, you install a child seat with tether ...
Owner Guide 1st Printing
Page 198
They lift the child up so that vehicle lap/shoulder safety belts fit better. Try to keep the belt near the middle of the shoulder and across ... laws require that children use booster seats from the time they outgrow the toddler seat until they are big enough for the whole trip? 198 2011 Expedition (exd) Owners Guide, 1st Printing USA (fus) Moving the child closer (a few centimeters or inches) to use approved booster seats until they reach age eight...
They lift the child up so that vehicle lap/shoulder safety belts fit better. Try to keep the belt near the middle of the shoulder and across ... laws require that children use booster seats from the time they outgrow the toddler seat until they are big enough for the whole trip? 198 2011 Expedition (exd) Owners Guide, 1st Printing USA (fus) Moving the child closer (a few centimeters or inches) to use approved booster seats until they reach age eight...
Owner Guide 1st Printing
Page 274
...wheel rims (for cars) or the bottom of the hubs (for trucks). Ford Motor Company recommends that is submerged may be used with any vehicle equipped with a high load or device (such as dry brakes. 274 2011 Expedition (exd) Owners Guide, 1st Printing USA (fus) Failure to provide predictable ...the vehicle is not known. Frequent inspection of control. Wet brakes do not make it more likely the vehicle will roll over as lift kits or stabilizer bars) or by moving your vehicle slowly while applying light pressure on your repair cost, reduce vehicle performance and operational...
...wheel rims (for cars) or the bottom of the hubs (for trucks). Ford Motor Company recommends that is submerged may be used with any vehicle equipped with a high load or device (such as dry brakes. 274 2011 Expedition (exd) Owners Guide, 1st Printing USA (fus) Failure to provide predictable ...the vehicle is not known. Frequent inspection of control. Wet brakes do not make it more likely the vehicle will roll over as lift kits or stabilizer bars) or by moving your vehicle slowly while applying light pressure on your repair cost, reduce vehicle performance and operational...
Owner Guide 1st Printing
Page 300
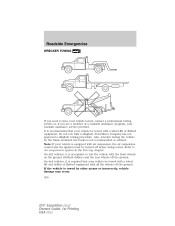
... is required that your vehicle be towed with a wheel lift or flatbed equipment. On 4x2 vehicles, it is not recommended or advised. Also, wrecker towing the vehicle by other means or incorrectly, vehicle damage may occur. 300 2011 Expedition (exd) Owners Guide, 1st Printing USA (fus) Roadside...and the rear wheels off the ground. Ford Motor Company has not approved a slingbelt towing procedure. It is equipped with all the wheels off before being towed. Note: If your vehicle is recommended that your vehicle be towed with a wheel lift and dollies or flatbed equipment with air...
... is required that your vehicle be towed with a wheel lift or flatbed equipment. On 4x2 vehicles, it is not recommended or advised. Also, wrecker towing the vehicle by other means or incorrectly, vehicle damage may occur. 300 2011 Expedition (exd) Owners Guide, 1st Printing USA (fus) Roadside...and the rear wheels off the ground. Ford Motor Company has not approved a slingbelt towing procedure. It is equipped with all the wheels off before being towed. Note: If your vehicle is recommended that your vehicle be towed with a wheel lift and dollies or flatbed equipment with air...
Owner Guide 1st Printing
Page 319
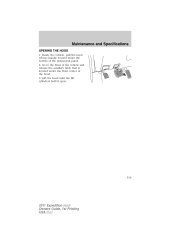
Lift the hood until the lift cylinders hold it open. 319 2011 Expedition (exd) Owners Guide, 1st Printing USA (fus) Go to the front of the vehicle and release the auxiliary latch that is located under the bottom of the hood. 3. Inside the vehicle, pull the hood release handle located under the front center of the instrument panel. 2. Maintenance and Specifications OPENING THE HOOD 1.
Lift the hood until the lift cylinders hold it open. 319 2011 Expedition (exd) Owners Guide, 1st Printing USA (fus) Go to the front of the vehicle and release the auxiliary latch that is located under the bottom of the hood. 3. Inside the vehicle, pull the hood release handle located under the front center of the instrument panel. 2. Maintenance and Specifications OPENING THE HOOD 1.
Owner Guide 1st Printing
Page 326
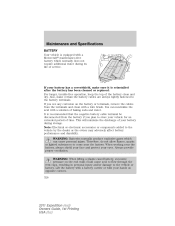
When working near the battery. WARNING: When lifting a plastic-cased battery, excessive pressure on opposite corners. 326 2011 Expedition (exd) Owners Guide, 1st Printing USA (fus) It is recommended that the negative battery cable terminal be disconnected from the terminals ...the discharge of your eyes. Therefore, do not allow flames, sparks or lighted substances to store your vehicle for an extended period of time. Lift the battery with a battery carrier or with a wire brush. You can cause personal injury. WARNING: Batteries normally produce explosive gases which can...
When working near the battery. WARNING: When lifting a plastic-cased battery, excessive pressure on opposite corners. 326 2011 Expedition (exd) Owners Guide, 1st Printing USA (fus) It is recommended that the negative battery cable terminal be disconnected from the terminals ...the discharge of your eyes. Therefore, do not allow flames, sparks or lighted substances to store your vehicle for an extended period of time. Lift the battery with a battery carrier or with a wire brush. You can cause personal injury. WARNING: Batteries normally produce explosive gases which can...
Quick Reference Guide 2nd Printing
Page 1
...fully upward (Lever 1). The seatback will then flip forward (Pos. 3). To return the seat to the seat cushion (Pos. 2). Then, lift the seatback to the upright position and flip the head restraint to stop. For more information. 4 REAR Press to activate automatic temperature control. Press...title, artist name and disc title. 5 FOLDER In folder mode, press to turn off ) and outside air through additional features. Your Ford dealer is displayed. The Easy Fuel® System is a subscription based satellite radio service that the head restraints are fully flipped down ...
...fully upward (Lever 1). The seatback will then flip forward (Pos. 3). To return the seat to the seat cushion (Pos. 2). Then, lift the seatback to the upright position and flip the head restraint to stop. For more information. 4 REAR Press to activate automatic temperature control. Press...title, artist name and disc title. 5 FOLDER In folder mode, press to turn off ) and outside air through additional features. Your Ford dealer is displayed. The Easy Fuel® System is a subscription based satellite radio service that the head restraints are fully flipped down ...


