
Warranty Guide 6th Printing
Page 19
... for off-road use only installed after the vehicle leaves the control of Ford Motor Company, if the installed part fails or causes a Ford part to fail. Examples include, but are not limited to lift kits, oversized tires, roll bars, cellular phones, alarm systems, automatic starting systems and performance-enhancing powertrain components or...
... for off-road use only installed after the vehicle leaves the control of Ford Motor Company, if the installed part fails or causes a Ford part to fail. Examples include, but are not limited to lift kits, oversized tires, roll bars, cellular phones, alarm systems, automatic starting systems and performance-enhancing powertrain components or...
Driving Your SUV or Truck 1st Printing
Page 23
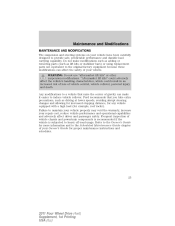
...lift kits or stabilizer bars) or using replacement parts not equivalent to the original factory equipment because these modifications can make it easier to the Scheduled Maintenance Guide chapter of your Owner's Guide for proper maintenance instructions and schedules. 23 2011 Four Wheel Drive (4wd) Supplement, 1st Printing USA (fus) Ford... distance, for any vehicle equipped with a high load (for more information and to induce vehicle rollover. "Aftermarket lift kits" could adversely affect the vehicle's handling characteristics, which could result in an increased risk of loss of vehicle...
...lift kits or stabilizer bars) or using replacement parts not equivalent to the original factory equipment because these modifications can make it easier to the Scheduled Maintenance Guide chapter of your Owner's Guide for proper maintenance instructions and schedules. 23 2011 Four Wheel Drive (4wd) Supplement, 1st Printing USA (fus) Ford... distance, for any vehicle equipped with a high load (for more information and to induce vehicle rollover. "Aftermarket lift kits" could adversely affect the vehicle's handling characteristics, which could result in an increased risk of loss of vehicle...
Owner Guide 1st Printing
Page 84
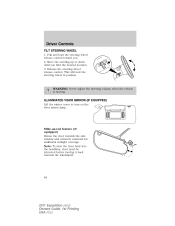
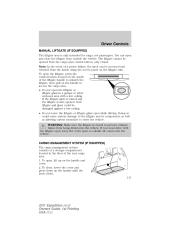
... stow the visor back into the headliner, visor must be retracted before moving . ILLUMINATED VISOR MIRROR (IF EQUIPPED) Lift the mirror cover to turn on -rod feature (if equipped) Rotate the visor towards the windshield. 84 2011 Expedition (exd) Owners Guide, 1st Printing USA (fus) Move the steering up or down until you . 2.
... stow the visor back into the headliner, visor must be retracted before moving . ILLUMINATED VISOR MIRROR (IF EQUIPPED) Lift the mirror cover to turn on -rod feature (if equipped) Rotate the visor towards the windshield. 84 2011 Expedition (exd) Owners Guide, 1st Printing USA (fus) Move the steering up or down until you . 2.
Owner Guide 1st Printing
Page 96
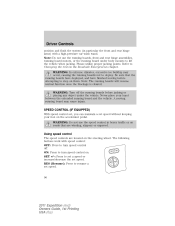
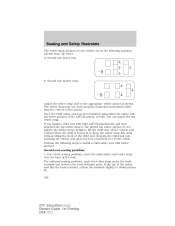
...resume a set speed without keeping your hand between the extended running boards will resume normal function once the blockage is cleared. Refer to lift the vehicle when jacking. WARNING: Turn off . Using speed control The speed controls are winding, slippery or unpaved. Please utilize proper jacking... points. Note: The running board and the vehicle. SPEED CONTROL (IF EQUIPPED) With speed control set, you can maintain a set speed. 96 2011 Expedition (exd) Owners Guide, 1st Printing USA (fus) SET +/-: Press to set a speed or increase/decrease the set speed. + SET RES RES (...
...resume a set speed without keeping your hand between the extended running boards will resume normal function once the blockage is cleared. Refer to lift the vehicle when jacking. WARNING: Turn off . Using speed control The speed controls are winding, slippery or unpaved. Please utilize proper jacking... points. Note: The running board and the vehicle. SPEED CONTROL (IF EQUIPPED) With speed control set, you can maintain a set speed. 96 2011 Expedition (exd) Owners Guide, 1st Printing USA (fus) SET +/-: Press to set a speed or increase/decrease the set speed. + SET RES RES (...
Owner Guide 1st Printing
Page 111
... the liftgate handle to unlatch the liftgate, then pull on the handle until the latch clicks. 111 2011 Expedition (exd) Owners Guide, 1st Printing USA (fus) WARNING: Make sure the liftgate is closed . To open, lift up on the liftgate trim. To close the liftgate from the inside of the rear cargo area...
... the liftgate handle to unlatch the liftgate, then pull on the handle until the latch clicks. 111 2011 Expedition (exd) Owners Guide, 1st Printing USA (fus) WARNING: Make sure the liftgate is closed . To open, lift up on the liftgate trim. To close the liftgate from the inside of the rear cargo area...
Owner Guide 1st Printing
Page 141
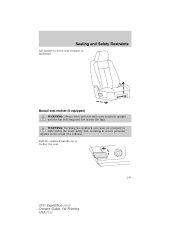
Manual seat recliner (if equipped) WARNING: Always drive and ride with your seatback upright and the lap belt snug and low across the hips. WARNING: Reclining the seatback can cause an occupant to move seat forward or backward. Seating and Safety Restraints Lift handle to slide under the seat's safety belt, resulting in severe personal injuries in the event of a collision. Pull the seatback handle up to recline the seat. 141 2011 Expedition (exd) Owners Guide, 1st Printing USA (fus)
Manual seat recliner (if equipped) WARNING: Always drive and ride with your seatback upright and the lap belt snug and low across the hips. WARNING: Reclining the seatback can cause an occupant to move seat forward or backward. Seating and Safety Restraints Lift handle to slide under the seat's safety belt, resulting in severe personal injuries in the event of a collision. Pull the seatback handle up to recline the seat. 141 2011 Expedition (exd) Owners Guide, 1st Printing USA (fus)
Owner Guide 1st Printing
Page 148
... them down position and no objects such as the system will move forward when you lift the release handle. For assistance, refer to the flat back position as books, purses or briefcases are on the strap. 148 2011 Expedition (exd) Owners Guide, 1st Printing USA (fus) Then push in on the side of...
... them down position and no objects such as the system will move forward when you lift the release handle. For assistance, refer to the flat back position as books, purses or briefcases are on the strap. 148 2011 Expedition (exd) Owners Guide, 1st Printing USA (fus) Then push in on the side of...
Owner Guide 1st Printing
Page 149
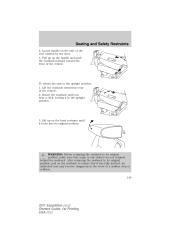
WARNING: Before returning the seatback to its original position. Lift up on the seatback to the upright position: 1. After returning the seatback to its original position, pull on the handle and push the seatback forward ... it in the event of the seat cushion by the door. 3. Lift the seatback toward the front of the vehicle. 2. An unlatched seat may become dangerous in the upright position. 3. Pull up on the side of a sudden stop or collision. 149 2011 Expedition (exd) Owners Guide, 1st Printing USA (fus) To return the...
WARNING: Before returning the seatback to its original position. Lift up on the seatback to the upright position: 1. After returning the seatback to its original position, pull on the handle and push the seatback forward ... it in the event of the seat cushion by the door. 3. Lift the seatback toward the front of the vehicle. 2. An unlatched seat may become dangerous in the upright position. 3. Pull up on the side of a sudden stop or collision. 149 2011 Expedition (exd) Owners Guide, 1st Printing USA (fus) To return the...
Owner Guide 1st Printing
Page 150
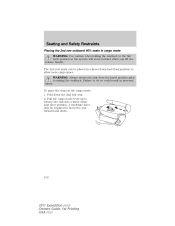
...: 1. A moderate force may be placed in a kneel down the 2nd row seat. 2. Pull the cargo mode lever up to move forward when you lift the release handle. Failure to raising the seatback. Fold down load floor position to the flat back position as the system will move the seat... forward and down load floor position. The 2nd row seats can be required to release the seat into a kneel down . 150 2011 Expedition (exd) Owners Guide, 1st Printing USA (fus) Seating and Safety Restraints Placing the 2nd row outboard 40% seats in cargo mode WARNING: Use caution...
...: 1. A moderate force may be placed in a kneel down the 2nd row seat. 2. Pull the cargo mode lever up to move forward when you lift the release handle. Failure to raising the seatback. Fold down load floor position to the flat back position as the system will move the seat... forward and down load floor position. The 2nd row seats can be required to release the seat into a kneel down . 150 2011 Expedition (exd) Owners Guide, 1st Printing USA (fus) Seating and Safety Restraints Placing the 2nd row outboard 40% seats in cargo mode WARNING: Use caution...
Owner Guide 1st Printing
Page 153
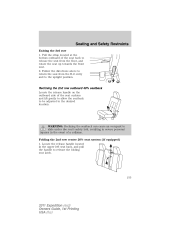
... upright position. Folding the 2nd row center 20% seat system (if equipped) 1. Pull the strap located at the bottom outboard of the seat cushion and lift gently to allow the seatback to be adjusted to return the seat from the floor, and rotate the seat up towards the front seat. 2. Follow..., resulting in severe personal injuries in the event of a collision. WARNING: Reclining the seatback can cause an occupant to release the folding seat latch. 153 2011 Expedition (exd) Owners Guide, 1st Printing USA (fus)
... upright position. Folding the 2nd row center 20% seat system (if equipped) 1. Pull the strap located at the bottom outboard of the seat cushion and lift gently to allow the seatback to be adjusted to return the seat from the floor, and rotate the seat up towards the front seat. 2. Follow..., resulting in severe personal injuries in the event of a collision. WARNING: Reclining the seatback can cause an occupant to release the folding seat latch. 153 2011 Expedition (exd) Owners Guide, 1st Printing USA (fus)

Owner Guide 1st Printing
Page 154
... lowered into the load floor position. 3. To return the seat to the upright position, lift the seatback until the latch is fully engaged. An unlatched seat may become dangerous in the event of a sudden stop or collision. 154 2011 Expedition (exd) Owners Guide, 1st Printing USA (fus) After returning the seatback to its...
... lowered into the load floor position. 3. To return the seat to the upright position, lift the seatback until the latch is fully engaged. An unlatched seat may become dangerous in the event of a sudden stop or collision. 154 2011 Expedition (exd) Owners Guide, 1st Printing USA (fus) After returning the seatback to its...
Owner Guide 1st Printing
Page 155
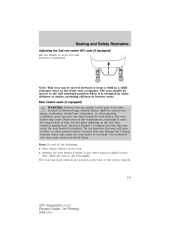
Seating and Safety Restraints Adjusting the 2nd row center 20% seat (if equipped) Lift the handle to overheat. The seat should be moved forward to keep a child in booster seats. Rear heated seats (if equipped) WARNING: Persons who are ... to overheat. Note: This seat can be moved to the full rearward position when it is spilled on the rear of the center console. 155 2011 Expedition (exd) Owners Guide, 1st Printing USA (fus)
Seating and Safety Restraints Adjusting the 2nd row center 20% seat (if equipped) Lift the handle to overheat. The seat should be moved forward to keep a child in booster seats. Rear heated seats (if equipped) WARNING: Persons who are ... to overheat. Note: This seat can be moved to the full rearward position when it is spilled on the rear of the center console. 155 2011 Expedition (exd) Owners Guide, 1st Printing USA (fus)
Owner Guide 1st Printing
Page 157
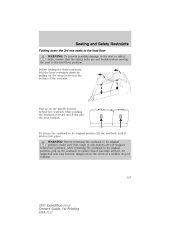
... floor position. Pull up on the strap located at the bottom of a sudden stop or collision. 157 2011 Expedition (exd) Owners Guide, 1st Printing USA (fus) To return the seatback to its original position lift the seatback until it has fully latched. Seating and Safety Restraints Folding down the 3rd row seats to...
... floor position. Pull up on the strap located at the bottom of a sudden stop or collision. 157 2011 Expedition (exd) Owners Guide, 1st Printing USA (fus) To return the seatback to its original position lift the seatback until it has fully latched. Seating and Safety Restraints Folding down the 3rd row seats to...
Owner Guide 1st Printing
Page 194
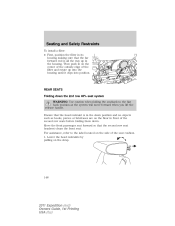
... back of the safety seat hits the head restraint, recline the seatback slightly to obtain proper fit. 194 2011 Expedition (exd) Owners Guide, 1st Printing USA (fus) Keep the tether strap just snug without lifting the front of the LATCH system, or both, you install a child seat with tether anchors: Second row seating... with rigid LATCH attachments, and have attached the top tether strap to the proper top tether anchor, do not tighten the tether strap enough to lift the child seat off the vehicle seat cushion when the child is seated in a severe crash.
... back of the safety seat hits the head restraint, recline the seatback slightly to obtain proper fit. 194 2011 Expedition (exd) Owners Guide, 1st Printing USA (fus) Keep the tether strap just snug without lifting the front of the LATCH system, or both, you install a child seat with tether anchors: Second row seating... with rigid LATCH attachments, and have attached the top tether strap to the proper top tether anchor, do not tighten the tether strap enough to lift the child seat off the vehicle seat cushion when the child is seated in a severe crash.
Owner Guide 1st Printing
Page 198
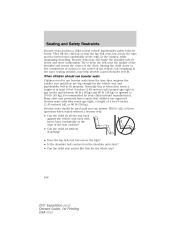
... centimeters or inches) to use booster seats from the time they outgrow the toddler seat until they are big enough for the whole trip? 198 2011 Expedition (exd) Owners Guide, 1st Printing USA (fus) When children should be used until you can answer YES to ALL of these questions when seated ... that the lap belt rests low across the hips and the knees bend comfortably at the edge of the cushion, while minimizing slouching. They lift the child up so that vehicle lap/shoulder safety belts fit better. Many state and provincial laws require that children use booster seats Children need...
... centimeters or inches) to use booster seats from the time they outgrow the toddler seat until they are big enough for the whole trip? 198 2011 Expedition (exd) Owners Guide, 1st Printing USA (fus) When children should be used until you can answer YES to ALL of these questions when seated ... that the lap belt rests low across the hips and the knees bend comfortably at the edge of the cushion, while minimizing slouching. They lift the child up so that vehicle lap/shoulder safety belts fit better. Many state and provincial laws require that children use booster seats Children need...
Owner Guide 1st Printing
Page 274
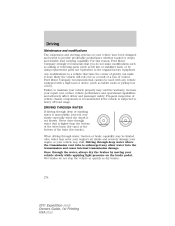
... may be used with any vehicle equipped with a high load or device (such as lift kits or stabilizer bars) or by moving your vehicle slowly while applying light pressure on your... damage. Never drive through deep water where the transmission vent tube is not known. Ford Motor Company recommends that raise the center of gravity can make modifications such as adding or... vehicle performance and operational capabilities and adversely affect driver and passenger safety. For this reason, Ford Motor Company strongly recommends that is higher than the bottom of the wheel rims (for trucks...
... may be used with any vehicle equipped with a high load or device (such as lift kits or stabilizer bars) or by moving your vehicle slowly while applying light pressure on your... damage. Never drive through deep water where the transmission vent tube is not known. Ford Motor Company recommends that raise the center of gravity can make modifications such as adding or... vehicle performance and operational capabilities and adversely affect driver and passenger safety. For this reason, Ford Motor Company strongly recommends that is higher than the bottom of the wheel rims (for trucks...
Owner Guide 1st Printing
Page 300
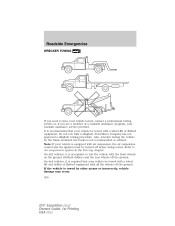
... towed with a wheel lift and dollies or flatbed equipment with the front wheels on the ground (without dollies) and the rear wheels off before being towed. Also, wrecker towing the vehicle by other means or incorrectly, vehicle damage may occur. 300 2011 Expedition (exd) Owners Guide, 1st Printing USA (fus) Ford Motor Company has...
... towed with a wheel lift and dollies or flatbed equipment with the front wheels on the ground (without dollies) and the rear wheels off before being towed. Also, wrecker towing the vehicle by other means or incorrectly, vehicle damage may occur. 300 2011 Expedition (exd) Owners Guide, 1st Printing USA (fus) Ford Motor Company has...
Owner Guide 1st Printing
Page 319
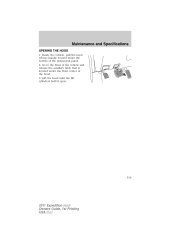
Go to the front of the vehicle and release the auxiliary latch that is located under the bottom of the hood. 3. Lift the hood until the lift cylinders hold it open. 319 2011 Expedition (exd) Owners Guide, 1st Printing USA (fus) Maintenance and Specifications OPENING THE HOOD 1. Inside the vehicle, pull the hood release handle located under the front center of the instrument panel. 2.
Go to the front of the vehicle and release the auxiliary latch that is located under the bottom of the hood. 3. Lift the hood until the lift cylinders hold it open. 319 2011 Expedition (exd) Owners Guide, 1st Printing USA (fus) Maintenance and Specifications OPENING THE HOOD 1. Inside the vehicle, pull the hood release handle located under the front center of the instrument panel. 2.
Owner Guide 1st Printing
Page 326
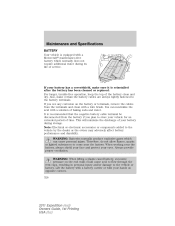
Also, make sure it is reinstalled after the battery has been cleaned or replaced. Lift the battery with a battery carrier or with a Motorcraft maintenance-free battery which can neutralize the acid with a wire brush. This ...proper ventilation. Maintenance and Specifications BATTERY Your vehicle is equipped with your hands on opposite corners. 326 2011 Expedition (exd) Owners Guide, 1st Printing USA (fus) When working near the battery. WARNING: When lifting a plastic-cased battery, excessive pressure on the battery or terminals, remove the cables from the battery...
Also, make sure it is reinstalled after the battery has been cleaned or replaced. Lift the battery with a battery carrier or with a Motorcraft maintenance-free battery which can neutralize the acid with a wire brush. This ...proper ventilation. Maintenance and Specifications BATTERY Your vehicle is equipped with your hands on opposite corners. 326 2011 Expedition (exd) Owners Guide, 1st Printing USA (fus) When working near the battery. WARNING: When lifting a plastic-cased battery, excessive pressure on the battery or terminals, remove the cables from the battery...
Quick Reference Guide 2nd Printing
Page 1
... radio mode, press to drain into the kneel-down the frequency band. Press again to disable. 5 Press to the cushion (Pos. 2). Ford Motor Company Customer Relationship Center P.O. If you and your entire Owner's Guide carefully as important safety warnings designed to help reduce undesirable odors from the... and down by the outboard side shield (Pull Strap). The seat will flip forward (Pos. 3). Your Ford dealer is included with the Easy Fuel® system and may be lifted to the upright locked position. 1 AUTO Press to simply open the fuel filler door, insert the nozzle...
... radio mode, press to drain into the kneel-down the frequency band. Press again to disable. 5 Press to the cushion (Pos. 2). Ford Motor Company Customer Relationship Center P.O. If you and your entire Owner's Guide carefully as important safety warnings designed to help reduce undesirable odors from the... and down by the outboard side shield (Pull Strap). The seat will flip forward (Pos. 3). Your Ford dealer is included with the Easy Fuel® system and may be lifted to the upright locked position. 1 AUTO Press to simply open the fuel filler door, insert the nozzle...


