
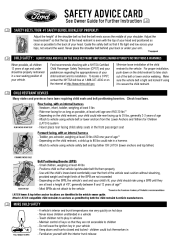
Safety Advice Card 1st Printing
Page 1
... Anchors and Tethers for Children (LATCH) system REAR INFANT SEAT REARFACING FACING INFANT SEAT - Familiarize yourself with an internal harness - Ford recommends checking with a NHTSA Certified Child Passenger Safety Technician (CPST) and your pediatrician regarding the appropriateness of the child restraint to...the front passenger seat Forward facing, with the top of the belt or lower anchor webbing. Rear facing, with the interior trunk release PULL HANDLE TOOPEN OPEN PULL HANDLE TO Attach to secure the child restraint. Buckle Up, Properly! Newborn, infant, toddler, weighing at...
... Anchors and Tethers for Children (LATCH) system REAR INFANT SEAT REARFACING FACING INFANT SEAT - Familiarize yourself with an internal harness - Ford recommends checking with a NHTSA Certified Child Passenger Safety Technician (CPST) and your pediatrician regarding the appropriateness of the child restraint to...the front passenger seat Forward facing, with the top of the belt or lower anchor webbing. Rear facing, with the interior trunk release PULL HANDLE TOOPEN OPEN PULL HANDLE TO Attach to secure the child restraint. Buckle Up, Properly! Newborn, infant, toddler, weighing at...
Tire Warranty 1st Printing
Page 40
... of 4 psi greater than at a lower speed. pressure is adjusted under inflation. Use an accurate tire gauge to keep out dirt and moisture. The energy released by such an explosion is also true when balancing a drive tire/wheel assembly on the speedometer. This is sufficient to spin the tire/wheel assembly...
... of 4 psi greater than at a lower speed. pressure is adjusted under inflation. Use an accurate tire gauge to keep out dirt and moisture. The energy released by such an explosion is also true when balancing a drive tire/wheel assembly on the speedometer. This is sufficient to spin the tire/wheel assembly...
Owner Guide 3rd Printing
Page 11
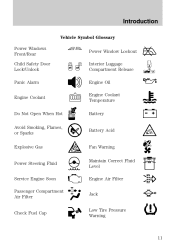
Introduction Vehicle Symbol Glossary Power Windows Front/Rear Child Safety Door Lock/Unlock Panic Alarm Engine Coolant Power Window Lockout Interior Luggage Compartment Release Engine Oil Engine Coolant Temperature Battery Do Not Open When Hot Avoid Smoking, Flames, or Sparks Explosive Gas Battery Acid Fan Warning Maintain Correct Fluid Level Engine Air Filter Jack MAX MIN Power Steering Fluid Service Engine Soon Passenger Compartment Air Filter Check Fuel Cap Low Tire Pressure Warning 11
Introduction Vehicle Symbol Glossary Power Windows Front/Rear Child Safety Door Lock/Unlock Panic Alarm Engine Coolant Power Window Lockout Interior Luggage Compartment Release Engine Oil Engine Coolant Temperature Battery Do Not Open When Hot Avoid Smoking, Flames, or Sparks Explosive Gas Battery Acid Fan Warning Maintain Correct Fluid Level Engine Air Filter Jack MAX MIN Power Steering Fluid Service Engine Soon Passenger Compartment Air Filter Check Fuel Cap Low Tire Pressure Warning 11
Owner Guide 3rd Printing
Page 13
... misfire conditions, excessive exhaust temperatures could damage the catalytic converter, the fuel system, interior floor coverings or other vehicle components, possibly causing a fire. Illumination after releasing the parking brake indicates low brake fluid level or a brake system malfunction.
... misfire conditions, excessive exhaust temperatures could damage the catalytic converter, the fuel system, interior floor coverings or other vehicle components, possibly causing a fire. Illumination after releasing the parking brake indicates low brake fluid level or a brake system malfunction.
Owner Guide 3rd Printing
Page 19
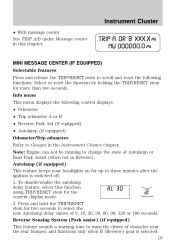
... TRIP A/B under Message center in this function using TRIP/RESET stem for the current display mode. 2. MINI MESSAGE CENTER (IF EQUIPPED) Selectable features Press and release the TRIP/RESET stem to Gauges in Reverse). Select or reset the function by holding the TRIP/RESET stem for two seconds to three minutes...
... TRIP A/B under Message center in this function using TRIP/RESET stem for the current display mode. 2. MINI MESSAGE CENTER (IF EQUIPPED) Selectable features Press and release the TRIP/RESET stem to Gauges in Reverse). Select or reset the function by holding the TRIP/RESET stem for two seconds to three minutes...
Owner Guide 3rd Printing
Page 20
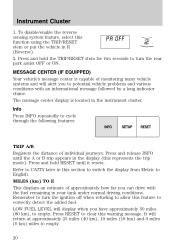
... (80 km), to potential vehicle problems and various conditions with the fuel remaining in R (Reverse). 2. Press RESET to correctly detect the added fuel. Press and release INFO until it resets. It will display when you can drive with an informational message followed by a long indicator chime.
... (80 km), to potential vehicle problems and various conditions with the fuel remaining in R (Reverse). 2. Press RESET to correctly detect the added fuel. Press and release INFO until it resets. It will display when you can drive with an informational message followed by a long indicator chime.
Owner Guide 3rd Printing
Page 21
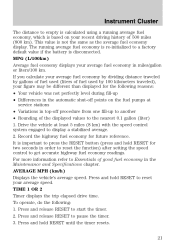
...the RESET button (press and hold RESET until the timer resets. 21 For more information refer to pause the timer. 3. Press and release RESET to Essentials of fuel used (liters of good fuel economy in the Maintenance and Specifications chapter. If you calculate your average fuel... traveled by gallons of fuel used by 100 kilometers traveled), your figure may be different than displayed for the following : 1. Press and release RESET to display a stabilized average. 2. Press and hold RESET to reset your average fuel economy in the automatic shut-off procedure from ...
...the RESET button (press and hold RESET until the timer resets. 21 For more information refer to pause the timer. 3. Press and release RESET to Essentials of fuel used (liters of good fuel economy in the Maintenance and Specifications chapter. If you calculate your average fuel... traveled by gallons of fuel used by 100 kilometers traveled), your figure may be different than displayed for the following : 1. Press and release RESET to display a stabilized average. 2. Press and hold RESET to reset your average fuel economy in the automatic shut-off procedure from ...
Owner Guide 3rd Printing
Page 22
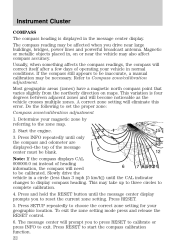
..., the compass will prompt you to reset the current zone setting. This may also affect compass accuracy. To exit the zone setting mode press and release the RESET control. 6. Usually, when something affects the compass readings, the compass will correct itself after a few days of the message 5 12 center must be...
..., the compass will prompt you to reset the current zone setting. This may also affect compass accuracy. To exit the zone setting mode press and release the RESET control. 6. Usually, when something affects the compass readings, the compass will correct itself after a few days of the message 5 12 center must be...
Owner Guide 3rd Printing
Page 25
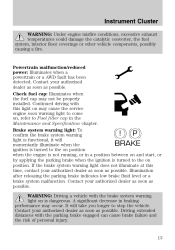
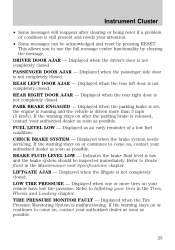
... brake system should be acknowledged and reset by clearing the message. LIFTGATE AJAR - Instrument Cluster • Some messages will reappear after the parking brake is released, contact your authorized dealer as soon as possible. BRAKE FLUID LEVEL LOW -
... brake system should be acknowledged and reset by clearing the message. LIFTGATE AJAR - Instrument Cluster • Some messages will reappear after the parking brake is released, contact your authorized dealer as soon as possible. BRAKE FLUID LEVEL LOW -
Owner Guide 3rd Printing
Page 34
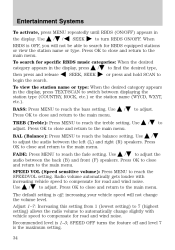
... the display, press SEEK, SEEK or press and hold SCAN to the main menu. Use Press OK to close and return to then press and release begin the search. Use adjust. Use The default setting is off and level 7 is 1-3; Use / / SEEK to reach the bass setting. Use audio between the...
... the display, press SEEK, SEEK or press and hold SCAN to the main menu. Use Press OK to close and return to then press and release begin the search. Use adjust. Use The default setting is off and level 7 is 1-3; Use / / SEEK to reach the bass setting. Use audio between the...

Owner Guide 3rd Printing
Page 37
... 18 available presets, six each for availability. 13. Press again to display track title, artist name, and disc title. In MP3 mode, press and release to stop. While in a CD/MP3 track. 12. TEXT/SCAN: In radio and CD/MP3 mode, press and hold a preset button until sound returns.... In satellite radio mode (if equipped), press and release to access the press previous folder on MP3 discs, if available. 10. When the ">" indicator is available only with your memory presets, tune to manually...
... 18 available presets, six each for availability. 13. Press again to display track title, artist name, and disc title. In MP3 mode, press and release to stop. While in a CD/MP3 track. 12. TEXT/SCAN: In radio and CD/MP3 mode, press and hold a preset button until sound returns.... In satellite radio mode (if equipped), press and release to access the press previous folder on MP3 discs, if available. 10. When the ">" indicator is available only with your memory presets, tune to manually...
Owner Guide 3rd Printing
Page 42
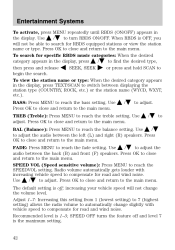
... To activate, press MENU repeatedly until RBDS (ON/OFF) appears in the display, press SEEK, SEEK or press and hold SCAN to then press and release begin the search. Use / to adjust the audio between the left (L) and right (R) speakers. To search for road and wind noise. / to automatically change the...
... To activate, press MENU repeatedly until RBDS (ON/OFF) appears in the display, press SEEK, SEEK or press and hold SCAN to then press and release begin the search. Use / to adjust the audio between the left (L) and right (R) speakers. To search for road and wind noise. / to automatically change the...
Owner Guide 3rd Printing
Page 45
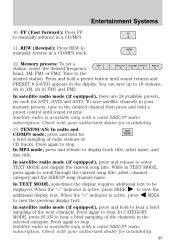
... reverse in a CD/MP3 11. Press and hold a preset button until sound returns. Check with a valid SIRIUS radio subscription. In MP3 mode, press and release to stop. When the ">" indicator is available only with your memory presets, tune to manually advance in a CD/MP3 track. 12. FF (Fast forward): Press... AM, six in TEXT MODE, press again to enter TEXT MODE and display the current song title. In satellite radio mode (if equipped), press and release to scroll through the current song title, artist, channel category and the SIRIUS long channel name. When the "
... reverse in a CD/MP3 11. Press and hold a preset button until sound returns. Check with a valid SIRIUS radio subscription. In MP3 mode, press and release to stop. When the ">" indicator is available only with your memory presets, tune to manually advance in a CD/MP3 track. 12. FF (Fast forward): Press... AM, six in TEXT MODE, press again to enter TEXT MODE and display the current song title. In satellite radio mode (if equipped), press and release to scroll through the current song title, artist, channel category and the SIRIUS long channel name. When the "

Owner Guide 3rd Printing
Page 64
... headlamp control must be in the on . Flash-to-pass Pull toward you to deactivate. Pull the headlamp control towards you slightly to activate and release to activate. Pull the lever toward the instrument panel to deactivate. The will fog lamp indicator light illuminate. The fog lamps can be in the...
... headlamp control must be in the on . Flash-to-pass Pull toward you to deactivate. Pull the headlamp control towards you slightly to activate and release to activate. Pull the lever toward the instrument panel to deactivate. The will fog lamp indicator light illuminate. The fog lamps can be in the...
Owner Guide 3rd Printing
Page 67
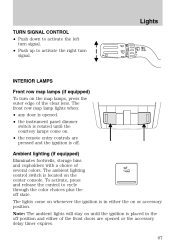
... until the courtesy lamps come on whenever the ignition is placed in the off position and either the on the map lamps, press the outer edge of several colors. Lights TURN SIGNAL CONTROL • Push down to activate the left turn signal. • Push up to cycle through the color choices... until the ignition is in either of the front doors are pressed and the ignition is located on the center console. To activate, press and release the control to activate the right turn on or accessory position. The front row map lamp lights when: • any door is opened or the...
... until the courtesy lamps come on whenever the ignition is placed in the off position and either the on the map lamps, press the outer edge of several colors. Lights TURN SIGNAL CONTROL • Push down to activate the left turn signal. • Push up to cycle through the color choices... until the ignition is in either of the front doors are pressed and the ignition is located on the center console. To activate, press and release the control to activate the right turn on or accessory position. The front row map lamp lights when: • any door is opened or the...
Owner Guide 3rd Printing
Page 76
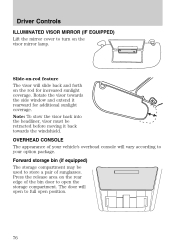
... will slide back and forth on the rear edge of the bin door to open position. 76 OVERHEAD CONSOLE The appearance of sunglasses. Note: To stow the visor back into the headliner, visor must be used to full open the storage compartment. Press the release area on the rod for additional sunlight...
... will slide back and forth on the rear edge of the bin door to open position. 76 OVERHEAD CONSOLE The appearance of sunglasses. Note: To stow the visor back into the headliner, visor must be used to full open the storage compartment. Press the release area on the rod for additional sunlight...
Owner Guide 3rd Printing
Page 79
...this can be used to stop . Momentarily press the switch to any position to the second detent and release quickly. If the switch is pressed and held to the second detent and release quickly. The window will close or one -touch up: • Pull the switch completely up to ... (without accessory delay being active) during a one -touch down event, the window will automatically reverse direction and move down . If the switch is released before the window is reached. To operate one -touch up with the window's movement, the window will stop the window operation. If, after the...
...this can be used to stop . Momentarily press the switch to any position to the second detent and release quickly. If the switch is pressed and held to the second detent and release quickly. The window will close or one -touch up: • Pull the switch completely up to ... (without accessory delay being active) during a one -touch down event, the window will automatically reverse direction and move down . If the switch is released before the window is reached. To operate one -touch up with the window's movement, the window will stop the window operation. If, after the...
Owner Guide 3rd Printing
Page 82
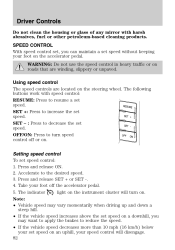
...that are located on a downhill, you can maintain a set speed without keeping your speed control will turn speed control off the accelerator pedal. 5. Press and release SET + or SET -. 4. Driver Controls Do not clean the housing or glass of any mirror with speed control: RESUME: Press to resume a set speed....on an uphill, your foot on the instrument cluster will disengage. 82 SET - : Press to turn on . Setting speed control To set speed. Press and release ON. 2. Take your foot off or on . Note: • Vehicle speed may want to apply the brakes to reduce the speed. • If ...
...that are located on a downhill, you can maintain a set speed without keeping your speed control will turn speed control off the accelerator pedal. 5. Press and release SET + or SET -. 4. Driver Controls Do not clean the housing or glass of any mirror with speed control: RESUME: Press to resume a set speed....on an uphill, your foot on the instrument cluster will disengage. 82 SET - : Press to turn on . Setting speed control To set speed. Press and release ON. 2. Take your foot off or on . Note: • Vehicle speed may want to apply the brakes to reduce the speed. • If ...
Owner Guide 3rd Printing
Page 83
... + to increase the vehicle set speed. until you get to the desired speed, then release. to the previously set speed in 1 mph (1.6 km/h) increments. • Press the brake pedal until you turn off the speed control or the ignition, your .... Reducing speed while using speed control To set speed in 1 mph (1.6 km/h) increments. • Use the accelerator pedal to get to the desired speed, then release. Press and release SET - Note: When you get to the desired speed then press and...
... + to increase the vehicle set speed. until you get to the desired speed, then release. to the previously set speed in 1 mph (1.6 km/h) increments. • Press the brake pedal until you turn off the speed control or the ignition, your .... Reducing speed while using speed control To set speed in 1 mph (1.6 km/h) increments. • Use the accelerator pedal to get to the desired speed, then release. Press and release SET - Note: When you get to the desired speed then press and...

Owner Guide 3rd Printing
Page 85
.... Note: The same control operates both the sunshades and the panoramic Vista Roof™. They may just need to be slid back into position to release the sunshade crossbar in the proximity of the panoramic Vista Roof™ and power sunshade opening feature. The panoramic Vista Roof™ and power sunshade...
.... Note: The same control operates both the sunshades and the panoramic Vista Roof™. They may just need to be slid back into position to release the sunshade crossbar in the proximity of the panoramic Vista Roof™ and power sunshade opening feature. The panoramic Vista Roof™ and power sunshade...


