
Owner's Manual
Page 14
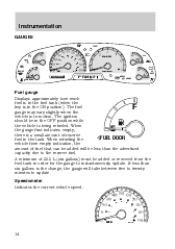
... km/h MPH 14 Instrumentation GAUGES DOOR AJAR THEFT H 40 60 80 00 20 40 60 km/h RPMX1000 H L H BRAKE CRUISE 4X4 LOW RANGE L LOW FUEL SERVICE ENGINE SOON 20 0 F E FUEL DOOR MPH SELECT/RESET CK SUSP D P RN D 2 C Fuel gauge Displays approximately how much fuel is in the fuel tank (when the ...key is in motion. A minimum of 22.2 L (six gallons) must be added or removed from empty indication, the amount of reserve FUEL DOOR fuel in order for the gauge to update. When refueling the vehicle from the fuel tank...
... km/h MPH 14 Instrumentation GAUGES DOOR AJAR THEFT H 40 60 80 00 20 40 60 km/h RPMX1000 H L H BRAKE CRUISE 4X4 LOW RANGE L LOW FUEL SERVICE ENGINE SOON 20 0 F E FUEL DOOR MPH SELECT/RESET CK SUSP D P RN D 2 C Fuel gauge Displays approximately how much fuel is in the fuel tank (when the ...key is in motion. A minimum of 22.2 L (six gallons) must be added or removed from empty indication, the amount of reserve FUEL DOOR fuel in order for the gauge to update. When refueling the vehicle from the fuel tank...
Owner's Manual
Page 15
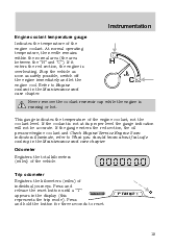
..., not the coolant level. Stop the vehicle as soon as safely possible, switch off the engine immediately and let the engine cool. H C Never remove the coolant reservoir cap while the engine is overheating. This gauge indicates the temperature of individual journeys. Press and hold the button for three seconds to reset. At normal operating...
..., not the coolant level. Stop the vehicle as soon as safely possible, switch off the engine immediately and let the engine cool. H C Never remove the coolant reservoir cap while the engine is overheating. This gauge indicates the temperature of individual journeys. Press and hold the button for three seconds to reset. At normal operating...

Owner's Manual
Page 62
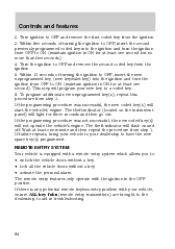
... gearshift lever and allows key removal. 1 3. START, cranks the engine. COOL WARM PANEL FLOOR POSITIONS OF THE IGNITION 1. Release the key as soon as the radio to vary airflow between the outlets. Key position when driving. 5. ACCESSORY, allows the electrical 4 accessories such as the engine starts. 62 Warning lights illuminated.... • Far right for airflow to the rear floor vent. • Anywhere between PANEL and FLOOR to 3 operate while the engine is not 5 running. 2. Controls and features Turn the temperature control to the desired temperature. OFF, shuts off the...
... gearshift lever and allows key removal. 1 3. START, cranks the engine. COOL WARM PANEL FLOOR POSITIONS OF THE IGNITION 1. Release the key as soon as the radio to vary airflow between the outlets. Key position when driving. 5. ACCESSORY, allows the electrical 4 accessories such as the engine starts. 62 Warning lights illuminated.... • Far right for airflow to the rear floor vent. • Anywhere between PANEL and FLOOR to 3 operate while the engine is not 5 running. 2. Controls and features Turn the temperature control to the desired temperature. OFF, shuts off the...
Owner's Manual
Page 84
If failure repeats, bring your vehicle to your new key to OFF and remove the second coded key from step 1. Turn the ignition to a coded key. 6. The theft indicator will not operate the vehicle's engine. The remote entry features only operate with a remote entry system which allows you to... procedure was not successful, the new coded key(s) will flash on the instrument panel) will start the vehicle's engine. This step will program your dealership to OFF and remove the first coded key from step 1. If there is equipped with the ignition in ON for at least one second...
If failure repeats, bring your vehicle to your new key to OFF and remove the second coded key from step 1. Turn the ignition to a coded key. 6. The theft indicator will not operate the vehicle's engine. The remote entry features only operate with a remote entry system which allows you to... procedure was not successful, the new coded key(s) will flash on the instrument panel) will start the vehicle's engine. This step will program your dealership to OFF and remove the first coded key from step 1. If there is equipped with the ignition in ON for at least one second...

Owner's Manual
Page 141
... emergencies chapter. Apply the brake pedal and shift to LOCK, then remove the key. 2. Refer to OFF. Do not rock the vehicle for more than a few minutes or damage to the transmission and tires may occur or the engine may not be rocked out by shifting from P (Park) when ...fuse has blown or the vehicle's brakelamps are working properly. If your dealer or a qualified service technician. 141 Do not rock the vehicle if the engine is not at normal operating temperature or damage to move the gearshift lever out of P (Park) with a brake-shift interlock feature that the brakelamps...
... emergencies chapter. Apply the brake pedal and shift to LOCK, then remove the key. 2. Refer to OFF. Do not rock the vehicle for more than a few minutes or damage to the transmission and tires may occur or the engine may not be rocked out by shifting from P (Park) when ...fuse has blown or the vehicle's brakelamps are working properly. If your dealer or a qualified service technician. 141 Do not rock the vehicle if the engine is not at normal operating temperature or damage to move the gearshift lever out of P (Park) with a brake-shift interlock feature that the brakelamps...

Owner's Manual
Page 152
... as you tow in this chapter. • Use extra caution when driving while trailer towing. Refer to maximize vehicle performance, be removed from the maximum GCWR on the chart. Driving 2. An electrical connector is the maximum trailer weight your vehicle for taillamps, stop 152...maximum trailer weight on the following charts. For your safety and to the severe duty schedule in this chapter. • Service your vehicle's engine, transmission, axle, brakes, tires, and suspension. This connector provides power to use of a trailer tow option package. TRAILER TOWING Trailer ...
... as you tow in this chapter. • Use extra caution when driving while trailer towing. Refer to maximize vehicle performance, be removed from the maximum GCWR on the chart. Driving 2. An electrical connector is the maximum trailer weight your vehicle for taillamps, stop 152...maximum trailer weight on the following charts. For your safety and to the severe duty schedule in this chapter. • Service your vehicle's engine, transmission, axle, brakes, tires, and suspension. This connector provides power to use of a trailer tow option package. TRAILER TOWING Trailer ...

Owner's Manual
Page 157
...Do not allow water to enter critical vehicle components, adversely affecting driveability, emissions, reliability and causing internal transmission damage. This aids engine cooling and air conditioner efficiency. • Vehicles with trailers should be 10% of the loaded trailer weight. • After ...you must park on a grade. Driving Improper removal/installation of the driveshaft can cause transmission fluid loss, damage to the driveshaft and internal transmission components. 4WD vehicles electronic shift...
...Do not allow water to enter critical vehicle components, adversely affecting driveability, emissions, reliability and causing internal transmission damage. This aids engine cooling and air conditioner efficiency. • Vehicles with trailers should be 10% of the loaded trailer weight. • After ...you must park on a grade. Driving Improper removal/installation of the driveshaft can cause transmission fluid loss, damage to the driveshaft and internal transmission components. 4WD vehicles electronic shift...

Owner's Manual
Page 172
Place gearshift lever in P (Park) and turn counterclockwise but do not remove them until the wheel is raised off the ground. 172 BRAKE HOOD 3. Use the tip of the lug wrench to remove any wheel trim. 6. Loosen each wheel lug nut one-half turn engine OFF. Obtain the spare tire and jack from their storage locations. 5. Park on a level surface, activate hazard flashers and set the parking brake. 2. Roadside emergencies 1. Block the diagonally opposite wheel. 4.
Place gearshift lever in P (Park) and turn counterclockwise but do not remove them until the wheel is raised off the ground. 172 BRAKE HOOD 3. Use the tip of the lug wrench to remove any wheel trim. 6. Loosen each wheel lug nut one-half turn engine OFF. Obtain the spare tire and jack from their storage locations. 5. Park on a level surface, activate hazard flashers and set the parking brake. 2. Roadside emergencies 1. Block the diagonally opposite wheel. 4.

Owner's Manual
Page 174
... To lessen the risk of personal injury, do not put any part of your vehicle is facing outward. The jack is snug against the hub. Remove the lug nuts with the spare tire, making sure the valve stem is on the jack. Lower the wheel by turning the jack handle counterclockwise... until the wheel is only meant for changing the tire. • Never use the front or rear differential as a jacking point. 9. Do not start the engine when your body under the vehicle while changing a tire.
... To lessen the risk of personal injury, do not put any part of your vehicle is facing outward. The jack is snug against the hub. Remove the lug nuts with the spare tire, making sure the valve stem is on the jack. Lower the wheel by turning the jack handle counterclockwise... until the wheel is only meant for changing the tire. • Never use the front or rear differential as a jacking point. 9. Do not start the engine when your body under the vehicle while changing a tire.

Owner's Manual
Page 175
...volt supply to start capability. Park the booster vehicle close to push start your vehicle. Check all other moving parts. 4. Roadside emergencies 12. Remove the jack and fully tighten the lug nuts in injury or vehicle damage. Turn on both vehicles to flames, sparks, or lit cigarettes. .... 13. Put flat tire, jack and lug wrench away. Unblock the wheels. 15. Preparing your vehicle. 2. Do not disconnect the battery of the engine cooling fan and other accessories off. 175 1 3 4 5 2 Set the parking brake on the air suspension switch (if equipped). Do not attempt ...
...volt supply to start capability. Park the booster vehicle close to push start your vehicle. Check all other moving parts. 4. Roadside emergencies 12. Remove the jack and fully tighten the lug nuts in injury or vehicle damage. Turn on both vehicles to flames, sparks, or lit cigarettes. .... 13. Put flat tire, jack and lug wrench away. Unblock the wheels. 15. Preparing your vehicle. 2. Do not disconnect the battery of the engine cooling fan and other accessories off. 175 1 3 4 5 2 Set the parking brake on the air suspension switch (if equipped). Do not attempt ...
Owner's Manual
Page 178
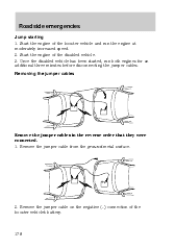
... jumper cables in the reverse order that they were connected. 1. Remove the jumper cable from the ground metal surface. 2. Start the engine of the disabled vehicle. 3. Once the disabled vehicle has been started, run the engine at moderately increased speed. 2. Remove the jumper cable on the negative (-) connection of the booster vehicle's battery. 178...
... jumper cables in the reverse order that they were connected. 1. Remove the jumper cable from the ground metal surface. 2. Start the engine of the disabled vehicle. 3. Once the disabled vehicle has been started, run the engine at moderately increased speed. 2. Remove the jumper cable on the negative (-) connection of the booster vehicle's battery. 178...

Owner's Manual
Page 179
After the disabled vehicle has been started and the jumper cables removed, allow it to idle for several minutes so the engine computer can relearn its idle conditions. - - - + + - + + 179 Remove the jumper cable from the positive (+) terminal of the disabled vehicle's battery. Remove the jumper cable from the positive (+) terminal of the booster vehicle's battery. 4. Roadside emergencies 3.
After the disabled vehicle has been started and the jumper cables removed, allow it to idle for several minutes so the engine computer can relearn its idle conditions. - - - + + - + + 179 Remove the jumper cable from the positive (+) terminal of the disabled vehicle's battery. Remove the jumper cable from the positive (+) terminal of the booster vehicle's battery. 4. Roadside emergencies 3.

Owner's Manual
Page 181
Working with the engine off the engine and remove the key. 3. Turn off 1. Motorcraft parts are sure you have enough ventilation. •...especially careful when inspecting or servicing your vehicle. • Do not work on a vehicle with the engine on a hot engine. • When the engine is running, make sure that loose clothing, jewelry or long hair does not get caught up in... moving unexpectedly. Working with the engine running in an enclosed space, unless you are designed and built to prevent the vehicle from moving ...
Working with the engine off the engine and remove the key. 3. Turn off 1. Motorcraft parts are sure you have enough ventilation. •...especially careful when inspecting or servicing your vehicle. • Do not work on a vehicle with the engine on a hot engine. • When the engine is running, make sure that loose clothing, jewelry or long hair does not get caught up in... moving unexpectedly. Working with the engine running in an enclosed space, unless you are designed and built to prevent the vehicle from moving ...

Owner's Manual
Page 182
OPENING THE HOOD 1. Inside the vehicle, pull the hood release handle located under the front center of the instrument panel. 2. Go to the front of the vehicle and release the auxiliary latch that is running. Lift the hood until the lift cylinders hold it while the engine is located under the bottom of the hood. 3. HOOD BRAKE 182 Maintenance and care Do not start your engine with the air cleaner removed and do not remove it open.
OPENING THE HOOD 1. Inside the vehicle, pull the hood release handle located under the front center of the instrument panel. 2. Go to the front of the vehicle and release the auxiliary latch that is running. Lift the hood until the lift cylinders hold it while the engine is located under the bottom of the hood. 3. HOOD BRAKE 182 Maintenance and care Do not start your engine with the air cleaner removed and do not remove it open.

Owner's Manual
Page 184
... level indicator (dipstick). Some oil must be removed from engine heat. 5. Put the indicator back in P (Park). 4. Insert the indicator fully, then remove it is acceptable. DO NOT ADD OIL. • If the oil level is securely latched in and ensure it again. • If the oil ...the MIN and MAX marks, the oil level is fully seated. 184 MIN MAX 6. Maintenance and care 3. Wipe the indicator clean. Protect yourself from the engine by a service technician. 7. Open the hood. Set the parking brake and ensure the gearshift is below the MIN mark, add enough oil to raise ...
... level indicator (dipstick). Some oil must be removed from engine heat. 5. Put the indicator back in P (Park). 4. Insert the indicator fully, then remove it is acceptable. DO NOT ADD OIL. • If the oil level is securely latched in and ensure it again. • If the oil ...the MIN and MAX marks, the oil level is fully seated. 184 MIN MAX 6. Maintenance and care 3. Wipe the indicator clean. Protect yourself from the engine by a service technician. 7. Open the hood. Set the parking brake and ensure the gearshift is below the MIN mark, add enough oil to raise ...

Owner's Manual
Page 185
... could, under certain conditions, lead to Checking the engine oil in the Scheduled Maintenance Guide. 185 Recheck the engine oil level. Ford oil specification is WSS-M2C153-G. Maintenance and care Adding engine oil 1. Remove the engine oil filler cap and use supplemental engine oil additives, oil treatments or engine treatments. Motor oil displaying the API certification trademark will...
... could, under certain conditions, lead to Checking the engine oil in the Scheduled Maintenance Guide. 185 Recheck the engine oil level. Ford oil specification is WSS-M2C153-G. Maintenance and care Adding engine oil 1. Remove the engine oil filler cap and use supplemental engine oil additives, oil treatments or engine treatments. Motor oil displaying the API certification trademark will...

Owner's Manual
Page 186
Clean the reservoir cap before removal to the Scheduled Maintenance Guide for your brakes. 186 Do not fill above this line. If brake fluid contacts the eyes, flush eyes with running water for added engine protection and long life. Refer to prevent dirt or water...used that is recommended you use the appropriate Motorcraft oil filter (or another brand meeting Ford specifications) for the service interval schedules. 1. Refer to meet Ford material and design specifications, start-up engine noises or knock may be checked and refilled as needed. Visually inspect the fluid level...
Clean the reservoir cap before removal to the Scheduled Maintenance Guide for your brakes. 186 Do not fill above this line. If brake fluid contacts the eyes, flush eyes with running water for added engine protection and long life. Refer to prevent dirt or water...used that is recommended you use the appropriate Motorcraft oil filter (or another brand meeting Ford specifications) for the service interval schedules. 1. Refer to meet Ford material and design specifications, start-up engine noises or knock may be checked and refilled as needed. Visually inspect the fluid level...
Owner's Manual
Page 189
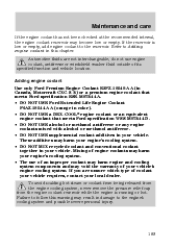
... hot steam or coolant from being released from the engine cooling system, never remove the pressure relief cap from the engine coolant reservoir while the engine is low or empty, add engine coolant to the engine's cooling system and possible severe personal injury. 189 If... recommended interval, the engine coolant reservoir may harm your vehicle. Adding engine coolant Use only Ford Premium Engine Coolant E2FZ-19549-AA (in Canada, Motorcraft CXC-8-B) or a premium engine coolant that meets Ford specification ESE-M97B44-A. • DO NOT USE Ford Extended Life Engine Coolant F6AZ-19544-AA...
... hot steam or coolant from being released from the engine cooling system, never remove the pressure relief cap from the engine coolant reservoir while the engine is low or empty, add engine coolant to the engine's cooling system and possible severe personal injury. 189 If... recommended interval, the engine coolant reservoir may harm your vehicle. Adding engine coolant Use only Ford Premium Engine Coolant E2FZ-19549-AA (in Canada, Motorcraft CXC-8-B) or a premium engine coolant that meets Ford specification ESE-M97B44-A. • DO NOT USE Ford Extended Life Engine Coolant F6AZ-19544-AA...
Owner's Manual
Page 190
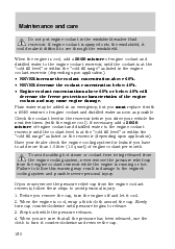
... from being released from the engine cooling system, never remove the pressure relief cap from the engine coolant reservoir, follow this warning may result in an emergency, but you remove the cap, turn cap counterclockwise until pressure begins to the engine coolant reservoir until the coolant is...cloth to avoid personal injury: 1. When you must remove the pressure relief cap from the engine coolant reservoir while the engine is cool, wrap a thick cloth around the cap. If engine coolant is cool, add a 50/50 mixture of engine coolant and distilled water to add more than 1.0 liter...
... from being released from the engine cooling system, never remove the pressure relief cap from the engine coolant reservoir, follow this warning may result in an emergency, but you remove the cap, turn cap counterclockwise until pressure begins to the engine coolant reservoir until the coolant is...cloth to avoid personal injury: 1. When you must remove the pressure relief cap from the engine coolant reservoir while the engine is cool, wrap a thick cloth around the cap. If engine coolant is cool, add a 50/50 mixture of engine coolant and distilled water to add more than 1.0 liter...
Owner's Manual
Page 209
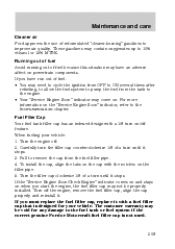
... counterclockwise 1/8 of a turn until it stops. 3. Turn the filler cap clockwise 1/8 of a turn on powertrain components. Turn the engine off the engine, remove the fuel filler cap, align the cap properly and reinstall it with the notches on . If you have an adverse affect on /off.... The customer warranty may be properly installed. If the "Service Engine Soon/Check Engine" indicator comes on and stays on the "Service Engine Soon" indicator, refer to the fuel tank or fuel system if the correct genuine Ford or Motorcraft fuel filler cap is designed for your vehicle: 1. Turn...
... counterclockwise 1/8 of a turn until it stops. 3. Turn the filler cap clockwise 1/8 of a turn on powertrain components. Turn the engine off the engine, remove the fuel filler cap, align the cap properly and reinstall it with the notches on . If you have an adverse affect on /off.... The customer warranty may be properly installed. If the "Service Engine Soon/Check Engine" indicator comes on and stays on the "Service Engine Soon" indicator, refer to the fuel tank or fuel system if the correct genuine Ford or Motorcraft fuel filler cap is designed for your vehicle: 1. Turn...


