
Four Wheeling Supplement 1st Printing
Page 9
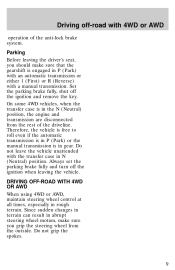
... in terrain can result in the N (Neutral) position, the engine and transmission are disconnected from the outside. Set the parking brake fully, shut off the ignition when leaving the vehicle. Always set the parking brake fully and turn off the ignition and remove the key. On some 4WD vehicles, when the transfer...
... in terrain can result in the N (Neutral) position, the engine and transmission are disconnected from the outside. Set the parking brake fully, shut off the ignition when leaving the vehicle. Always set the parking brake fully and turn off the ignition and remove the key. On some 4WD vehicles, when the transfer...

Owner Guide 1st Printing
Page 12
...first indicates empty, there is being refueled. F E Speedometer Indicates the current vehicle speed. 60 40 20 0 80 00 20 40 60 km/h MPH Engine coolant temperature gauge Indicates the temperature of reserve FUEL DOOR fuel in the tank. At normal operating temperature, the needle remains within the normal area... and let the engine cool. When refueling the vehicle from the fuel tank in order for the gauge to update. Refer to the reserve fuel. A minimum of six gallons must be added or removed from empty indication, the amount of fuel that can be added will take between the "H" and ...
...first indicates empty, there is being refueled. F E Speedometer Indicates the current vehicle speed. 60 40 20 0 80 00 20 40 60 km/h MPH Engine coolant temperature gauge Indicates the temperature of reserve FUEL DOOR fuel in the tank. At normal operating temperature, the needle remains within the normal area... and let the engine cool. When refueling the vehicle from the fuel tank in order for the gauge to update. Refer to the reserve fuel. A minimum of six gallons must be added or removed from empty indication, the amount of fuel that can be added will take between the "H" and ...

Owner Guide 1st Printing
Page 13
Instrumentation Never remove the coolant reservoir cap while the engine is not at the top of individual journeys. This gauge indicates the temperature of the vehicle. Odometer Registers the total kilometers (miles) of the engine coolant, not the coolant level. Tachometer Indicates the engine speed in the...know about fail-safe cooling in the Maintenance and care chapter. If the gauge enters the red section, the oil pressure/engine coolant and Check Engine/Service Engine Soon indicators illuminate, refer to reset. If the coolant is running or hot. D 2 P RN D RPMX1000 13 ...
Instrumentation Never remove the coolant reservoir cap while the engine is not at the top of individual journeys. This gauge indicates the temperature of the vehicle. Odometer Registers the total kilometers (miles) of the engine coolant, not the coolant level. Tachometer Indicates the engine speed in the...know about fail-safe cooling in the Maintenance and care chapter. If the gauge enters the red section, the oil pressure/engine coolant and Check Engine/Service Engine Soon indicators illuminate, refer to reset. If the coolant is running or hot. D 2 P RN D RPMX1000 13 ...
Owner Guide 1st Printing
Page 48
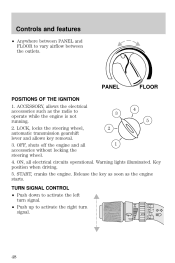
...4. LOCK, locks the steering wheel, 2 automatic transmission gearshift lever and allows key removal. 1 3. START, cranks the engine. PANEL FLOOR POSITIONS OF THE IGNITION 1. Warning lights illuminated. OFF, shuts off the engine and all electrical circuits operational. Key position when driving. 5. TURN SIGNAL CONTROL &#... • Push up to vary airflow between the outlets. Release the key as soon as the radio to 3 operate while the engine is not 5 running. 2. Controls and features • Anywhere between PANEL and FLOOR to activate the right turn signal. 48 ACCESSORY...
...4. LOCK, locks the steering wheel, 2 automatic transmission gearshift lever and allows key removal. 1 3. START, cranks the engine. PANEL FLOOR POSITIONS OF THE IGNITION 1. Warning lights illuminated. OFF, shuts off the engine and all electrical circuits operational. Key position when driving. 5. TURN SIGNAL CONTROL &#... • Push up to vary airflow between the outlets. Release the key as soon as the radio to 3 operate while the engine is not 5 running. 2. Controls and features • Anywhere between PANEL and FLOOR to activate the right turn signal. 48 ACCESSORY...

Owner Guide 1st Printing
Page 66
...; key(s) to your vehicle. Procedure to program spare SecuriLockி keys to your vehicle New SecuriLock keys must bring your vehicle to your vehicle's engine). If the theft indicator stays on top of the instrument panel will operate as follows: • When the ignition is OFF, the theft indicator will... read and understand the entire procedure before you will need two previously programmed SecuriLock keys (keys that already operate your dealership to OFF and remove the first SecuriLock key from OFF to RUN (maintain ignition in the procedure.
...; key(s) to your vehicle. Procedure to program spare SecuriLockி keys to your vehicle New SecuriLock keys must bring your vehicle to your vehicle's engine). If the theft indicator stays on top of the instrument panel will operate as follows: • When the ignition is OFF, the theft indicator will... read and understand the entire procedure before you will need two previously programmed SecuriLock keys (keys that already operate your dealership to OFF and remove the first SecuriLock key from OFF to RUN (maintain ignition in the procedure.

Owner Guide 1st Printing
Page 67
This step will program your dealership to OFF and remove the second SecuriLock key from step 1. REMOTE ENTRY SYSTEM Your vehicle is equipped with the ignition in the OFF position. 67 The theft indicator will start the vehicle's engine. The remote entry features only operate with a ...If the programming procedure was successful, the new SecuriLock key(s) will flash on the instrument panel) will not operate the vehicle's engine. If failure repeats, bring your vehicle to RUN (maintain ignition in RUN for at least one minute and then repeat the procedure from ...
This step will program your dealership to OFF and remove the second SecuriLock key from step 1. REMOTE ENTRY SYSTEM Your vehicle is equipped with the ignition in the OFF position. 67 The theft indicator will start the vehicle's engine. The remote entry features only operate with a ...If the programming procedure was successful, the new SecuriLock key(s) will flash on the instrument panel) will not operate the vehicle's engine. If failure repeats, bring your vehicle to RUN (maintain ignition in RUN for at least one minute and then repeat the procedure from ...
Owner Guide 1st Printing
Page 111
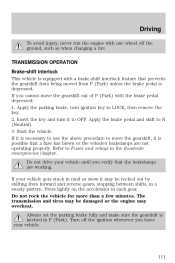
If it to LOCK, then remove the key. 2. Press lightly on the accelerator in the Roadside emergencies ... not drive your vehicle until you cannot move the gearshift, it may overheat. Driving To avoid injury, never run the engine with the brake pedal depressed: 1. If you verify that prevents the gearshift from being moved from forward and reverse gears,...stopping between shifts, in P (Park). If your vehicle. 111 The transmission and tires may be damaged or the engine may be rocked out by shifting from P (Park) unless the brake pedal is latched in a steady pattern. ...
If it to LOCK, then remove the key. 2. Press lightly on the accelerator in the Roadside emergencies ... not drive your vehicle until you cannot move the gearshift, it may overheat. Driving To avoid injury, never run the engine with the brake pedal depressed: 1. If you verify that prevents the gearshift from being moved from forward and reverse gears,...stopping between shifts, in P (Park). If your vehicle. 111 The transmission and tires may be damaged or the engine may be rocked out by shifting from P (Park) unless the brake pedal is latched in a steady pattern. ...

Owner Guide 1st Printing
Page 122
For your vehicle's engine, transmission, axle, brakes, tires, and suspension. If exceeded, cargo should be sure to use of a trailer tow option package. Refer to attach the brake controller ... within specified limits. • Thoroughly prepare your vehicle may require the use the proper equipment while towing. Follow these guidelines to maximize vehicle performance, be removed from the trailer and/or the vehicle until your vehicle's load limits.
For your vehicle's engine, transmission, axle, brakes, tires, and suspension. If exceeded, cargo should be sure to use of a trailer tow option package. Refer to attach the brake controller ... within specified limits. • Thoroughly prepare your vehicle may require the use the proper equipment while towing. Follow these guidelines to maximize vehicle performance, be removed from the trailer and/or the vehicle until your vehicle's load limits.

Owner Guide 1st Printing
Page 137
... instructions, work gloves from the two retaining clips attached to relieve tension against the stowage bracket. 137 Location of the radiator shroud. Removing the jack and tools 1. Roadside emergencies CHANGING THE TIRES If you get a flat tire while driving, do not apply the brake heavily... identical to a safe place on the right rear quarter panel interior trim. Locate the access panel on the side of the engine compartment Item Spare tire Removing the jack handle 1. Open the hood. 2. Instead, gradually decrease your speed. Un-snap the wheel lug nut wrench, instructions...
... instructions, work gloves from the two retaining clips attached to relieve tension against the stowage bracket. 137 Location of the radiator shroud. Removing the jack and tools 1. Roadside emergencies CHANGING THE TIRES If you get a flat tire while driving, do not apply the brake heavily... identical to a safe place on the right rear quarter panel interior trim. Locate the access panel on the side of the engine compartment Item Spare tire Removing the jack handle 1. Open the hood. 2. Instead, gradually decrease your speed. Un-snap the wheel lug nut wrench, instructions...

Owner Guide 1st Printing
Page 139
... the interior trim access panel with Air Suspension, turn OFF the Air Suspension switch prior to remove any wheel trim. 6. Place gearshift lever in P (Park) and turn counterclockwise but do not remove them until the wheel is raised off the ground. 139 Loosen each wheel lug nut one-half... turn engine OFF. HOOD BRAKE 3. Obtain the spare tire and jack from their storage locations. 5. Block the diagonally opposite ...
... the interior trim access panel with Air Suspension, turn OFF the Air Suspension switch prior to remove any wheel trim. 6. Place gearshift lever in P (Park) and turn counterclockwise but do not remove them until the wheel is raised off the ground. 139 Loosen each wheel lug nut one-half... turn engine OFF. HOOD BRAKE 3. Obtain the spare tire and jack from their storage locations. 5. Block the diagonally opposite ...

Owner Guide 1st Printing
Page 141
Remove the lug nuts with the spare tire, making sure the valve stem is only meant for changing the tire. • Never use the front or ...) • Rear To lessen the risk of personal injury, do not put any part of your vehicle is on the jack. Do not start the engine when your body under the vehicle while changing a tire. Do not fully tighten the lug nuts until the wheel is snug against the hub. Reinstall...
Remove the lug nuts with the spare tire, making sure the valve stem is only meant for changing the tire. • Never use the front or ...) • Rear To lessen the risk of personal injury, do not put any part of your vehicle is on the jack. Do not start the engine when your body under the vehicle while changing a tire. Do not fully tighten the lug nuts until the wheel is snug against the hub. Reinstall...
Owner Guide 1st Printing
Page 142
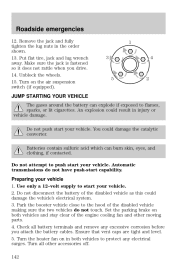
... sulfuric acid which can explode if exposed to push start your vehicle. Turn the heater fan on in both vehicles and stay clear of the engine cooling fan and other accessories off. 142 1 3 4 5 2 Do not push start your vehicle. Do not disconnect the battery of the disabled... vehicle making sure the two vehicles do not have push-start your vehicle 1. Ensure that vent caps are tight and level. 5. Remove the jack and fully tighten the lug nuts in injury or vehicle damage. You could damage the vehicle's electrical system. 3. Preparing your vehicle. ...
... sulfuric acid which can explode if exposed to push start your vehicle. Turn the heater fan on in both vehicles and stay clear of the engine cooling fan and other accessories off. 142 1 3 4 5 2 Do not push start your vehicle. Do not disconnect the battery of the disabled... vehicle making sure the two vehicles do not have push-start your vehicle 1. Ensure that vent caps are tight and level. 5. Remove the jack and fully tighten the lug nuts in injury or vehicle damage. You could damage the vehicle's electrical system. 3. Preparing your vehicle. ...
Owner Guide 1st Printing
Page 145
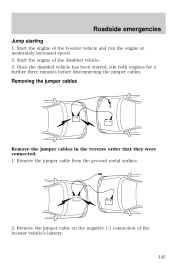
Once the disabled vehicle has been started, run the engine at moderately increased speed. 2. Remove the jumper cable from the ground metal surface. 2. Remove the jumper cable on the negative (-) connection of the disabled vehicle. 3. Removing the jumper cables Remove the jumper cables in the reverse order that they were connected. 1. Roadside emergencies Jump starting 1. Start the engine of the booster vehicle's battery. - - - - + + + + 145 Start the engine of the booster vehicle and run both engines for a further three minutes before disconnecting the jumper cables.
Once the disabled vehicle has been started, run the engine at moderately increased speed. 2. Remove the jumper cable from the ground metal surface. 2. Remove the jumper cable on the negative (-) connection of the disabled vehicle. 3. Removing the jumper cables Remove the jumper cables in the reverse order that they were connected. 1. Roadside emergencies Jump starting 1. Start the engine of the booster vehicle's battery. - - - - + + + + 145 Start the engine of the booster vehicle and run both engines for a further three minutes before disconnecting the jumper cables.

Owner Guide 1st Printing
Page 146
Roadside emergencies 3. Remove the jumper cable from the positive (+) terminal of the disabled vehicle's battery. After the disabled vehicle has been started and the jumper cables removed, allow it to idle for several minutes so the engine computer can relearn its idle conditions. 146 - - - + + - + + Remove the jumper cable from the positive (+) terminal of the booster vehicle's battery. 4.
Roadside emergencies 3. Remove the jumper cable from the positive (+) terminal of the disabled vehicle's battery. After the disabled vehicle has been started and the jumper cables removed, allow it to idle for several minutes so the engine computer can relearn its idle conditions. 146 - - - + + - + + Remove the jumper cable from the positive (+) terminal of the booster vehicle's battery. 4.
Owner Guide 1st Printing
Page 148
...its idle conditions before your "Warranty Guide" to find out which makes tracking routine service easy. Working with the engine on a vehicle with the engine off the engine and remove the key. 3. Check your vehicle will drive properly, as explained in Battery in an enclosed space, unless ...VEHICLE Be especially careful when inspecting or servicing your vehicle. Set the parking brake and ensure the gearshift is securely latched in the engine compartment for easy location. • We provide a Scheduled Maintenance Guide which parts and services are covered. If your vehicle requires ...
...its idle conditions before your "Warranty Guide" to find out which makes tracking routine service easy. Working with the engine on a vehicle with the engine off the engine and remove the key. 3. Check your vehicle will drive properly, as explained in Battery in an enclosed space, unless ...VEHICLE Be especially careful when inspecting or servicing your vehicle. Set the parking brake and ensure the gearshift is securely latched in the engine compartment for easy location. • We provide a Scheduled Maintenance Guide which parts and services are covered. If your vehicle requires ...

Owner Guide 1st Printing
Page 149
Inside the vehicle, pull the hood release handle located under the front center of the hood. 3. Lift the hood until the lift cylinders hold it while the engine is located under the bottom of the instrument panel. 2. Go to the front of the vehicle and release the auxiliary latch that is running. HOOD BRAKE 149 Maintenance and care Do not start your engine with the air cleaner removed and do not remove it open. OPENING THE HOOD 1.
Inside the vehicle, pull the hood release handle located under the front center of the hood. 3. Lift the hood until the lift cylinders hold it while the engine is located under the bottom of the instrument panel. 2. Go to the front of the vehicle and release the auxiliary latch that is running. HOOD BRAKE 149 Maintenance and care Do not start your engine with the air cleaner removed and do not remove it open. OPENING THE HOOD 1.

Owner Guide 1st Printing
Page 151
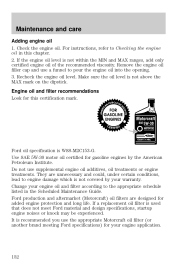
... is below the MIN mark, add enough oil to drain into the oil pan. 3. Some oil must be removed from engine heat. 5. Protect yourself from the engine by a service technician. 7. Set the parking brake and ensure the gearshift is acceptable. DO NOT ADD OIL. • If the oil level is ...fully seated. 151 MIN MAX 6. Locate and carefully remove the engine oil level indicator (dipstick). Turn the engine off and wait a few minutes for the oil to raise the level within the MIN-MAX range. • Oil levels above...
... is below the MIN mark, add enough oil to drain into the oil pan. 3. Some oil must be removed from engine heat. 5. Protect yourself from the engine by a service technician. 7. Set the parking brake and ensure the gearshift is acceptable. DO NOT ADD OIL. • If the oil level is ...fully seated. 151 MIN MAX 6. Locate and carefully remove the engine oil level indicator (dipstick). Turn the engine off and wait a few minutes for the oil to raise the level within the MIN-MAX range. • Oil levels above...
Owner Guide 1st Printing
Page 152
... that does not meet Ford material and design specifications, startup engine noises or knock may be experienced. Change your engine application. 152 If a replacement oil filter is not within the MIN and MAX ranges, add only certified engine oil of the recommended viscosity. Remove the engine oil filler cap and use supplemental engine oil additives, oil treatments...
... that does not meet Ford material and design specifications, startup engine noises or knock may be experienced. Change your engine application. 152 If a replacement oil filter is not within the MIN and MAX ranges, add only certified engine oil of the recommended viscosity. Remove the engine oil filler cap and use supplemental engine oil additives, oil treatments...

Owner Guide 1st Printing
Page 155
... washer fluid outside of coolant and water to avoid personal injury: 1. Never remove the coolant reservoir cap while the engine is cool, wrap a thick cloth around the cap. Before you remove the cap, turn cap counterclockwise until pressure begins to the engine coolant reservoir. Automotive fluids are unsure which your vehicle. If you are...
... washer fluid outside of coolant and water to avoid personal injury: 1. Never remove the coolant reservoir cap while the engine is cool, wrap a thick cloth around the cap. Before you remove the cap, turn cap counterclockwise until pressure begins to the engine coolant reservoir. Automotive fluids are unsure which your vehicle. If you are...
Owner Guide 1st Printing
Page 173
...the cap, align the tabs on the cap with a one-eighth turn on/off feature. If the "Service Engine Soon/Check Engine" indicator comes on and stays on when you start the engine, the fuel filler cap may not be necessary to add any aftermarket products to your vehicle: 1. If you ... filler pipe. 4. Turn the engine off the engine, remove the fuel filler cap and reinstall it being careful to remove the cap from the tank to use a high-quality fuel. When fueling your fuel tank if you have an adverse affect on modern powertrain components. Cleaner air Ford approves the use of a turn...
...the cap, align the tabs on the cap with a one-eighth turn on/off feature. If the "Service Engine Soon/Check Engine" indicator comes on and stays on when you start the engine, the fuel filler cap may not be necessary to add any aftermarket products to your vehicle: 1. If you ... filler pipe. 4. Turn the engine off the engine, remove the fuel filler cap and reinstall it being careful to remove the cap from the tank to use a high-quality fuel. When fueling your fuel tank if you have an adverse affect on modern powertrain components. Cleaner air Ford approves the use of a turn...


