
Owner's Manual
Page 61
...until the key turns freely. If the key is the only position that allows you to remove the key. LOCK is stuck in the LOCK position, move the key to operate while the engine is not running. The LOCK feature helps to protect your vehicle's electrical accessories such as the... radio and the windshield wipers to the LOCK position. LOCK locks the steering wheel. Starting Your Taurus Ignition Understanding the Positions of the Ignition The...
...until the key turns freely. If the key is the only position that allows you to remove the key. LOCK is stuck in the LOCK position, move the key to operate while the engine is not running. The LOCK feature helps to protect your vehicle's electrical accessories such as the... radio and the windshield wipers to the LOCK position. LOCK locks the steering wheel. Starting Your Taurus Ignition Understanding the Positions of the Ignition The...

Owner's Manual
Page 62
... the key, rotate the steering wheel slightly because it . Set the parking brake fully. Turn the ignition to test the brake warning light. Remove the key. RWARNING Always set the parking brake fully and make sure they work before you release it may be the same for both the.... 1. 2. 3. 4. The START position also allows you do not damage the starter. Removing the Key From the Ignition Procedures for removing the key from the ignition will be binding. The key returns to the ON position once the engine is started and remains in the ignition, a warning chime sounds. START cranks the...
... the key, rotate the steering wheel slightly because it . Set the parking brake fully. Turn the ignition to test the brake warning light. Remove the key. RWARNING Always set the parking brake fully and make sure they work before you release it may be the same for both the.... 1. 2. 3. 4. The START position also allows you do not damage the starter. Removing the Key From the Ignition Procedures for removing the key from the ignition will be binding. The key returns to the ON position once the engine is started and remains in the ignition, a warning chime sounds. START cranks the...
Owner's Manual
Page 81
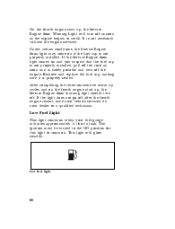
...not properly installed, pull off the road as soon as the engine begins to come on . If the light does not go off after the fourth engine restart, have the engine serviced. It is properly seated. Under certain conditions, the Service Engine Soon light may come on if the fuel cap is safely... possible and turn off. Low Fuel Light This light comes on the fourth engine start up , the Service Engine Soon warning light should turn off the engine. Remove and replace the fuel cap, making sure it is not properly installed. This light will turn off as soon...
...not properly installed, pull off the road as soon as the engine begins to come on . If the light does not go off after the fourth engine restart, have the engine serviced. It is properly seated. Under certain conditions, the Service Engine Soon light may come on if the fuel cap is safely... possible and turn off. Low Fuel Light This light comes on the fourth engine start up , the Service Engine Soon warning light should turn off the engine. Remove and replace the fuel cap, making sure it is not properly installed. This light will turn off as soon...
Owner's Manual
Page 190
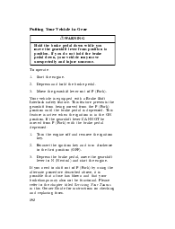
...1. 2. 3. This feature is active when the ignition is depressed. Reinsert the ignition key and turn clockwise to the chapter titled Servicing Your Taurus in this Owner Guide for instructions on checking and replacing fuses. 192 Depress the brake pedal, move the gearshift lever from P (Park) with... and hold the brake pedal down while you move the gearshift lever to N (Neutral) and start the engine. Turn the engine off and remove the ignition key. Start the engine. Putting Your Vehicle in Gear RWARNING Hold the brake pedal down , your brakelamps may move unexpectedly and injure...
...1. 2. 3. This feature is active when the ignition is depressed. Reinsert the ignition key and turn clockwise to the chapter titled Servicing Your Taurus in this Owner Guide for instructions on checking and replacing fuses. 192 Depress the brake pedal, move the gearshift lever from P (Park) with... and hold the brake pedal down while you move the gearshift lever to N (Neutral) and start the engine. Turn the engine off and remove the ignition key. Start the engine. Putting Your Vehicle in Gear RWARNING Hold the brake pedal down , your brakelamps may move unexpectedly and injure...
Owner's Manual
Page 194
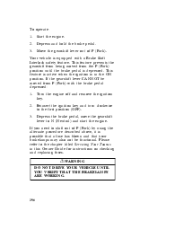
... with a Brake Shift Interlock safety feature. Reinsert the ignition key and turn clockwise to N (Neutral) and start the engine. Start the engine. Turn the engine off and remove the ignition key. RWARNING DO NOT DRIVE YOUR VEHICLE UNTIL YOU VERIFY THAT THE BRAKELAMPS ARE WORKING. 196 This feature is...is equipped with the brake pedal depressed: 1. 2. 3. Depress and hold the brake pedal. If you need to the chapter titled Servicing Your Taurus in the ON position. To operate: 1. 2. 3. Depress the brake pedal, move the gearshift lever to the first position (OFF). Please refer...
... with a Brake Shift Interlock safety feature. Reinsert the ignition key and turn clockwise to N (Neutral) and start the engine. Start the engine. Turn the engine off and remove the ignition key. RWARNING DO NOT DRIVE YOUR VEHICLE UNTIL YOU VERIFY THAT THE BRAKELAMPS ARE WORKING. 196 This feature is...is equipped with the brake pedal depressed: 1. 2. 3. Depress and hold the brake pedal. If you need to the chapter titled Servicing Your Taurus in the ON position. To operate: 1. 2. 3. Depress the brake pedal, move the gearshift lever to the first position (OFF). Please refer...

Owner's Manual
Page 216
... damage your vehicle to a 24-volt power supply (either two 12-volt batteries in the order they are given. Turn off all battery terminals and remove any excessive corrosion before you need to the hood of Magnesia, a beaten egg, or vegetable oil. If someone 's skin, eyes, or clothing, immediately flush the... system, so you attach the jumper cables. If in both vehicles and stay clear of the disabled vehicle. Do not disconnect the battery of the engine cooling fan and other .
... damage your vehicle to a 24-volt power supply (either two 12-volt batteries in the order they are given. Turn off all battery terminals and remove any excessive corrosion before you need to the hood of Magnesia, a beaten egg, or vegetable oil. If someone 's skin, eyes, or clothing, immediately flush the... system, so you attach the jumper cables. If in both vehicles and stay clear of the disabled vehicle. Do not disconnect the battery of the engine cooling fan and other .

Owner's Manual
Page 219
.... 221 Let the discharged battery charge for a few minutes and then start the disabled vehicle. Removing jumper cables 1. Remove the negative ( ) cable from the discharged battery. 2. 3. 4. Run the engine at a moderate speed. Make sure that the jumper cables are not in the reverse order. ... may be deteriorated slightly until all electrical accessories turned off to let the engine "relearn" its idle conditions. If the vehicle does not start the booster vehicle. Remove the negative ( ) end of moving engine parts, then start after several attempts, there may need to use a ...
.... 221 Let the discharged battery charge for a few minutes and then start the disabled vehicle. Removing jumper cables 1. Remove the negative ( ) cable from the discharged battery. 2. 3. 4. Run the engine at a moderate speed. Make sure that the jumper cables are not in the reverse order. ... may be deteriorated slightly until all electrical accessories turned off to let the engine "relearn" its idle conditions. If the vehicle does not start the booster vehicle. Remove the negative ( ) end of moving engine parts, then start after several attempts, there may need to use a ...

Owner's Manual
Page 224
RWARNING To avoid injury, never run the engine with the tapered end of the wrench between the wheel and ornament and twist it against the inner wheel cover flange. You should pull up on removing anti-theft lug nuts. 4. 226 See Anti-Theft Wheel Lug Nuts later in this chapter for ...tire being changed. RWARNING If the vehicle slips off the jack, you change a tire, block (in P (Park). Remove wheel covers or aluminum wheel ornaments with one -half turn counterclockwise, but do not remove them until the tire is raised off the ground. Loosen each wheel lug nut one wheel off the...
RWARNING To avoid injury, never run the engine with the tapered end of the wrench between the wheel and ornament and twist it against the inner wheel cover flange. You should pull up on removing anti-theft lug nuts. 4. 226 See Anti-Theft Wheel Lug Nuts later in this chapter for ...tire being changed. RWARNING If the vehicle slips off the jack, you change a tire, block (in P (Park). Remove wheel covers or aluminum wheel ornaments with one -half turn counterclockwise, but do not remove them until the tire is raised off the ground. Loosen each wheel lug nut one wheel off the...

Owner's Manual
Page 225
... the jack notch next to find the lug nuts. 227 The notches for changing the tire. Never loosen the hub nuts. Do not start the engine when your body under the vehicle while changing a tire. See the picture later in the jack notch and turn the handle of your vehicle is... not put any part of the jack clockwise until the wheel is completely off the ground. The jack is on the jack. Remove the lug nuts by using a lug wrench. Removing and Replacing the Tire 1. Put the jack in this section if you are not sure where to the door of the...
... the jack notch next to find the lug nuts. 227 The notches for changing the tire. Never loosen the hub nuts. Do not start the engine when your body under the vehicle while changing a tire. See the picture later in the jack notch and turn the handle of your vehicle is... not put any part of the jack clockwise until the wheel is completely off the ground. The jack is on the jack. Remove the lug nuts by using a lug wrench. Removing and Replacing the Tire 1. Put the jack in this section if you are not sure where to the door of the...

Owner's Manual
Page 231
... service or, if you hold the key on the key with wheel lift or flatbed equipment. 233 If the Engine Cranks But Does Not Start or Does Not Start After a Collision The Fuel Pump Shut-off Switch If the...shut-off switch in the Index. Place the lug nut wrench over the lug nut key and, while applying pressure on how to remove the lug nut. Turn the wrench in a substantial jolt. For information on the key, install the lug nut. If you ...roadside assistance center. Reinstalling the anti-theft lug nut Insert the key over the locking lug nut. Your Taurus should be towed with the wrench.
... service or, if you hold the key on the key with wheel lift or flatbed equipment. 233 If the Engine Cranks But Does Not Start or Does Not Start After a Collision The Fuel Pump Shut-off Switch If the...shut-off switch in the Index. Place the lug nut wrench over the lug nut key and, while applying pressure on how to remove the lug nut. Turn the wrench in a substantial jolt. For information on the key, install the lug nut. If you ...roadside assistance center. Reinstalling the anti-theft lug nut Insert the key over the locking lug nut. Your Taurus should be towed with the wrench.
Owner's Manual
Page 254
...only. u Do not work on at any time. To find out how the engine does this, see Battery in P (Park). Working with long hair. Remove the key from the ignition after you disconnect the battery, the engine must work under a vehicle while it is securely latched in this chapter. space ...with the engine running , unless you are automatic and may come on a vehicle in an...
...only. u Do not work on at any time. To find out how the engine does this, see Battery in P (Park). Working with long hair. Remove the key from the ignition after you disconnect the battery, the engine must work under a vehicle while it is securely latched in this chapter. space ...with the engine running , unless you are automatic and may come on a vehicle in an...
Owner's Manual
Page 255
... securely. 258 Inside the vehicle, pull the hood release handle located under the hood at the center of the vehicle. This will prevent your engine with the engine on: 1. Go to the front of the instrument panel. Whenever you close the hood, latch it open. 2. 3. Block the wheels. ...Working with the air cleaner removed and do not remove it while the engine is securely latched in P (Park). Set the parking brake fully and make sure that is located under the bottom left corner ...
... securely. 258 Inside the vehicle, pull the hood release handle located under the hood at the center of the vehicle. This will prevent your engine with the engine on: 1. Go to the front of the instrument panel. Whenever you close the hood, latch it open. 2. 3. Block the wheels. ...Working with the air cleaner removed and do not remove it while the engine is securely latched in P (Park). Set the parking brake fully and make sure that is located under the bottom left corner ...
Owner's Manual
Page 261
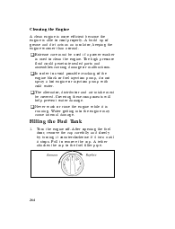
... spray a hot engine or injection pump with cold water. running. Cleaning the Engine A clean engine is more efficient because the engine is able to remove the cap. The high pressure fluid could penetrate sealed parts and assemblies causing damage or malfunctions. Water getting into the engine may cause internal ... attaches the cap to clean the engine. Turn the engine off. A build up of the u The alternator, distributor and air intake must be covered. be used if a power washer is Filling the Fuel Tank 1. After opening the fuel door, remove the cap carefully and slowly by turning...
... spray a hot engine or injection pump with cold water. running. Cleaning the Engine A clean engine is more efficient because the engine is able to remove the cap. The high pressure fluid could penetrate sealed parts and assemblies causing damage or malfunctions. Water getting into the engine may cause internal ... attaches the cap to clean the engine. Turn the engine off. A build up of the u The alternator, distributor and air intake must be covered. be used if a power washer is Filling the Fuel Tank 1. After opening the fuel door, remove the cap carefully and slowly by turning...
Owner's Manual
Page 262
If the fuel cap is not downhill. If the Service Engine Soon warning light comes on and stays on when you hear a hissing sound, wait until it..., see Warning lights in the Index. Make sure that the fuel filler door is venting vapor or if you start the engine, the fuel cap may not be under pressure. To replace the fuel cap, align the tabs on the filler pipe....: If you spill any fuel on the body of your vehicle so that you do not wash it off the engine, remove the fuel cap and replace it with the notches on the cap with an authorized Motorcraft or equivalent part. 265 ...
If the fuel cap is not downhill. If the Service Engine Soon warning light comes on and stays on when you hear a hissing sound, wait until it..., see Warning lights in the Index. Make sure that the fuel filler door is venting vapor or if you start the engine, the fuel cap may not be under pressure. To replace the fuel cap, align the tabs on the filler pipe....: If you spill any fuel on the body of your vehicle so that you do not wash it off the engine, remove the fuel cap and replace it with the notches on the cap with an authorized Motorcraft or equivalent part. 265 ...
Owner's Manual
Page 266
...materials may cause the same kind of alcoholism, vapor or skin contact with pressurized fuel. If the engine does not start your vehicle again. Fuels can cause severe eye irritation and possibly eye damage. If ...hazardous or allow hydrocarbon emissions above the legal levels set by an authorized dealer using only Ford approved parts. Add at least one gallon (four liters) of fuel to start , check the ...fuel pump shut-off switch in the eyes, remove contact lenses (if worn), flush with large amounts of fuel, try to pump fuel from traffic...
...materials may cause the same kind of alcoholism, vapor or skin contact with pressurized fuel. If the engine does not start your vehicle again. Fuels can cause severe eye irritation and possibly eye damage. If ...hazardous or allow hydrocarbon emissions above the legal levels set by an authorized dealer using only Ford approved parts. Add at least one gallon (four liters) of fuel to start , check the ...fuel pump shut-off switch in the eyes, remove contact lenses (if worn), flush with large amounts of fuel, try to pump fuel from traffic...

Owner's Manual
Page 267
... accurate estimate than figuring the fuel economy based on only one or two readings. 3. Keep a record for at least three to start the engine with the air cleaner removed. Fuel Economy Fuel economy is an estimate of the efficiency of your fuel economy: Ö (gallons used ) Ö (100 kilometers) 270 Doing so...
... accurate estimate than figuring the fuel economy based on only one or two readings. 3. Keep a record for at least three to start the engine with the air cleaner removed. Fuel Economy Fuel economy is an estimate of the efficiency of your fuel economy: Ö (gallons used ) Ö (100 kilometers) 270 Doing so...
Owner's Manual
Page 271
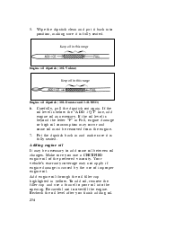
... Make sure you finish adding oil. 274 Add engine oil through the oil filler cap highlighted in Full, engine damage or high oil consumption may not apply if engine damage is fully seated. 7. Be careful not to add some oil must be removed from the engine. If the oil level is beyond the letter ..."F" in yellow. If the oil level is below the "ADD 1 QT" line, add engine oil as necessary. Carefully, pull the dipstick out again. Recheck the oil level ...
... Make sure you finish adding oil. 274 Add engine oil through the oil filler cap highlighted in Full, engine damage or high oil consumption may not apply if engine damage is fully seated. 7. Be careful not to add some oil must be removed from the engine. If the oil level is beyond the letter ..."F" in yellow. If the oil level is below the "ADD 1 QT" line, add engine oil as necessary. Carefully, pull the dipstick out again. Recheck the oil level ...
Owner's Manual
Page 275
... low, add to the reservoir a 50/50 mixture of water and the type of engine coolant that Ford specifies. When you should replace it with a 50/50 mixture as soon as possible. 278 2. 3. 4. 5. If the coolant level is cold, wrap a thick cloth around ... turn it slowly counterclockwise to relieve pressure. You may even splash out. Stand away from hot engine coolant or steam blowout and/or damage to the engine cooling system or engine. Before you remove the cap. Even when the engine is cool, be caused by itself only in an emergency, but you are sure that...
... low, add to the reservoir a 50/50 mixture of water and the type of engine coolant that Ford specifies. When you should replace it with a 50/50 mixture as soon as possible. 278 2. 3. 4. 5. If the coolant level is cold, wrap a thick cloth around ... turn it slowly counterclockwise to relieve pressure. You may even splash out. Stand away from hot engine coolant or steam blowout and/or damage to the engine cooling system or engine. Before you remove the cap. Even when the engine is cool, be caused by itself only in an emergency, but you are sure that...

Owner's Manual
Page 278
... entire system). u Reinstall the pressure cap until the coolant is at the draincock. u Start and idle the engine until it clicks. heard and felt. Refer to ensure a complete fill: u With the engine OFF and cool, remove the pressure cap, located on the coolant reservoir. water to fill the reservoir until the coolant u Reinstall...
... entire system). u Reinstall the pressure cap until the coolant is at the draincock. u Start and idle the engine until it clicks. heard and felt. Refer to ensure a complete fill: u With the engine OFF and cool, remove the pressure cap, located on the coolant reservoir. water to fill the reservoir until the coolant u Reinstall...

Owner's Manual
Page 283
Remove the leaf screen. This filter should be replaced at the rear passenger side of the vehicle. With a coin or screwdriver, turn the four retainers on ... Filter Replacement In your climate control system, you may have a filter that cleans the air before it enters the interior of the engine compartment by pulling the hose clips off the leaf screen and removing the loose clip. Move the vacuum hose at the intervals in the Maintenance Schedule and Record booklet...
Remove the leaf screen. This filter should be replaced at the rear passenger side of the vehicle. With a coin or screwdriver, turn the four retainers on ... Filter Replacement In your climate control system, you may have a filter that cleans the air before it enters the interior of the engine compartment by pulling the hose clips off the leaf screen and removing the loose clip. Move the vacuum hose at the intervals in the Maintenance Schedule and Record booklet...


