
Owner's Manual
Page 9
...the owner, the surfaces of new vehicles damaged by warranty. DO NOT: u Wash your vehicle with a cleaner made for inspection by a Ford representative. Customers may be required to bring their vehicle in for washing cars. Cleaning the Outside of Your Vehicle Pollen, bird droppings and tree ...sap can damage the paint, especially in direct sunlight u Wash your vehicle while the body is hot Polish your vehicle to remove harmful deposits and protect the finish. 6 Washing and Polishing Your Vehicle Wash the outside of purchase, whichever comes first. Take similar precautions ...
...the owner, the surfaces of new vehicles damaged by warranty. DO NOT: u Wash your vehicle with a cleaner made for inspection by a Ford representative. Customers may be required to bring their vehicle in for washing cars. Cleaning the Outside of Your Vehicle Pollen, bird droppings and tree ...sap can damage the paint, especially in direct sunlight u Wash your vehicle while the body is hot Polish your vehicle to remove harmful deposits and protect the finish. 6 Washing and Polishing Your Vehicle Wash the outside of purchase, whichever comes first. Take similar precautions ...

Owner's Manual
Page 10
... and aluminum parts with thinners, solvents or petroleum-based cleaners. Do not use steel wool, abrasive cleaners, fuel or strong detergents. If rustproofing is not removed from plastic and rubber parts, it can cause deterioration. 7 Clean with a tar and road oil...
... and aluminum parts with thinners, solvents or petroleum-based cleaners. Do not use steel wool, abrasive cleaners, fuel or strong detergents. If rustproofing is not removed from plastic and rubber parts, it can cause deterioration. 7 Clean with a tar and road oil...

Owner's Manual
Page 14
... receives an impact of 5 mph (8 km/h) or more, the lap/shoulder belt locks and helps reduce your vehicle, close the door and lock it is, remove the twist. Insert the belt tongue into the proper buckle until you get into your forward movement. Make sure the tongue is not twisted. However...
... receives an impact of 5 mph (8 km/h) or more, the lap/shoulder belt locks and helps reduce your vehicle, close the door and lock it is, remove the twist. Insert the belt tongue into the proper buckle until you get into your forward movement. Make sure the tongue is not twisted. However...

Owner's Manual
Page 19
... a single belt for more than one person. Never wear the shoulder belt under the arm. 2) Never swing it latch. Be sure the belt is twisted remove the twist. Make sure the tongue is securely fastened to follow these precautions could increase the risk and/or severity of the seat cushion. RWARNING...
... a single belt for more than one person. Never wear the shoulder belt under the arm. 2) Never swing it latch. Be sure the belt is twisted remove the twist. Make sure the tongue is securely fastened to follow these precautions could increase the risk and/or severity of the seat cushion. RWARNING...

Owner's Manual
Page 23
Remove them to the belt. Pull the belt across your hips and insert the tongue into the correct buckle on the loose end of the webbing ...
Remove them to the belt. Pull the belt across your hips and insert the tongue into the correct buckle on the loose end of the webbing ...

Owner's Manual
Page 41
Push down on the child seat while you pull up on the belt to remove any slack in the belt. Allow the belt to automatic locking mode 5. This indicates the retractor is in the automatic locking mode (child seat restraint mode). Figures 5 and 6. 39 Setting the retractor to retract. See Figure 4. At this time, the retractor is heard. Pull up on the shoulder webbing. A clicking sound will be heard as the belt retracts. 4. Grasp the shoulder portion of the belt and pull downward until all of the belt is extracted and a click is in the automatic locking mode.
Push down on the child seat while you pull up on the belt to remove any slack in the belt. Allow the belt to automatic locking mode 5. This indicates the retractor is in the automatic locking mode (child seat restraint mode). Figures 5 and 6. 39 Setting the retractor to retract. See Figure 4. At this time, the retractor is heard. Pull up on the shoulder webbing. A clicking sound will be heard as the belt retracts. 4. Grasp the shoulder portion of the belt and pull downward until all of the belt is extracted and a click is in the automatic locking mode.

Owner's Manual
Page 42
Allowing shoulder belt to retract Removing slack from belt 40
Allowing shoulder belt to retract Removing slack from belt 40

Owner's Manual
Page 44
Double check that the child seat is in the automatic locking mode, Figure 8. Check to make sure that the retractor is properly secured prior to pull more belt out of the retractor. 7. Try to each use. NOTE: To remove the retractor from automatic lock mode, allow seat belt to retract fully to its stowed position and the retractor will automatically switch back to the vehicle sensitive locking mode for normal adult usage. 42 If the retractor is in the automatic locking mode. If you cannot, the belt is not locked, repeat steps 4 through 7. Checking the retractor 8.
Double check that the child seat is in the automatic locking mode, Figure 8. Check to make sure that the retractor is properly secured prior to pull more belt out of the retractor. 7. Try to each use. NOTE: To remove the retractor from automatic lock mode, allow seat belt to retract fully to its stowed position and the retractor will automatically switch back to the vehicle sensitive locking mode for normal adult usage. 42 If the retractor is in the automatic locking mode. If you cannot, the belt is not locked, repeat steps 4 through 7. Checking the retractor 8.

Owner's Manual
Page 47
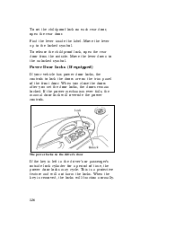
Finding the tether anchors in a rearward and upward direction. Use a screwdriver or coin to snap the covers off the anchor in the wagon 1. 2. Snap the tether strap hook onto the U-shaped tether anchor. 3. 45 Remove the covers completely. Behind the second seat, find the plastic snap-on covers for the floor anchors.
Finding the tether anchors in a rearward and upward direction. Use a screwdriver or coin to snap the covers off the anchor in the wagon 1. 2. Snap the tether strap hook onto the U-shaped tether anchor. 3. 45 Remove the covers completely. Behind the second seat, find the plastic snap-on covers for the floor anchors.

Owner's Manual
Page 57
... belt buckle is securely fastened and the retractor is locked. Refer to Figure 5. 55 2. 3. Slide the shoulder belts off the child's shoulders and remove the child. To remove the child from the built-in child seat: 1. Refer back to Figure 8. If the belts become too tight, unbuckle the crotch safety belt buckle...
... belt buckle is securely fastened and the retractor is locked. Refer to Figure 5. 55 2. 3. Slide the shoulder belts off the child's shoulders and remove the child. To remove the child from the built-in child seat: 1. Refer back to Figure 8. If the belts become too tight, unbuckle the crotch safety belt buckle...

Owner's Manual
Page 59
... Children who are damaged and/or do not function properly. Do not use household cleaners as described, the risk of your Ford dealer if the shoulder belt webbing is removable and can be machine-washed and air-dried. If the shoulder belt portion of one of the lap and shoulder belts can...
... Children who are damaged and/or do not function properly. Do not use household cleaners as described, the risk of your Ford dealer if the shoulder belt webbing is removable and can be machine-washed and air-dried. If the shoulder belt portion of one of the lap and shoulder belts can...

Owner's Manual
Page 61
... position, move the key to shut off the engine and all vehicles with an automatic transaxle. The automatic transaxle gearshift must be in P (Park) to remove the key. OFF allows you to move the steering wheel left or right until the key turns freely. LOCK locks the steering wheel. Starting Your...
... position, move the key to shut off the engine and all vehicles with an automatic transaxle. The automatic transaxle gearshift must be in P (Park) to remove the key. OFF allows you to move the steering wheel left or right until the key turns freely. LOCK locks the steering wheel. Starting Your...

Owner's Manual
Page 62
... to test the brake warning light. Set the parking brake fully. Turn the ignition to the ON position once the engine is still in P (Park). Remove the key. ON allows you to test your vehicle's warning lights (except the brake system warning light) to make sure the gearshift is securely latched... start the engine. START cranks the engine. Put the gearshift in the ignition, a warning chime sounds. If you release it may be the same for removing the key from the ignition will be binding. The key should return to ON when you have difficulty in this position while the engine runs...
... to test the brake warning light. Set the parking brake fully. Turn the ignition to the ON position once the engine is still in P (Park). Remove the key. ON allows you to test your vehicle's warning lights (except the brake system warning light) to make sure the gearshift is securely latched... start the engine. START cranks the engine. Put the gearshift in the ignition, a warning chime sounds. If you release it may be the same for removing the key from the ignition will be binding. The key should return to ON when you have difficulty in this position while the engine runs...
Owner's Manual
Page 81
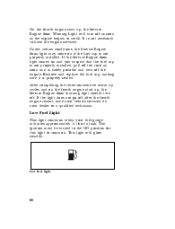
... go off . Low Fuel Light This light comes on if the fuel cap is not properly installed, pull off the engine. Low fuel light 80 Remove and replace the fuel cap, making sure it is safely possible and turn off after the fourth engine restart, have the engine serviced. The ignition...
... go off . Low Fuel Light This light comes on if the fuel cap is not properly installed, pull off the engine. Low fuel light 80 Remove and replace the fuel cap, making sure it is safely possible and turn off after the fourth engine restart, have the engine serviced. The ignition...

Owner's Manual
Page 102
... same time. VENT button Press this button to select outside temperature is about 50˚F (10˚C) and above, the air will be dehumidified to remove moisture. Your EATC will NOT be cooled regardless of the temperature.
... same time. VENT button Press this button to select outside temperature is about 50˚F (10˚C) and above, the air will be dehumidified to remove moisture. Your EATC will NOT be cooled regardless of the temperature.

Owner's Manual
Page 103
If the EATC is on the radio due to remove moisture. OUTSIDE TEMP button When this button is about 50˚F (10˚C) and above, the air will help prevent fogging in the display window. ...
If the EATC is on the radio due to remove moisture. OUTSIDE TEMP button When this button is about 50˚F (10˚C) and above, the air will help prevent fogging in the display window. ...
Owner's Manual
Page 104
... The defroster for the rear defroster and heated side view mirrors is located at the bottom of the windshield, under the front seats that u Remove any desired selection. This will help to prevent windshield fogging. intake area of your climate control system. After a few minutes of operation, switch... to any snow, ice, or leaves from the air u If the air conditioner performs well in A/C, this filter, see Servicing Your Taurus. The button for the rear window clears frost, fog, or thin ice from both the inside and outside air before driving. Operating tips The ...
... The defroster for the rear defroster and heated side view mirrors is located at the bottom of the windshield, under the front seats that u Remove any desired selection. This will help to prevent windshield fogging. intake area of your climate control system. After a few minutes of operation, switch... to any snow, ice, or leaves from the air u If the air conditioner performs well in A/C, this filter, see Servicing Your Taurus. The button for the rear window clears frost, fog, or thin ice from both the inside and outside air before driving. Operating tips The ...
Owner's Manual
Page 125
... for a period of the front door. The power locks on the trim panel of time, the power door locks may cycle. When the key is removed, the locks will override the power controls. If the power mechanism ever fails, the manual door lock will function normally. 126 Move the lever up...
... for a period of the front door. The power locks on the trim panel of time, the power door locks may cycle. When the key is removed, the locks will override the power controls. If the power mechanism ever fails, the manual door lock will function normally. 126 Move the lever up...

Owner's Manual
Page 141
... the ON or ACC position or when the ignition has been turned from the ON to the OFF position and/or the key has been removed and no front doors on that operates all four windows. Make sure occupants are illuminated. The power window controls are clear of 3 causes are possible...
... the ON or ACC position or when the ignition has been turned from the ON to the OFF position and/or the key has been removed and no front doors on that operates all four windows. Make sure occupants are illuminated. The power window controls are clear of 3 causes are possible...

Owner's Manual
Page 143
... the glass panel, or you can use the moon roof in your vehicle in the ON or ACC position or when the key has been removed from the closed position, the motor automatically turns off.
... the glass panel, or you can use the moon roof in your vehicle in the ON or ACC position or when the key has been removed from the closed position, the motor automatically turns off.


