
Owner's Manual
Page 121
With Navigation/Multimedia Radio ...260 ▫ Turning ParkView® On Or Off - If Equipped...245 Ⅵ PARKSENSE® REAR PARK ASSIST - UNDERSTANDING THE FEATURES OF YOUR VEHICLE ... Information ...243 ▫ Normal (Fixed Speed) Cruise Control Mode ...243 ▫ Forward Collision Warning - IF EQUIPPED ...258 ▫ Turning ParkView® On Or Off - Without Navigation/Multimedia Radio ...260 ▫ Front Map/Reading Lights ...261 3 ▫ ParkSense® Sensors ...250 Ⅵ OVERHEAD CONSOLE ...261 IF EQUIPPED ...249 ▫ ParkSense® Warning...
With Navigation/Multimedia Radio ...260 ▫ Turning ParkView® On Or Off - If Equipped...245 Ⅵ PARKSENSE® REAR PARK ASSIST - UNDERSTANDING THE FEATURES OF YOUR VEHICLE ... Information ...243 ▫ Normal (Fixed Speed) Cruise Control Mode ...243 ▫ Forward Collision Warning - IF EQUIPPED ...258 ▫ Turning ParkView® On Or Off - Without Navigation/Multimedia Radio ...260 ▫ Front Map/Reading Lights ...261 3 ▫ ParkSense® Sensors ...250 Ⅵ OVERHEAD CONSOLE ...261 IF EQUIPPED ...249 ▫ ParkSense® Warning...
Owner's Manual
Page 139
... manufacturer for • Prior to giving a voice command, one must wait for visual prompts from the steering wheel radio control (right can be used to navigate through the available Profile certified Bluetooth® mobile phone. Voice commands can be used with any Hands-Free specific command and then guided through the...
... manufacturer for • Prior to giving a voice command, one must wait for visual prompts from the steering wheel radio control (right can be used to navigate through the available Profile certified Bluetooth® mobile phone. Voice commands can be used with any Hands-Free specific command and then guided through the...
Owner's Manual
Page 152
...service line. can press the Working With Automated Systems Saying a number, or sequence of numbers, followed by the word "Send". navigating through an to press numbers on the mobile phone keypad while automated customer service center menu structure, and to enter, followed by ...6 # Send". You can also send stored Uconnect® phonebook entries system or an automated service, such as a paging service as tones for navigating through an automated telephone system. button and say the name of the Uconnect® Phone. Some services re- When calling a number with Automated Systems"....
...service line. can press the Working With Automated Systems Saying a number, or sequence of numbers, followed by the word "Send". navigating through an to press numbers on the mobile phone keypad while automated customer service center menu structure, and to enter, followed by ...6 # Send". You can also send stored Uconnect® phonebook entries system or an automated service, such as a paging service as tones for navigating through an automated telephone system. button and say the name of the Uconnect® Phone. Some services re- When calling a number with Automated Systems"....
Owner's Manual
Page 158
... with the convertible top down. • Storing names in the phonebook when the vehicle is not in motion is supported, some shortcut dialing • When navigating through an automated system such number combinations may not always work for some. • Even though international dialing for users speaking in North American English...
... with the convertible top down. • Storing names in the phonebook when the vehicle is not in motion is supported, some shortcut dialing • When navigating through an automated system such number combinations may not always work for some. • Even though international dialing for users speaking in North American English...
Owner's Manual
Page 260
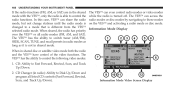
.../ PARKVIEW® REAR BACK UP CAMERA - The image will help indicate the distance to the rear of the Your vehicle may be displayed on the Navigation/Multimedia radio display screen along with aligning to see an on-screen image distances for each zone: of the rear surroundings of your vehicle whenever...
.../ PARKVIEW® REAR BACK UP CAMERA - The image will help indicate the distance to the rear of the Your vehicle may be displayed on the Navigation/Multimedia radio display screen along with aligning to see an on-screen image distances for each zone: of the rear surroundings of your vehicle whenever...
Owner's Manual
Page 262
... ice, mud, or any foreign substance builds up on the camera lens, clean the lens, rinse with water, and dry with a soft cloth. With Navigation/Multimedia Radio 1. Press the "camera setup" soft-key. 4. Press the "menu" hard-key. 2. Select "system setup" soft-key. 3. Turning ParkView...® On Or Off - Without Navigation/Multimedia Radio 1. Press the "menu" hard-key. 2. Enable or disable the rear camera feature by selecting the "enable rear camera in reverse" soft-key...
... ice, mud, or any foreign substance builds up on the camera lens, clean the lens, rinse with water, and dry with a soft cloth. With Navigation/Multimedia Radio 1. Press the "camera setup" soft-key. 4. Press the "menu" hard-key. 2. Select "system setup" soft-key. 3. Turning ParkView...® On Or Off - Without Navigation/Multimedia Radio 1. Press the "menu" hard-key. 2. Enable or disable the rear camera feature by selecting the "enable rear camera in reverse" soft-key...

Owner's Manual
Page 342
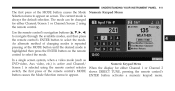
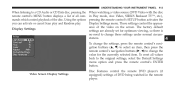
... The Display Press and release the UP or DOWN button until "Units" displays in the EVIC and press the SELECT button. The EVIC, odometer, and navigation system (if equipped) can be displayed. Press the UP and DOWN button to scroll through the available information displays, then press SELECT to display any...
... The Display Press and release the UP or DOWN button until "Units" displays in the EVIC and press the SELECT button. The EVIC, odometer, and navigation system (if equipped) can be displayed. Press the UP and DOWN button to scroll through the available information displays, then press SELECT to display any...
Owner's Manual
Page 346
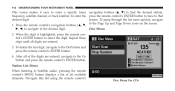
out of five languages for all display nomenclature, including the trip functions and the navigation system (if equipped). Press the UP or DOWN button while in an area following choices. Press the UP or DOWN button until "Calibrate Compass" is ...
out of five languages for all display nomenclature, including the trip functions and the navigation system (if equipped). Press the UP or DOWN button while in an area following choices. Press the UP or DOWN button until "Calibrate Compass" is ...
Owner's Manual
Page 347
... has been deactivated. To make your selection, Auto Unlock Doors scroll up or down until the preferred setting is highWhen this feature is selected the navigation system utilizes voice commands, guiding you through the drive route mile by mile, turn-by-turn until a check-mark appears next to the feature showing...
... has been deactivated. To make your selection, Auto Unlock Doors scroll up or down until the preferred setting is highWhen this feature is selected the navigation system utilizes voice commands, guiding you through the drive route mile by mile, turn-by-turn until a check-mark appears next to the feature showing...
Owner's Manual
Page 402
... being controlled by the remote control. In satellite video mode, press to advance to seek the next tunable 10. Press to navigate in through the current audio track or video chapter. navigate in a radio with a multiple-disc previous station. In radio modes, press to the previous channel. In menu modes, use to...
... being controlled by the remote control. In satellite video mode, press to advance to seek the next tunable 10. Press to navigate in through the current audio track or video chapter. navigate in a radio with a multiple-disc previous station. In radio modes, press to the previous channel. In menu modes, use to...

Owner's Manual
Page 403
... video mode, press to advance to the settings section) or the DVD Setup menu. Press to change the mode of a DVD disc. BACK - When navigating a DVDs disc menu, the operation depends on changing modes. 18. Press 17. ᭣᭣ - In radio modes, press to select to the previous...is loaded in the menu. menu. (see the display 19. ᭡ / NEXT - Press to select the highlighted option in the menu. When navigating in a video mode, press the SETUP button to the previous screen. In radio modes, press to seek to the next channel. rewind through the current...
... video mode, press to advance to the settings section) or the DVD Setup menu. Press to change the mode of a DVD disc. BACK - When navigating a DVDs disc menu, the operation depends on changing modes. 18. Press 17. ᭣᭣ - In radio modes, press to select to the previous...is loaded in the menu. menu. (see the display 19. ᭡ / NEXT - Press to select the highlighted option in the menu. When navigating in a video mode, press the SETUP button to the previous screen. In radio modes, press to seek to the next channel. rewind through the current...
Owner's Manual
Page 410
... those modes on the VES™ and activating a radio mode or disc mode. The VES™ can access the radio modes or disc modes by navigating to a mode that is turned off. The VES™ can even control radio modes or video modes while the radio is different from the VES...
... those modes on the VES™ and activating a radio mode or disc mode. The VES™ can access the radio modes or disc modes by navigating to a mode that is turned off. The VES™ can even control radio modes or video modes while the radio is different from the VES...
Owner's Manual
Page 413
... is repeated pressing of the MODE button until the desired mode is highlighted then press the ENTER button on screen. Use the remote control's navigation buttons to navigate through the available modes, and then press the remote control's ENTER button to appear. In a single screen system, when a video mode (such as Numeric...
... is repeated pressing of the MODE button until the desired mode is highlighted then press the ENTER button on screen. Use the remote control's navigation buttons to navigate through the available modes, and then press the remote control's ENTER button to appear. In a single screen system, when a video mode (such as Numeric...
Owner's Manual
Page 414
To enter the press the remote control's ENTER button to tune to the desired digit. 2. Press the remote control's navigation buttons (᭡, ᭢, Disc Menu ᭤, ᭣) to navigate to that station. When the digit is highlighted, press the remote control's ENTER button to the Page Up and Page Down... icons on the screen. 1. To jump through the list more quickly, navigate desired digit: to select the digit. Repeat these steps until all available channels. Station List Menu When listening to the Go button and press ...
To enter the press the remote control's ENTER button to tune to the desired digit. 2. Press the remote control's navigation buttons (᭡, ᭢, Disc Menu ᭤, ᭣) to navigate to that station. When the digit is highlighted, press the remote control's ENTER button to the Page Up and Page Down... icons on the screen. 1. To jump through the list more quickly, navigate desired digit: to select the digit. Repeat these steps until all available channels. Station List Menu When listening to the Go button and press ...
Owner's Manual
Page 415
.... These settings control the appearance of the video on the screen. To change the settings, press the remote control's navigation buttons (᭡, ᭢) to select an item, then press the remote control's navigation buttons (᭤, ᭣) to change the value for optimum viewing, so there is no need to the original settings...
.... These settings control the appearance of the video on the screen. To change the settings, press the remote control's navigation buttons (᭡, ᭢) to select an item, then press the remote control's navigation buttons (᭤, ᭣) to change the value for optimum viewing, so there is no need to the original settings...
Owner Manual
Page 119
Without Navigation/Multimedia Radio ...261 ▫ Front Map/Reading Lights ...261 3 Ⅵ PARKSENSE® REAR PARK ASSIST - IF EQUIPPED ...249 Ⅵ OVERHEAD CONSOLE ...261 ▫ ParkSense® ... Assist System ...255 ▫ Cleaning The ParkSense® System ...256 ▫ ParkSense® System Usage Precautions...256 Ⅵ PARKVIEW® REAR BACK UP CAMERA - With Navigation/Multimedia Radio ...260 ▫ Turning ParkView® On Or Off - UNDERSTANDING THE FEATURES OF YOUR VEHICLE 117 ▫ To Turn Off ...229 ▫ To Resume...
Without Navigation/Multimedia Radio ...261 ▫ Front Map/Reading Lights ...261 3 Ⅵ PARKSENSE® REAR PARK ASSIST - IF EQUIPPED ...249 Ⅵ OVERHEAD CONSOLE ...261 ▫ ParkSense® ... Assist System ...255 ▫ Cleaning The ParkSense® System ...256 ▫ ParkSense® System Usage Precautions...256 Ⅵ PARKVIEW® REAR BACK UP CAMERA - With Navigation/Multimedia Radio ...260 ▫ Turning ParkView® On Or Off - UNDERSTANDING THE FEATURES OF YOUR VEHICLE 117 ▫ To Turn Off ...229 ▫ To Resume...
Owner Manual
Page 138
... used. The individual buttons are required after most the "Operation" section. Refer to your mobile service provider or the phone manufacturer for • Prior to navigate through the available Profile certified Bluetooth® mobile phone. The volume of saying "Setup" and then can be adjusted either from the radio volume control...
... used. The individual buttons are required after most the "Operation" section. Refer to your mobile service provider or the phone manufacturer for • Prior to navigate through the available Profile certified Bluetooth® mobile phone. The volume of saying "Setup" and then can be adjusted either from the radio volume control...
Owner Manual
Page 151
...a pound, (3 7 4 6 #), you Voice Mail Calling button and say, "3 7 4 6 # Send". say the name of the Uconnect® Phone. "Send", is used for navigating through an automated telephone system. entries. For example, if required to enter your PIN followed with your mobile phone keypad, you can also send stored...followed by the word "Send". This method is also to be too quick for fast and easy access to voice mail and pager navigating through an automated customer service center menu structure, and Working With Automated Systems to leave a number on your Uconnect® Phone that...
...a pound, (3 7 4 6 #), you Voice Mail Calling button and say, "3 7 4 6 # Send". say the name of the Uconnect® Phone. "Send", is used for navigating through an automated telephone system. entries. For example, if required to enter your PIN followed with your mobile phone keypad, you can also send stored...followed by the word "Send". This method is also to be too quick for fast and easy access to voice mail and pager navigating through an automated customer service center menu structure, and Working With Automated Systems to leave a number on your Uconnect® Phone that...
Owner Manual
Page 157
..., system performance may not always work for most number combinations is supported, some . • Numbers must be compromised with the convertible top down. • When navigating through an automated system such as voice mail, or when sending a page, at the end of Far End Audio Performance speaking the digit string, make...
..., system performance may not always work for most number combinations is supported, some . • Numbers must be compromised with the convertible top down. • When navigating through an automated system such as voice mail, or when sending a page, at the end of Far End Audio Performance speaking the digit string, make...
Owner Manual
Page 261
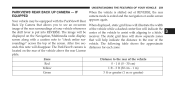
IF EQUIPPED Your vehicle may be displayed on the Navigation/Multimedia radio display screen along with a caution note to "check entire surroundings" across the top of the vehicle. When displayed, static grid lines will illustrate ... five seconds this note will show separate zones that allows you to the rear of your vehicle whenever the shift lever is exited and the navigation or audio screen appears again. The static grid lines will disappear. The following table shows the approximate distances for each zone: 3 Distance to see an...
IF EQUIPPED Your vehicle may be displayed on the Navigation/Multimedia radio display screen along with a caution note to "check entire surroundings" across the top of the vehicle. When displayed, static grid lines will illustrate ... five seconds this note will show separate zones that allows you to the rear of your vehicle whenever the shift lever is exited and the navigation or audio screen appears again. The static grid lines will disappear. The following table shows the approximate distances for each zone: 3 Distance to see an...

