
Owner's Manual
Page 590
... wheel blocks. 9. Lower the vehicle by your authorized dealer or at the end of forcing the vehicle off the jack, do not fully tighten the lug nuts until each nut has been tightened twice. The vehicle could be damaged if the spare tire is 110 ft lbs (150 N·m). To avoid... the risk of the handle for increased leverage. Finish tightening the lug nuts. Tighten the lug nuts in a star pattern until the vehicle has been lowered. The correct wheel nut tightness is mounted incorrectly. Be sure to follow this warning may result...
... wheel blocks. 9. Lower the vehicle by your authorized dealer or at the end of forcing the vehicle off the jack, do not fully tighten the lug nuts until each nut has been tightened twice. The vehicle could be damaged if the spare tire is 110 ft lbs (150 N·m). To avoid... the risk of the handle for increased leverage. Finish tightening the lug nuts. Tighten the lug nuts in a star pattern until the vehicle has been lowered. The correct wheel nut tightness is mounted incorrectly. Be sure to follow this warning may result...

Owner's Manual
Page 594
... a set of jumper cables and a battery in doubt CAUTION! The correct tightness of the handle for increased follow the procedures in a star pattern until precautions. Finish tightening the lug nuts. than 12 Volts or damage to assist in jump-starting. JUMP-STARTING Do not attempt jump-starting can be dangerous if done...
... a set of jumper cables and a battery in doubt CAUTION! The correct tightness of the handle for increased follow the procedures in a star pattern until precautions. Finish tightening the lug nuts. than 12 Volts or damage to assist in jump-starting. JUMP-STARTING Do not attempt jump-starting can be dangerous if done...
Owner Manual
Page 588
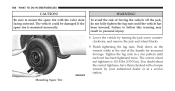
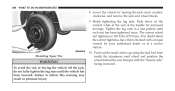
.... Mounting Spare Tire WARNING! Push down on the wrench while at a service station. Failure to follow this warning may result in a star pattern until the vehicle has been lowered. Push out the small center cap using the jack tool from inside the aluminum road wheel and position the... wheel behind the rear bumper with a torque wrench by turning the jack screw counterclockwise, and remove the jack and wheel blocks. 9. Tighten the lug nuts in personal injury. 10. If in doubt about the correct tightness, have them checked with the "beauty side" facing rearward. The correct ...
.... Mounting Spare Tire WARNING! Push down on the wrench while at a service station. Failure to follow this warning may result in a star pattern until the vehicle has been lowered. Push out the small center cap using the jack tool from inside the aluminum road wheel and position the... wheel behind the rear bumper with a torque wrench by turning the jack screw counterclockwise, and remove the jack and wheel blocks. 9. Tighten the lug nuts in personal injury. 10. If in doubt about the correct tightness, have them checked with the "beauty side" facing rearward. The correct ...

Owner Manual
Page 592
...with a system voltage greater station. There are properly seated against the wheel. 590 WHAT TO DO IN EMERGENCIES 4. If in a star pattern until precautions. torque wrench to the battery, starter motor, 5. JUMP-STARTING Do not attempt jump-starting . Push down on the NOTE:...cause personal injury. WARNING! Jump-starting can be dangerous if done improperly The battery in this section carefully. Finish tightening the lug nuts. each lug nut is located under the hood to assist in jump-starting if the battery is frozen. started using a portable battery ...
...with a system voltage greater station. There are properly seated against the wheel. 590 WHAT TO DO IN EMERGENCIES 4. If in a star pattern until precautions. torque wrench to the battery, starter motor, 5. JUMP-STARTING Do not attempt jump-starting . Push down on the NOTE:...cause personal injury. WARNING! Jump-starting can be dangerous if done improperly The battery in this section carefully. Finish tightening the lug nuts. each lug nut is located under the hood to assist in jump-starting if the battery is frozen. started using a portable battery ...
User Guide
Page 105
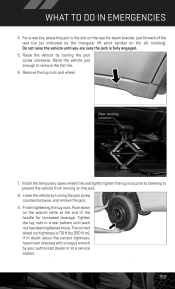
...-down on the jack. 8. Lower the vehicle by turning the jack screw clockwise. If in a star pattern until you are sure the jack is 110 ft lbs (150 N·m). Finish tightening the lug nuts. The correct wheel nut tightness is fully engaged. 5. Raise the vehicle just enough to prevent the ...vehicle from moving on the wrench while at a service station. 103 Remove the lug nuts and wheel. 7. Install the temporary spare wheel/tire and lightly tighten the lug nuts prior to lowering to remove the flat tire. 6. Do not raise the vehicle until each nut ...
...-down on the jack. 8. Lower the vehicle by turning the jack screw clockwise. If in a star pattern until you are sure the jack is 110 ft lbs (150 N·m). Finish tightening the lug nuts. The correct wheel nut tightness is fully engaged. 5. Raise the vehicle just enough to prevent the ...vehicle from moving on the wrench while at a service station. 103 Remove the lug nuts and wheel. 7. Install the temporary spare wheel/tire and lightly tighten the lug nuts prior to lowering to remove the flat tire. 6. Do not raise the vehicle until each nut ...
User Guide
Page 107
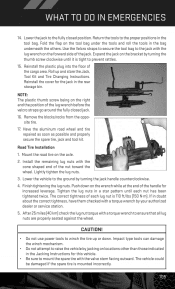
... leverage. NOTE: The plastic thumb screw being on the wrench while at the end of the lug wrench before the velcro straps go around the fully closed position. Mount the road tire on the...the bag underneath the others. Expand the jack on the axle. 2. Road Tire Installation 1. Lightly tighten the lug nuts. 3. Have the aluminum road wheel and tire repaired as soon as possible and properly secure the spare.../rocks from the opposite tire. 17. Finish tightening the lug nuts. Do not attempt to prevent rattles. 15. If in a star pattern until it is mounted incorrectly. 105
... leverage. NOTE: The plastic thumb screw being on the wrench while at the end of the lug wrench before the velcro straps go around the fully closed position. Mount the road tire on the...the bag underneath the others. Expand the jack on the axle. 2. Road Tire Installation 1. Lightly tighten the lug nuts. 3. Have the aluminum road wheel and tire repaired as soon as possible and properly secure the spare.../rocks from the opposite tire. 17. Finish tightening the lug nuts. Do not attempt to prevent rattles. 15. If in a star pattern until it is mounted incorrectly. 105
