Owner Manual
Page 7
...; Key-In-Ignition Reminder ...12 ▫ Floor Shift Ignition Interlock System - THINGS TO KNOW BEFORE STARTING YOUR VEHICLE CONTENTS Ⅵ A Word About Your Keys ...9 ▫ Sentry Key Engine Immobilizer- If Equipped ...13 Ⅵ Glove Compartment Lock ...14 Ⅵ Illuminated Entry System - If Equipped ...15 ▫ "Child-Protection" Lock System (Rear Doors) . .16 ▫ Automatic (Rolling) Door Locks ...16 ▫ Automatic Unlock On Exit (Only Available If Automatic Door Locks Enabled) ...17 Ⅵ Remote Keyless Entry...
...; Key-In-Ignition Reminder ...12 ▫ Floor Shift Ignition Interlock System - THINGS TO KNOW BEFORE STARTING YOUR VEHICLE CONTENTS Ⅵ A Word About Your Keys ...9 ▫ Sentry Key Engine Immobilizer- If Equipped ...13 Ⅵ Glove Compartment Lock ...14 Ⅵ Illuminated Entry System - If Equipped ...15 ▫ "Child-Protection" Lock System (Rear Doors) . .16 ▫ Automatic (Rolling) Door Locks ...16 ▫ Automatic Unlock On Exit (Only Available If Automatic Door Locks Enabled) ...17 Ⅵ Remote Keyless Entry...
Owner Manual
Page 11
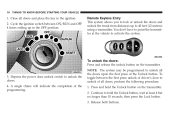
... programming a blank key to the vehicle electronics. The Theft Alarm Light will sound. Repeat this device may be performed at least 3 seconds but no longer than 15 seconds. THINGS TO KNOW BEFORE STARTING YOUR VEHICLE 11 At the time of purchase, the original owner is subject to the following : 1. This number is required for 3 seconds; Turn the ignition Off and remove...
... programming a blank key to the vehicle electronics. The Theft Alarm Light will sound. Repeat this device may be performed at least 3 seconds but no longer than 15 seconds. THINGS TO KNOW BEFORE STARTING YOUR VEHICLE 11 At the time of purchase, the original owner is subject to the following : 1. This number is required for 3 seconds; Turn the ignition Off and remove...
Owner Manual
Page 15
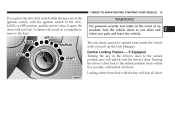
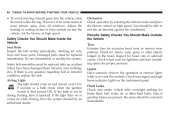
... park and leave the vehicle. WARNING! Turning the driver's door lock to remove the keys. THINGS TO KNOW BEFORE STARTING YOUR VEHICLE 15 If you press the door lock switch while the keys are in the ignition switch, with the key will lock all doors. The rear doors cannot be opened from inside the vehicle until you pull up the lock plungers. If Equipped Turning the key in the ACC, LOCK, or OFF position, and the driver's door...
... park and leave the vehicle. WARNING! Turning the driver's door lock to remove the keys. THINGS TO KNOW BEFORE STARTING YOUR VEHICLE 15 If you press the door lock switch while the keys are in the ignition switch, with the key will lock all doors. The rear doors cannot be opened from inside the vehicle until you pull up the lock plungers. If Equipped Turning the key in the ACC, LOCK, or OFF position, and the driver's door...
Owner Manual
Page 18
... the power door unlock switch to activate the system. Remote Keyless Entry This system allows you to hold the Unlock button on the transmitter. You don't have to point the transmitter at least 4 but no longer than 10 seconds, then press the Lock button. 3. Continue to lock or unlock the doors and unlock the trunk from distances up in the ignition. 2. Release...
... the power door unlock switch to activate the system. Remote Keyless Entry This system allows you to hold the Unlock button on the transmitter. You don't have to point the transmitter at least 4 but no longer than 10 seconds, then press the Lock button. 3. Continue to lock or unlock the doors and unlock the trunk from distances up in the ignition. 2. Release...
Owner Manual
Page 36
... Light • Driver and Passenger Front Airbags • Optional Driver and Passenger Side Airbags. • Steering Wheel and Column • Instrument Panel • Interconnecting Wiring • Crash Sensors • Knee Impact Bolsters The side airbag system, on vehicles so equipped, consists of the following: • AIRBAG Readiness Light • Side Airbag in the Driver's Seat • Side Airbag in the Passenger's Seat • ACM (Airbag Control Module) • SIACM (Side Impact Airbag Control Module) • Interconnecting Wiring How the Frontal Airbag System Works...
... Light • Driver and Passenger Front Airbags • Optional Driver and Passenger Side Airbags. • Steering Wheel and Column • Instrument Panel • Interconnecting Wiring • Crash Sensors • Knee Impact Bolsters The side airbag system, on vehicles so equipped, consists of the following: • AIRBAG Readiness Light • Side Airbag in the Driver's Seat • Side Airbag in the Passenger's Seat • ACM (Airbag Control Module) • SIACM (Side Impact Airbag Control Module) • Interconnecting Wiring How the Frontal Airbag System Works...

Owner Manual
Page 47
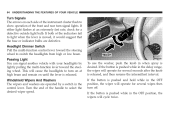
... . Oil changes should be consistent with the engine running, adjust your heating or cooling controls to move your new vehicle does not require a long break-in Section 7 of a problem. To avoid breathing (CO) follow the safety tips below. • Do not run the engine in a closed garage or in confined areas any longer than needed to force outside air into the vehicle. SAFETY TIPS Exhaust Gas 2 WARNING! Exhaust gases...
... . Oil changes should be consistent with the engine running, adjust your heating or cooling controls to move your new vehicle does not require a long break-in Section 7 of a problem. To avoid breathing (CO) follow the safety tips below. • Do not run the engine in a closed garage or in confined areas any longer than needed to force outside air into the vehicle. SAFETY TIPS Exhaust Gas 2 WARNING! Exhaust gases...
Owner Manual
Page 48
... mode and place the blower control on high speed. Adjust the heating or cooling system to feel the air directed against the windshield. Safety Checks You Should Make Inside the Vehicle Seat Belts Inspect the belt system periodically, checking for excessive tread wear or uneven wear patterns. Safety belt assemblies must be corrected immediately. Check turn signal and high beam indicator lights on for brake fluid, fuel, water, oil, or other objects lodged...
... mode and place the blower control on high speed. Adjust the heating or cooling system to feel the air directed against the windshield. Safety Checks You Should Make Inside the Vehicle Seat Belts Inspect the belt system periodically, checking for excessive tread wear or uneven wear patterns. Safety belt assemblies must be corrected immediately. Check turn signal and high beam indicator lights on for brake fluid, fuel, water, oil, or other objects lodged...

Owner Manual
Page 50
... Lights ...70 Ⅵ Garage Door Opener - 50 UNDERSTANDING THE FEATURES OF YOUR VEHICLE Ⅵ Exterior Lights ...62 ▫ Headlights And Parking Lights ...62 ▫ Lights-On Reminder ...62 ▫ Headlight Time Delay ...62 ▫ Battery Saver Feature-Exterior Lights ...63 ▫ Fog Lights ...63 ▫ Daytime Running Lights (Canada Only) ...63 Ⅵ Multifunction Control Lever ...63 ▫ Turn Signals ...64 ▫ Headlight Dimmer Switch ...64 ▫ Passing Light ...64 ▫ Windshield Wipers And Washers ...64 ▫ Speed Sensitive Intermittent Wipers...
... Lights ...70 Ⅵ Garage Door Opener - 50 UNDERSTANDING THE FEATURES OF YOUR VEHICLE Ⅵ Exterior Lights ...62 ▫ Headlights And Parking Lights ...62 ▫ Lights-On Reminder ...62 ▫ Headlight Time Delay ...62 ▫ Battery Saver Feature-Exterior Lights ...63 ▫ Fog Lights ...63 ▫ Daytime Running Lights (Canada Only) ...63 Ⅵ Multifunction Control Lever ...63 ▫ Turn Signals ...64 ▫ Headlight Dimmer Switch ...64 ▫ Passing Light ...64 ▫ Windshield Wipers And Washers ...64 ▫ Speed Sensitive Intermittent Wipers...
Owner Manual
Page 63
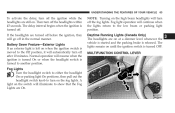
... the ignition switch is released. Fog light operation will resume when the ignition is turned On or when the headlight switch is turned to another position. Battery Saver Feature-Exterior Lights If an exterior light is left on . MULTIFUNCTION CONTROL LEVER 3 UNDERSTANDING THE FEATURES OF YOUR VEHICLE 63 To activate the delay, turn off the fog lights. The delay interval begins when the ignition is moved to turn off after 10 minutes. Daytime Running Lights (Canada...
... the ignition switch is released. Fog light operation will resume when the ignition is turned On or when the headlight switch is turned to another position. Battery Saver Feature-Exterior Lights If an exterior light is left on . MULTIFUNCTION CONTROL LEVER 3 UNDERSTANDING THE FEATURES OF YOUR VEHICLE 63 To activate the delay, turn off the fog lights. The delay interval begins when the ignition is moved to turn off after 10 minutes. Daytime Running Lights (Canada...
Owner Manual
Page 64
.... Headlight Dimmer Switch Pull the multi-function control lever toward the steering wheel. If the button is desired. 64 UNDERSTANDING THE FEATURES OF YOUR VEHICLE Turn Signals The arrows on until the lever is released. If either light flashes at high beam and remain on each side of the instrument cluster flash to select the desired wiper speed. If both of the front and rear turn off. Turn...
.... Headlight Dimmer Switch Pull the multi-function control lever toward the steering wheel. If the button is desired. 64 UNDERSTANDING THE FEATURES OF YOUR VEHICLE Turn Signals The arrows on until the lever is released. If either light flashes at high beam and remain on each side of the instrument cluster flash to select the desired wiper speed. If both of the front and rear turn off. Turn...

Owner Manual
Page 81
... the instrument panel (see the paragraph on fuses in section 7 of this outlet are slowly updated when vehicle speed is located in the center of the fuse block) from its on the upper right of the instrument panel if your vehicle has bench or split bench seats. ELECTRICAL POWER OUTLET Your vehicle may convert the outlet from ignition to a cigar lighter by the ignition switch, when in the "run...
... the instrument panel (see the paragraph on fuses in section 7 of this outlet are slowly updated when vehicle speed is located in the center of the fuse block) from its on the upper right of the instrument panel if your vehicle has bench or split bench seats. ELECTRICAL POWER OUTLET Your vehicle may convert the outlet from ignition to a cigar lighter by the ignition switch, when in the "run...

Owner Manual
Page 89
... out the next time the ignition is moving with the exterior turn signal, when using the turn signal lever towards the steering wheel to go traffic, or when towing a trailer. 4 UNDERSTANDING YOUR INSTRUMENT PANEL 89 7. Cruise (Speed Control) Light This light shows that a door is ON. 14. Engine Coolant Temperature Gauge The temperature gauge shows engine coolant temperature. High Beam Indicator This light shows that the engine cooling system is fastened. 10. Seat Belt Reminder Light The light will sound when...
... out the next time the ignition is moving with the exterior turn signal, when using the turn signal lever towards the steering wheel to go traffic, or when towing a trailer. 4 UNDERSTANDING YOUR INSTRUMENT PANEL 89 7. Cruise (Speed Control) Light This light shows that a door is ON. 14. Engine Coolant Temperature Gauge The temperature gauge shows engine coolant temperature. High Beam Indicator This light shows that the engine cooling system is fastened. 10. Seat Belt Reminder Light The light will sound when...

Owner Manual
Page 90
... your air conditioning is on when turning the key from the engine cooling system. 16. In most situations the vehicle will drive normally and will come on , turn off the engine until the problem is not lit during starting, Airbag Light The light will not require towing. Continuing to drive with an overheated engine cooling system can also turn the Temperature control to maximum heat, the Mode control to Floor and the Fan control to High. The air conditioning...
... your air conditioning is on when turning the key from the engine cooling system. 16. In most situations the vehicle will drive normally and will come on , turn off the engine until the problem is not lit during starting, Airbag Light The light will not require towing. Continuing to drive with an overheated engine cooling system can also turn the Temperature control to maximum heat, the Mode control to Floor and the Fan control to High. The air conditioning...

Owner Manual
Page 93
UNDERSTANDING YOUR INSTRUMENT PANEL 93 ELECTRONIC DIGITAL CLOCK The clock and radio each time you press the button. 2. IF EQUIPPED 4 Operating Instructions - Radio NOTE: Power to operate the radio is in the ON or ACC position to turn off. Power Switch, Volume Control Press the ON/VOL control to operate the radio. To Set The Clock: 1. Press any other button to press the hour...
UNDERSTANDING YOUR INSTRUMENT PANEL 93 ELECTRONIC DIGITAL CLOCK The clock and radio each time you press the button. 2. IF EQUIPPED 4 Operating Instructions - Radio NOTE: Power to operate the radio is in the ON or ACC position to turn off. Power Switch, Volume Control Press the ON/VOL control to operate the radio. To Set The Clock: 1. Press any other button to press the hour...

Owner Manual
Page 118
... engine is mounted behind the ATC control panel. NOTE: The temperature setting can be defeated by the figure shown in the center of the instrument panel near the windshield glass. The Sun Sensor is in the display window. AUTO Control Press the top of air forced through the system in any mode you select. Do not cover either sensor with any time without affecting automatic control operation. This feature...
... engine is mounted behind the ATC control panel. NOTE: The temperature setting can be defeated by the figure shown in the center of the instrument panel near the windshield glass. The Sun Sensor is in the display window. AUTO Control Press the top of air forced through the system in any mode you select. Do not cover either sensor with any time without affecting automatic control operation. This feature...
Owner Manual
Page 128
... 6 of starting procedures. If the engine fails to start to run, but not have enough power to the floor and hold it may damage the transaxle or the rear of cranking with another vehicle may be repeated. WARNING! This should be flooded. If this manual for more than 15 seconds at a time. Never pour fuel or other flammable liquid into the throttle body air inlet...
... 6 of starting procedures. If the engine fails to start to run, but not have enough power to the floor and hold it may damage the transaxle or the rear of cranking with another vehicle may be repeated. WARNING! This should be flooded. If this manual for more than 15 seconds at a time. Never pour fuel or other flammable liquid into the throttle body air inlet...

Owner Manual
Page 139
... spare tire inflation pressure at 60 psi [4.1 bars](414 kPa). Temporary-use spare tires are for the compact spare. Failure to follow the warnings, which apply to mount a conventional tire on your vehicle, do not drive more than 50 miles (80 km) with the compact spare installed. WARNING! Temporary-use spare tires have a total tread life of vehicle control. 5 Because of the reduced ground clearance...
... spare tire inflation pressure at 60 psi [4.1 bars](414 kPa). Temporary-use spare tires are for the compact spare. Failure to follow the warnings, which apply to mount a conventional tire on your vehicle, do not drive more than 50 miles (80 km) with the compact spare installed. WARNING! Temporary-use spare tires have a total tread life of vehicle control. 5 Because of the reduced ground clearance...
Owner Manual
Page 148
Vehicle Loading Capacities Front Seat Occupants ...2 or 3 Rear Seat Occupants ...3 Luggage ...115 lbs. (52 kg) Rated Vehicle Capacity ...865 lbs. (392 kg) Luggage Racks External racks do not exceed the rated vehicle capacity shown on the tire pressure label attached to tow trailers for vehicles equipped with 2.7L engines is: 1,500 lbs (680 kg) • For vehicles equipped with 2.7L engines: when driving in this range, the "3" range MUST be selected. However the...
Vehicle Loading Capacities Front Seat Occupants ...2 or 3 Rear Seat Occupants ...3 Luggage ...115 lbs. (52 kg) Rated Vehicle Capacity ...865 lbs. (392 kg) Luggage Racks External racks do not exceed the rated vehicle capacity shown on the tire pressure label attached to tow trailers for vehicles equipped with 2.7L engines is: 1,500 lbs (680 kg) • For vehicles equipped with 2.7L engines: when driving in this range, the "3" range MUST be selected. However the...

Owner Manual
Page 169
... serviced before any of the emissions, engine, and automatic transaxle control systems. When these systems require service, the OBD II system will usually be performed. Be sure the gas cap is tightened every time you hear it "click." 7 CAUTION! If the light is required. MAINTAINING YOUR VEHICLE 169 ONBOARD DIAGNOSTIC SYSTEM (OBD II) To meet new government regulations and promote cleaner air, your vehicle...
... serviced before any of the emissions, engine, and automatic transaxle control systems. When these systems require service, the OBD II system will usually be performed. Be sure the gas cap is tightened every time you hear it "click." 7 CAUTION! If the light is required. MAINTAINING YOUR VEHICLE 169 ONBOARD DIAGNOSTIC SYSTEM (OBD II) To meet new government regulations and promote cleaner air, your vehicle...
Owner Manual
Page 241
... ...167,168 Cooling ...89,188 Fails to Start ...128 Oil ...88,172 Oil Change Interval ...174 Oil Selection ...175 Oil Synthetic ...177 Overheating ...89,152 Specifications ...208 Timing Belt ...180 Entry System, Illuminated ...14 Exhaust Gas Caution ...47,187 Exhaust System ...187 Exterior Lights ...62,204 Filters Air Cleaner ...180 Automatic Transaxle ...197 Engine Fuel ...180 Engine Oil ...178 Flashers Hazard Warning ...152 Flat Tire Changing ...153 Floor Shift Interlock ...13 Fluid Capacities ...208 Fluid Leaks ...48 Fog Lights ...63 Freeing A Stuck Vehicle ...162 Fuel ...88,143...
... ...167,168 Cooling ...89,188 Fails to Start ...128 Oil ...88,172 Oil Change Interval ...174 Oil Selection ...175 Oil Synthetic ...177 Overheating ...89,152 Specifications ...208 Timing Belt ...180 Entry System, Illuminated ...14 Exhaust Gas Caution ...47,187 Exhaust System ...187 Exterior Lights ...62,204 Filters Air Cleaner ...180 Automatic Transaxle ...197 Engine Fuel ...180 Engine Oil ...178 Flashers Hazard Warning ...152 Flat Tire Changing ...153 Floor Shift Interlock ...13 Fluid Capacities ...208 Fluid Leaks ...48 Fog Lights ...63 Freeing A Stuck Vehicle ...162 Fuel ...88,143...


