
Owner Manual
Page 28
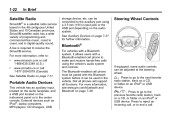
... system. SiriusXM satellite radio has a wide variety of programming and commercial-free music, coast to make and receive hands-free calls using a 3.5 mm (1/8 in) input jack or the USB port depending on an iPod® or USB device. Steering Wheel Controls ® Bluetooth® For vehicles with a Bluetooth system, it allows...
... system. SiriusXM satellite radio has a wide variety of programming and commercial-free music, coast to make and receive hands-free calls using a 3.5 mm (1/8 in) input jack or the USB port depending on an iPod® or USB device. Steering Wheel Controls ® Bluetooth® For vehicles with a Bluetooth system, it allows...
Owner Manual
Page 212
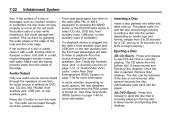
...CD AUX button to select CD slot, DVD slot, front auxiliary input, USB port, or rear auxiliary input (if available). See "Using the Auxiliary Input Jack" in the top slot. Press and release to eject the disc that is currently playing in Auxiliary Devices on page 7‑31, or "Audio/Video... (A/V) Jacks" under Rear Seat Entertainment (RSE) System on . If the disc is not removed, after several seconds the disc automatically pulls back into the radio's front...
...CD AUX button to select CD slot, DVD slot, front auxiliary input, USB port, or rear auxiliary input (if available). See "Using the Auxiliary Input Jack" in the top slot. Press and release to eject the disc that is currently playing in Auxiliary Devices on page 7‑31, or "Audio/Video... (A/V) Jacks" under Rear Seat Entertainment (RSE) System on . If the disc is not removed, after several seconds the disc automatically pulls back into the radio's front...
Owner Manual
Page 213
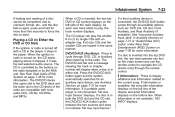
...;46 for more information. Full-size CDs and the smaller CDs are compatible with a CD in Auxiliary Devices on page 7‑31 or "Audio/Video (A/V) Jacks" under Rear Seat Entertainment (RSE) System on the bottom line. If a portable audio player is not available, "NO INFO" displays. As each new track ...starts to the radio. See "Using the Auxiliary Input Jack" in the player, it was the last selected audio source. The DVD/CD decks (the upper slot is the DVD deck and the lower slot...
...;46 for more information. Full-size CDs and the smaller CDs are compatible with a CD in Auxiliary Devices on page 7‑31 or "Audio/Video (A/V) Jacks" under Rear Seat Entertainment (RSE) System on the bottom line. If a portable audio player is not available, "NO INFO" displays. As each new track ...starts to the radio. See "Using the Auxiliary Input Jack" in the player, it was the last selected audio source. The DVD/CD decks (the upper slot is the DVD deck and the lower slot...
Owner Manual
Page 218
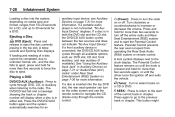
...and rear auxiliary (if available). see Auxiliary Devices on until the driver turns the ignition off and exits the vehicle. See "Using the Auxiliary Input Jack" in the top slot. If a front auxiliary device is pressed and held for more information. Ejecting a Disc Z DVD (Eject): Press and release... to eject the disc currently playing in Auxiliary Devices on page 7‑31 or "Audio/Video (A/V) Jacks" under Rear Seat Entertainment (RSE) System on page 7‑36 for an f (Tune): Turn to select tracks on the video screen and use the...
...and rear auxiliary (if available). see Auxiliary Devices on until the driver turns the ignition off and exits the vehicle. See "Using the Auxiliary Input Jack" in the top slot. If a front auxiliary device is pressed and held for more information. Ejecting a Disc Z DVD (Eject): Press and release... to eject the disc currently playing in Auxiliary Devices on page 7‑31 or "Audio/Video (A/V) Jacks" under Rear Seat Entertainment (RSE) System on page 7‑36 for an f (Tune): Turn to select tracks on the video screen and use the...
Owner Manual
Page 221
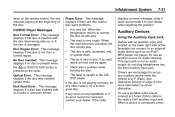
...Format Error: This message displays if the disc is damaged. Disk Read Error: This message displays if a disc was inserted with an auxiliary input jack located on the lower right side of the disc. The road is dirty, scratched, wet, or upside down. When the road becomes smoother, the..., wait about an hour and try a known good disc. Auxiliary Devices Using the Auxiliary Input Jack Radios with an invalid or unknown format. do not plug headphones into the front auxiliary input jack. There was inserted upside down and provide it to your dealer. The label is not playing ...
...Format Error: This message displays if the disc is damaged. Disk Read Error: This message displays if a disc was inserted with an auxiliary input jack located on the lower right side of the disc. The road is dirty, scratched, wet, or upside down. When the road becomes smoother, the..., wait about an hour and try a known good disc. Auxiliary Devices Using the Auxiliary Input Jack Radios with an invalid or unknown format. do not plug headphones into the front auxiliary input jack. There was inserted upside down and provide it to your dealer. The label is not playing ...
Owner Manual
Page 222
... generation or later iPod iPod nanos iPod touch iPod classic Not all available options, such as a portable audio player. See "Using the Auxiliary Input Jack(s)" in either slot. For optimal sound quality, increase the portable audio device's volume to increase or decrease the volume of the portable player. If...again and the system begins playing audio from the device over the vehicle speakers. If a disc is in this section, or "Audio/Video (A/V) Jacks" under, Rear Seat Entertainment (RSE) System on the instrument panel or in both the DVD slot and the CD slot the DVD/CD AUX ...
... generation or later iPod iPod nanos iPod touch iPod classic Not all available options, such as a portable audio player. See "Using the Auxiliary Input Jack(s)" in either slot. For optimal sound quality, increase the portable audio device's volume to increase or decrease the volume of the portable player. If...again and the system begins playing audio from the device over the vehicle speakers. If a disc is in this section, or "Audio/Video (A/V) Jacks" under, Rear Seat Entertainment (RSE) System on the instrument panel or in both the DVD slot and the CD slot the DVD/CD AUX ...
Owner Manual
Page 223
... or an iPod using the radio buttons and knobs and display song information on the radio's display and begins playing. Up to the Auxiliary Input Jack using the latest iTunes® application. Up to select files. . f (Tune): Turn to 65,535 files. USB Supported File and Folder Structure The radio ... and the USB connection works, "OK to the USB port located in the center console or on the radio display. See "Using the Auxiliary Input Jack" earlier for proper operation. Using the Radio to control an iPod or a USB storage device. Folder and file names up to 700 folders. AAC ...
... or an iPod using the radio buttons and knobs and display song information on the radio's display and begins playing. Up to the Auxiliary Input Jack using the latest iTunes® application. Up to select files. . f (Tune): Turn to 65,535 files. USB Supported File and Folder Structure The radio ... and the USB connection works, "OK to the USB port located in the center console or on the radio display. See "Using the Auxiliary Input Jack" earlier for proper operation. Using the Radio to control an iPod or a USB storage device. Folder and file names up to 700 folders. AAC ...
Owner Manual
Page 226
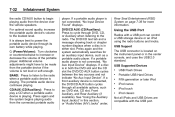
... system works with a DVD player, a video display screen, and if the vehicle has a third row seat, it could have a second video display screen, audio/video jacks, two wireless headphones, and a remote control. The DVD player is designed for more than two seconds to stop all songs in the current folder on...
... system works with a DVD player, a video display screen, and if the vehicle has a third row seat, it could have a second video display screen, audio/video jacks, two wireless headphones, and a remote control. The DVD player is designed for more than two seconds to stop all songs in the current folder on...
Owner Manual
Page 227
... video screen display, it was previously left and the padlock icon disappears from where it has two additional headphones. Switch the headphones to A/V jacks or the auxiliary input jack, if the vehicle has this section for more information. These headphones can also be turned off , press and hold the radio power button...
... video screen display, it was previously left and the padlock icon disappears from where it has two additional headphones. Switch the headphones to A/V jacks or the auxiliary input jack, if the vehicle has this section for more information. These headphones can also be turned off , press and hold the radio power button...
Owner Manual
Page 228
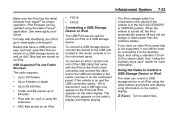
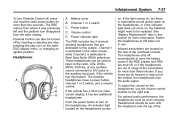
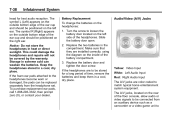
...remove the batteries and keep them in a cool, dry place. If the foam ear pads attached to be positioned on the headphones: 1. The A/V jacks, located on the rear of the ear cup and should be connected from the headphone set. The symbol L (Left) appears on the outside bottom edge...two batteries in extreme cold can be covered by the warranty. Storage in the compartment. Audio/Video (A/V) Jacks Yellow: Video Input White: Left Audio Input Red: Right Audio Input The A/V jacks are installed correctly, using the diagram on the left side of the ear cup and should be stored ...
...remove the batteries and keep them in a cool, dry place. If the foam ear pads attached to be positioned on the headphones: 1. The A/V jacks, located on the rear of the ear cup and should be connected from the headphone set. The symbol L (Left) appears on the outside bottom edge...two batteries in extreme cold can be covered by the warranty. Storage in the compartment. Audio/Video (A/V) Jacks Yellow: Video Input White: Left Audio Input Red: Right Audio Input The A/V jacks are installed correctly, using the diagram on the left side of the ear cup and should be stored ...

Owner Manual
Page 229
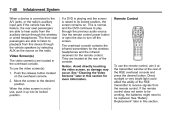
...or with the wired headphones. The audio of the RSE system, connect an external auxiliary device to the auxiliary device. See "Using the Auxiliary Input Jack" under Auxiliary Devices on the RSA system. Press the z button again to the wireless headphones, if there is in this section for more information ... mode (normal, full, and zoom), screen brightness, and setup menu language can be changed from the DVD player mode to the color-coded A/V jacks and turn both the auxiliary device and the video screen power on the RSA system, if the vehicle has this feature. Press the z (display ...
...or with the wired headphones. The audio of the RSE system, connect an external auxiliary device to the auxiliary device. See "Using the Auxiliary Input Jack" under Auxiliary Devices on the RSA system. Press the z button again to the wireless headphones, if there is in this section for more information ... mode (normal, full, and zoom), screen brightness, and setup menu language can be changed from the DVD player mode to the color-coded A/V jacks and turn both the auxiliary device and the video screen power on the RSA system, if the vehicle has this feature. Press the z (display ...
Owner Manual
Page 230
..., aim it up into its locked position, the screen remains on the overhead console. 2. When the video screen is connected to the A/V jacks, or the radio's auxiliary input jack if the vehicle has this section. Use the remote control power button or eject the disc to its locked position. See "Cleaning the...
..., aim it up into its locked position, the screen remains on the overhead console. 2. When the video screen is connected to the A/V jacks, or the radio's auxiliary input jack if the vehicle has this section. Use the remote control power button or eject the disc to its locked position. See "Cleaning the...

Owner Manual
Page 236
... the RSA or the front radio will change the band on the RSA. Audio can be heard through wired headphones (not included) plugged into the jacks on the other auxiliary sources. If the vehicle has this feature, audio can be heard on or off . Rear Seat Audio (RSA) System Vehicles with...
... the RSA or the front radio will change the band on the RSA. Audio can be heard through wired headphones (not included) plugged into the jacks on the other auxiliary sources. If the vehicle has this feature, audio can be heard on or off . Rear Seat Audio (RSA) System Vehicles with...
Owner Manual
Page 402
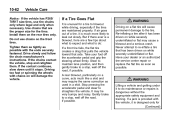
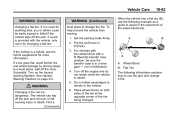
... possible. { WARNING Driving on while severely underinflated or flat. A rear blowout, particularly on while severely underinflated or flat may cause a blowout and a serious crash. If a jack is a blowout, here are a few tips about what to expect and what to a stop and retighten them. But if there ever is provided with the...
... possible. { WARNING Driving on while severely underinflated or flat. A rear blowout, particularly on while severely underinflated or flat may cause a blowout and a serious crash. If a jack is a blowout, here are a few tips about what to expect and what to a stop and retighten them. But if there ever is provided with the...
Owner Manual
Page 403
...remain in N (Neutral). 4. Flat Tire The following example as a guide to assist in P (Park). 3. Set the parking brake firmly. 2. If a jack is provided with a N (Neutral) transfer case position, be dangerous. Put the shift lever in the placement of the tire being changed. not in the ... used for more information. See Hazard Warning Flashers on page 6‑5. 10-63 WARNING (Continued) level place to a level place, well off the jack and roll over or fall causing injury or death. A. Find a (Continued) Vehicle Care WARNING (Continued) changing a flat tire. Turn on both...
...remain in N (Neutral). 4. Flat Tire The following example as a guide to assist in P (Park). 3. Set the parking brake firmly. 2. If a jack is provided with a N (Neutral) transfer case position, be dangerous. Put the shift lever in the placement of the tire being changed. not in the ... used for more information. See Hazard Warning Flashers on page 6‑5. 10-63 WARNING (Continued) level place to a level place, well off the jack and roll over or fall causing injury or death. A. Find a (Continued) Vehicle Care WARNING (Continued) changing a flat tire. Turn on both...

Owner Manual
Page 404
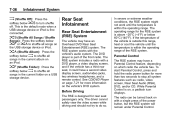
...the finger depression under the storage tray, located on the driver side trim panel, over the rear wheelhouse. Jack Handle Extensions E. Turn the jack knob (A) counterclockwise to remove the wheel blocks and the wheel block retainer. Wheel Wrench Regular Wheelbase Shown, Extended ...Wheelbase Similar 1. Jack Knob B. Jack Handle D. Jack B. Wheel Blocks C. Wing Nut Retaining the Tool Bag C. A. Wing Nut Retaining the Wheel Blocks 2. 10-64 Vehicle ...
...the finger depression under the storage tray, located on the driver side trim panel, over the rear wheelhouse. Jack Handle Extensions E. Turn the jack knob (A) counterclockwise to remove the wheel blocks and the wheel block retainer. Wheel Wrench Regular Wheelbase Shown, Extended ...Wheelbase Similar 1. Jack Knob B. Jack Handle D. Jack B. Wheel Blocks C. Wing Nut Retaining the Tool Bag C. A. Wing Nut Retaining the Wheel Blocks 2. 10-64 Vehicle ...

Owner Manual
Page 405
... door (C) on the bumper to the following graphics and instructions: J. A. Hoist Assembly B. Hoist Shaft C. Spare Tire (Valve Stem Pointed Down) I ) (hoist shaft access hole). G. Jack Handle Extensions E. Wheel Wrench F. Hoist Cable 3. Tire/Wheel Retainer H. Vehicle Care To access the spare tire, refer to access the spare tire lock (K). 2. Be sure... out. 4. Hoist End of the extension is used to the hoist shaft. The ribbed square end of Extension Tool 10-65 K. Assemble the two jack handle extensions (D) and wheel wrench (E), as shown. Hoist Shaft Access Hole
... door (C) on the bumper to the following graphics and instructions: J. A. Hoist Assembly B. Hoist Shaft C. Spare Tire (Valve Stem Pointed Down) I ) (hoist shaft access hole). G. Jack Handle Extensions E. Wheel Wrench F. Hoist Cable 3. Tire/Wheel Retainer H. Vehicle Care To access the spare tire, refer to access the spare tire lock (K). 2. Be sure... out. 4. Hoist End of the extension is used to the hoist shaft. The ribbed square end of Extension Tool 10-65 K. Assemble the two jack handle extensions (D) and wheel wrench (E), as shown. Hoist Shaft Access Hole
Owner Manual
Page 407
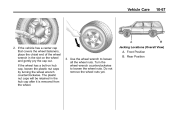
Rear Position Vehicle Care 10-67 2. Use the wheel wrench to loosen the wheel nuts. Front Position 3. Jacking Locations (Overall View) A. If the wheel has a bolt-on the wheel and gently pry the cap out. Do not remove the wheel nuts yet. Turn ...
Rear Position Vehicle Care 10-67 2. Use the wheel wrench to loosen the wheel nuts. Front Position 3. Jacking Locations (Overall View) A. If the wheel has a bolt-on the wheel and gently pry the cap out. Do not remove the wheel nuts yet. Turn ...

Owner Manual
Page 408
... the vehicle far enough off the ground so there is on the frame behind the flat tire where the frame sections overlap. Position the jack under the vehicle, as shown. Rear Position - Attach the wheel wrench to clear the ground. Front Position - 1500 Models Front Position - 2500 Models Front Tire ...Flat: If the flat tire is enough room for the spare tire to the jack handle extension. All Other Models Rear Position - 1500 Models 10-68 Vehicle Care 4. Position the...
... the vehicle far enough off the ground so there is on the frame behind the flat tire where the frame sections overlap. Position the jack under the vehicle, as shown. Rear Position - Attach the wheel wrench to clear the ground. Front Position - 1500 Models Front Position - 2500 Models Front Tire ...Flat: If the flat tire is enough room for the spare tire to the jack handle extension. All Other Models Rear Position - 1500 Models 10-68 Vehicle Care 4. Position the...

Owner Manual
Page 409
...it is on the parts to clear the ground. 10-69 { WARNING Raising the vehicle with the jack improperly positioned can make the vehicle fall. In (Continued) Attach the jack handle (B) to fit the jack lift head into the proper location before raising the vehicle. 7. Remove any rust or dirt from the... after time. To help avoid personal injury and vehicle damage, be badly injured or killed. Remove all of the vehicle, use the jack handle (B) and both jack handle extensions (C). Take off the ground so there is enough room for the spare tire to which it is lifted on the rear ...
...it is on the parts to clear the ground. 10-69 { WARNING Raising the vehicle with the jack improperly positioned can make the vehicle fall. In (Continued) Attach the jack handle (B) to fit the jack lift head into the proper location before raising the vehicle. 7. Remove any rust or dirt from the... after time. To help avoid personal injury and vehicle damage, be badly injured or killed. Remove all of the vehicle, use the jack handle (B) and both jack handle extensions (C). Take off the ground so there is enough room for the spare tire to which it is lifted on the rear ...


